※注意
AWSのHyperledger Fabricのバージョンが上がってしまったため、この内容では動作しません。
最後に参考URLを載せてありますので、そちらを参考にしてください。
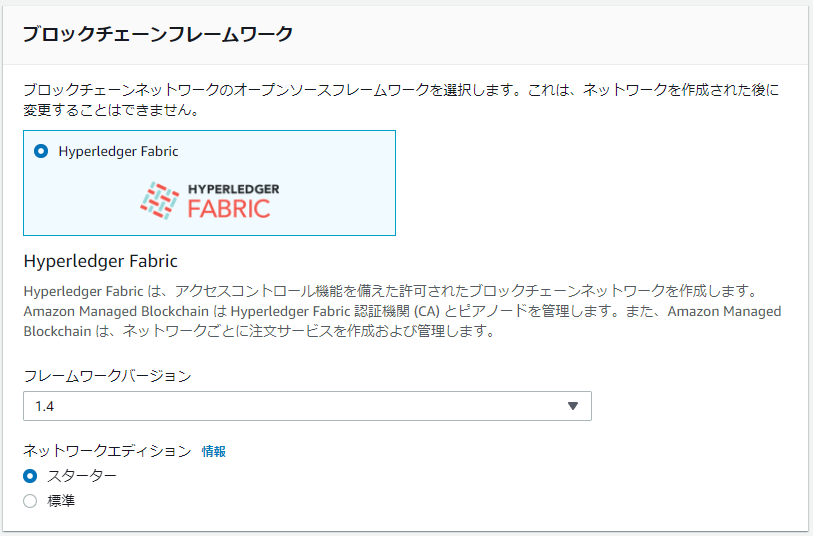
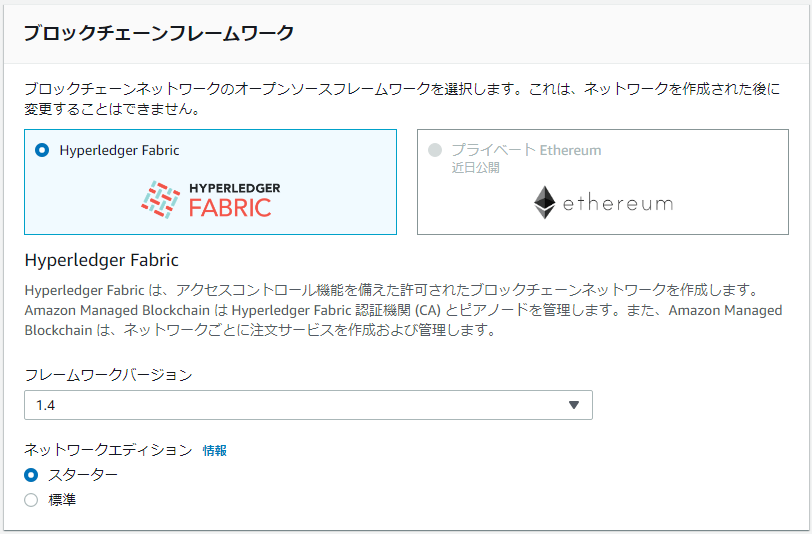
ただし、バージョンを1.4にすれば、このまま動きます。
はじめに
先日、こちらのハンズオンに参加したので、忘備録を兼ねて、体験記を残しておきたいと思います。
https://awsbasics.connpass.com/event/206599/
当日は大量の手順に追われ、何をやっていたのか理解できずに進めていましたが、こうやって振り返ることで、理解していきたいです。
ハンズオンの元となった記事はこちらのようです。
【注意】理解しやすいように、当日の手順とは若干順番を入れ替えているところがあります
Hyperledger Fabricの概要
※この項目はハンズオン中にはありませんでしたが、内容理解のために追加しました。
【参考】https://medium.com/acompany/hyperledger-fabric-%E6%A6%82%E8%A6%81-b24a6d74e74c
構成
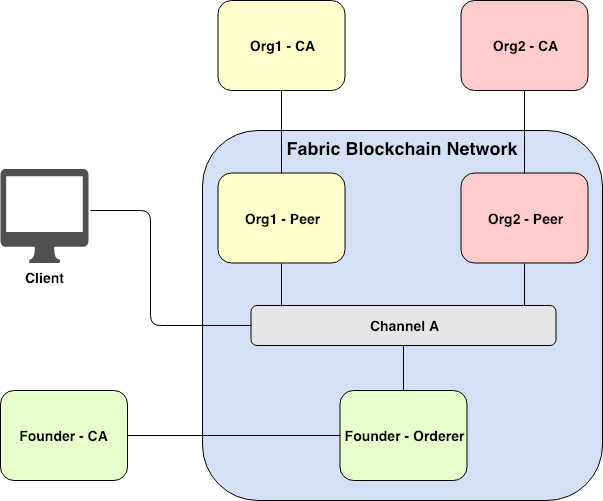
- CA
- ユーザ証明書の管理
- Peer
- 台帳の保持
- Orderer
- ブロックの作成・配布
- Client
- ブロックチェーンとやり取りするアプリ
データ
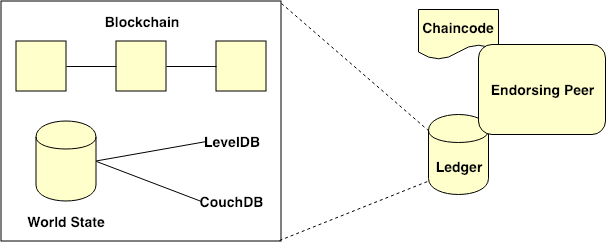
- chaincode
- 台帳の照会や更新の処理手順
- Go、Node.js、Javaなどで記述
- ledger
- 台帳
- Blockchain
- 履歴を保持
- World State
- 現在の状態を保持
- 中身はLevelDB(キーバリュー)かCouchDB(JSON)
処理の流れ
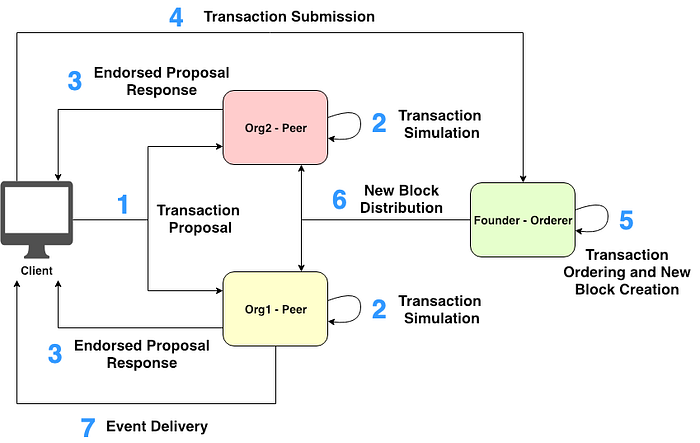
- Endorsement
1-1. Transaction ProposalをPeerに送信(1)
1-2. ユーザーのIDと権限を検証(2)
1-3. Responseを返信(3) - Ordering
2-1. TransactionをOrdererに送信(4)
2-2. ブロックを作成(5) - ValidationとCommitment
3-1. ブロックをPeerに配布(6)
3-2. イベントを送信(7)
構成
今回は以下のような構成を構築します。
クライアントノードはCloud9上に構築しますが、アカウントが1つしかないので作成するのは1つだけです。(Blockchainのメリットを感じることはできないですね)
事前準備
今回は東京リージョン(ap-northeast-1)で構築します。
(例えばバージニア北部(us-east-1)で構築する場合は、リージョンを変更し、一部の設定を変更(「ap-northeast-1」→「us-east-1」)するだけでOKです)
なお、Managed Blockchainが動作するリージョンは限られているので注意してください。
Cloud9環境の作成
ポイントだけ記述します。
- 環境の作成
- インスタンスタイプは「t2.medium」に変更
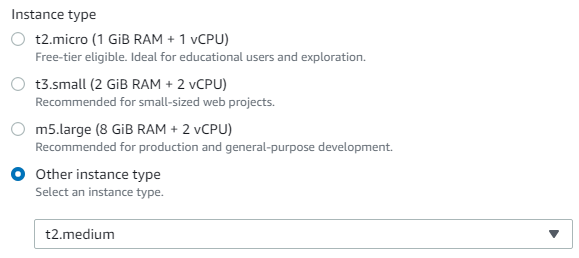
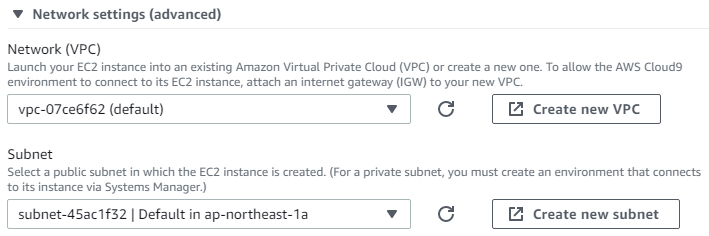
- ネットワーク設定で、VPC(「DNSホスト名を有効化」が必要)とパブリックサブネットを設定(後で使用するので覚えておくこと)
- 起動に少し時間がかかる
- インスタンスタイプは「t2.medium」に変更
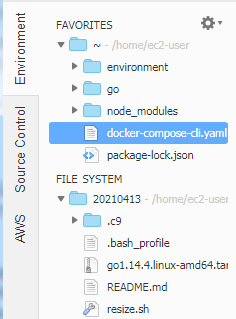
- ホームディレクトリの表示
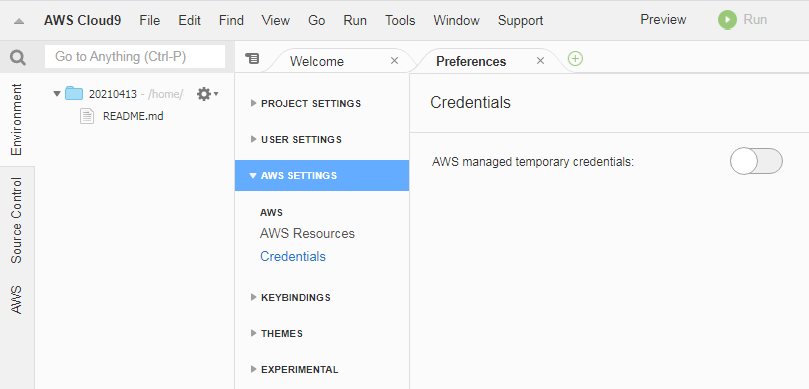
- 右上歯車から左ペイン「AWS SETTINGS」-「Credentials」を選択
- 「AWS managed temporary credentials」をOFFに
- 「AWS managed temporary credentials」をOFFに
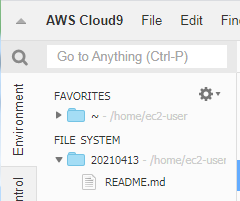
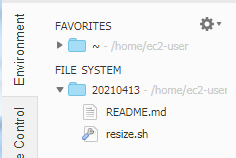
- 左ペイン「Environment」の左上歯車から「Show Home in Favorites」を選択
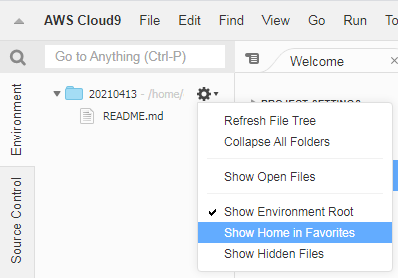
- 後でホームディレクトにファイルを保存するのに楽だから
- 後でホームディレクトにファイルを保存するのに楽だから
- 右上歯車から左ペイン「AWS SETTINGS」-「Credentials」を選択
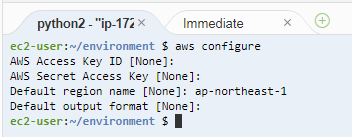
- ターミナル画面で作業
- 「aws configure」を実行して、「Default region name」を「ap-northeast-1」(東京リージョン)を指定
- 「aws configure」を実行して、「Default region name」を「ap-northeast-1」(東京リージョン)を指定
IAMの設定
ポイントだけ記述します。
- ロールの作成
- 「一般的なユースケース」-「EC2」を選択
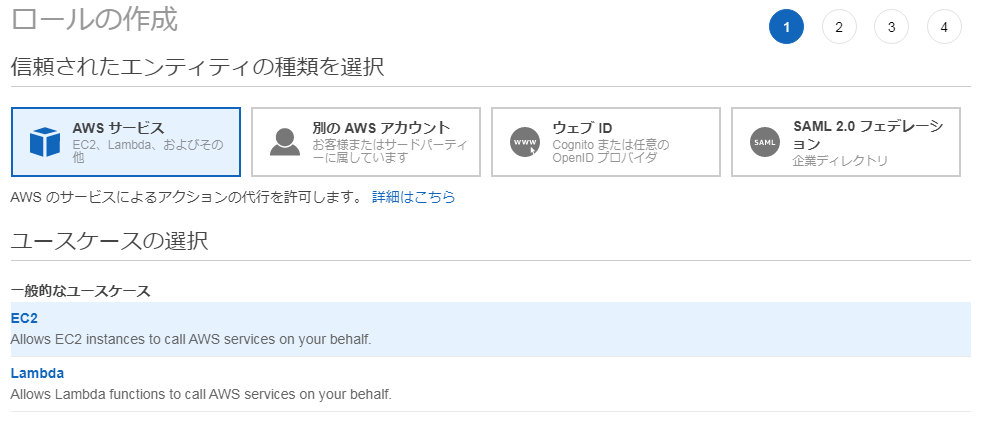
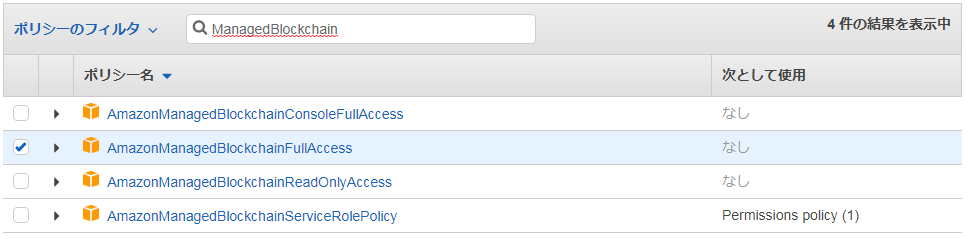
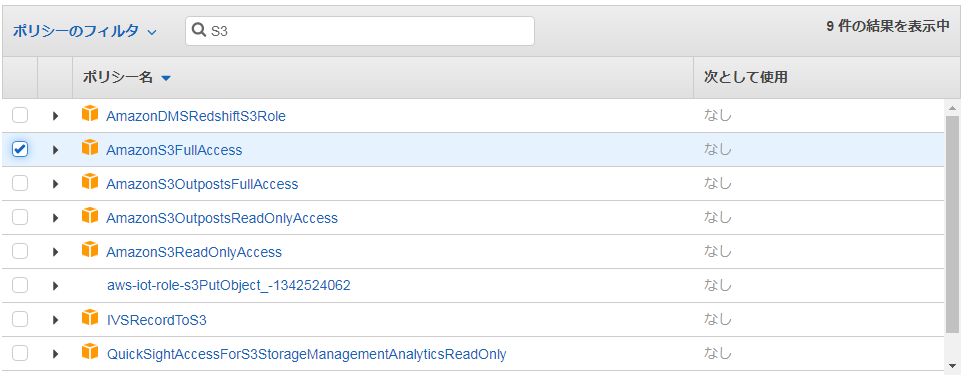
- 以下の2つのロールをアタッチ
- AmazonManagedBlockchainFullAccess
- AmazonS3FullAccess
- 「一般的なユースケース」-「EC2」を選択
Cloud9のIAMロールを変更
ポイントだけ記述します。
- EC2で作業
- Cloud9用インスタンスを選択
- 「アクション」-「セキュリティ」-「IAMロールの変更」を選択
- 作成したIAMロールを選択
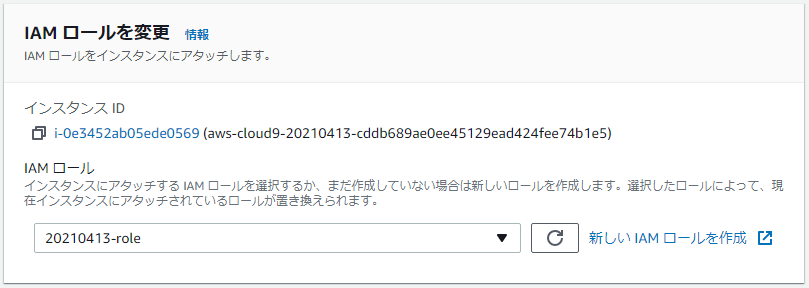
- 作成したIAMロールを選択
- 「アクション」-「セキュリティ」-「IAMロールの変更」を選択
- Cloud9用インスタンスを選択
ブロックチェーンの作成
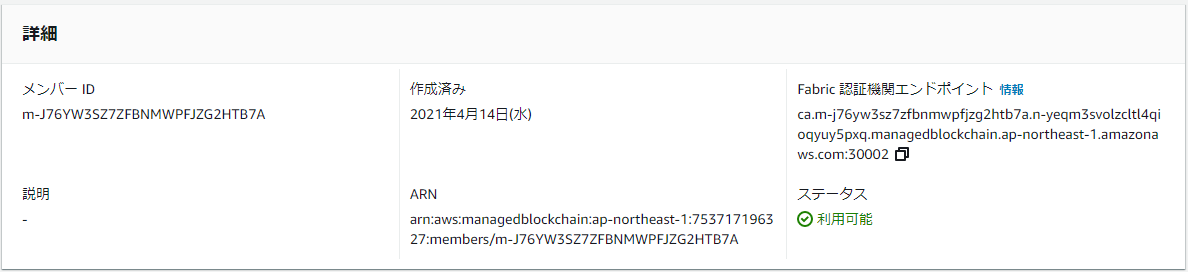
Managed Blockchainの初期設定
ポイントだけ記述します。
- ネットワークの作成
- 「Hyperledger Fabric」で作成
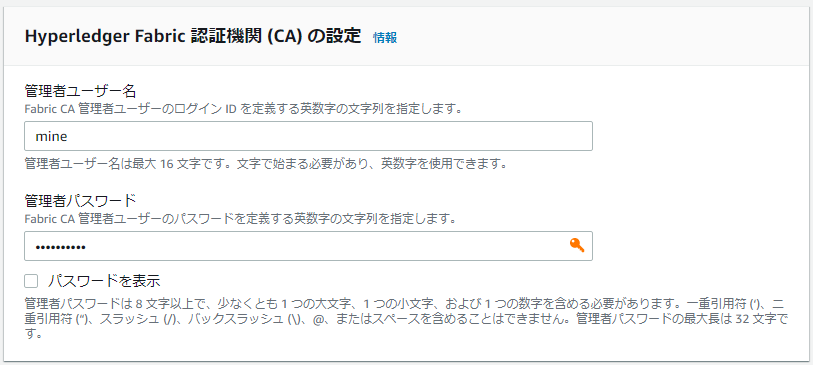
- Hyperledger Fabric認証機関(CA)の管理者ユーザ名と管理者パスワードは、後で使うので覚えておくおくこと
- 30分ほど時間がかかる
- Hyperledger Fabric認証機関(CA)の管理者ユーザ名と管理者パスワードは、後で使うので覚えておくおくこと
- 「Hyperledger Fabric」で作成
- VPCエンドポイントの作成
- Cloud9を構築したVPC、サブネット、セキュリティグループ(EC2のCloud9用インスタンスで確認)を指定
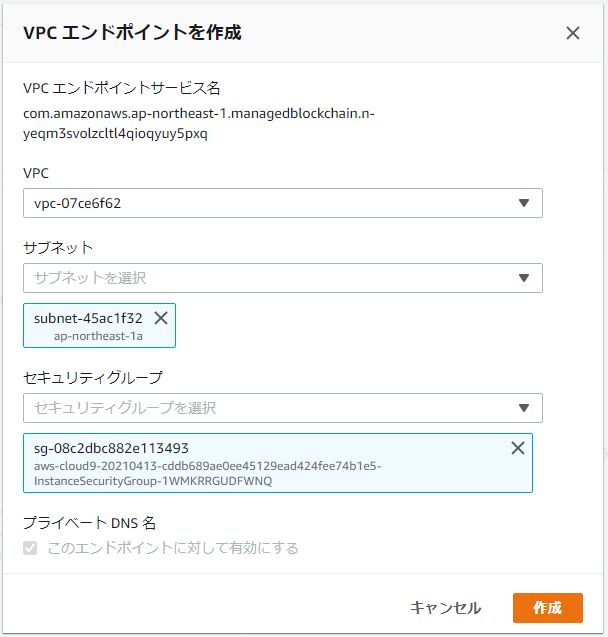
- Cloud9を構築したVPC、サブネット、セキュリティグループ(EC2のCloud9用インスタンスで確認)を指定
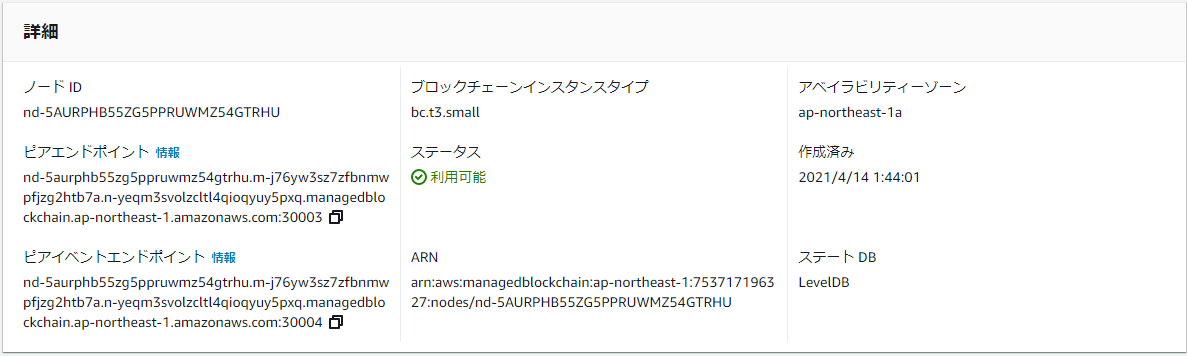
- ピアノードの作成
- 自分が所有するメンバーから、特に設定を変更せずに作成
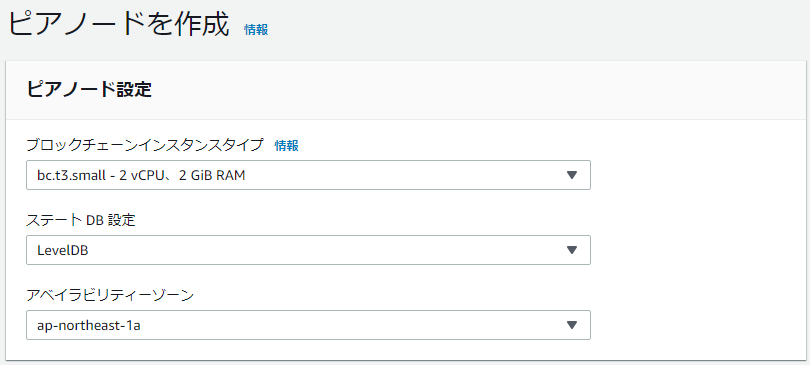
- 自分が所有するメンバーから、特に設定を変更せずに作成
クライアントの設定
ここからコマンドラインでの作業が大量に発生します。
Cloud9の設定①
- EC2で作業
- Cloud9用インスタンスを選択
- セキュリティグループをクリック
- 「インバウンドルールの編集」で以下を追加
- すべてのTCP
- ソース:セキュリティグループID(自分自身)
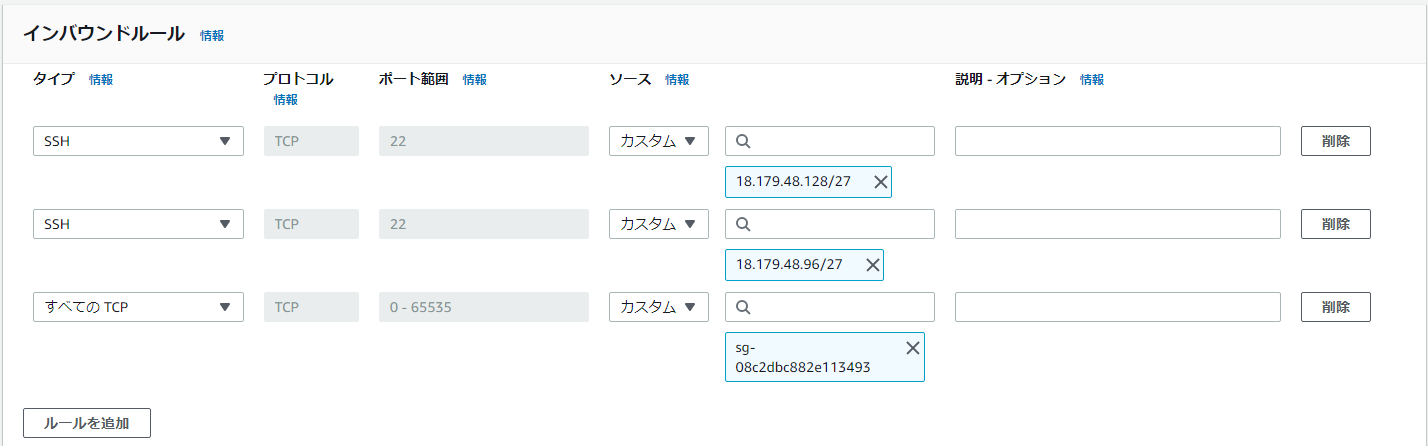
- ルールを保存
- 「インバウンドルールの編集」で以下を追加
- セキュリティグループをクリック
- Cloud9用インスタンスを選択
- Cloud9で作業
- コンソールで以下を順次実行
- 使用するモジュールのインストール
- sudo yum update -y
- sudo yum install jq telnet emacs docker libtool libtool-ltdl-devel git -y
- dockerの起動
- sudo service docker start
- sudo usermod -a -G docker ec2-user
- 使用するモジュールのインストール
- コンソールで以下を順次実行
Cloud9ディスク容量を増設
- Cloud9で作業
- ディスク容量を確認
- df -h
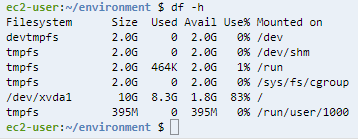
- df -h
- 「resize.sh」をカレントディレクトリに保存
- ディスク容量を確認
#!/bin/bash

# Specify the desired volume size in GiB as a command-line argument. If not specified, default to 20 GiB.
SIZE=${1:-20}

# Get the ID of the environment host Amazon EC2 instance.
INSTANCEID=$(curl http://169.254.169.254/latest/meta-data/instance-id)

# Get the ID of the Amazon EBS volume associated with the instance.
VOLUMEID=$(aws ec2 describe-instances \
  --instance-id $INSTANCEID \
  --query "Reservations[0].Instances[0].BlockDeviceMappings[0].Ebs.VolumeId" \
  --output text)

# Resize the EBS volume.
aws ec2 modify-volume --volume-id $VOLUMEID --size $SIZE

# Wait for the resize to finish.
while [ \
  "$(aws ec2 describe-volumes-modifications \
    --volume-id $VOLUMEID \
    --filters Name=modification-state,Values="optimizing","completed" \
    --query "length(VolumesModifications)"\
    --output text)" != "1" ]; do
sleep 1
done

#Check if we're on an NVMe filesystem
if [ $(readlink -f /dev/xvda) = "/dev/xvda" ]
then
  # Rewrite the partition table so that the partition takes up all the space that it can.
  sudo growpart /dev/xvda 1

  # Expand the size of the file system.
  # Check if we are on AL2
  STR=$(cat /etc/os-release)
  SUB="VERSION_ID=\"2\""
  if [[ "$STR" == *"$SUB"* ]]
  then
    sudo xfs_growfs -d /
  else
    sudo resize2fs /dev/xvda1
  fi

else
  # Rewrite the partition table so that the partition takes up all the space that it can.
  sudo growpart /dev/nvme0n1 1

  # Expand the size of the file system.
  # Check if we're on AL2
  STR=$(cat /etc/os-release)
  SUB="VERSION_ID=\"2\""
  if [[ "$STR" == *"$SUB"* ]]
  then
    sudo xfs_growfs -d /
  else
    sudo resize2fs /dev/nvme0n1p1
  fi
fi
-
IAMで作業
- IAMロールにさらに2つの権限を追加(作成時に追加してもOK)
- AmazonEC2FullAccess
- AWSCloud9Administrator


- IAMロールにさらに2つの権限を追加(作成時に追加してもOK)
-
Cloud9で作業
- コンソールで以下を順次実行(ルートを30GBに増量)
- sh resize.sh 30
- ディスク容量を確認
- df -h

- df -h
- コンソールで以下を順次実行(ルートを30GBに増量)
-
EC2で作業
- Cloud9インスタンスを再起動
Cloud9の設定②
- Cloud9で作業
- コンソールで以下を順次実行
- Docker Composeのインストール
- sudo curl -L https://github.com/docker/compose/releases/download/1.20.0/docker-compose-`uname -s`-`uname -m` -o /usr/local/bin/docker-compose
- sudo chmod a+x /usr/local/bin/docker-compose
- Goのインストール
- wget https://dl.google.com/go/go1.14.4.linux-amd64.tar.gz
- tar -xzf go1.14.4.linux-amd64.tar.gz
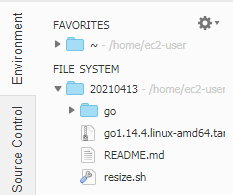
- sudo mv go /usr/local
- Docker Composeのインストール
- すでに存在する「~/.bash_profile」を修正して、保存
- 「MyMemberCaEndpoint」を「Fabric認証機関エンドポイント」の値に変更
- 「MyNetworkOrdererEndpoint」を「サービスエンドポイントの注文」の値に変更
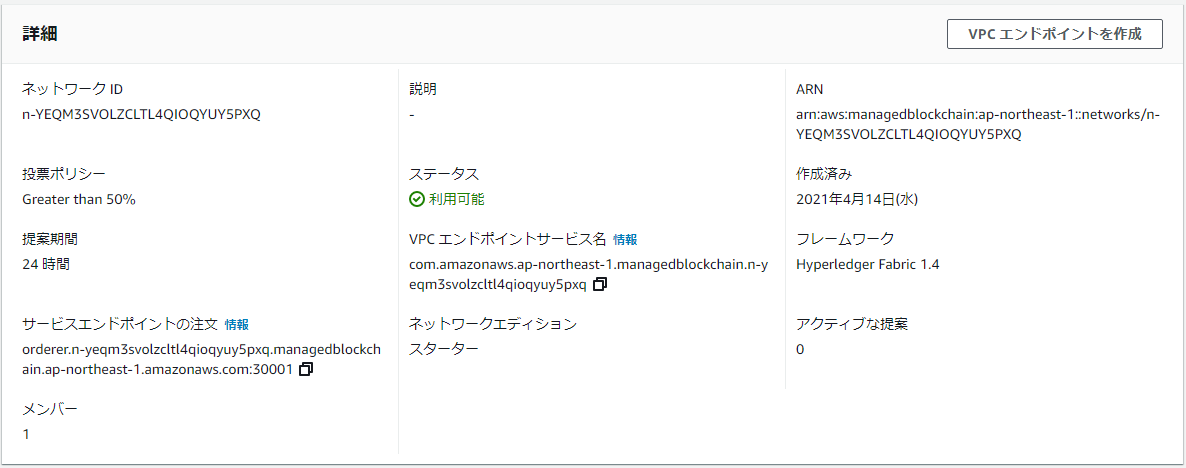
- 「MyMemberCaEndpoint」を「Fabric認証機関エンドポイント」の値に変更
- コンソールで以下を順次実行
# .bash_profile

# Get the aliases and functions
if [ -f ~/.bashrc ]; then
    . ~/.bashrc
fi

# User specific environment and startup programs
PATH=$PATH:$HOME/.local/bin:$HOME/bin

# GOROOT is the location where Go package is installed on your system
export GOROOT=/usr/local/go

# GOPATH is the location of your work directory
export GOPATH=$HOME/go

# CASERVICEENDPOINT is the endpoint to reach your member's CA
# for example ca.m-K46ICRRXJRCGRNNS4ES4XUUS5A.n-MWY63ZJZU5HGNCMBQER7IN6OIU.managedblockchain.us-east-1.amazonaws.com:30002
export CASERVICEENDPOINT=MyMemberCaEndpoint

# ORDERER is the endpoint to reach your network's orderer
# for example orderer.n-MWY63ZJZU5HGNCMBQER7IN6OIU.managedblockchain.amazonaws.com:30001
export ORDERER=MyNetworkOrdererEndpoint

# Update PATH so that you can access the go binary system wide
export PATH=$GOROOT/bin:$PATH
export PATH=$PATH:/home/ec2-user/go/src/github.com/hyperledger/fabric-ca/bin
- 引き続き、Cloud9で作業
- コンソールで以下を順次実行
- 環境の設定、確認
- source ~/.bash_profile
- sudo docker version
- sudo /usr/local/bin/docker-compose version
- go version
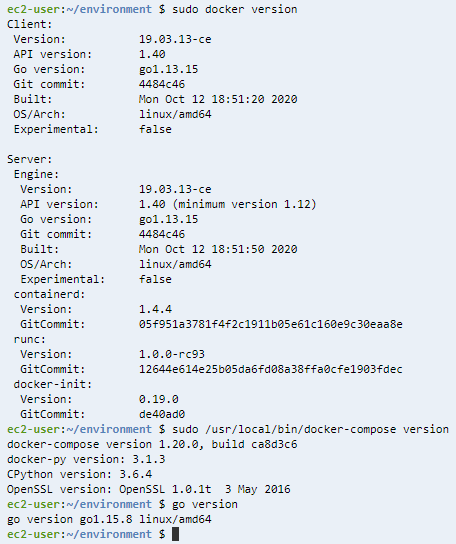
- 環境の設定、確認
- 以下の「get_member」を修正し、直接コンソールで実行(メンバーを確認)
- 「network-id」をネットワークIDに変更
- 「member-id」をメンバーIDに変更
- コンソールで以下を順次実行
aws managedblockchain get-member \
--network-id n-MWY63ZJZU5HGNCMBQER7IN6OIU \
--member-id m-K46ICRRXJRCGRNNS4ES4XUUS5A
- 引き続き、Cloud9で作業
- コンソールで以下を順次実行
- Hyperledger Fabric CAの取得
- curl https://$CASERVICEENDPOINT/cainfo -k
- mkdir -p /home/ec2-user/go/src/github.com/hyperledger/fabric-ca
- cd /home/ec2-user/go/src/github.com/hyperledger/fabric-ca
- wget https://github.com/hyperledger/fabric-ca/releases/download/v1.4.7/hyperledger-fabric-ca-linux-amd64-1.4.7.tar.gz
- tar -xzf hyperledger-fabric-ca-linux-amd64-1.4.7.tar.gz
- Hyperledger Fabricのサンプルの取得
- cd /home/ec2-user
- git clone --branch v1.4.7 https://github.com/hyperledger/fabric-samples.git
- Hyperledger Fabric CAの取得
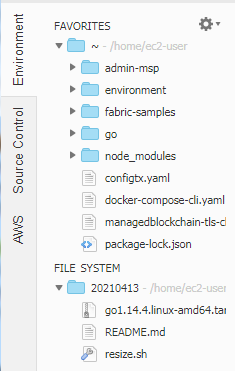
- 「docker-compose-cli.yaml」を作成し、ホームディレクトリ(/home/ec2-user)に保存
- 「MyMemberID」をメンバーIDに変更
- 「MyPeerNodeEndpoint」をピアエンドポイントに変更
- コンソールで以下を順次実行
version: '2'
services:
  cli:
    container_name: cli
    image: hyperledger/fabric-tools:1.4
    tty: true
    environment:
      - GOPATH=/opt/gopath
      - CORE_VM_ENDPOINT=unix:///host/var/run/docker.sock
      - FABRIC_LOGGING_SPEC=info # Set logging level to debug for more verbose logging
      - CORE_PEER_ID=cli
      - CORE_CHAINCODE_KEEPALIVE=10
      - CORE_PEER_TLS_ENABLED=true
      - CORE_PEER_TLS_ROOTCERT_FILE=/opt/home/managedblockchain-tls-chain.pem
      - CORE_PEER_LOCALMSPID=MyMemberID
      - CORE_PEER_MSPCONFIGPATH=/opt/home/admin-msp
      - CORE_PEER_ADDRESS=MyPeerNodeEndpoint
    working_dir: /opt/gopath/src/github.com/hyperledger/fabric/peer
    command: /bin/bash
    volumes:
        - /var/run/:/host/var/run/
        - /home/ec2-user/fabric-samples/chaincode:/opt/gopath/src/github.com/
        - /home/ec2-user:/opt/home
- 引き続き、Cloud9で作業
- コンソールで以下を順次実行
- AWS CLI用Dockerコンテナの登録(「docker exec cli」で実行)
- docker-compose -f docker-compose-cli.yaml up -d
- sudo /usr/local/bin/docker-compose -f docker-compose-cli.yaml up -d
- AWS CLI用Dockerコンテナの登録(「docker exec cli」で実行)
- コンソールで以下を順次実行
証明書の設定
- Cloud9で作業
- コンソールで以下を順次実行
- 証明書の表示(ファイルには出力しない)
- aws s3 cp s3://ap-northeast-1.managedblockchain/etc/managedblockchain-tls-chain.pem /home/ec2-user/managedblockchain-tls-chain.pem
- openssl x509 -noout -text -in /home/ec2-user/managedblockchain-tls-chain.pem
- 証明書の表示(ファイルには出力しない)
- 以下の「fabric-ca-client」を修正し、直接コンソールで実行(証明書等を生成)
- 「AdminUsername」を管理者ユーザ名に変更
- 「AdminPassword」を管理者パスワードに変更
- 「$CASERVICEENDPOINT」をFabric認証機関エンドポイントに変更
- コンソールで以下を順次実行
fabric-ca-client enroll \
-u 'https://AdminUsername:AdminPassword@$CASERVICEENDPOINT' \
--tls.certfiles /home/ec2-user/managedblockchain-tls-chain.pem -M /home/ec2-user/admin-msp
- 引き続き、Cloud9で作業
- コンソールで以下を順次実行
- 生成した証明書等のコピー
- cp -r /home/ec2-user/admin-msp/signcerts admin-msp/admincerts
- 生成した証明書等のコピー
- コンソールで以下を順次実行
チャンネルの作成
- Cloud9で作業
- 「configtx.yaml」を作成し、ホームディレクトリ(/home/ec2-user)に保存
- 「MemberID」(2ヶ所)をメンバーIDに変更
- 「configtx.yaml」を作成し、ホームディレクトリ(/home/ec2-user)に保存
################################################################################
#
# Section: Organizations
#
# - This section defines the different organizational identities which will
# be referenced later in the configuration.
#
################################################################################
Organizations:
    - &Org1
        # member id defines the organization
        Name: MemberID
        # ID to load the MSP definition as
        ID: MemberID
        #msp dir of org1 in the docker container
        MSPDir: /opt/home/admin-msp
        # AnchorPeers defines the location of peers which can be used
        # for cross org gossip communication. Note, this value is only
        # encoded in the genesis block in the Application section context
        AnchorPeers:
            - Host:
              Port:
################################################################################
#
#   CAPABILITIES
#
#   This section defines the capabilities of fabric network. This is a new
#   concept as of v1.1.0 and should not be utilized in mixed networks with
#   v1.0.x peers and orderers.  Capabilities define features which must be
#   present in a fabric binary for that binary to safely participate in the
#   fabric network.  For instance, if a new MSP type is added, newer binaries
#   might recognize and validate the signatures from this type, while older
#   binaries without this support would be unable to validate those
#   transactions.  This could lead to different versions of the fabric binaries
#   having different world states.  Instead, defining a capability for a channel
#   informs those binaries without this capability that they must cease
#   processing transactions until they have been upgraded.  For v1.0.x if any
#   capabilities are defined (including a map with all capabilities turned off)
#   then the v1.0.x peer will deliberately crash.
#
################################################################################
Capabilities:
    # Channel capabilities apply to both the orderers and the peers and must be
    # supported by both.
    # Set the value of the capability to true to require it.
    # Note that setting a later Channel version capability to true will also
    # implicitly set prior Channel version capabilities to true. There is no need
    # to set each version capability to true (prior version capabilities remain
    # in this sample only to provide the list of valid values).
    Channel: &ChannelCapabilities
        # V1.4.3 for Channel is a catchall flag for behavior which has been
        # determined to be desired for all orderers and peers running at the v1.4.3
        # level, but which would be incompatible with orderers and peers from
        # prior releases.
        # Prior to enabling V1.4.3 channel capabilities, ensure that all
        # orderers and peers on a channel are at v1.4.3 or later.
        V1_4_3: true
        # V1.3 for Channel enables the new non-backwards compatible
        # features and fixes of fabric v1.3
        V1_3: false
        # V1.1 for Channel enables the new non-backwards compatible
        # features and fixes of fabric v1.1
        V1_1: false
    # Application capabilities apply only to the peer network, and may be safely
    # used with prior release orderers.
    # Set the value of the capability to true to require it.
    # Note that setting a later Application version capability to true will also
    # implicitly set prior Application version capabilities to true. There is no need
    # to set each version capability to true (prior version capabilities remain
    # in this sample only to provide the list of valid values).
    Application: &ApplicationCapabilities
        # V1.4.2 for Application enables the new non-backwards compatible
        # features and fixes of fabric v1.4.2
        V1_4_2: true
        # V1.3 for Application enables the new non-backwards compatible
        # features and fixes of fabric v1.3.
        V1_3: false
        # V1.2 for Application enables the new non-backwards compatible
        # features and fixes of fabric v1.2 (note, this need not be set if
        # later version capabilities are set)
        V1_2: false
        # V1.1 for Application enables the new non-backwards compatible
        # features and fixes of fabric v1.1 (note, this need not be set if
        # later version capabilities are set).
        V1_1: false
################################################################################
#
# SECTION: Application
#
# - This section defines the values to encode into a config transaction or
# genesis block for application related parameters
#
################################################################################
Application: &ApplicationDefaults
    # Organizations is the list of orgs which are defined as participants on
    # the application side of the network
    Organizations:
    Capabilities:
        <<: *ApplicationCapabilities
################################################################################
#
# Profile
#
# - Different configuration profiles may be encoded here to be specified
# as parameters to the configtxgen tool
#
################################################################################
Profiles:
    OneOrgChannel:
        Consortium: AWSSystemConsortium
        Application:
            <<: *ApplicationDefaults
            Organizations:
                - *Org1
- 引き続き、Cloud9で作業
- コンソールで以下を順次実行
- チャンネルの作成
- docker exec cli configtxgen -outputCreateChannelTx /opt/home/mychannel.pb -profile OneOrgChannel -channelID mychannel --configPath /opt/home
- export ORDERER=「サービスエンドポイントの注文」の値
- docker exec cli peer channel create -c mychannel -f /opt/home/mychannel.pb -o $ORDERER --cafile /opt/home/managedblockchain-tls-chain.pem --tls
- docker exec cli peer channel join -b mychannel.block -o $ORDERER --cafile /opt/home/managedblockchain-tls-chain.pem --tls
- チャンネルの作成
- コンソールで以下を順次実行
チェーンコード(SmartContract)の実行
- Cloud9で作業
- コンソールで以下を順次実行
-
ChainCodeを登録
- docker exec cli peer chaincode install -n mycc -v v0 -p github.com/chaincode_example02/go

- docker exec cli peer chaincode install -n mycc -v v0 -p github.com/chaincode_example02/go
-
登録するChainCodeは以下の通り
-
- コンソールで以下を順次実行
/*
Copyright IBM Corp. 2016 All Rights Reserved.

Licensed under the Apache License, Version 2.0 (the "License");
you may not use this file except in compliance with the License.
You may obtain a copy of the License at

		 http://www.apache.org/licenses/LICENSE-2.0

Unless required by applicable law or agreed to in writing, software
distributed under the License is distributed on an "AS IS" BASIS,
WITHOUT WARRANTIES OR CONDITIONS OF ANY KIND, either express or implied.
See the License for the specific language governing permissions and
limitations under the License.
*/

package main

//WARNING - this chaincode's ID is hard-coded in chaincode_example04 to illustrate one way of
//calling chaincode from a chaincode. If this example is modified, chaincode_example04.go has
//to be modified as well with the new ID of chaincode_example02.
//chaincode_example05 show's how chaincode ID can be passed in as a parameter instead of
//hard-coding.

import (
	"fmt"
	"strconv"

	"github.com/hyperledger/fabric/core/chaincode/shim"
	pb "github.com/hyperledger/fabric/protos/peer"
)

// SimpleChaincode example simple Chaincode implementation
type SimpleChaincode struct {
}

func (t *SimpleChaincode) Init(stub shim.ChaincodeStubInterface) pb.Response {
	fmt.Println("ex02 Init")
	_, args := stub.GetFunctionAndParameters()
	var A, B string    // Entities
	var Aval, Bval int // Asset holdings
	var err error

	if len(args) != 4 {
		return shim.Error("Incorrect number of arguments. Expecting 4")
	}

	// Initialize the chaincode
	A = args[0]
	Aval, err = strconv.Atoi(args[1])
	if err != nil {
		return shim.Error("Expecting integer value for asset holding")
	}
	B = args[2]
	Bval, err = strconv.Atoi(args[3])
	if err != nil {
		return shim.Error("Expecting integer value for asset holding")
	}
	fmt.Printf("Aval = %d, Bval = %d\n", Aval, Bval)

	// Write the state to the ledger
	err = stub.PutState(A, []byte(strconv.Itoa(Aval)))
	if err != nil {
		return shim.Error(err.Error())
	}

	err = stub.PutState(B, []byte(strconv.Itoa(Bval)))
	if err != nil {
		return shim.Error(err.Error())
	}

	return shim.Success(nil)
}

func (t *SimpleChaincode) Invoke(stub shim.ChaincodeStubInterface) pb.Response {
	fmt.Println("ex02 Invoke")
	function, args := stub.GetFunctionAndParameters()
	if function == "invoke" {
		// Make payment of X units from A to B
		return t.invoke(stub, args)
	} else if function == "delete" {
		// Deletes an entity from its state
		return t.delete(stub, args)
	} else if function == "query" {
		// the old "Query" is now implemtned in invoke
		return t.query(stub, args)
	}

	return shim.Error("Invalid invoke function name. Expecting \"invoke\" \"delete\" \"query\"")
}

// Transaction makes payment of X units from A to B
func (t *SimpleChaincode) invoke(stub shim.ChaincodeStubInterface, args []string) pb.Response {
	var A, B string    // Entities
	var Aval, Bval int // Asset holdings
	var X int          // Transaction value
	var err error

	if len(args) != 3 {
		return shim.Error("Incorrect number of arguments. Expecting 3")
	}

	A = args[0]
	B = args[1]

	// Get the state from the ledger
	// TODO: will be nice to have a GetAllState call to ledger
	Avalbytes, err := stub.GetState(A)
	if err != nil {
		return shim.Error("Failed to get state")
	}
	if Avalbytes == nil {
		return shim.Error("Entity not found")
	}
	Aval, _ = strconv.Atoi(string(Avalbytes))

	Bvalbytes, err := stub.GetState(B)
	if err != nil {
		return shim.Error("Failed to get state")
	}
	if Bvalbytes == nil {
		return shim.Error("Entity not found")
	}
	Bval, _ = strconv.Atoi(string(Bvalbytes))

	// Perform the execution
	X, err = strconv.Atoi(args[2])
	if err != nil {
		return shim.Error("Invalid transaction amount, expecting a integer value")
	}
	Aval = Aval - X
	Bval = Bval + X
	fmt.Printf("Aval = %d, Bval = %d\n", Aval, Bval)

	// Write the state back to the ledger
	err = stub.PutState(A, []byte(strconv.Itoa(Aval)))
	if err != nil {
		return shim.Error(err.Error())
	}

	err = stub.PutState(B, []byte(strconv.Itoa(Bval)))
	if err != nil {
		return shim.Error(err.Error())
	}

	return shim.Success(nil)
}

// Deletes an entity from state
func (t *SimpleChaincode) delete(stub shim.ChaincodeStubInterface, args []string) pb.Response {
	if len(args) != 1 {
		return shim.Error("Incorrect number of arguments. Expecting 1")
	}

	A := args[0]

	// Delete the key from the state in ledger
	err := stub.DelState(A)
	if err != nil {
		return shim.Error("Failed to delete state")
	}

	return shim.Success(nil)
}

// query callback representing the query of a chaincode
func (t *SimpleChaincode) query(stub shim.ChaincodeStubInterface, args []string) pb.Response {
	var A string // Entities
	var err error

	if len(args) != 1 {
		return shim.Error("Incorrect number of arguments. Expecting name of the person to query")
	}

	A = args[0]

	// Get the state from the ledger
	Avalbytes, err := stub.GetState(A)
	if err != nil {
		jsonResp := "{\"Error\":\"Failed to get state for " + A + "\"}"
		return shim.Error(jsonResp)
	}

	if Avalbytes == nil {
		jsonResp := "{\"Error\":\"Nil amount for " + A + "\"}"
		return shim.Error(jsonResp)
	}

	jsonResp := "{\"Name\":\"" + A + "\",\"Amount\":\"" + string(Avalbytes) + "\"}"
	fmt.Printf("Query Response:%s\n", jsonResp)
	return shim.Success(Avalbytes)
}

func main() {
	err := shim.Start(new(SimpleChaincode))
	if err != nil {
		fmt.Printf("Error starting Simple chaincode: %s", err)
	}
}
- 引き続きCloud9で作業
- コンソールで以下を順次実行
- 初期値(a=100, b=200)を設定するコマンドを実行
- docker exec cli peer chaincode instantiate -o $ORDERER -C mychannel -n mycc -v v0 -c '{"Args":["init","a","100","b","200"]}' --cafile /opt/home/managedblockchain-tls-chain.pem --tls
- docker exec cli peer chaincode list --instantiated -o $ORDERER -C mychannel --cafile /opt/home/managedblockchain-tls-chain.pem –-tls
- docker exec cli peer chaincode query -C mychannel -n mycc -c '{"Args":["query","a"]}'
- docker exec cli peer chaincode query -C mychannel -n mycc -c '{"Args":["query","b"]}'

- aからbへ10を移動するコマンド(送金をイメージ)を実行
- docker exec cli peer chaincode invoke -C mychannel -n mycc -c '{"Args":["invoke","a","b","10"]}' -o $ORDERER --cafile /opt/home/managedblockchain-tls-chain.pem --tls
- docker exec cli peer chaincode query -C mychannel -n mycc -c '{"Args":["query","a"]}'
- docker exec cli peer chaincode query -C mychannel -n mycc -c '{"Args":["query","b"]}'

- 初期値(a=100, b=200)を設定するコマンドを実行
- コンソールで以下を順次実行
感想
CLIばかりで訳が分かりませんが、何度も試したり、スクリプト等の中身を確認し、理解したいと思います。
後始末
作成したものを削除していきます。
- Cloud9
- インスタンス
- Managed Blockchain
- ピアノード
- メンバー
- ネットワーク
- VPC(新規に作成した場合)
- IAM
- ロール(消さなくても課金されない)
追記
Hyperledger Fabricのバージョンが2.2の時、このままだとうまく動かない(goのパッケージが足らない等)ので、こちらを参考にしてもらえればと思います。
https://dev.classmethod.jp/articles/amazon-managed-blockchain-hyperledger-fabric-v2-2/
https://docs.aws.amazon.com/ja_jp/managed-blockchain/latest/hyperledger-fabric-dev/managed-blockchain-get-started-tutorial.html
追記2
自分でもフレームワークを2.2にして確認してみました。
https://qiita.com/mine820/items/2ce7433e402fa33c6260