はじめに
最近CLIツールを作るのはGoで書くのが流行りっぽいので、GoでCLIツールを作ってみたメモ。
お題としては、aws-sdk-goでAWSのAPI叩く myaws という自作コマンドを作って、
サブコマンドとしてEC2インスタンスの一覧を取得する myaws ec2 ls コマンドを作ってみる。
自作コマンドへの引数フラグの渡し方、設定ファイルの読み込み方などCLIツールとして必要そうなトピックにも触れつつ、最終的にビルドしてできたバイナリをGitHubのReleaseページからダウンロードできるようにするところまで説明する。
これからGoで何かCLIツールを作ってみようと思ってる人の参考になれば幸いです。
作ったもの
作ったものはGitHubにあげておいた。
https://github.com/minamijoyo/myaws
あとで機能追加したりしてコードが変わっちゃうと思うので、この記事執筆時点の断面は以下です。
https://github.com/minamijoyo/myaws/tree/v0.0.2
実行イメージ
この記事を最後まで読むとどんなものができるのか、参考までに実行イメージを貼っておきます。
このツールの機能自体はすごく単機能なので、ツールの機能自体にはあまり期待しないで下さい。
$ myaws --help
myaws is a simple command line tool for managing my aws resources

Usage:
  myaws [command]

Available Commands:
  ec2         Manage EC2 resources
  version     Print version

Flags:
      --config string   config file (default: $HOME/.myaws.yaml)
      --region string   AWS region (default: "")

Use "myaws [command] --help" for more information about a command.
$ myaws ec2 --help
Manage EC2 resources

Usage:
  myaws ec2 [flags]
  myaws ec2 [command]

Available Commands:
  ls          List EC2 instances

Global Flags:
      --config string   config file (default: $HOME/.myaws.yaml)
      --region string   AWS region (default: "")

Use "myaws ec2 [command] --help" for more information about a command.
$ myaws ec2 ls --help
List EC2 instances

Usage:
  myaws ec2 ls [flags]

Flags:
  -a, --all   List all instances (default: false)

Global Flags:
      --config string   config file (default: $HOME/.myaws.yaml)
      --region string   AWS region (default: "")
$ myaws ec2 ls
i-0f48fxxxxxxxxxxxx     t2.micro        52.197.xxx.xxx  10.193.xxx.xxx    running 2016-07-20 02:38:05     proxy
i-0e267xxxxxxxxxxxx     t2.medium       52.198.xxx.xxx  10.193.xxx.xxx    running 2016-08-26 10:57:00     app
i-0fdaaxxxxxxxxxxxx     t2.large        52.197.xxx.xxx  10.193.xxx.xxx    running 2016-08-23 01:42:59     batch
Go環境のセットアップ
既にGo環境がある人は読み飛ばしておk。
Goのインストール
Goが手元のPCに入ってなかったらインストールする。Macならbrewで入る。
rbenv的なものでgoのバージョンを切り替えたい人は、goenvとかもあるようなので適宜ぐぐれ。
$ brew install go
$ go version
go version go1.7 darwin/amd64
あとGOPATH環境変数を適当なところにセットしておく。
GoではGOPATH配下にダウンロードしたライブラリも自分の書いたコードも置くというかんじになる。慣れるまでキモい。
入門記事を見ると $HOME/go とか $HOME/.go とかにセットしている人が多いようだけど、
個人的にはghq+pecoでリポジトリ間を切り替えて移動しているので、Goとそれ以外のコードを区別するのがめんどうになり、結果的にGOPATHを $HOME にしちゃうというのに現在のところ落ち着いたけど、少数派かもしれない。
あと $GOPATH/bin にPATHを通しておくとビルドしたコマンドがそのまま使えるのでPATHを通しておく。
このへんは自身の環境に合わせて適宜読み替えて下さい。
$ vi ~/.zshrc
export GOPATH=$HOME
export PATH=$PATH:$GOPATH/bin
Go言語の入門
Go言語がはじめてなら、とりあえず公式のチュートリアルでもやるとよいんじゃなかろうか。
https://tour.golang.org
日本語版もある
https://go-tour-jp.appspot.com
CLIフレームワーク
ちょっとした引数のパースぐらいなら言語標準の機能でもよいのだけど、まぁ引数とかサブコマンドとか増えてくるとメンドくなるのは容易に想像できる。だいたいこの手のボイラープレートにはCLIフレームワークとかライブラリとかがあって、それを使うのがよいだろう。
というわけで、Goでも候補はいくつかあるが、READMEを眺めて個人的な好みでspf13/cobraというのを選んだ。
spf13/cobra
DockerやKubernetesなどで使われている。というか作ってるのもDockerの中の人。
cobraがよいなと思った理由は以下
- サブコマンドを追加するときに親コマンドのファイルを編集する必要がない
- サブコマンドのサブコマンドとかネストできる
- 設定ファイルでオプションのデフォルト値を定義しつつ、コマンド引数で上書きできる(※内部的にはspf13/viperとspf13/pflagで実装されてる)
だいたいやりたいと思ったことはなんでもできそうである。
他のと比べると重量級なので好みは分かれるかもしれない。
aws-sdk叩くみたいな必要になった都度サブコマンドが増えていくパターンにはすごいマッチしてると思う。
あと、AWSのリージョンとか、出力に含めたい内容とか、自分としてよく使うオプションは限られてるのに、人によって違うので、エンドユーザがデフォルト値を設定ファイルで書いておいて、コマンド引数で上書きしたいみたいなのが簡単に実現できる。
参考までに他の候補についても列挙しておく。
READMEを眺めただけで、比較記事を書けるほど全部使ってみたわけではない。ただの主観である。
urfave/cli (codegangsta/cli)
ググるとよく出てくる。
以前は codegangsta/cli という名前だったようだが、リポジトリが移動したよう。
ちょっとしたことやるのには十分だと思う。バランスはよいと思う。
mitchellh/cli
HashiCorpのやつ。READMEにほとんど説明がないけど、コード短いので読めということだろうか。
シンプルなのが好きな人はよいんじゃないか。
tcnksm/gcli
他のCLIフレームワークを使ったコードを生成するscaffold的なやつで、この並びで紹介するのは若干違和感あるけど。
ちなみに上で紹介したcobraには対応していないが、cobraは内部的にscaffoldを持っているからだろう。
その他
参考: GoでCLIツール作るのに便利そうなパッケージを集めてみました
cobraで雛形を作る
それではコマンドを作っていこう。
cobraのインストール
go getでインストールする
$ go get github.com/spf13/cobra/cobra
インストールできたらパスが通ってるか確認。
$ cobra
Cobra is a CLI library for Go that empowers applications.
This application is a tool to generate the needed files
to quickly create a Cobra application.

Usage:
  cobra [command]

Available Commands:
  add         Add a command to a Cobra Application
  init        Initialize a Cobra Application

Flags:
  -a, --author string        Author name for copyright attribution (default "YOUR NAME")
      --config string        config file (default is $HOME/.cobra.yaml)
  -h, --help                 help for cobra
  -l, --license license      Name of license for the project (can provide license in config)
  -b, --projectbase string   base project directory, e.g. github.com/spf13/
      --viper                Use Viper for configuration (default true)

Use "cobra [command] --help" for more information about a command.
cobra initで雛形を作る
cobra自体はライブラリ単体としても使えるけど、scaffoldが付いてるので、はじめての場合はscaffoldで雛形を作るのがよいだろう。
まずはhelpを眺める。
$ cobra init --help
Initialize (cobra init) will create a new application, with a license
and the appropriate structure for a Cobra-based CLI application.

  * If a name is provided, it will be created in the current directory;
  * If no name is provided, the current directory will be assumed;
  * If a relative path is provided, it will be created inside $GOPATH
    (e.g. github.com/spf13/hugo);
  * If an absolute path is provided, it will be created;
  * If the directory already exists but is empty, it will be used.

Init will not use an existing directory with contents.

Usage:
  cobra init [name] [flags]

Aliases:
  init, initialize, initialise, create


Global Flags:
  -a, --author string        Author name for copyright attribution (default "YOUR NAME")
      --config string        config file (default is $HOME/.cobra.yaml)
  -l, --license license      Name of license for the project (can provide license in config)
  -b, --projectbase string   base project directory, e.g. github.com/spf13/
      --viper                Use Viper for configuration (default true)
github.com/minamijoyo/myaws という名前で作ってみる
$ cobra init github.com/minamijoyo/myaws -a "Masayuki Morita" -l MIT
Your Cobra application is ready at
/Users/minamijoyo/src/github.com/minamijoyo/myaws
Give it a try by going there and running `go run main.go`
Add commands to it by running `cobra add [cmdname]`
できたファイルを眺めてみる
$ cd $GOPATH/src/github.com/minamijoyo/myaws
$ tree
.
├── LICENSE
├── cmd
│   └── root.go
└── main.go

1 directory, 3 files
LICENSE
The MIT License (MIT)

Copyright © 2016 Masayuki Morita

Permission is hereby granted, free of charge, to any person obtaining a copy
of this software and associated documentation files (the "Software"), to deal
in the Software without restriction, including without limitation the rights
to use, copy, modify, merge, publish, distribute, sublicense, and/or sell
copies of the Software, and to permit persons to whom the Software is
furnished to do so, subject to the following conditions:

The above copyright notice and this permission notice shall be included in
all copies or substantial portions of the Software.

THE SOFTWARE IS PROVIDED "AS IS", WITHOUT WARRANTY OF ANY KIND, EXPRESS OR
IMPLIED, INCLUDING BUT NOT LIMITED TO THE WARRANTIES OF MERCHANTABILITY,
FITNESS FOR A PARTICULAR PURPOSE AND NONINFRINGEMENT. IN NO EVENT SHALL THE
AUTHORS OR COPYRIGHT HOLDERS BE LIABLE FOR ANY CLAIM, DAMAGES OR OTHER
LIABILITY, WHETHER IN AN ACTION OF CONTRACT, TORT OR OTHERWISE, ARISING FROM,
OUT OF OR IN CONNECTION WITH THE SOFTWARE OR THE USE OR OTHER DEALINGS IN
THE SOFTWARE.
main.go
// Copyright © 2016 Masayuki Morita
//
// Permission is hereby granted, free of charge, to any person obtaining a copy
// of this software and associated documentation files (the "Software"), to deal
// in the Software without restriction, including without limitation the rights
// to use, copy, modify, merge, publish, distribute, sublicense, and/or sell
// copies of the Software, and to permit persons to whom the Software is
// furnished to do so, subject to the following conditions:
//
// The above copyright notice and this permission notice shall be included in
// all copies or substantial portions of the Software.
//
// THE SOFTWARE IS PROVIDED "AS IS", WITHOUT WARRANTY OF ANY KIND, EXPRESS OR
// IMPLIED, INCLUDING BUT NOT LIMITED TO THE WARRANTIES OF MERCHANTABILITY,
// FITNESS FOR A PARTICULAR PURPOSE AND NONINFRINGEMENT. IN NO EVENT SHALL THE
// AUTHORS OR COPYRIGHT HOLDERS BE LIABLE FOR ANY CLAIM, DAMAGES OR OTHER
// LIABILITY, WHETHER IN AN ACTION OF CONTRACT, TORT OR OTHERWISE, ARISING FROM,
// OUT OF OR IN CONNECTION WITH THE SOFTWARE OR THE USE OR OTHER DEALINGS IN
// THE SOFTWARE.

package main

import "github.com/minamijoyo/myaws/cmd"

func main() {
	cmd.Execute()
}
cmd/root.go
// Copyright © 2016 Masayuki Morita
//
// Permission is hereby granted, free of charge, to any person obtaining a copy
// of this software and associated documentation files (the "Software"), to deal
// in the Software without restriction, including without limitation the rights
// to use, copy, modify, merge, publish, distribute, sublicense, and/or sell
// copies of the Software, and to permit persons to whom the Software is
// furnished to do so, subject to the following conditions:
//
// The above copyright notice and this permission notice shall be included in
// all copies or substantial portions of the Software.
//
// THE SOFTWARE IS PROVIDED "AS IS", WITHOUT WARRANTY OF ANY KIND, EXPRESS OR
// IMPLIED, INCLUDING BUT NOT LIMITED TO THE WARRANTIES OF MERCHANTABILITY,
// FITNESS FOR A PARTICULAR PURPOSE AND NONINFRINGEMENT. IN NO EVENT SHALL THE
// AUTHORS OR COPYRIGHT HOLDERS BE LIABLE FOR ANY CLAIM, DAMAGES OR OTHER
// LIABILITY, WHETHER IN AN ACTION OF CONTRACT, TORT OR OTHERWISE, ARISING FROM,
// OUT OF OR IN CONNECTION WITH THE SOFTWARE OR THE USE OR OTHER DEALINGS IN
// THE SOFTWARE.

package cmd

import (
	"fmt"
	"os"

	"github.com/spf13/cobra"
	"github.com/spf13/viper"
)

var cfgFile string

// RootCmd represents the base command when called without any subcommands
var RootCmd = &cobra.Command{
	Use:   "myaws",
	Short: "A brief description of your application",
	Long: `A longer description that spans multiple lines and likely contains
examples and usage of using your application. For example:

Cobra is a CLI library for Go that empowers applications.
This application is a tool to generate the needed files
to quickly create a Cobra application.`,
// Uncomment the following line if your bare application
// has an action associated with it:
//	Run: func(cmd *cobra.Command, args []string) { },
}

// Execute adds all child commands to the root command sets flags appropriately.
// This is called by main.main(). It only needs to happen once to the rootCmd.
func Execute() {
	if err := RootCmd.Execute(); err != nil {
		fmt.Println(err)
		os.Exit(-1)
	}
}

func init() {
	cobra.OnInitialize(initConfig)

	// Here you will define your flags and configuration settings.
	// Cobra supports Persistent Flags, which, if defined here,
	// will be global for your application.

	RootCmd.PersistentFlags().StringVar(&cfgFile, "config", "", "config file (default is $HOME/.myaws.yaml)")
	// Cobra also supports local flags, which will only run
	// when this action is called directly.
	RootCmd.Flags().BoolP("toggle", "t", false, "Help message for toggle")
}

// initConfig reads in config file and ENV variables if set.
func initConfig() {
	if cfgFile != "" { // enable ability to specify config file via flag
		viper.SetConfigFile(cfgFile)
	}

	viper.SetConfigName(".myaws") // name of config file (without extension)
	viper.AddConfigPath("$HOME")  // adding home directory as first search path
	viper.AutomaticEnv()          // read in environment variables that match

	// If a config file is found, read it in.
	if err := viper.ReadInConfig(); err == nil {
		fmt.Println("Using config file:", viper.ConfigFileUsed())
	}
}
とりあえずこの状態で既に実行可能な状態なので実行してみよう。
$ go run main.go
A longer description that spans multiple lines and likely contains
examples and usage of using your application. For example:

Cobra is a CLI library for Go that empowers applications.
This application is a tool to generate the needed files
to quickly create a Cobra application.
この状態だとRootCmdのlonger descriptonのところが出てるだけですね。
go installしてmyawsコマンドをビルドして $GOPATH/bin 配下にインストールする。
$ go install
$ myaws
A longer description that spans multiple lines and likely contains
examples and usage of using your application. For example:

Cobra is a CLI library for Go that empowers applications.
This application is a tool to generate the needed files
to quickly create a Cobra application.
とりあえずミニマムなコマンドの形ができた。
まぁ開発中はgo runでコンパイルしつつ実行を試すのがよいだろう。
cobra.ymlの設定
authorやlicenseは毎回指定するのがめんどい場合は $HOME/.cobra.yaml に書いておくとよいっぽい。
author: Masayuki Morita
license: MIT
サブコマンドも作ってみる
myawsにec2サブコマンドを追加してみよう
$ cobra add ec2
Using config file: /Users/minamijoyo/.cobra.yaml
ec2 created at /Users/minamijoyo/src/github.com/minamijoyo/myaws/cmd/ec2.go
生成された cmd/ec2.go を眺める
// Copyright © 2016 Masayuki Morita
//
// Permission is hereby granted, free of charge, to any person obtaining a copy
// of this software and associated documentation files (the "Software"), to deal
// in the Software without restriction, including without limitation the rights
// to use, copy, modify, merge, publish, distribute, sublicense, and/or sell
// copies of the Software, and to permit persons to whom the Software is
// furnished to do so, subject to the following conditions:
//
// The above copyright notice and this permission notice shall be included in
// all copies or substantial portions of the Software.
//
// THE SOFTWARE IS PROVIDED "AS IS", WITHOUT WARRANTY OF ANY KIND, EXPRESS OR
// IMPLIED, INCLUDING BUT NOT LIMITED TO THE WARRANTIES OF MERCHANTABILITY,
// FITNESS FOR A PARTICULAR PURPOSE AND NONINFRINGEMENT. IN NO EVENT SHALL THE
// AUTHORS OR COPYRIGHT HOLDERS BE LIABLE FOR ANY CLAIM, DAMAGES OR OTHER
// LIABILITY, WHETHER IN AN ACTION OF CONTRACT, TORT OR OTHERWISE, ARISING FROM,
// OUT OF OR IN CONNECTION WITH THE SOFTWARE OR THE USE OR OTHER DEALINGS IN
// THE SOFTWARE.

package cmd

import (
	"fmt"

	"github.com/spf13/cobra"
)

// ec2Cmd represents the ec2 command
var ec2Cmd = &cobra.Command{
	Use:   "ec2",
	Short: "A brief description of your command",
	Long: `A longer description that spans multiple lines and likely contains examples
and usage of using your command. For example:

Cobra is a CLI library for Go that empowers applications.
This application is a tool to generate the needed files
to quickly create a Cobra application.`,
	Run: func(cmd *cobra.Command, args []string) {
		// TODO: Work your own magic here
		fmt.Println("ec2 called")
	},
}

func init() {
	RootCmd.AddCommand(ec2Cmd)

	// Here you will define your flags and configuration settings.

	// Cobra supports Persistent Flags which will work for this command
	// and all subcommands, e.g.:
	// ec2Cmd.PersistentFlags().String("foo", "", "A help for foo")

	// Cobra supports local flags which will only run when this command
	// is called directly, e.g.:
	// ec2Cmd.Flags().BoolP("toggle", "t", false, "Help message for toggle")

}
RootCmd.AddCommand(ec2Cmd) しているところがポイントで、サブコマンドを追加しても、親コマンドのコードを修正する必要がない。
ところでaddする度にライセンスの文言をファイルごとに追加してくれるのちょっと邪魔なんだけど、noneを指定してもauthorは挿入されちゃうっぽい。まぁ自動生成されたコメントなどはあとできれいにするので一旦無視しよう。慣れてくると、コマンドの追加はscaffoldを使わずに、既存のコマンドのコピペで増やす方が簡単なので、あまり深くは気にしない。以降のコード例でも自動生成されたコメントなどは適宜省略してます。
ec2サブコマンドを実行してみる
$ go run main.go ec2
ec2 called

$ go run main.go ec2 --help
A longer description that spans multiple lines and likely contains examples
and usage of using your command. For example:

Cobra is a CLI library for Go that empowers applications.
This application is a tool to generate the needed files
to quickly create a Cobra application.

Usage:
  myaws ec2 [flags]

Global Flags:
      --config string   config file (default is $HOME/.myaws.yaml)
サブサブコマンドを作る
myawsコマンドのec2サブコマンドの下にlsサブサブコマンドを作る。
気持ち的にcmdの下にサブディレクトリを掘って名前空間を分けたいところなんだけど、scaffoldではそこまで対応してないっぽい。
Goだとパッケージの階層化はあまり細分化せずにフラットにして分けすぎない流儀なのかなぁ。この辺の勘所がまだよく分かっていない。
CLIのエントリーポイントになるcmdパッケージは平べったくしておいて、処理の実体の実装コードは別パッケージに切り出して、cmdパッケージからは呼び出すだけみたいなかんじにしておけば実用上は問題ない気もする。
とりあえずec2lsコマンドを作って-pオプションで親をec2Cmdに指定してみる。
$ cobra add ec2ls -p 'ec2Cmd'
Using config file: /Users/minamijoyo/.cobra.yaml
ec2ls created at /Users/minamijoyo/src/github.com/minamijoyo/myaws/cmd/ec2ls.go
この状態だとec2コマンドの下にec2lsコマンドができている状態。このままだと冗長なので、ちょっとコードをいじって調整する。
$ go run main.go ec2 --help
A longer description that spans multiple lines and likely contains examples
and usage of using your command. For example:

Cobra is a CLI library for Go that empowers applications.
This application is a tool to generate the needed files
to quickly create a Cobra application.

Usage:
  myaws ec2 [flags]
  myaws ec2 [command]

Available Commands:
  ec2ls       A brief description of your command

Global Flags:
      --config string   config file (default is $HOME/.myaws.yaml)

Use "myaws ec2 [command] --help" for more information about a command.
cmd/ec2ls.goで Use: "ec2ls" になっているところを Use: "ls" にする
package cmd

import (
	"fmt"

	"github.com/spf13/cobra"
)

// ec2lsCmd represents the ec2ls command
var ec2lsCmd = &cobra.Command{
	// Use:   "ec2ls",
	Use:   "ls",
	Short: "A brief description of your command",
	Long: `A longer description that spans multiple lines and likely contains examples
and usage of using your command. For example:

Cobra is a CLI library for Go that empowers applications.
This application is a tool to generate the needed files
to quickly create a Cobra application.`,
	Run: func(cmd *cobra.Command, args []string) {
		// TODO: Work your own magic here
		fmt.Println("ec2ls called")
	},
}

func init() {
	ec2Cmd.AddCommand(ec2lsCmd)
}
ec2コマンドのhelpの出力はこんなかんじになった。
$ go run main.go ec2 --help
A longer description that spans multiple lines and likely contains examples
and usage of using your command. For example:

Cobra is a CLI library for Go that empowers applications.
This application is a tool to generate the needed files
to quickly create a Cobra application.

Usage:
  myaws ec2 [flags]
  myaws ec2 [command]

Available Commands:
  ls          A brief description of your command

Global Flags:
      --config string   config file (default is $HOME/.myaws.yaml)

Use "myaws ec2 [command] --help" for more information about a command.
実行してみる
$ go run main.go ec2 ls
ec2ls called
バイナリをビルドしてmyawsコマンドにすると、実行イメージはこんなかんじになる。
$ go install
$ myaws ec2 ls
ec2ls called
よさげ。コマンドの枠組みはできた。
実装
aws-sdk-goでインスタンスの一覧を取得する
とりあえず枠組みはできたので中身の実装をしていこう。
GoからAWS SDKを叩くには公式の aws-sdk-go があるので、これを使う。
https://github.com/aws/aws-sdk-go
ググるとサンプルコードで github.com/awslabs/aws-sdk-go をimportしているやつがいっぱい見つかるが、これは古い実装で、 github.com/aws/aws-sdk-go といろいろインターフェースが違ってそのまま使えないことが多いので注意。 Web上で見つけたサンプルコードをコピペする場合は、importパスが github.com/aws/aws-sdk-go なってるか確認した方がよい。
公式ドキュメントはこちら↓なんだけど公式ドキュメントは不親切ですごく分かりづらい(´・ω・`)
http://docs.aws.amazon.com/sdk-for-go/api/
$ go get github.com/aws/aws-sdk-go
自作コマンドの引数の解析とかは後で説明するとして、まずは純粋なaws-sdk-goの使い方を見ていこう。
エントリポイントとなる cmd/ec2ls.go は ec.Ls を呼んでるだけで、実装コードは myaws/ec/ls.go 配下にまとめた。
cmd/ec2ls.go
package cmd

import (
	"github.com/minamijoyo/myaws/myaws/ec2"
	"github.com/spf13/cobra"
)

// ec2lsCmd represents the ec2ls command
var ec2lsCmd = &cobra.Command{
	Use:   "ls",
	Short: "List EC2 instances",
	Long:  `List EC2 instances`,
	Run:   ec2.Ls,
}

func init() {
	ec2Cmd.AddCommand(ec2lsCmd)
}
aws-cli使ったことあれば、aws-sdk-goの入出力のパラメータなどは不親切なAPIリファレンスを眺めつつ、空気を読めば推測可能。
たぶんaws-sdk-goのDescribeInstancesを使ってインスタンスの一覧を取得すればよかろうということで、プロトタイプ実装として、こんなかんじで書いてみる。とりあえずの稼働確認でいろいろハードコードで決め打ちになっているけどまぁ、あとは引数見て入出力をいじればよいだろう。
myaws/ec/ls.go
package ec2

import (
	"fmt"
	"strings"

	"github.com/aws/aws-sdk-go/aws"
	"github.com/aws/aws-sdk-go/aws/session"
	"github.com/aws/aws-sdk-go/service/ec2"
	"github.com/spf13/cobra"
)

func Ls(*cobra.Command, []string) {
	svc := ec2.New(
		session.New(),
		&aws.Config{
			Region: aws.String("ap-northeast-1"),
		},
	)

	params := &ec2.DescribeInstancesInput{
		Filters: []*ec2.Filter{
			{
				Name: aws.String("instance-state-name"),
				Values: []*string{
					aws.String("running"),
				},
			},
		},
	}

	resp, err := svc.DescribeInstances(params)
	if err != nil {
		panic(err)
	}

	for _, res := range resp.Reservations {
		for _, inst := range res.Instances {
			fmt.Println(formatInstance(inst))
		}
	}
}

func formatInstance(inst *ec2.Instance) string {
	output := []string{
		*inst.PublicIpAddress,
		*inst.InstanceId,
		*inst.State.Name,
		(*inst.LaunchTime).Format("2006-01-02 15:04:05"),
		lookupTag(inst, "Name"),
	}
	return strings.Join(output[:], "\t")
}

func lookupTag(inst *ec2.Instance, key string) string {
	var value string
	for _, t := range inst.Tags {
		if *t.Key == key {
			value = *t.Value
			break
		}
	}
	return value
}
いちおう簡単に補足説明すると、ec2.Newでサービスを初期化する。これがAPIのクライアントのオブジェクトみたいなもの。
	svc := ec2.New(
		session.New(),
		&aws.Config{
			Region: aws.String("ap-northeast-1"),
		},
	)
次にfilterのparamsを作って、DescribeInstancesに渡す。この例ではステータスがrunningのものだけに絞っている。
とくにfilterする必要がない場合はDescribeInstancesにnilを渡せば良い。
	params := &ec2.DescribeInstancesInput{
		Filters: []*ec2.Filter{
			{
				Name: aws.String("instance-state-name"),
				Values: []*string{
					aws.String("running"),
				},
			},
		},
	}

	resp, err := svc.DescribeInstances(params)
	if err != nil {
		panic(err)
	}
出力のレスポンスはReservationsとInstancesの入れ子になってるので二重ループで取り出して、
	for _, res := range resp.Reservations {
		for _, inst := range res.Instances {
			fmt.Println(formatInstance(inst))
		}
	}
}
出力を整形して表示する。
func formatInstance(inst *ec2.Instance) string {
	output := []string{
		*inst.PublicIpAddress,
		*inst.InstanceId,
		*inst.State.Name,
		(*inst.LaunchTime).Format("2006-01-02 15:04:05"),
		lookupTag(inst, "Name"),
	}
	return strings.Join(output[:], "\t")
}

func lookupTag(inst *ec2.Instance, key string) string {
	var value string
	for _, t := range inst.Tags {
		if *t.Key == key {
			value = *t.Value
			break
		}
	}
	return value
}
goの日付のフォーマットは %Y-%M-%D %H%m%s とかじゃなくて "2006-01-02 15:04:05" みたいに例示するというのが、ちょっと特殊な感じで違和感。
cobraで引数フラグをパースして渡す
次に引数フラグを見て、振る舞いを変える方法を試す。
例えば、ステータスrunningで絞ってるけど、running以外も全部出したい場合もあるだろう。
引数の渡し方は2種類あって、cobraでパースして明示的に変数にセットして渡す方法と、cobraでパースしたものを後述するviperを経由して渡す方法とある。まずは、cobraでパースして明示的に変数にセットして渡す方法をやってみる。
パースした変数をセットするのに、cmdパッケージ内にすべての実装がある場合はローカル変数でもよいのだけど、今回は実装コードはパッケージを分けているので、LsFlagという受け取るフラグの集合をtypeで定義しておいて、これをLs()の引数で渡してもらうようにする。
myaws/ec2/ls.go
...(略)

type LsFlag struct {
	All bool
}

func Ls(flag *LsFlag) {
	svc := ec2.New(
		session.New(),
		&aws.Config{
			Region: aws.String("ap-northeast-1"),
		},
	)

	var stateFilter *ec2.Filter
	if flag.All {
		stateFilter = &ec2.Filter{}
	} else {
		stateFilter = &ec2.Filter{
			Name: aws.String("instance-state-name"),
			Values: []*string{
				aws.String("running"),
			},
		}
	}

	params := &ec2.DescribeInstancesInput{
		Filters: []*ec2.Filter{
			stateFilter,
		},
	}
...(略)
コマンド側では ec2lsCmd.Flags().BoolVarP で変数にセットして渡す。
cmd/ec2ls.go
package cmd

import (
	"github.com/minamijoyo/myaws/myaws/ec2"
	"github.com/spf13/cobra"
)

var ec2LsFlag ec2.LsFlag

var ec2lsCmd = &cobra.Command{
	Use:   "ls",
	Short: "List EC2 instances",
	Run: func(*cobra.Command, []string) {
		ec2.Ls(&ec2LsFlag)
	},
}

func init() {
	ec2Cmd.AddCommand(ec2lsCmd)
	ec2lsCmd.Flags().BoolVarP(&ec2LsFlag.All, "all", "a", false, "List all instances")
}
最後の ec2lsCmd.Flags().BoolVarP(&ec2LsFlag.All, "all", "a", false, "List all instances") の部分について、補足説明しておくと、 ec2lsCmd.Flags() が引数が渡されるコマンドのオブジェクト、 BoolVarP はBool型の引数を変数にセットする関数で、 &ec2LsFlag.All がセットする変数のアドレス、 "all" がロングフラグで、 "a" がショートフラグ。 false はデフォルト値で、 "List all instances" がHelpやUsageに出す説明。
このように書くと myaws ec2 ls -a とか myaws ec2 ls --all とかで ec2LsFlag.All 変数にBool値をセットできるようになる。
cobraのグローバルフラグを使う
ところでregionとかはmyawsコマンド全体で必要なフラグであって、サブコマンドごとにわざわざ定義してセットするのは面倒である。
そういうものはPersistentFlags()というのがある。PersistentFlags()で定義すると、
$ myaws --region ap-northeast-1 ec2 ls
$ myaws ec2 ls --region ap-northeast-1
このように引数の指定場所をグローバルでもローカルでも指定できるようになって利便性があがる。
cmd/root.go
func init() {
	cobra.OnInitialize(initConfig)

	RootCmd.PersistentFlags().StringVar(&cfgFile, "config", "", "config file (default is $HOME/.myaws.yaml)")
	RootCmd.PersistentFlags().StringVar(&myawsFlag.Region, "region", "", "AWS region")
}
ちなみにStringVarPじゃなくてStringVarなのはショートフラグがない版の関数です。
cmd/ec2ls.go
var ec2lsCmd = &cobra.Command{
	Use:   "ls",
	Short: "List EC2 instances",
	Run: func(*cobra.Command, []string) {
		ec2LsFlag.MyawsFlag = myawsFlag
		ec2.Ls(&ec2LsFlag)
	},
}
type定義とかはいろいろ略するが使い方は同じで、PersistentFlags()でセットした変数はサブコマンドのRunの中で見える。
ちなみにec2ls.goのinit()の中では見えないので注意。init()時点では引数の定義がバインドされているだけで、実際の値はまだセットされていないため。(これに気付かずに悩んだ)
viperを使って設定ファイルでデフォルト値を定義する
ところでregionなんてものは毎回引数に渡すのはダルいので、デフォルト値を定義しておきたい。AWS関連のツールとしては、デフォルトをus-east-1あたりにするのがツールとしては妥当だろう。しかしながら、私は日本人なので東京リージョンのap-northeast-1をデフォルトとして使いたい。このようなリージョンは人によってよく使うものが決まっているが、ツールに東京をデフォルト値として埋め込むのはあんまり良くない。aws-cliなどは環境変数を読んでくれるが、今回のツールにはリージョン以外にも出力時に表示するタグとかをエンドユーザ側でカスタマイズしたりしたいので、環境変数が大量に定義されるのもイマイチである。設定ファイルから読み込む仕組みを作りたい。
というわけで、このような設定ファイルの読み込みをよしなにやってくれるのがviperである。
viperはcobraと同じ作者が作っていて、設定ファイルでデフォルト値を定義しておいて、cobraのコマンドライン引数で上書きというのがよい感じに統合されている。
viperそのものは設定ファイルだけじゃなくて、バックエンドにetcdとかのKey/Valueストアとか環境変数も使えたりしてすごい高機能。
viperを使うには、こんなかんじでinitConfig()で設定ファイルを読み込んで、viper.BindPFlagでバインドする。
cmd/root.go
import (
	(略)
	"github.com/spf13/viper"
)

(略)
func init() {
	cobra.OnInitialize(initConfig)

	RootCmd.PersistentFlags().StringVar(&cfgFile, "config", "", "config file (default: $HOME/.myaws.yaml)")
	RootCmd.PersistentFlags().StringP("region", "", "", "AWS region (default: \"\")")

	viper.BindPFlag("region", RootCmd.PersistentFlags().Lookup("region"))
}

func initConfig() {
	if cfgFile != "" {
		viper.SetConfigFile(cfgFile)
	}

	viper.SetConfigName(".myaws")
	viper.AddConfigPath("$HOME")
	viper.AutomaticEnv()

	viper.ReadInConfig()
}
viper.BindPFlag("region", RootCmd.PersistentFlags().Lookup("region")) の部分について補足説明しておくと、 "region" がviperにセットするキー、 RootCmd.PersistentFlags().Lookup("region") がcobraのコマンド引数のどれとバインドするか。
例えば、こんなファイルを $HOME/.myaws.yaml を作っておくと、
region: ap-northeast-1
viper.GetString("region") で値を取得できるようになる。
myaws/ec2/ls.go
func Ls(*cobra.Command, []string) {
	svc := ec2.New(
		session.New(),
		&aws.Config{
			Region: aws.String(viper.GetString("region")),
		},
	)
コマンド引数で上書きした場合は、その値、コマンド引数で指定されなかった場合は設定ファイルの値みたいなかんじで使えてべんり。
ネストしたキーも可能で、たとえばこんな感じで、yamlでネストしたデータ構造を作っておき、
$HOME/.myaws.yaml
region: ap-northeast-1
ec2:
  ls:
    all: false
こんな感じで、サブコマンドの引数を、ネストしたキーにバインドしておくと
cmd/ec2ls.go
package cmd

import (
	"github.com/minamijoyo/myaws/myaws/ec2"
	"github.com/spf13/cobra"
	"github.com/spf13/viper"
)

var ec2lsCmd = &cobra.Command{
	Use:   "ls",
	Short: "List EC2 instances",
	Run:   ec2.Ls,
}

func init() {
	ec2Cmd.AddCommand(ec2lsCmd)

	ec2lsCmd.Flags().BoolP("all", "a", false, "List all instances (default: false)")

	viper.BindPFlag("ec2.ls.all", ec2lsCmd.Flags().Lookup("all"))
}
こんな感じで viper.GetBool("ec2.ls.all") で参照できる。
myaws/ec2/ls.go
import (
	(略)
	"github.com/spf13/viper"
)

func Ls(*cobra.Command, []string) {
	svc := ec2.New(
		session.New(),
		&aws.Config{
			Region: aws.String(viper.GetString("region")),
		},
	)

	var stateFilter *ec2.Filter
	if viper.GetBool("ec2.ls.all") {
		stateFilter = &ec2.Filter{}
	} else {
		stateFilter = &ec2.Filter{
			Name: aws.String("instance-state-name"),
			Values: []*string{
				aws.String("running"),
			},
		}
	}
デフォルト値が気に入らなければエンドユーザ側でカスタマイズできる余地を残せるので、引数のオプションとか思いつきでどんどん増やせそうでよい感じですね。
リリース
この手のCLIツールは無限に機能を増やせるので、この辺りで一旦リリースして、あとは趣味で機能を増やそう。
というわけでリリースする。
goxでクロスビルドする
goはコンパイル言語なので、配布する場合は、OSやCPUのアーキテクチャによってビルドし分ける必要がある。
手元のPCはMacで開発しているけれども、Linux向けにクロスビルドしたりとか。
標準のgo buildでもできるんだけど、クロスビルド用の便利ツールgoxがあるのでこれを利用してみる。
goxのインストール
$ go get github.com/mitchellh/gox
gox自体の使い方は、こんな感じで、ビルドしたいアーキテクチャと出力先などを指定する。
$ gox --osarch "darwin/amd64 linux/amd64" -output="out/myaws_v0.0.1_{{.OS}}_{{.Arch}}/{{.Dir}}"
gox単体ではzip圧縮などはしてくれないので、scripts/package.shという適当な作業スクリプトを書いた。
別のgoxcというビルドツールは圧縮もしてくれるけど、zipの中にライセンスファイルも含めてくれたり、debian用のdebファイル作ったり、ダウンロード用のHTML生成したり、なんかいろいろ余計なことをしてくれるので好きになれなかった。
ちなみにこのシェルスクリプトの元ネタはtcnksm/ghrのリポジトリにあったscripts/package.shを参考にさせてもらいつつ、自分用にカスタマイズして必要最小限なところだけにした劣化コピーである。
scripts/package.sh
# !/bin/bash

set -e
set -x

VERSION=$(grep "const version " cmd/version.go | sed -E 's/.*"(.+)"$/\1/')
REPO="myaws"

rm -rf ./out/
gox --osarch "darwin/amd64 linux/amd64" -output="./out/${REPO}_${VERSION}_{{.OS}}_{{.Arch}}/{{.Dir}}"

rm -rf ./pkg/
mkdir ./pkg

for PLATFORM in $(find ./out -mindepth 1 -maxdepth 1 -type d); do
    PLATFORM_NAME=$(basename ${PLATFORM})

    pushd ${PLATFORM}
    zip ../../pkg/${PLATFORM_NAME}.zip ./*
    popd
done
シェルスクリプトをGoで置き換えるためにツールを作ってるのに、ここでシェルスクリプトを書くことになるとは複雑な気分である。GoはC言語の文化圏なので、この手のことはmakeでやるのがよいのもしれないが、Makefileとか久しく書いていないので、シェルスクリプトでやってしまった。
$ scripts/package.sh
++ grep 'const version ' cmd/version.go
++ sed -E 's/.*"(.+)"$/\1/'
+ VERSION=v0.0.2
+ REPO=myaws
+ rm -rf ./out/
+ gox --osarch 'darwin/amd64 linux/amd64' '-output=./out/myaws_v0.0.2_{{.OS}}_{{.Arch}}/{{.Dir}}'
Number of parallel builds: 3

-->     linux/amd64: github.com/minamijoyo/myaws
-->    darwin/amd64: github.com/minamijoyo/myaws
+ rm -rf ./pkg/
+ mkdir ./pkg
++ find ./out -mindepth 1 -maxdepth 1 -type d
+ for PLATFORM in '$(find ./out -mindepth 1 -maxdepth 1 -type d)'
++ basename ./out/myaws_v0.0.2_darwin_amd64
+ PLATFORM_NAME=myaws_v0.0.2_darwin_amd64
+ pushd ./out/myaws_v0.0.2_darwin_amd64
~/src/github.com/minamijoyo/myaws/out/myaws_v0.0.2_darwin_amd64 ~/src/github.com/minamijoyo/myaws
+ zip ../../pkg/myaws_v0.0.2_darwin_amd64.zip ./myaws
  adding: myaws (deflated 72%)
+ popd
~/src/github.com/minamijoyo/myaws
+ for PLATFORM in '$(find ./out -mindepth 1 -maxdepth 1 -type d)'
++ basename ./out/myaws_v0.0.2_linux_amd64
+ PLATFORM_NAME=myaws_v0.0.2_linux_amd64
+ pushd ./out/myaws_v0.0.2_linux_amd64
~/src/github.com/minamijoyo/myaws/out/myaws_v0.0.2_linux_amd64 ~/src/github.com/minamijoyo/myaws
+ zip ../../pkg/myaws_v0.0.2_linux_amd64.zip ./myaws
  adding: myaws (deflated 72%)
+ popd
~/src/github.com/minamijoyo/myaws
上記のスクリプトを実行するとこんなディレクトリ構造になる
$ tree
.
├── LICENSE
├── README.md
├── cmd
│   ├── ec2.go
│   ├── ec2ls.go
│   ├── root.go
│   └── version.go
├── main.go
├── myaws
│   └── ec2
│       └── ls.go
├── out
│   ├── myaws_v0.0.2_darwin_amd64
│   │   └── myaws
│   └── myaws_v0.0.2_linux_amd64
│       └── myaws
├── pkg
│   ├── myaws_v0.0.2_darwin_amd64.zip
│   └── myaws_v0.0.2_linux_amd64.zip
└── scripts
    └── package.sh

8 directories, 13 files
ghrでリリースする
配布物ができたので、GitHubのReleaseページにuploadする。
GoにはRubyのrubygems.orgみたいなパッケージ配布の標準的なリポジトリがないので、GitHub Releaseページにビルド済のバイナリをアップしておいて、これをダウンドードしてもらうのがお手軽で簡単そうである。
これをやるのにghrという便利ツールがあるので、これを利用させてもらう。
$ go get github.com/tcnksm/ghr
GithHubのAPIを叩くので、GitHubのAccessTokenを発行する。
Privateリポジトリも使うならrepoスコープで、Publicリポジトリだけであればpublic_repoだけチェックすればよいはず。(たぶん)
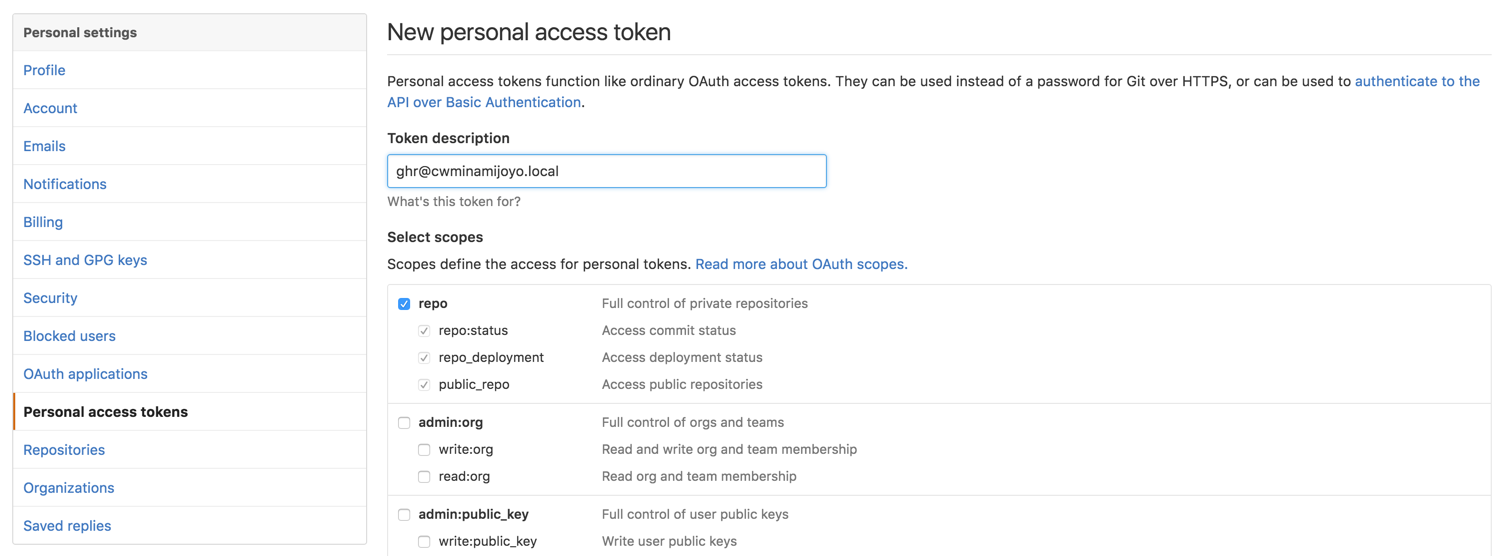
$ export GITHUB_TOKEN=XXXXXX
upload前にコードの最新もGitHubにpushしておく。upload時にtagも打たれるので。
$ git push origin master
uploadはユーザ名がminamijoyoでリリースタグがv0.0.2で、配布物がpkg配下にあるとすると、こんな感じ。
(v0.0.1じゃないのは、この記事を書く前に先にちょっと試しにやってみたからで、特に深い意味は無いです)
$ ghr -u minamijoyo v0.0.2 pkg/
--> Uploading: myaws_v0.0.2_linux_amd64.zip
--> Uploading: myaws_v0.0.2_darwin_amd64.zip

アップロードできた。よいかんじ。これでGoのビルド環境がない人も、ビルド済のバイナリをダウンロードしてunzipしてchmodするだけで使える状態になった。
終わりに
GoでAWS SDKを叩くCLIツールを作ってリリースするところまでやってみた。なんとなくaws-sdk-goの使い方も分かったし、引数のフラグのパースや設定ファイルの読み込み方法も覚えたので、あとは自分の欲しい機能を細々と実装していけばよさげ。
この記事がGoで何かCLIツールを作ろうと思ってる人の参考になれば幸いです。
(おまけ)こんな記事も書きました。あわせてどうぞ↓
GolangでwebサービスのAPIを叩くCLIツールを作ろう