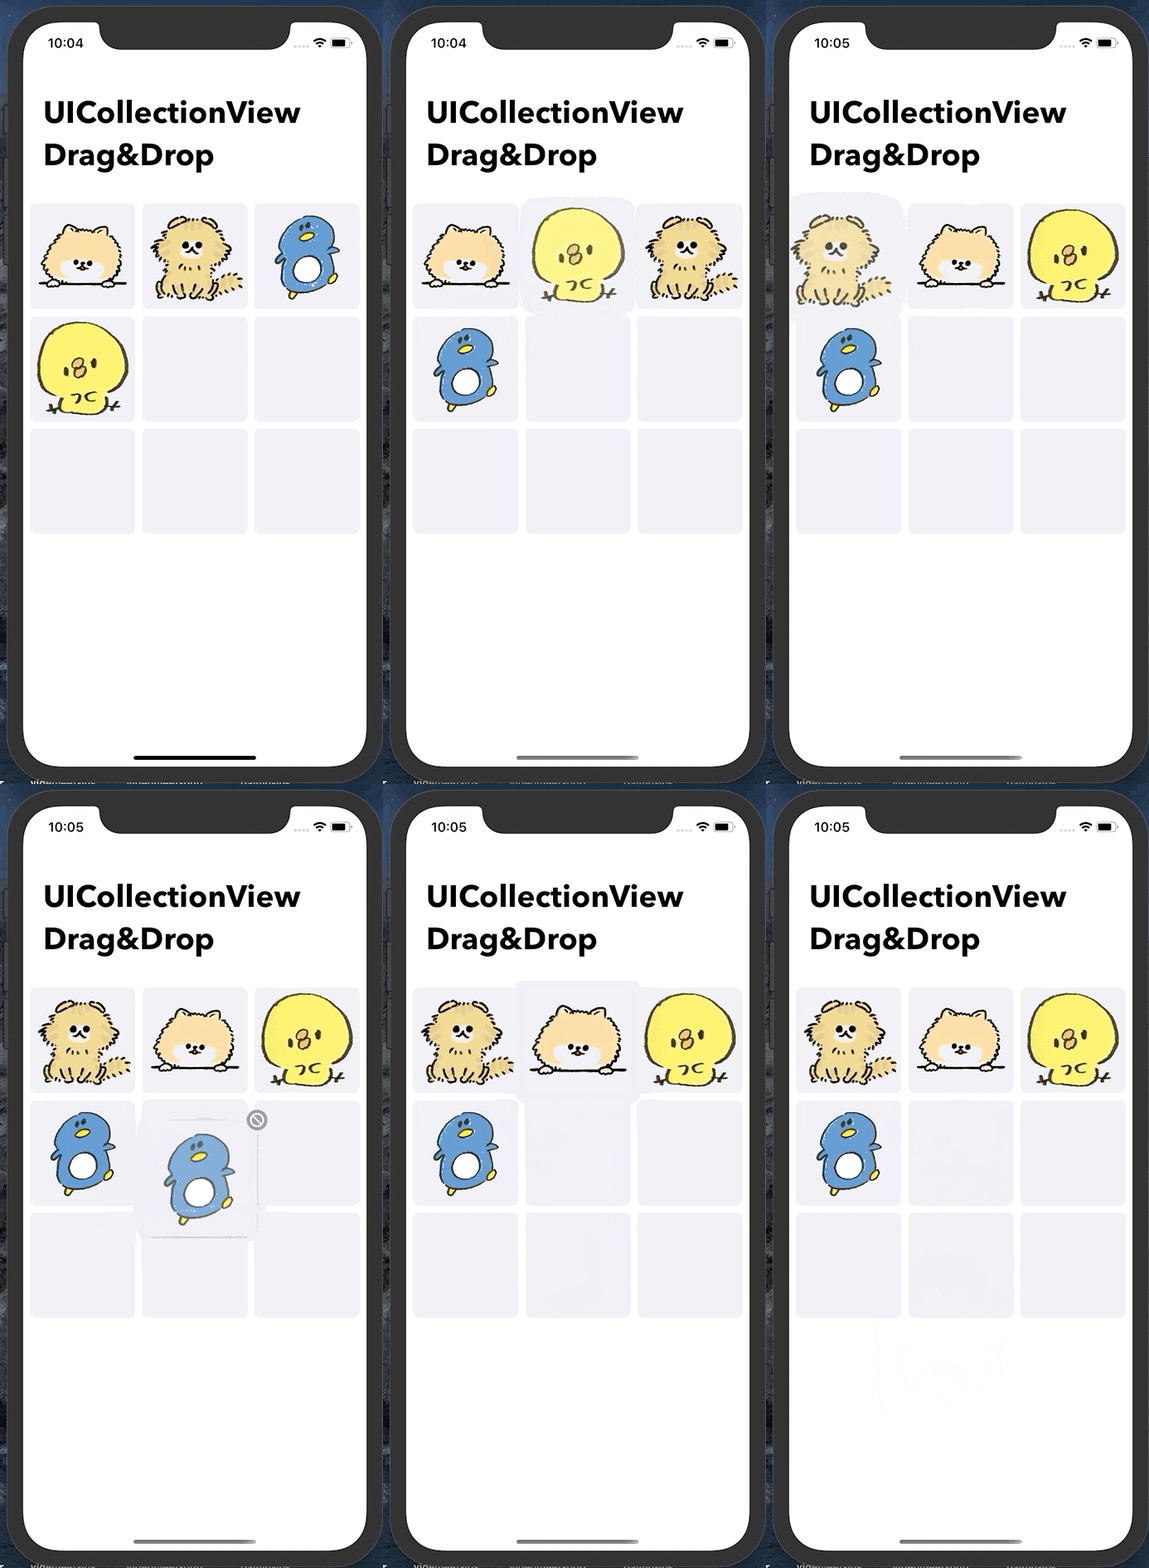
🚀 ゴール
📖 仕様
- ドラッグ&ドロップで並び替えができるUICollectionView
- 並び替えをすると配列の更新もされる
- データの入ってるセルでのみドラッグ&ドロップが可能
✏️ 完成版コード
少し長いですが、まずは完成版のコードです。解説は後述してます 🙂
import UIKit

class ViewController: UIViewController {
    // storyboardのUICollectionViewを接続
    @IBOutlet weak var collection: UICollectionView!
    // UICollectionViewFlowLayoutを使用してcellのレイアウトを制御します
    private let layout = UICollectionViewFlowLayout()

    // セルに表示したい画像の配列
    var images = ["neco", "hiyoko", "penguin", "inu"]

    override func viewDidLoad() {
        super.viewDidLoad()
        // UIの初期設定
        configUI()
    }

    func configUI() {
        // UICollectionViewFlowLayoutの余白設定
        // => セル同士の余白が設定される
        layout.minimumLineSpacing = 8
        layout.minimumInteritemSpacing = 8

        // UICollectionViewにLayoutを適用
        collection.collectionViewLayout = layout

        // cellを呼び出し
        collection.register(UICollectionViewCell.self, forCellWithReuseIdentifier: "CELL")

        // delegaeなどの設定
        collection.dragDelegate = self
        collection.dropDelegate = self
        collection.delegate = self
        collection.dragInteractionEnabled = true
        collection.dataSource = self

        // UICollectionViewの周りの余白設定
        collection.contentInset = UIEdgeInsets(top: 8, left: 8, bottom: 8, right: 8)

        // UICollectionViewをviewに設置
        view.addSubview(collection)
    }

    // ドラッグ&ドロップをした時に配列(images)を更新する
    func updateItem(coordinator: UICollectionViewDropCoordinator, destinationIndex: IndexPath, collectionView: UICollectionView) {
        guard let item = coordinator.items.first else { return }
        guard let sourceIndex = item.sourceIndexPath else { return }

        // セルと配列の更新
        collectionView.performBatchUpdates({
            // 配列の更新
            self.images.remove(at: sourceIndex.item)
            self.images.insert(item.dragItem.localObject as! String, at: destinationIndex.item)
            // セルの更新
            collectionView.deleteItems(at: [sourceIndex])
            collectionView.insertItems(at: [destinationIndex])
        })
        // ドロップの実行
        coordinator.drop(item.dragItem, toItemAt: destinationIndex)
    }
}

extension ViewController: UICollectionViewDelegateFlowLayout, UICollectionViewDataSource {
    // cellのサイズの指定
    func collectionView(_ collectionView: UICollectionView, layout collectionViewLayout: UICollectionViewLayout, sizeForItemAt indexPath: IndexPath) -> CGSize {
        var cellSize = CGSize(width: ((collectionView.frame.width-32)/3), height: ((collectionView.frame.width-32)/3))
        return cellSize
    }

    // cellの数の指定
    func collectionView(_ collectionView: UICollectionView, numberOfItemsInSection section: Int) -> Int {
        return 9
    }

    // cellの設定
    func collectionView(_ collectionView: UICollectionView, cellForItemAt indexPath: IndexPath) -> UICollectionViewCell {
        // cellのidentifierを指定
        let cell = collectionView.dequeueReusableCell(withReuseIdentifier: "CELL", for: indexPath)

        // cellの背景色指定
        cell.backgroundColor = UIColor(red: 235/255, green: 236/255, blue: 243/255, alpha: 1)
        cell.layer.cornerRadius = 8

        // セルの再利用によるコンテンツの重複を回避する
        for subview in cell.contentView.subviews{
            subview.removeFromSuperview()
        }

        // 画像データの数だけcellに画像を設定する
        if indexPath.row < images.count {
           // 画像をセット
           let image = UIImageView(image:UIImage(named: images[indexPath.row])!)
            // 制約をかける
            image.translatesAutoresizingMaskIntoConstraints = false
            // 画像をcellに設置
            cell.contentView.addSubview(image)
            // 画像のスタイル指定
            image.topAnchor.constraint(equalTo: cell.contentView.topAnchor, constant: 0).isActive = true
            image.leadingAnchor.constraint(equalTo: cell.contentView.leadingAnchor, constant: 0).isActive = true
            image.trailingAnchor.constraint(equalTo: cell.contentView.trailingAnchor, constant: 0).isActive = true
            image.bottomAnchor.constraint(equalTo: cell.contentView.bottomAnchor, constant: 0).isActive = true
            image.contentMode = .scaleAspectFill
            image.layer.masksToBounds = true
        }

        return cell
    }
}

// ドラッグの設定
extension ViewController: UICollectionViewDragDelegate {
    func collectionView(_ collectionView: UICollectionView, itemsForBeginning session: UIDragSession, at indexPath: IndexPath) -> [UIDragItem] {
        // 画像が無い場合はドラッグを無効化
        if indexPath.row >= images.count { return [] }
        // ドラッグするアイテムの情報を取得
        let item = "\(self.images[indexPath.row])"
        let itemProvider = NSItemProvider(object: item as NSString)
        let dragItem = UIDragItem(itemProvider: itemProvider)
        dragItem.localObject = item
        return [dragItem]
    }
}

// ドロップの設定
extension ViewController: UICollectionViewDropDelegate {
    // ドロップ時のパスを取得&設定
    func collectionView(_ collectionView: UICollectionView, performDropWith coordinator: UICollectionViewDropCoordinator) {
        var destinationIndexPath: IndexPath
        if let indexPath = coordinator.destinationIndexPath {
            destinationIndexPath = indexPath
        } else {
            let row = collectionView.numberOfItems(inSection: 0)
            destinationIndexPath = IndexPath(item: row - 1, section: 0)
        }
        // 配列とセルの更新処理を呼び出し
        if coordinator.proposal.operation == .move {
            self.updateItem(coordinator: coordinator, destinationIndex: destinationIndexPath, collectionView: collectionView)
        }
    }

    // ドロップ範囲の設定
    func collectionView(_ collectionView: UICollectionView, dropSessionDidUpdate session: UIDropSession, withDestinationIndexPath destinationIndexPath: IndexPath?) -> UICollectionViewDropProposal {

        let lastItemInFirstSection = collectionView.numberOfItems(inSection: 0)
        let destinationIndexPath: IndexPath = destinationIndexPath ?? .init(item: lastItemInFirstSection - 1, section: 0)

        // 画像が入っているところのみDropを有効にする
        if collectionView.hasActiveDrag && destinationIndexPath.row < images.count {
            return UICollectionViewDropProposal(operation: .move, intent: .insertAtDestinationIndexPath)
        }
        // 画像が入ってないところはforbiddenで無効化
        return UICollectionViewDropProposal(operation: .forbidden)
    }
}
🔎 解説
頭から順に見ていきます🍃 長いのでポイントを絞って見ていきます。
UIに必要な素材の準備
今回はstoryboardでUICollectionViewを実装してIBOutletで接続しています。
また、セルで使用したい画像をAssetsに用意して画像の名前を配列で用意しておきます。
// storyboardのUICollectionViewを接続
@IBOutlet weak var collection: UICollectionView!

// セルに表示したい画像の配列
var images = ["neco", "hiyoko", "penguin", "inu"]
レイアウトの指定
UICollectionViewのサブクラスであるUICollectionViewFlowLayoutを使用して レイアウトを整えています。
// UICollectionViewFlowLayoutの余白設定
// => セル同士の余白が設定される
layout.minimumLineSpacing = 8
layout.minimumInteritemSpacing = 8

// UICollectionViewにLayoutを適用
collection.collectionViewLayout = layout
ドラッグの設定
今回は画像の入っているセルだけドラッグできるようにします。
UIDragItemに必要な情報を準備しておしまいです。
// ドラッグの設定
extension ViewController: UICollectionViewDragDelegate {
    func collectionView(_ collectionView: UICollectionView, itemsForBeginning session: UIDragSession, at indexPath: IndexPath) -> [UIDragItem] {
        // 画像が無い場合はドラッグを無効化
        if indexPath.row >= images.count { return [] }
        // ドラッグするアイテムの情報を取得
        let item = "\(self.images[indexPath.row])"
        let itemProvider = NSItemProvider(object: item as NSString)
        let dragItem = UIDragItem(itemProvider: itemProvider)
        dragItem.localObject = item
        return [dragItem]
    }
}
ドロップの設定
今回は余白があったりドロップ出来ないセルがあったりするので、
クラッシュしないようドロップの有効範囲を予めしっかり指定してあげます☄️
// ドロップの設定
extension ViewController: UICollectionViewDropDelegate {
    // ドロップ時のパスを取得&設定
    func collectionView(_ collectionView: UICollectionView, performDropWith coordinator: UICollectionViewDropCoordinator) {
        var destinationIndexPath: IndexPath
        if let indexPath = coordinator.destinationIndexPath {
            destinationIndexPath = indexPath
        } else {
            let row = collectionView.numberOfItems(inSection: 0)
            destinationIndexPath = IndexPath(item: row - 1, section: 0)
        }
        // 配列とセルの更新処理を呼び出し
        if coordinator.proposal.operation == .move {
            self.updateItem(coordinator: coordinator, destinationIndex: destinationIndexPath, collectionView: collectionView)
        }
    }

    // ドロップ範囲の設定
    func collectionView(_ collectionView: UICollectionView, dropSessionDidUpdate session: UIDropSession, withDestinationIndexPath destinationIndexPath: IndexPath?) -> UICollectionViewDropProposal {

        let lastItemInFirstSection = collectionView.numberOfItems(inSection: 0)
        let destinationIndexPath: IndexPath = destinationIndexPath ?? .init(item: lastItemInFirstSection - 1, section: 0)

        // 画像が入っているところのみDropを有効にする
        if collectionView.hasActiveDrag && destinationIndexPath.row < images.count {
            return UICollectionViewDropProposal(operation: .move, intent: .insertAtDestinationIndexPath)
        }
        // 画像が入ってないところはforbiddenで無効化
        return UICollectionViewDropProposal(operation: .forbidden)
    }
}
セルと配列の更新
今回の実装ではドロップがされる度にセルと配列を更新します。
セルの更新はperformBatchUpdatesを用いて行います。
    // ドラッグ&ドロップをした時に配列(images)を更新する
    func updateItem(coordinator: UICollectionViewDropCoordinator, destinationIndex: IndexPath, collectionView: UICollectionView) {
        guard let item = coordinator.items.first else { return }
        guard let sourceIndex = item.sourceIndexPath else { return }

        // セルと配列の更新
        collectionView.performBatchUpdates({
            // 配列の更新
            self.images.remove(at: sourceIndex.item)
            self.images.insert(item.dragItem.localObject as! String, at: destinationIndex.item)
            // セルの更新
            collectionView.deleteItems(at: [sourceIndex])
            collectionView.insertItems(at: [destinationIndex])
        })
        // ドロップの実行
        coordinator.drop(item.dragItem, toItemAt: destinationIndex)
    }
セルの再利用によるコンテンツの重複回避
これをしないと並び替えがされる度にコンテンツが暴走します(笑)
UITableViewと同じくUICollectionViewでもメモリ割り当てを最小限にする為にセルの再利用が行われます。
コンテンツが重複するのを防止する為にセルの生成時にsubviewsをremoveしてあげます。
この処理は並び替えが行われる度に発火します 🚀
extension ViewController: UICollectionViewDelegateFlowLayout, UICollectionViewDataSource {
    ・・・(略)・・・

    func collectionView(_ collectionView: UICollectionView, cellForItemAt indexPath: IndexPath) -> UICollectionViewCell {
        ・・・(略)・・・
        // セルの再利用によるコンテンツの重複を回避する
        for subview in cell.contentView.subviews {
            subview.removeFromSuperview()
        }
        ・・・(略)・・・
        return cell
    }
}
🏁 まとめ
今回の実装にタップジェスチャーを実装すればカメラロールからのアップロードなども簡単に実装出来ます!
是非試してみてください🐈
