Deviseを用いてメールアドレスなどでログイン機能を実装している状態で、OAuthを用いてTwitterやFacebookなどのアカウントでもログインできるようにします。
具体的な流れの例は、【Facebookでログイン/新規登録】ボタンを押すと認証が始まり、そのあと自身のサイト上でメールアドレスとパスワードを入力してユーザー登録をします。
登録以降は「【Facebookでログイン/新規登録】ボタン」でログイン、または「メールアドレスとパスワードを入力」でログインできるようになります。
詳しい説明は https://github.com/plataformatec/devise/wiki/OmniAuth:-Overview などを参考にしてください。
環境
- rails (5.1.3)
- devise (4.3.0)
- omniauth-facebook (4.0.0)
Facebookでの準備
まず、https://developers.facebook.com/quickstarts/ にアクセスして、developerに登録します。
そして、アプリIDとapp secretを控えておいてください。

Rails側
1. Gemfileに追加
gem 'omniauth-facebook'
$ bundle install --path=vendor/bundle
2. DBのスキーマ変更
Userモデル(認証の対象となるモデル)にproviderカラム(文字列)とuidカラム(文字列)を追加
bundle exec rails g migration AddOmniauthToUsers provider:string uid:string
bundle exec rake db:migrate
3. 使うプロバイダを宣言
config/initializers/devise.rbに以下を追記します。
そしてAPP_IDとAPP_SECRETに先ほどFacebookで取得したアプリIDとapp secretを入れてください。
config.omniauth :facebook,
                "APP_ID",
                "APP_SECRET",
                scope: 'email',
                info_fields: 'email,name'
4. ログイン画面上にリンクを追加
<%= link_to "Facebookでログイン", user_facebook_omniauth_authorize_path %>
この時点で、上のリンクをクリックすると、ユーザーはFacebookにリダイレクトされます。(サーバー再起動必須)
まだコールバックメソッドを実装してないので、登録はできませんが。
5. コールバックメソッドの実装
Facebook側で認証されると、再度リダイレクトしてアプリケーションのコールバックメソッドに戻るので、まずroutesを編集します。
devise_for :users, controllers: { omniauth_callbacks: "users/omniauth_callbacks" }
また、その宛先となるコントローラを作成して実装していきます。以下は実装例です。
class Users::OmniauthCallbacksController < Devise::OmniauthCallbacksController
  def facebook

    # Facebook上でメール使用を許可しているかの分岐
    if request.env['omniauth.auth'].info.email.blank?
      redirect_to '/users/auth/facebook?auth_type=rerequest&scope=email'
    end

    # User.from_omniauthはModel側で実装
    user = User.from_omniauth(request.env['omniauth.auth'])

    # すでにuserが登録済みかの判定
    if user
      # 登録済みならログイン
      sign_in_and_redirect user, event: :authentication
      set_flash_message(:notice, :success, kind: "Facebook") if is_navigational_format?
    else
      # 新規登録用にセッションに必要情報を格納
      if (data = request.env['omniauth.auth']['extra']['raw_info'])
        session['devise.omniauth_data'] = {
            email: data['email'],
            name: data['name'],
            facebook_uid: data['id']
        }
      endect_to new_user_registration_url
    end
  end

  def failure
    redirect_to root_path
  end
end
FacebookからOmniAuthで取得したすべての情報はrequest.env["omniauth.auth"]に格納されています。
6. 対応するUserモデルの実装
class User < ApplicationRecord
  # deviseに
  # :omniauthable, omniauth_providers: [:facebook]
  # を追加
  devise :database_authenticatable, :registerable,
         :recoverable, :rememberable, :trackable, :validatable, :confirmable,
         :omniauthable, omniauth_providers: [:facebook]

  # omniauthから対応するuserを取得する
  def self.from_omniauth(auth)
    # どのSNSで認証したかをproviderで判定
    if auth.provider == 'facebook'
      where(facebook_uid: auth.uid).first
    # twitterの判定も先取って記述しておきます
    elsif auth.provider == 'twitter'
      where(twitter_uid: auth.uid).first
    end
  end

  # ユーザー登録に渡すデータを設定
  def self.new_with_session(_, session)
    super.tap do |user|
      if (data = session['devise.omniauth_data'])
        user.email = data['email'] if user.email.blank?
        user.username = data['name'] if user.username.blank?
        user.facebook_uid = data['facebook_uid'] if data['facebook_uid'] && user.facebook_uid.blank?
        # twitterの判定も先取って記述しておきます
        user.twitter_uid = data['twitter_uid'] if data['twitter_uid'] && user.twitter_uid.blank?
        user.skip_confirmation!
      end
    end
  end
end
self.from_omniauthメソッドはproviderとuidを用いて既存のユーザーを検索します。
self.new_with_sessionメソッドはユーザー登録前にセッションからデータを使用する際の処理を記述します。
7. omniauth_dataの削除
class Users::SessionsController < Devise::SessionsController
  def new
    session.delete('devise.omniauth_data')
    super
  end
end
一度OAuthした後に登録画面に遷移後、キャンセルしてもセッションにデータが残ってしまっているので、削除するコードをログインコントローラに自分は追加しました。
これでFacebook側の実装は一通り終わりです。
Twitterでの準備
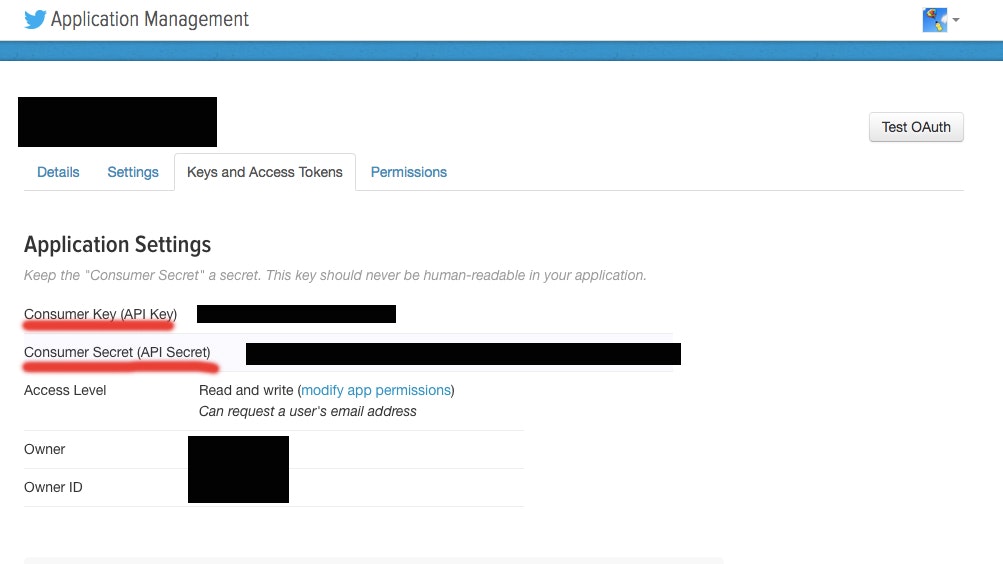
https://apps.twitter.com/にアクセスして、アプリケーションを登録し、API KeyとAPI Secretを控えておいてください。

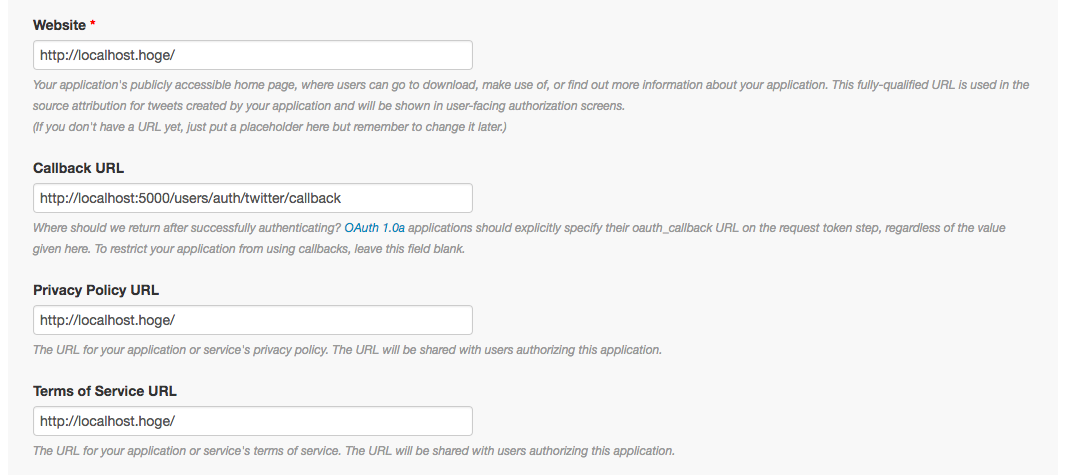
Settingsタブに移動して、各項目を設定します。
開発段階ではまだドメインなどを取得していないケースが多いと思うので、Websiteなどは仮の値を設定しておいてください。
Callback URLは認証後に戻ってくるURLなので、各自のコールバックURLを設定してください。
今回の例だと/users/auth/twitter/callbackになります。
Privacy Policy URLとTerms of Service URLはemailを取得する際に必要なので入力しておいてください。

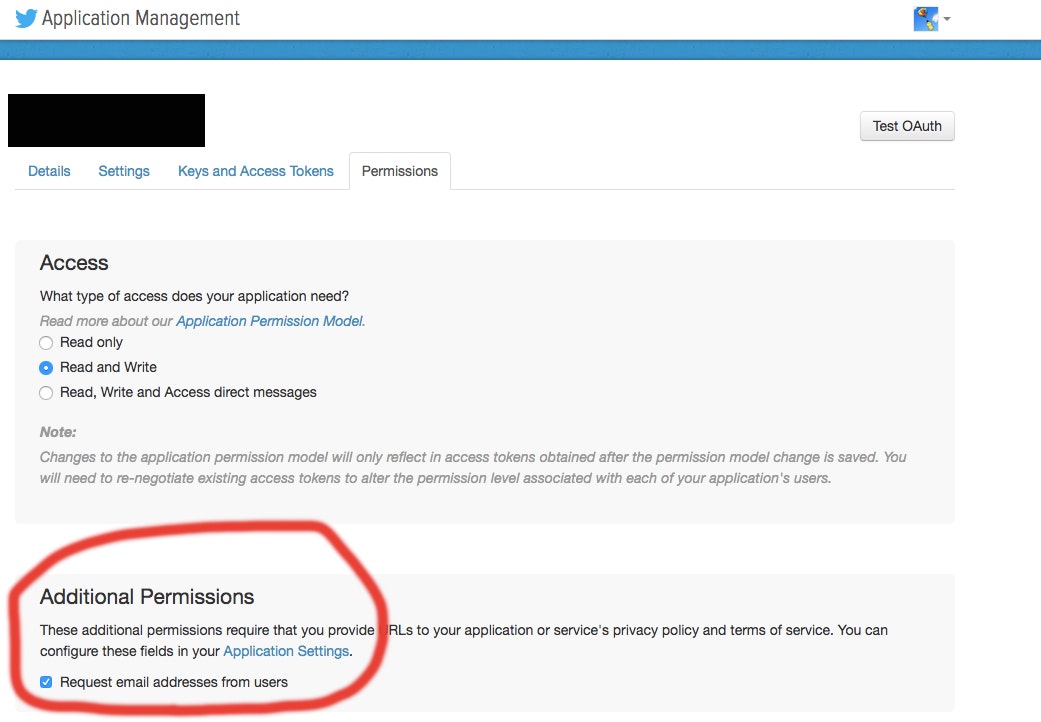
また、今回はemailを取得したいのでPermissionsタブから設定してください。

Rails側
1. Gemfileに追加
gem 'omniauth-twitter'
$ bundle install --path=vendor/bundle
3. 使うプロバイダを宣言
config.omniauth :facebook,
                ENV['FACEBOOK_APP_ID'],
                ENV['FACEBOOK_APP_SECRET'],
                scope: 'email',
                info_fields: 'email,name'

config.omniauth :twitter,
                ENV['TWITTER_APP_ID'],
                ENV['TWITTER_APP_SECRET']
4. ログイン画面上にリンクを追加
<%= link_to "Twitterでログイン", user_twitter_omniauth_authorize_path %>
5. コールバックメソッドの実装
class Users::OmniauthCallbacksController < Devise::OmniauthCallbacksController
  def twitter
    user = User.from_omniauth(request.env['omniauth.auth'])
    if user
      sign_in_and_redirect user, event: :authentication
      set_flash_message(:notice, :success, kind: "Twitter") if is_navigational_format?
    else
      if (data = request.env['omniauth.auth'])
        session['devise.omniauth_data'] = {
            email: data['info']['email'],
            name: data['info']['name'],
            twitter_uid: data['uid']
        }
      end
      redirect_to new_user_registration_url
    end
  end
end
6. 対応するUserモデルの実装
class User < ApplicationRecord
  # deviseに
  # omniauth_providers: [:facebook, :twitter]
  # を追加
  devise :database_authenticatable, :registerable,
         :recoverable, :rememberable, :trackable, :validatable, :confirmable,
         :omniauthable, omniauth_providers: [:facebook, :twitter]
  ...
end
これで、FacebookとTwitterの両方で認証ができるようになったはずです。
未確認
HTTPSでしっかりと動作するか。
参考にしたサイト等
https://github.com/plataformatec/devise/wiki/OmniAuth:-Overview
https://techracho.bpsinc.jp/hachi8833/2017_05_16/40096
https://cloudpack.media/14824
https://qiita.com/kite_999/items/e0ab8c52f918bbb02cfd