作業を開始する前に以下のことを確認してください。
- ArduinoはMacに接続されているか?
- Arduinoの電源ランプ(ONと書かれているLED)は点灯しているか?
- Processingのスケッチを実行していないか?
- なにか実行していたら停止ボタンを押して停止しておこう
スケッチの入力は、最初はとりあえずコピペで。
うまく動いたら、コピペせずに手入力してもういちど実行してみよう。
Arduino側
Processing側が起動しているとArduinoに書き込めないので、Arduino側から作業する。
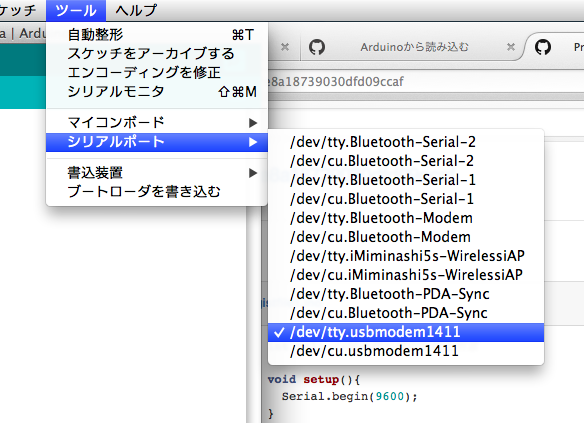
シリアルポートを選択する
/dev/tty.usbmodem1411 の部分は名前が実行するMacによって異なる
Arduinoにスケッチを書き込む
send_to_serial.ino
void setup(){
  Serial.begin(9600);
}

void loop(){
  Serial.write(100);
  delay(1000);
  Serial.write(200);
  delay(1000);
}
「検証」をクリックして「コンパイル終了」と表示されたら、「マイコンボードに書き込む」をクリックしてArduinoに書き込む。
Processing側
スケッチを準備する
シリアルポートの指定を前述の「シリアルポートを選択する」で選んだシリアルポートにあわせて書き換えるのを忘れずに。
read_from_serial.pde
// シリアルライブラリを取り入れる
import processing.serial.*;

// myPort(任意名)というインスタンスを用意
Serial myPort;

int x; //図形のX座標の変数を用意

void setup(){
  // 画面サイズ
  size(256, 256);

  // シリアルポートの設定
  // "/dev/tty.usbmodem1411" の部分を前述の「シリアルポートを選択する」で選択したシリアルポートにあわせて書き換える
  myPort = new Serial(this, "/dev/tty.usbmodem1411", 9600);
}

void draw(){
  // 背景色を白に設定
  background(255);

  // XY座標を(x,100)に設定し、
  // 幅50、高さ50の円を描画
  ellipse(x,100,50,50);
}

void serialEvent(Serial p){
  //変数xにシリアル通信で読み込んだ値を代入
  x = p.read();
  println(x);
}
スケッチを実行する
▶ ボタンを押して実行する
Processingの実行ウィンドウに表示されている円が左右に動いていれば成功
