はじめに
コードの荒野にはカウボーイといわれる人種がいます。
Code Craftではカウボーイを次のように評価しています。
カウボーイは性急にコーディングに取りかかり、目の前の問題を最小限の労力で解決することを目指します。優れた解決策かどうかは気にしません。コードの構造が崩れようとも、今後の要件にそぐわない点があろうとも、お構いなしです。
カウボーイは1つの作業を済ませて次の作業に移ることに多大な意欲を注ぎます。プロセスについて少し学んだことのあるカウボーイなら、これはアジャイルプログラミングなのだと言うことでしょう。しかし実際は単に怠けているだけです。
本記事で述べる内容は、カウボーイには嫌がられる内容です。
それはコーディングスタイルの話であり、ドキュメンテーションの話であり、テストの話です。
これらの話をEffective Pythonを元に、Pythonではどう進めるかを考えます。
なお、この記事で使用するPythonのバージョンはPython 3.7.4のWindows版になります。
コードのスタイル
Effective Pythonの項目2「PEP8 スタイルガイドに従う」があります。一貫したスタイルに従うことでコードが扱いやすく、読みやすくなり、協同作業が捗ります。
実際、どこぞの役所がPEP8に従わないサンプルコードを出したため、サンドバックになっていたことも記憶に新しいかと思います。
正直、機械的にチェックできることで、時間を使うのは無駄なので静的解析ツールでチェックできる方法を調べます。
なお、5年ほどまえ、こんな記事を書きましたが、さすがに古いです。
pep8を用いてpythonのコードのスタイルをチェックする
https://qiita.com/mima_ita/items/af2b53b3a33006db23ff
pylintでPEP8をチェックする
Effective Pythonでよく使われるといわれていたツールです。
インストール方法
pip install pylint
pylintを使用するにはWindowsの場合は以下のようにパスを通す必要があります。
set PATH=C:\Users\[ユーザ名]\AppData\Roaming\Python\Python37\Scripts;C:\Users\[ユーザ名]\AppData\Local\Programs\Python\Python37-32\Scripts;C:\Users\[ユーザ名]\AppData\Local\Programs\Python\Python37-32\;%PATH%
Jenkinsでの集計方法
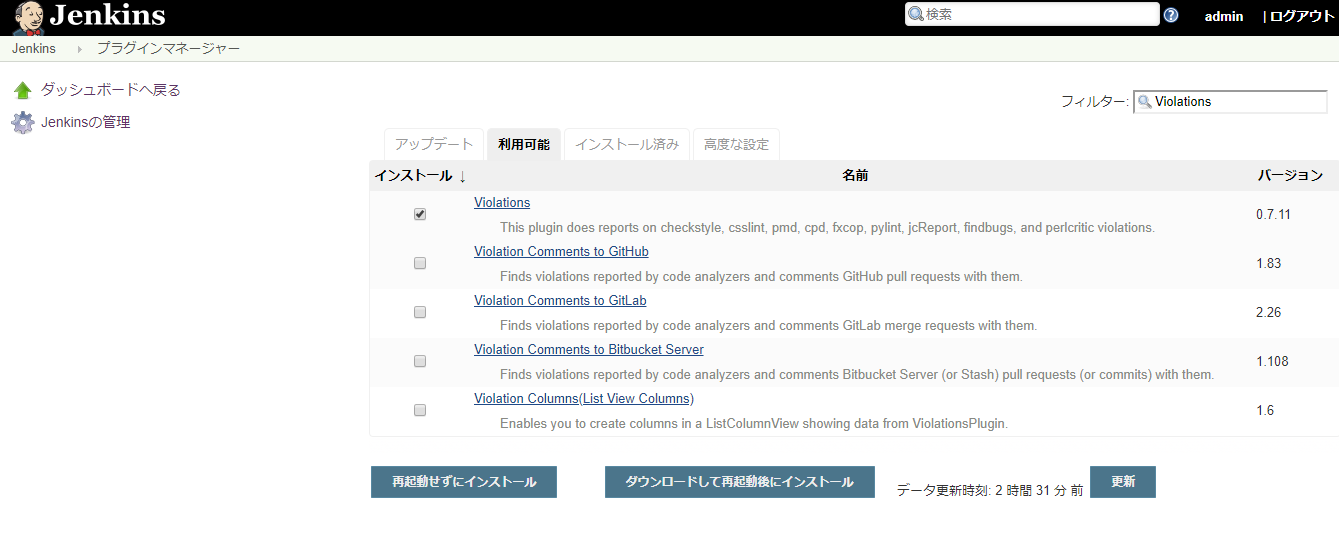
pylintの結果をJenkinsで集計するためにはViolationsプラグインを使います。
https://wiki.jenkins.io/display/JENKINS/Violations
(1)プラグインマネージャー画面でViolationsをインストールします。
(2)ジョブを追加してビルドに以下のようなスクリプトを追加する。
 del %WORKSPACE%\test.out
 for %%f in (%WORKSPACE%\*.py) do (
   pylint  -f parseable -r y  %%f  >> %WORKSPACE%\test.out
 )
 exit 0
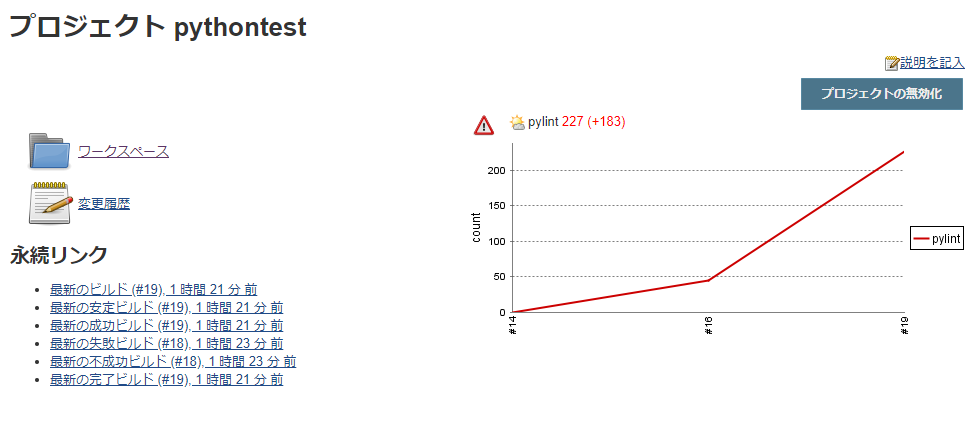
(3)ビルド後の処理に「Report Violations」を追加し、「pylint」に出力ファイルを指定します

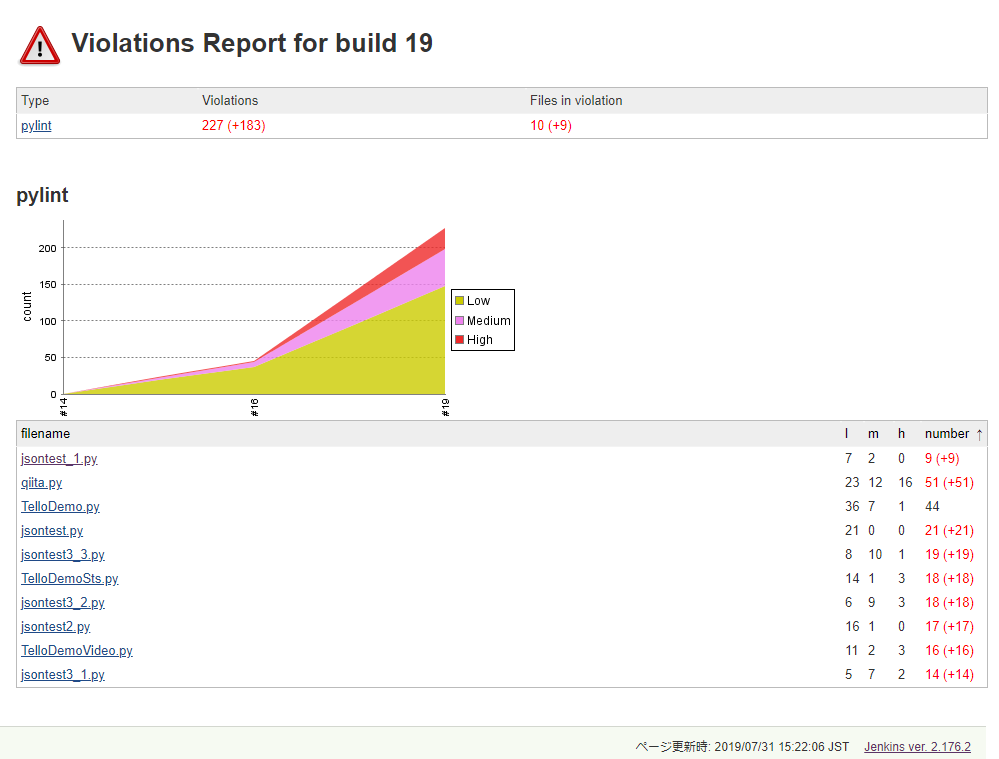
(4)ビルド後にレポートが作成されます。
flake8でPEP8を含めたエラーや複雑度をチェックする
pylintと同様によく使われる静的解析ツールにflax8があります。
flax8は下記のツールのラッパーになっています。
-
PyFlakes
- プログラムを分析して様々なエラーを検出します。
-
pycodestyle
- PEP8のコードスタイルをチェックします。
-
Ned Batchelder’s McCabe script
- 複雑度チェック
インストール方法
pip install flake8
Jenkinsでの使用方法
flake8 コマンド実行時の--formatオプションで「pylint」を指定することでpylintと同じ形式で出力できます。
flake8 --format=pylint --output-file=%WORKSPACE%\test.txt .
pylintとflake8を同時に使用する場合は、Jenkinsの「Report Violations」のpylintの項目に出力ファイルをコンマ区切りで指定することで、複数のレポートを使用できます。
参考
https://github.com/jenkinsci/violations-plugin/issues/51
pylintに対するアドバンテージ
掲示板でpylintとflake8のどちらをつかえばいいかというのが話題になっていました。
「両方つかって、矛盾する警告は好みに合わせて無効にする」という意見が支持を得ているようです。
Any advantages of Flake8 over PyLint?
https://www.reddit.com/r/Python/comments/82hgzm/any_advantages_of_flake8_over_pylint/
Banditでセキュリティの問題をチェックする
Pythonの一般的なセキュリティ問題を見つけるためのツールです。前述の掲示板でお勧めされていたツールです。
https://github.com/PyCQA/bandit
実際にエラーが発生するコードのサンプルは以下を参照してください。
https://github.com/PyCQA/bandit/tree/master/examples
インストール
pip install bandit
Jenkinsでの使用方法
(1)-fオプションを使用してJUnitのテスト結果と同じXML形式を出力します。
bandit -f xml -r . -o test.xml
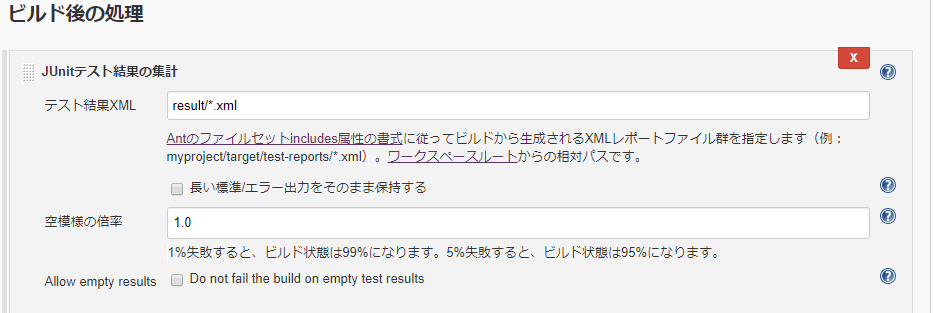
(2)JUnitテスト結果の集計で、作成したXMLを指定します。
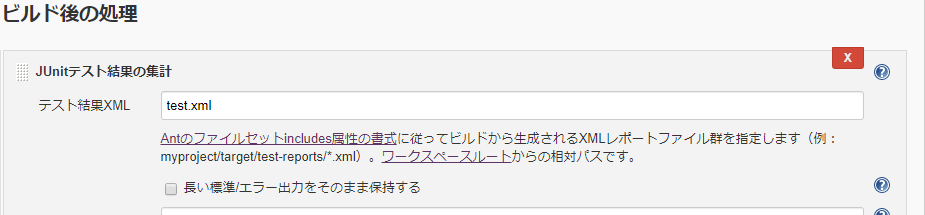
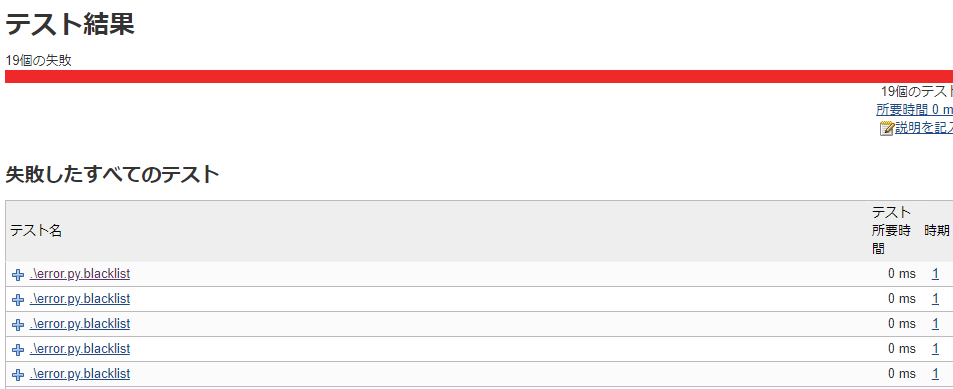
(3)banditで出力されたセキュリティの問題はJUnitのテストで失敗したものと同様に出力されます。
参考:
https://vdwaa.nl/openstack-bandit-jenkins-integration.html
ドキュメンテーション
Effective Pythonの項目49「すべての関数、クラス、モジュールについてドキュメンテーション文字列を書く」とあります。
適切なドキュメンテーションは協同作業を進めるうえで有用です。
ドキュメント文字列のガイドラインとしてはPEP257があります。
https://www.python.org/dev/peps/pep-0257/
それをベースとした上で細かい流派がいくつかあります。
Google docstrings
https://github.com/google/styleguide/blob/gh-pages/pyguide.md#38-comments-and-docstrings
NumPy/SciPy docstrings
https://numpydoc.readthedocs.io/en/latest/format.html#docstring-standard
サンプル
"""testパッケージでござる、一行目の最後はピリオドである必要があります.

複数行書く場合は最初の行の後に、空行をいれる必要があります。
なんか説明
"""

def func(arg_value1, arg_value2):
    """NumPyスタイルのドキュメント.

    Parameters
    ----------
    arg_value1 : int
        引数1の解説.
    arg_value2 : int
        引数2の解説

    Returns
    -------
    int
        戻り値の説明.

    """
    return arg_value1 + arg_value2 + 1

class MyClass:
    """クラスの説明."""

    myclass_value = 0

    def add(self, add_value):
        """Googleスタイルのコメント.

        Args:
            add_value (int): 増加分

        Returns:
            int: 増加後の値

        """
        self.myclass_value = self.myclass_value + add_value
        return self.myclass_value

    def minus(self, minus_value):
        """関数の説明2."""
        self.myclass_value = self.myclass_value + minus_value
        return self.myclass_value

    def error_func(self):
        raise ValueError

    def get_value(self):
        """xxx."""
        return self.myclass_value
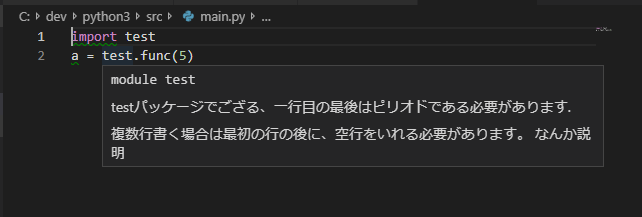
ここで記載したドキュメントは__doc__オブジェクト経由で取得できます。
 >>> test.func.__doc__
 '関数の説明.\n\n    ----------\n    arg_value1 : int\n        引数1の解説.\n    arg_value1\n        引数2の解説\n\n    Returns\n    -------\n    int\n        戻り値の説明.\n\n
VSCodeなどを使用している場合、このドキュメント文字が表示されるようになります。
以下のように、関数をマウスオーバーすることで表示されます。
ドキュメント文字列のチェック
ドキュメント文字列が適切に記載されているかチェックをする方法はいくつかあります。
pylintのプラグインを使用したチェック
pylintのプラグインであるDocstyle checkerとParameter Documentation checkerを使用することでドキュメントストリングの内容をチェックできます。
例
pylint --load-plugins=pylint.extensions.docparams,pylint.extensions.docstyle test.py
pydocstyleを用いたチェック
PEP257のガイドラインに適応しているかどうかをチェックするには「pydocstyle」を使用します。
https://pypi.org/project/pydocstyle/
また、flake8ではpydocstyleを利用したプラグインが存在するので、それを利用すると簡単にJenkinsと連携できるようになります。
インストール方法:
pip install pydocstyle=="3.0.0"
pip install flake8-docstrings
※pydocstyleは2019/8/1時点で4.0.0がリリースされていますが、それはflaske8-docstringsと整合性がないため、バージョンを落としてインストールしています。
https://gitlab.com/pycqa/flake8-docstrings/issues/36
使用例
flake8を通常どおり実行するだけでドキュメントのチェックが行われます。
C:\dev\python3\doctest>flake8 test.py
test.py:50:1: D102 Missing docstring in public method
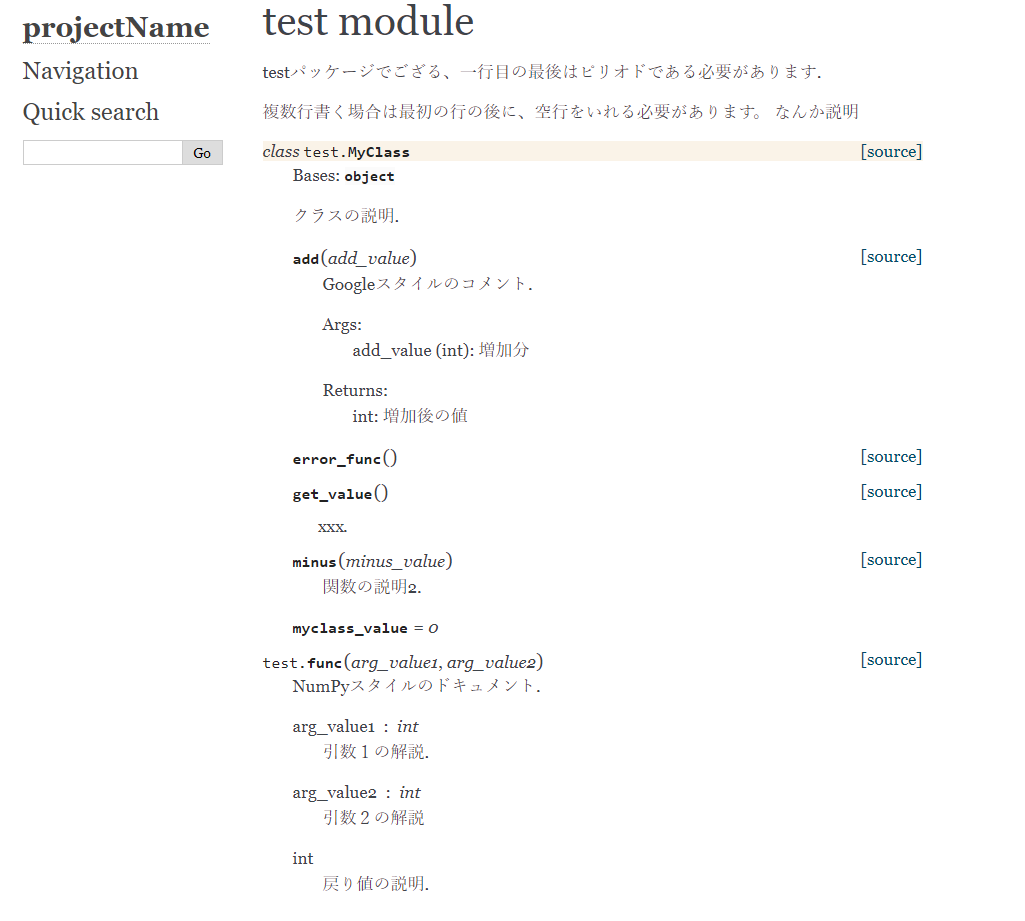
HTMLドキュメントの作成
Pythonのドキュメント文字列をもとにDoxygenのようにHTML文章を作成することが可能です。
作成にはsphinxを使用します。
https://sphinx-users.jp/
インストール方法
pip install sphinx
使用例
以下のようなファイル構成があるとします。
C:\DEV\PYTHON3\DOCTEST
    main.py
    test.py
    unittest_example.py
    unittest_example2.py
(1)sphinx-quickstartを実行してドキュメント用のフォルダを作成します。
cd doctest
sphinx-quickstart docs
sphinx-quickstartコマンドにより、対話式で質問が始まります。
「Project name」と「Author name(s)」に任意の値を入力して、あとはデフォルトとしています。
C:\dev\python3\doctest>sphinx-quickstart docs
Welcome to the Sphinx 2.1.2 quickstart utility.

Please enter values for the following settings (just press Enter to
accept a default value, if one is given in brackets).

Selected root path: docs

You have two options for placing the build directory for Sphinx output.
Either, you use a directory "_build" within the root path, or you separate
"source" and "build" directories within the root path.
> Separate source and build directories (y/n) [n]:

The project name will occur in several places in the built documentation.
> Project name: projectName
> Author name(s): author
> Project release []:

If the documents are to be written in a language other than English,
you can select a language here by its language code. Sphinx will then
translate text that it generates into that language.

For a list of supported codes, see
https://www.sphinx-doc.org/en/master/usage/configuration.html#confval-language.
> Project language [en]:

Creating file docs\conf.py.
Creating file docs\index.rst.
Creating file docs\Makefile.
Creating file docs\make.bat.

Finished: An initial directory structure has been created.

You should now populate your master file docs\index.rst and create other documentation
source files. Use the Makefile to build the docs, like so:
   make builder
where "builder" is one of the supported builders, e.g. html, latex or linkcheck.
この時点のファイルの構成は以下の通りです。
C:\DEV\PYTHON3\DOCTEST
│  main.py
│  test.py
│  unittest_example.py
│  unittest_example2.py
│
└─docs
    │  conf.py
    │  index.rst
    │  make.bat
    │  Makefile
    │
    ├─_build
    ├─_static
    └─_templates
(2)conf.pyを修正します。
docsフォルダに作成された「conf.py」を以下のように修正します。
# If extensions (or modules to document with autodoc) are in another directory,
# add these directories to sys.path here. If the directory is relative to the
# documentation root, use os.path.abspath to make it absolute, like shown here.
#
import os
import sys
sys.path.insert(0, os.path.abspath('../')) # ソースコードのある場所

# 略
# Add any Sphinx extension module names here, as strings. They can be
# extensions coming with Sphinx (named 'sphinx.ext.*') or your custom
# ones.
extensions =  ['sphinx.ext.autodoc','sphinx.ext.viewcode']
(3)sphinx-apidocコマンドを用いてrstファイルを生成します。
sphinx-apidoc -f -o ./docs .
pythonファイルに対応したrstファイルが作成されます。
この時点のファイルの構成は以下の通りです。
C:\DEV\PYTHON3\DOCTEST
│  main.py
│  test.py
│  unittest_example.py
│  unittest_example2.py
│
└─docs
    │  conf.py
    │  index.rst
    │  main.rst
    │  make.bat
    │  Makefile
    │  modules.rst
    │  test.rst
    │  unittest_example.rst
    │  unittest_example2.rst
    │
    ├─_build
    ├─_static
    └─_templates
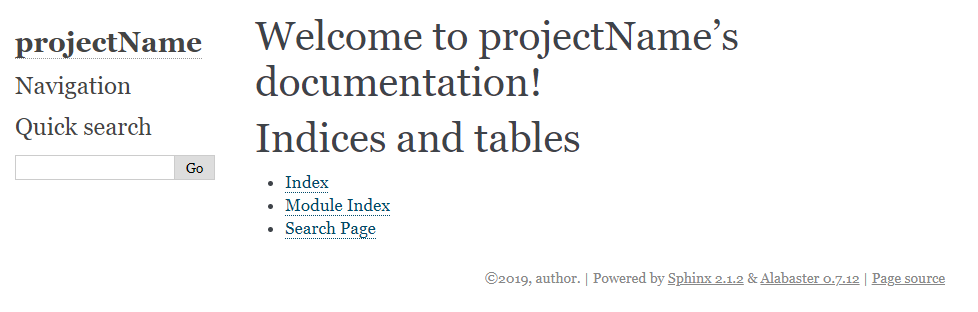
(4)「sphinx-build」コマンドを使用してHTMLドキュメントを作成します。
sphinx-build -b html ./docs ./docs/_build
これにより「docs/_build」中にHTMLドキュメントが作成されます。
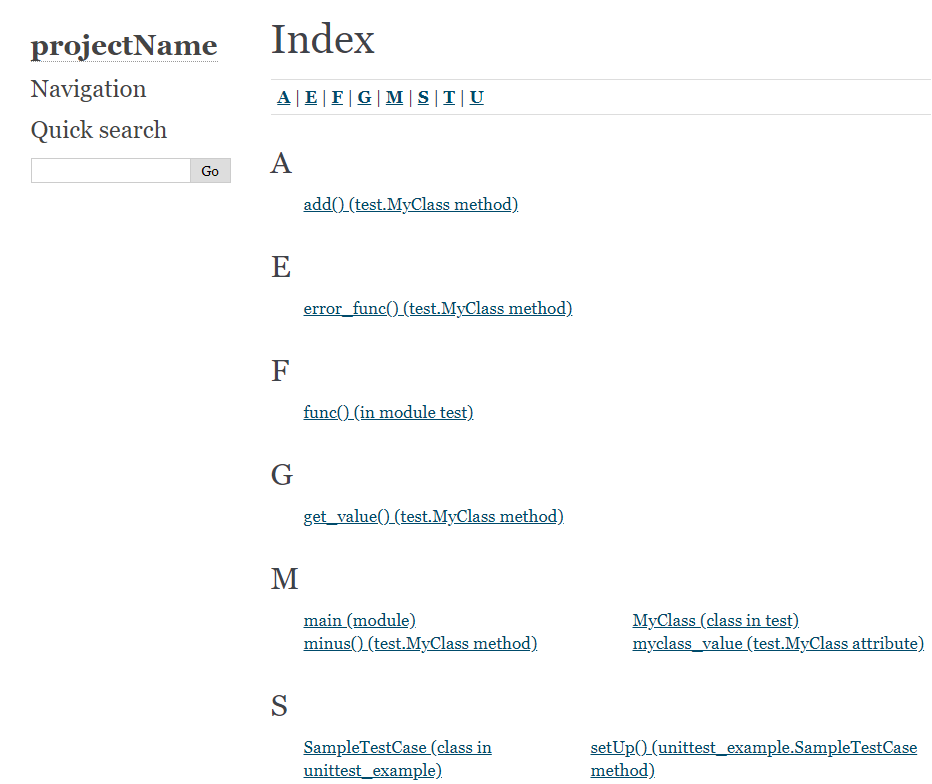
ユニットテスト
Effective Python の項目56に「unittestですべてをテストする」とあります。
ここでは次のようにかかれています。
Pythonプログラムで確信が持てる唯一の方法はテストを書くことだ
あやしげな実装を後工程に全てをぶん投げて、やり逃げダイナミックをかますビジネスモデルもあることはありますが、保安官に吊るされないためにも、ユニットテストを書いて動作確認を行うことは有効だと思います。
標準のunittest用のフレームワーク
Pythonでは標準でユニットテスト用のフレームワークが用意してあります。
https://docs.python.org/ja/3/library/unittest.html
テストケースの例
import unittest
import test


class SampleTestCase(unittest.TestCase):
    @classmethod
    def setUpClass(cls):
        # 開始時に1回呼ばれる
        print("setUpClass")

    @classmethod
    def tearDownClass(cls):
        # 終了時に1回呼ばれる
        print("tearDownClass")

    def setUp(self):
        # テスト開始毎に呼ばれる
        print("setup")

    def tearDown(self):
        # テスト毎に呼ばれる
        print("tearDown")

    def test_1(self):
        # テストが成功する例
        self.assertEqual(test.func(5, 3), 9, 'test.func(5, 3)の試験')

    def test_2(self):
        # テストが失敗する例
        self.assertEqual(test.func(5, 3), 8, 'test.func(5, 3)の試験')

    @unittest.skip("demonstrating skipping")
    def test_3(self):
        # スキップの例
        self.assertEqual(test.func(5, 3), 8, 'test.func(5, 3)の試験')

    def test_4(self):
        # 例外の発生を確認する場合で例外がでる場合
        m = test.MyClass()
        with self.assertRaises(ValueError):
            m.error_func()

    def test_5(self):
        # 例外の発生を確認する場合で例外がでない場合
        m = test.MyClass()
        with self.assertRaises(ValueError):
            m.add(1)

if __name__ == '__main__':
    unittest.main()
テスト実行例
# unittest.main()を実装していない場合
# python -m unittest unittest_example.py
#
# unittest.main()を実装している場合
# python unittest_example.py

----------------------------------------------------------------------
Ran 0 tests in 0.000s

OK

C:\dev\python3\doctest>python -m unittest unittest_example.py
setUpClass
setup
tearDown
.setup
tearDown
Fssetup
tearDown
.setup
tearDown
FtearDownClass

======================================================================
FAIL: test_2 (unittest_example.SampleTestCase)
----------------------------------------------------------------------
Traceback (most recent call last):
  File "C:\dev\python3\doctest\unittest_example.py", line 30, in test_2
    self.assertEqual(test.func(5, 3), 8, 'test.func(5, 3)の試験')
AssertionError: 9 != 8 : test.func(5, 3)の試験

======================================================================
FAIL: test_5 (unittest_example.SampleTestCase)
----------------------------------------------------------------------
Traceback (most recent call last):
  File "C:\dev\python3\doctest\unittest_example.py", line 47, in test_5
    m.add(1)
AssertionError: ValueError not raised

----------------------------------------------------------------------
Ran 5 tests in 0.007s

FAILED (failures=2, skipped=1)
モックの利用
unittest.mockを使用することでテスト対象が依存している関数をテスト用に置き換えることが可能です。
https://docs.python.org/ja/3/library/unittest.mock.html
例えばテスト対象の以下の関数が存在したとします。
import test

def test1():
    m = test.MyClass()
    m.add(10)
    return m.get_value()
MyClassの各メソッドを置き換えるためにpatchを利用します。
import unittest
import test
import main
from unittest.mock import patch

class SampleTestCase2(unittest.TestCase):
    @patch('test.MyClass.minus')     # minus_object
    @patch('test.MyClass.add')       # add_object
    @patch('test.MyClass.get_value') # get_value_object
    def test_1(self, get_value_object, add_object, minus_object):
        # 戻り値の偽装
        get_value_object.return_value = 3

        # テスト対象の関数を実行
        ret = main.test1()

        print(ret)

        # 当該関数が実行されているかの確認
        self.assertTrue(add_object.called, 'addが実行されている')

        # 当該関数が実行される場合の引数の確認。複数ある場合は(1,2,3)
        add_object.assert_called_with(10)

        # 当該関数が実行されているかの確認
        self.assertFalse(minus_object.called, 'minusが実行されていない')

        # 当該関数が実行されているかの確認
        self.assertTrue(get_value_object.called, 'get_value_objectが実行されている')

        self.assertEqual(ret, 3, 'モックテスト')
Jenkinsでの集計方法
Jenkinsで集計するためにはXMLで出力する必要があるのでxmlrunnerを利用します。
インストール方法
pip install xmlrunner
XML出力用のコード例
import unittest
import xmlrunner

test_suite = unittest.TestSuite()
all_test_cases = unittest.defaultTestLoader.discover('.','*.py')
# Loop the found test cases and add them into test suite.
for test_case in all_test_cases:
    test_suite.addTests(test_case)

test_runner = xmlrunner.XMLTestRunner(output="./result")
test_runner.run(test_suite)
参考:
https://www.dev2qa.com/python-3-unittest-html-and-xml-report-example/
Jenkinsでの使用例
(1)ビルド時のコードに以下を追加します。
rmdir /q /s result
coverage run unittest_runner.py
(2)ビルド後の処理に「JUnitテスト結果の集計」を追加します。
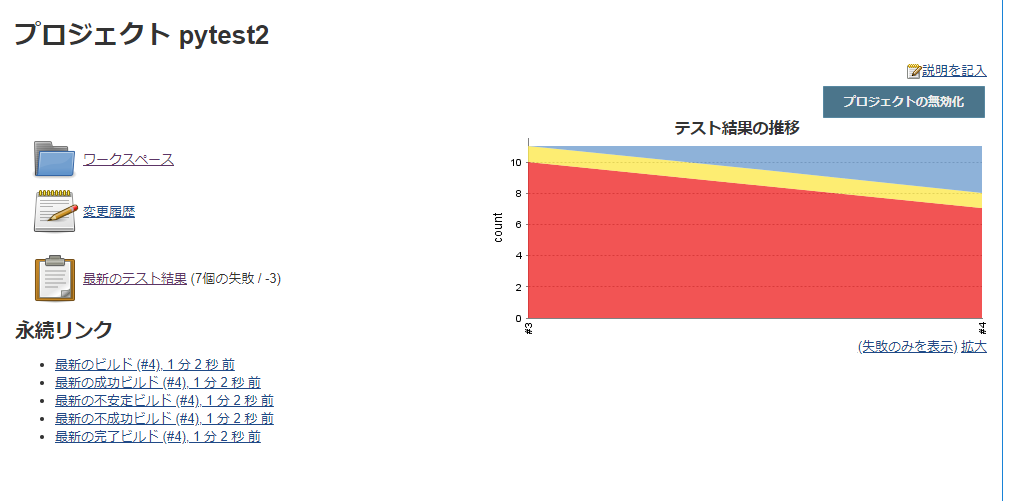
(3)ビルド後にテスト結果としてレポートされます。

カバレッジの集計
Coverage.pyを使用することでカバレッジを計測できます。
https://coverage.readthedocs.io/en/v4.5.x/index.html
インストール
pip insatll coverage
使用方法:
# コードを指定してカバレッジの集計
coverage run unittest_example.py
# カバレッジの出力
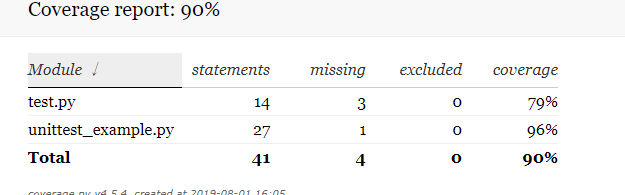
coverage report -m
Name Stmts Miss Cover Missing
---------------------------------------------------
test.py 14 3 79% 47-48, 55
unittest_example.py 27 1 96% 35
---------------------------------------------------
TOTAL 41 4 90%
# カバレッジの集計データを削除
coverage erase
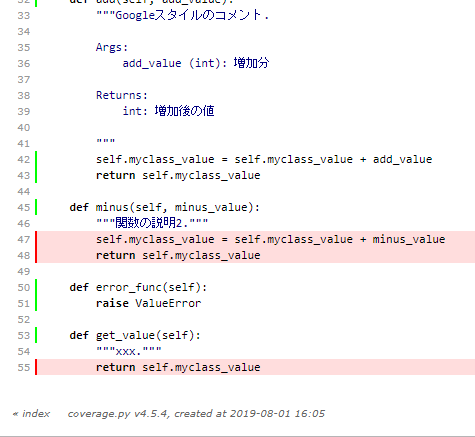
カバレッジの出力時に以下のコマンドを実行することでHTMLで出力も可能です。
coverage html
カレントディレクトリにhtmlcovフォルダが作成されてカバレッジのレポートが作成されます。
Jenkinsでの集計方法
(1)Cobertura PluginをJenkinsのプラグインマネージャでインストールします。
https://wiki.jenkins.io/display/JENKINS/Cobertura+Plugin
(2)以下のコマンドを記載することで、coverage.xmlが作成されます。
coverage erase
coverage run unittest_runner.py
coverage xml
coverage erase
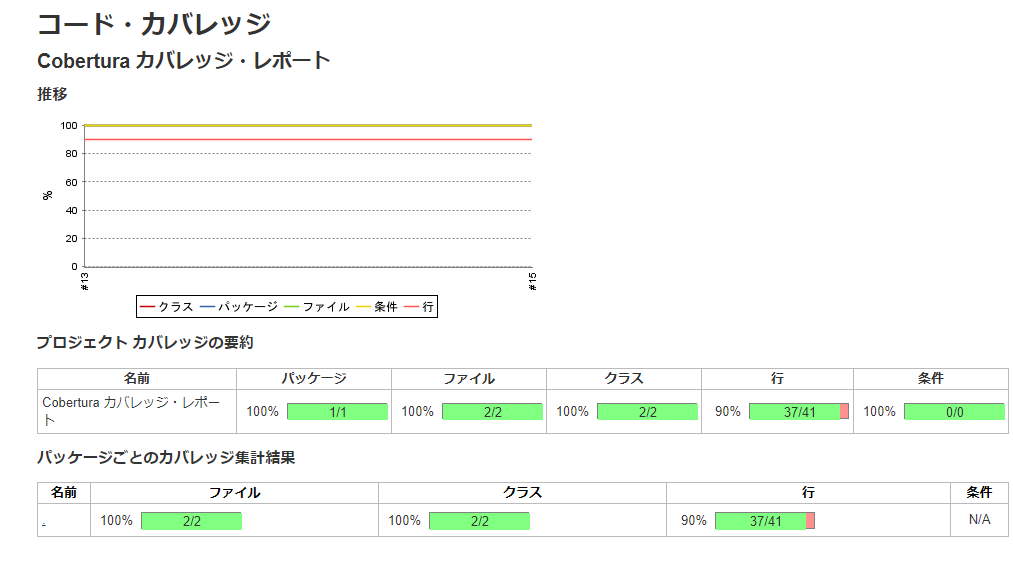
(3)ビルド後の処理として「Coberturaカバレッジレポートの集計」を追加します。
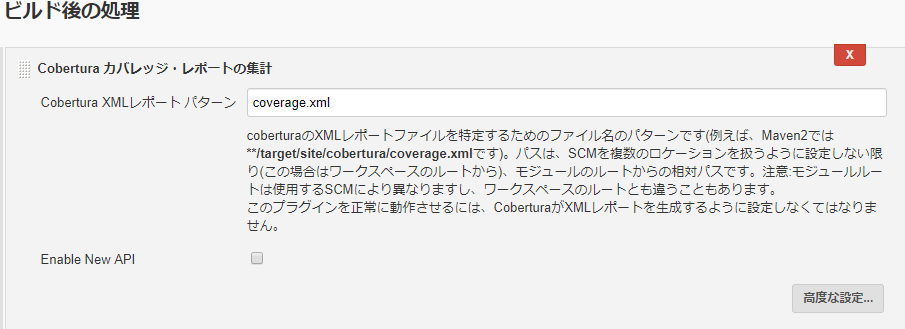
(4)ビルド後にコードカバレッジのレポートが作成されます。
まとめ
Effective Pythonを読んで気になったコードスタイル、ドキュメンテーション、テストの分野を調べてみました。
ドキュメントやテストなどの地味で退屈といわれている分野なので、コードの荒野にいるカウボーイに嫌われますが、ギャレットに射殺されないためには覚えておいて損はないと思います。