TL;DR;
タイトルのとおりなんですけど、ASP.NET Coreを使って画像を登録したり取得したり出来るサービスを作成して、そこにAndroidアプリから画像をやりとりしようってやつです。
なお、この記事は以前個人ブログで書いた記事に修正加筆を行ったものです
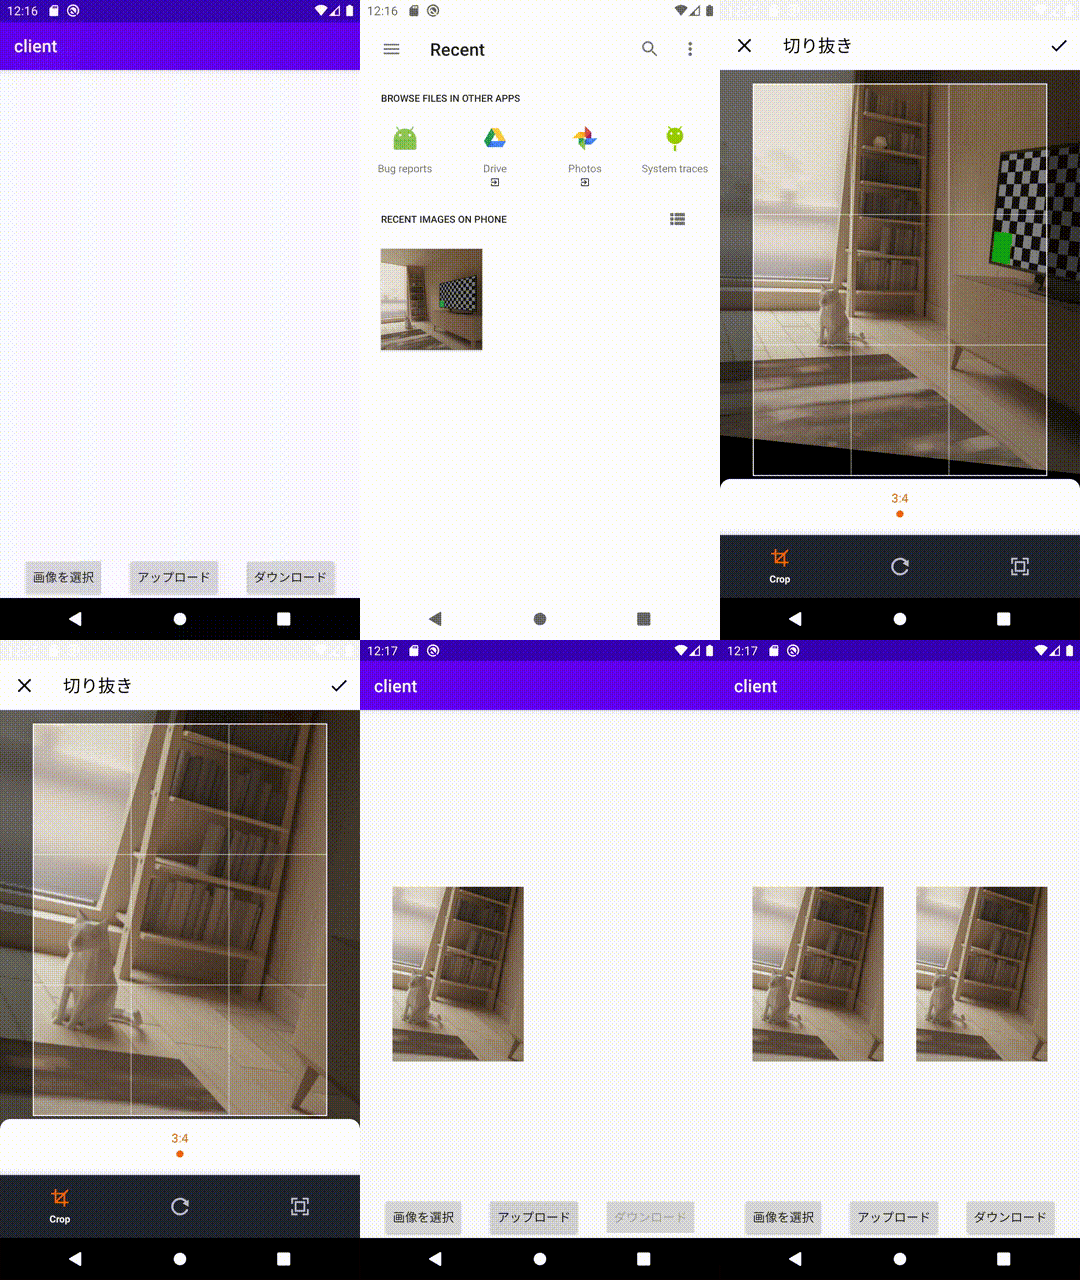
動作の様子
この記事のまま作るとこんな感じの動作をします。
とはいってもアップロード/ダウンロードの流れが直に見えてるわけではないのナンノコッチャって感じですが。

環境
環境はざっくり以下のとおりです。その他にもサーバ側やらクライアント側で個別に使ってるライブラリは提示します。
- Ubuntu 20.04
- .NET Core 3.1
- MySQL 8.0
- Android Studio 3.6.2
- Kotlin 1.3.71
- Android 8
要件
DB構造
今回は、画像のID(meida_id)と保存パス(media_path)をDBに保存することにします。それ以外の項目、例えば画像投稿者(media_author)だったりとかはユースケースに合わせて適宜追加してもらえばいいかと。
それ以外に、画像IDは重複してほしくないので(今回は特になにも考えずに)PRIMARY KEY制約にしてしまいますし、自分で裁判するのは面倒なのでそれもSQL側に任せてしまいます(AUTO INCREMENT)。型も当然のことユースケースに合わせて適宜登録すればいいと思う。今回のはあくまで一例として。
てことで必要なクエリは以下。
CREATE TABLE media(
        media_id BIGINT UNSIGNED AUTO_INCREMENT PRIMARY KEY,
        media_path CHAR(64) NOT NULL);
画像のアップロード
画像アップロードにはHTTP/POSTを利用します。その際、各種データはリクエストボディに含めることにします。扱うデータは最低限画像データ(media_data)を埋め込むことにしましょう。今回はBASE64エンコードするのが面倒なのでそのまま埋め込みますし、multi-partにするのも面倒なので対応しません。その他、例えば様々なメディアタイプ(type)を扱えるようにしたい場合にはそれもアップロードしましょう(そうでなくとも、もととなったファイル名をアップロードする方法も良いと思います。)
あと、アップロード側でJSONを作成するのはめんどくさいので、今回はKey-Value形式で埋め込みます。(もちろんここも自由です。)
また、レスポンスとして画像ID(media_id)を返してあげないと画像の取得に利用できないのでそれも忘れないようにしましょう。
ということでこれから作成するコントローラにデータを投稿するときの形は次の形式になります。
curl -X POST --url "<FQDN>/media" --data "media_data=123456789ABCDEF........" --data "type=png"
画像のダウンロード
画像のダウンロードにはHTTP/GETを利用します。どの画像を取得するかどうかは、クエリパラメータでmedia_idを指定すれば十分でしょう。
ということで、これから作成するコントローラからデータを取得する際の形式は次の形式になります。
curl -X GET --url "<FQDN>/media?media_id=$media_id"
サーバ側(ASP.NET)
サーバ側のプロジェクトはwebapiテンプレートを利用して作成してください。
それと、依存関係の解決のためにNuGetパッケージを追加する必要があります。
dotnet add package System.Imaging.Common
dotnet add package Mysql.Data
コントローラの作成
で、今回はImageController.csなるものを実装していきます。
using System;
using System.Collections.Generic;
using System.IO;
using System.Linq;
using System.Threading.Tasks;
using Microsoft.AspNetCore.Mvc;
using Microsoft.Extensions.Logging;
using MySql.Data.MySqlClient;


namespace webapi.Controllers{
[ApiController]
[Route("[controller]")]
public class MediaController : ControllerBase{
[HttpPost]
public async Task<IActionResult> Post(){
  // リクエストボディを文字列として読み込む
  // このときはまだ{key}={value}
  string body;
  using (var reader = new StreamReader(HttpContext.Request.Body)){
    body = await reader.ReadToEndAsync();
  }

  // 受け取ったリクエストボディをパースするよ
  // {key}={value}が望ましいけど{key}={空っぽ}とか{key}={base64}とかも対処するよ
  var queryPair = body.Split("&");
  var query = new List<KeyValuePair<string, string>>();
  foreach (var q in queryPair){
    var tmp = q.Split("=", 2);
    if (tmp.Count() == 2){
      query.Add(new KeyValuePair<string, string>(tmp[0], tmp[1]));
    }
  }


  var receivedData = query.Where(x => x.Key == "data");
  String data;
  if (receivedData.Count() == 1){
    data = receivedData.First().Value;
  }else{
    return BadRequest(new { reason = "nothing or multiple data is provided." });
  }

  var receivedType = query.Where(x => x.Key == "type");
  String type;
  if (receivedType.Count() == 1){
    type = receivedType.First().Value;
  }else{
    return BadRequest(new { reason = "nothing or multiple media type is provided" });
  }

  // 拡張子を設定するよ〜〜〜〜
  System.Drawing.Imaging.ImageFormat format;
  switch (type.ToLower()){
    case "png":
      format = System.Drawing.Imaging.ImageFormat.Png;
      break;
    case "jpg":
    case "jpeg":
      format = System.Drawing.Imaging.ImageFormat.Jpeg;
      break;
    case "gif":
      format = System.Drawing.Imaging.ImageFormat.Gif;
      break;
    default:
      return BadRequest(new { reason = "unsupported media type" });
  }

  // {xxxxxxxx-xxxx-xxxx-xxxx-xxxxxxxxxxxx}.{拡張子}
  var filename = $"{Guid.NewGuid().ToString("D")}.{format.ToString().ToLower()}";


  // 文字列として受け取った画像ファイルをbyte列に変換
  var byteData = new List<byte>();
  for (var i = 0; i < data.Length; i += 2){
     byteData.Add(Convert.ToByte(data.Substring(i, 2), 16));
  }

  // GUIDの衝突がめちゃくちゃ稀に、ほんと稀に存在するかもしれないくらいのアレなので念の為削除
  if (System.IO.File.Exists($"media/{filename}")){
    System.IO.File.Delete($"media/{filename}");
  }

  // 保存
  using (var image = System.Drawing.Image.FromStream(new MemoryStream(byteData.ToArray()))){
    image.Save($"media/{filename}", format);
  }

  ulong mediaId = 0;
  using (var connection = new MySqlConnection("server=<MySQLのホスト。localhostとか>;userid=<MySQLに接続するユーザ>;password=<MySQLのパスワード>;database=<使用するデータベース>;")){
    {
    // ファイルを登録するよ
      var cmd = new MySqlCommand($"insert into media(media_path) values ('{filename}')", connection);
      cmd.Connection.Open();
      cmd.ExecuteNonQuery();
      cmd.Connection.Close();
    }

    {
      // 昇順で自動採番されるのでもう一度接続して最大値を取り出すよ
      var cmd = new MySqlCommand($"select max(media_id) as max from media", connection);
      cmd.Connection.Open();

      var reader = cmd.ExecuteReader();
      while (reader.Read()){
        mediaId = ulong.Parse(reader["max"].ToString());
      }

      cmd.Connection.Close();
    }
  }

  return Ok(new { media_id = mediaId });
}


[HttpGet]
public ActionResult Get(){
  var media_id = long.Parse(HttpContext.Request.Query["media_id"].ToString());
  var media_path = "";

  using (var connection = new MySqlConnection("server=<MySQLのホスト。localhostとか>;userid=<MySQLに接続するユーザ>;password=<MySQLのパスワード>;database=<使用するデータベース>;")){
    var cmd = new MySqlCommand($"select media_path from media where media_id = {media_id}", connection);
    cmd.Connection.Open();
    var reader = cmd.ExecuteReader();

    // クエリに引っかかったかどうか
    if (!reader.HasRows){
      return NotFound(new { reason = "specified media id does not exist" });
    }

    // クエリ結果読み出し
    // media_idはユニークなので実質1ループになるはず
    while (reader.Read()){
      media_path = reader["media_path"].ToString();
    }

    cmd.Connection.Close();
  }

  var file = new BinaryReader(new StreamReader($"media/{media_path}").BaseStream);
  var stream = new MemoryStream(file.ReadBytes((int)file.BaseStream.Length));

  return File(stream, $"image/{Path.GetExtension(media_path).Trim('.')}");
}
}
}
説明しようと思ったけどソース内コメントでわかりそうなので省いていいですか?
プロジェクトの設定
ASP.NET CoreでWebコントローラを作成した場合、デフォルトだとたしかlocalhostからしか受け付けなかった記憶があります。今回はAndroidから接続したいのでプロジェクトの設定をいじってその制約を剥がす必要があります。
なお、エミュレータを使用する場合には10.0.2.2がエミュレータを動かしている物理マシンのlocalhost(127.0.0.1)へのループバックなので、それを用いる際にはこの設定は不要となります。
プロジェクトルートにhosting.jsonというファイルを作成し、以下を参考にして内容を記述してください。そのままコピペすると文法エラーで死にます(((
{
  "server.urls":"http://0.0.0.0:5000"  // 待受アドレス:待受ポート。今回はすべてのホストからポート5001で待ち受ける
}
そしたら、Program.csをいじります。というかMain()をいじります。
public static void Main(string[] args){
  var config = new ConfigurationBuilder()
        .SetBasePath(Directory.GetCurrentDirectory())
        .AddJsonFile("hosting.json", optional: true)
        .Build();

  var host = new WebHostBuilder()
        .UseKestrel()
        .UseConfiguration(config)
        .UseContentRoot(Directory.GetCurrentDirectory())
        .UseIISIntegration()
        .UseStartup<Startup>()
        .Build();

  host.Run();
}
起動
mkdir media // アップロードされた画像を保存するディレクトリ
dotnet run  (サーバ証明書がないとランタイムエラーになると思う)
もしくは
dotnet build && ./bin/Debug/netcore3.1/webapi
クライアント側(Kotlin)
続いてクライアントとなるAndroidアプリを作成していきます。
HttpアクセスにはFuelというライブラリを使用します。また、今回は詳しくは説明しませんが、せっかくなので画像のトリミングにUCropというライブラリを使用したいと思います。あと、画像を表示するためにGlideというライブラリも使用します。
いちからやってたらめんどくさいのでプロジェクト作成とかはすでに済んでいるものとして進めていきます。
build.gradle(project)
プロジェクトに対するbuild.gradleは以下のとこだけ変更した。UCropのリポジトリを登録しただけです。
allprojects {
    repositories {
        google()
        jcenter()

        maven { url "https://jitpack.io" }
    }
}
build.gradle(app)
appレベルのbuild.gradleはこんな感じになりました。さっき挙げたライブラリを使うための依存解決の他に、Coroutineっていうスレッド周りのライブラリを入れてます。
dependencies {
    implementation fileTree(dir: 'libs', include: ['*.jar'])
    implementation "org.jetbrains.kotlin:kotlin-stdlib-jdk7:$kotlin_version"
    implementation "org.jetbrains.kotlin:kotlin-reflect:$kotlin_version"
    implementation 'androidx.appcompat:appcompat:1.3.0'
    implementation 'androidx.core:core-ktx:1.5.0'
    implementation "androidx.activity:activity:1.3.0-alpha08"
    implementation "com.squareup.moshi:moshi-kotlin:1.5.0"
    implementation 'com.github.yalantis:ucrop:2.2.6-native'
    implementation 'com.github.kittinunf.fuel:fuel:2.2.0'
    implementation 'com.github.kittinunf.fuel:fuel-gson:2.2.0'
    implementation 'androidx.constraintlayout:constraintlayout:2.0.4'
    implementation 'com.github.bumptech.glide:glide:4.4.0'
    implementation 'org.jetbrains.kotlinx:kotlinx-coroutines-android:1.4.3'
}
レイアウト
ボタン3つと画像表示領域が2個のシンプルな作りです。
<?xml version="1.0" encoding="utf-8"?>
<androidx.constraintlayout.widget.ConstraintLayout xmlns:android="http://schemas.android.com/apk/res/android"
    android:layout_width="match_parent"
    android:layout_height="match_parent"
    xmlns:app="http://schemas.android.com/apk/res-auto">
    <Button
        app:layout_constraintBottom_toBottomOf="parent"
        app:layout_constraintStart_toStartOf="parent"
        app:layout_constraintEnd_toStartOf="@id/upload"
        android:id="@+id/select"
        android:layout_width="wrap_content"
        android:layout_height="wrap_content"
        android:text="画像を選択"/>
    <Button
        android:id="@+id/upload"
        android:layout_width="wrap_content"
        android:layout_height="wrap_content"
        android:text="アップロード"
        app:layout_constraintBottom_toBottomOf="parent"
        app:layout_constraintStart_toEndOf="@id/select"
        app:layout_constraintEnd_toStartOf="@id/download"/>
    <Button
        android:id="@+id/download"
        android:layout_width="wrap_content"
        android:layout_height="wrap_content"
        android:text="ダウンロード"
        app:layout_constraintBottom_toBottomOf="parent"
        app:layout_constraintStart_toEndOf="@id/upload"
        app:layout_constraintEnd_toEndOf="parent"/>
    <ImageView
        android:id="@+id/selected_image"
        android:layout_width="0dp"
        android:layout_height="200dp"
        app:layout_constraintTop_toTopOf="parent"
        app:layout_constraintBottom_toBottomOf="parent"
        app:layout_constraintStart_toStartOf="parent"
        app:layout_constraintEnd_toStartOf="@id/uploaded_image"
        app:layout_constraintDimensionRatio="w,3:4"/>
    <ImageView
        android:id="@+id/uploaded_image"
        android:layout_width="0dp"
        android:layout_height="200dp"
        app:layout_constraintTop_toTopOf="parent"
        app:layout_constraintBottom_toBottomOf="parent"
        app:layout_constraintStart_toEndOf="@id/selected_image"
        app:layout_constraintEnd_toEndOf="parent"
        app:layout_constraintDimensionRatio="w,3:4"/>
</androidx.constraintlayout.widget.ConstraintLayout>
ソース
package com.milkcocoa.info.client

import android.app.Activity
import android.content.Intent
import android.graphics.Bitmap
import android.net.Uri
import android.os.Bundle
import android.util.Log
import android.widget.Button
import androidx.activity.result.contract.ActivityResultContracts
import androidx.appcompat.app.AppCompatActivity
import com.bumptech.glide.Glide
import com.github.kittinunf.fuel.gson.responseObject
import com.github.kittinunf.fuel.httpPost
import com.yalantis.ucrop.UCrop
import com.yalantis.ucrop.model.AspectRatio
import kotlinx.coroutines.CoroutineScope
import kotlinx.coroutines.Dispatchers
import kotlinx.coroutines.launch
import java.io.BufferedInputStream
import java.io.File
import java.util.*

class ActivityMain: AppCompatActivity() {
    var selectedImageUri: Uri? = null
    var cropImageUri: Uri? = null
    lateinit var select: Button
    lateinit var upload: Button
    lateinit var download: Button

    data class Media(val media_id: ULong)
    var media: Media? = null

    override fun onCreate(savedInstanceState: Bundle?) {
        super.onCreate(savedInstanceState)
        setContentView(R.layout.activity_main)

        // ファイル選択用のやつ
        // startActivityForResultとonActivityResultはdeprecatedなのでこちらを使いましょう。
        val chooser = registerForActivityResult(ActivityResultContracts.GetContent()) { uri ->
            if (uri == null) {
                return@registerForActivityResult
            }
            selectedImageUri = uri
            val tmpFileName = UUID.randomUUID().toString() + ".png"
            File.createTempFile(tmpFileName, null, cacheDir)
            val tmpFileUri = Uri.fromFile(File(cacheDir, tmpFileName))

            // UCropの設定をします。詳しくはリファレンスを見てくれ
            var options = com.yalantis.ucrop.UCrop.Options()
            options.setToolbarTitle("切り抜き")
            options.setCompressionFormat(Bitmap.CompressFormat.PNG)
            options.setAspectRatioOptions(0, AspectRatio("3:4", 3.0f, 4.0f));
            options.setCompressionQuality(70)
            var uCrop = UCrop.of(selectedImageUri!!, tmpFileUri)
            uCrop.withOptions(options)
            uCrop.start(this)

        }

        // 画像選択ボタン
        select = findViewById<Button>(R.id.select).also {
            it.setOnClickListener {
                upload.isEnabled = false
                download.isEnabled = false
                chooser.launch("image/*")
            }
        }

        // 画像アップロードボタン
        upload = findViewById<Button>(R.id.upload).also {
            it.setOnClickListener {
                val stream =
                    BufferedInputStream(
                        applicationContext.getContentResolver().openInputStream(cropImageUri!!)
                    )

                val size = stream.available()
                val data = ByteArray(size)
                val builder = StringBuilder()


                // 画像データをHexデコード
                stream.read(data)
                for (byte in data) {
                    builder.append("%02X".format(byte))
                }

                // Androidの規格上、メインスレッドで通信できないのでIOスレッドに逃がす
                CoroutineScope(Dispatchers.IO).launch{
                    "http://10.0.2.2:5001/media"
                        .httpPost(listOf("data" to builder.toString(), "type" to "png")) // データとタイプをセット
                        .responseObject<Media> { _, _, result ->
                            val (media, err) = result
                            this@ActivityMain.media = media
                            CoroutineScope(Dispatchers.Main).launch {
                                download.isEnabled = true
                            }
                        }
                }
            }
        }

        // 画像ダウンロードボタン
        download = findViewById<Button>(R.id.download).also {
            it.setOnClickListener {
                Glide.with(this)
                    .load("http://10.0.2.2:5001/media?media_id=${media?.media_id}")
                    .into(findViewById(R.id.uploaded_image))
            }
        }
    }


    override fun onActivityResult(requestCode: Int, resultCode: Int, data: Intent?) {
        // UCropでの切り抜き結果に対する処理
        if ((requestCode and 0xff) == UCrop.REQUEST_CROP) {
            if (resultCode == Activity.RESULT_OK) {
                data?.let {
                    cropImageUri = UCrop.getOutput(it)
                    Glide.with(this).load(UCrop.getOutput(it))
                        .into(findViewById(R.id.selected_image))
                    upload.isEnabled = true
                }
            } else if (resultCode == UCrop.RESULT_ERROR) {
                Log.e("TAG", "uCropエラー: " + UCrop.getError(data!!).toString())
            }
        }
        super.onActivityResult(requestCode, resultCode, data)
    }
}
AndroidManifest
これと言って特別なことはしていませんが、INTERNETのパーミッションを忘れずに指定することと、UCropはそれ用のActivityが起動するのでそれを登録するのを忘れないようにしましょうって感じですかね
<manifest xmlns:android="http://schemas.android.com/apk/res/android"
    package="com.milkcocoa.info.client">

    <uses-permission android:name="android.permission.INTERNET" />

    <application
        android:networkSecurityConfig="@xml/network_security_config"
        android:allowBackup="true"
        android:icon="@mipmap/ic_launcher"
        android:label="@string/app_name"
        android:roundIcon="@mipmap/ic_launcher_round"
        android:supportsRtl="true"
        android:theme="@style/AppTheme" >
        <activity android:name=".ActivityMain">
            <intent-filter>
                <action android:name="android.intent.action.MAIN" />

                <category android:name="android.intent.category.LAUNCHER" />
            </intent-filter>
        </activity>

        <activity
            android:name="com.yalantis.ucrop.UCropActivity"
            android:screenOrientation="portrait"
            android:theme="@style/Theme.AppCompat.Light.NoActionBar" />
    </application>
</manifest>
インターネット設定
どのバージョンからか忘れたんですけど、非SSLでHTTPアクセスする場合には許可用のxmlを用意してあげないといけません。これはエミュレータでローカルホストに繋ごうと実機から繋ごうと同じことです。
このxmlを上のAndroidManifest.xmlの7行目で指定してます。
<?xml version="1.0" encoding="utf-8"?>
<network-security-config xmlns:android="http://schemas.android.com/apk/res/android">
    <domain-config cleartextTrafficPermitted="true">
        <domain includeSubdomains="true">10.0.2.2</domain>
    </domain-config>
</network-security-config>
最後に
一気に書き上げて疲れたのでソース内のコメントはまた今度気が向いたときでいいですか??
一応プロジェクトはGitHubにあげときました。