WebのReactアプリケーションにもAmplitudeを導入してみます。Expo/React Native版の記事はこちら。
まずはJavaScript SDKをインストールし、
$ npm install --save amplitude-js
getInstanceメソッドでAmplitudeClientのインスタンスが取得でき、これを通してAmplitudeにイベントやユーザー情報などを送信します。
getInstanceメソッドに識別名を渡すことで複数のプロジェクトに向けたインスタンスを作成することもできるようです。詳しくはこちら
import amplitude from 'amplitude-js/amplitude';

// APIキーを渡してinitialize
amplitude.getInstance().init('API_KEY');

// カスタムユーザーIDをセット
amplitude.getInstance().setUserId('USER_ID');

// ユーザープロパティをセット
const identify = new amplitude.Identify()
  .set('gender', 'female')
  .set('age', 90)
  .set('friends', 123)
  .set('interests', 'sports');
amplitude.getInstance().identify(identify);

// ユーザープロパティの数値を増加
amplitude.getInstance().identify(
  new amplitude.Identify().add('friends', 1)
);

// ユーザープロパティの配列に追加
amplitude.getInstance().identify(
  new amplitude.Identify().append('interests', ['art', 'music'])
);

// ユーザープロパティの配列の先頭に追加
amplitude.getInstance().identify(
  new amplitude.Identify().prepend('interests', ['dance'])
);

// ユーザーのグループをセット
amplitude.getInstance().setGroup('organizationId', '123');
amplitude.getInstance().setGroup('sport', ['soccer', 'tennis']);

// イベント送信
amplitude.getInstance().logEvent('Init');

// プロパティを渡してイベント送信
amplitude.getInstance().logEvent('Send', { title: 'test title', message: 'test message' });
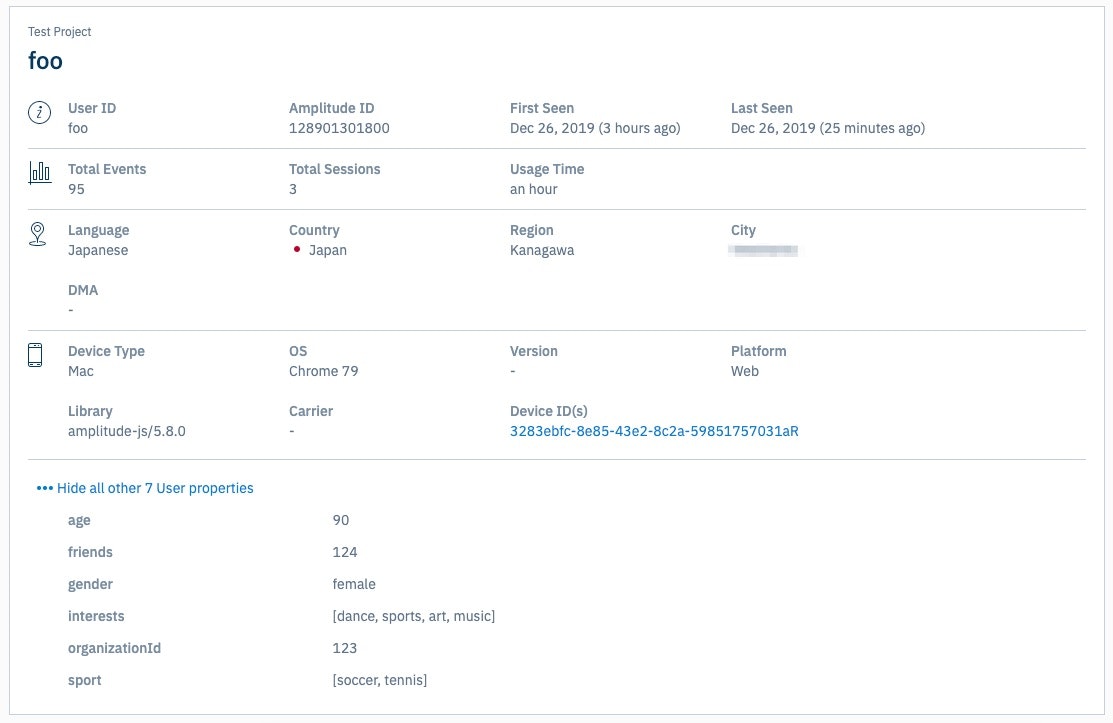
Device IDはAmplitudeClientが自動的にブラウザごとに生成しているようです。
特に難しいことはなく、このようにユーザー情報やイベントを送信することができます。
getInstanceメソッドを毎回呼んでいるのは公式のドキュメントにしたがっています。
シングルトンとして考えてしまって、下記のようにして使ってもいい気もしますが、
amplitude.js
import amplitude from "amplitude-js/amplitude";

const amplitudeClient = amplitude.getInstance();
amplitudeClient.init('API_KEY');

export default amplitudeClient;
ユーザープロパティの設定などに使うamplitude.Identify等もインポートしないといけないので、
薄いラッパーを作るよりは少々冗長ですが公式にしたがって毎回getInstanceするので問題ないかと思います。
このようなラッパーにしている例もありました。
https://stackoverflow.com/a/49528229
Reactでクリックした時にイベントを送信する処理をつける場合、このようにコンポーネント化しておくと良さそうです。
例えば外部リンクの場合、遷移する前にイベント送信が完了していなければいけないので、logEventメソッドにコールバック関数を渡してイベント送信が完了した後にページを遷移させるようにします。
Link.js
import React from 'react';
import amplitude from "amplitude-js/amplitude";
import * as PropTypes from 'prop-types';

const REL_BASE_VALUES = ['noopener', 'noreferrer'];

const Link = (props) => {
  const newProps = {...props};
  const external = props.external || (/http/).test(props.href); // 外部サイトかどうか判定('http'があるかどうかでも簡易的に判断。)
  const eventType = props.eventType;
  const onClick = props.onClick;
  delete newProps.external;
  delete newProps.eventType;
  delete newProps.eventProperties;
  if (eventType) { // eventTypeが指定されていたらAmplitudeにイベントを送信
    // 外部サイトかつ同タブの場合イベント送信のコールバックで遷移
    const callback = external && props.target !== '_blank' ? () => {
      window.location.href = props.href;
    } : null;
    newProps.onClick = (e) => {
      if (callback) { // 上記のコールバックがある場合はデフォルトのページ遷移をキャンセル
        e.preventDefault();
      }
      amplitude.getInstance().logEvent(eventType, props.eventProperties, callback);
      if (typeof onClick === 'function') { // onClickも渡せるようにしておく
        onClick(e);
      }
    };
  }
  // Amplitudeとは関係ないけど、target="_blank"ならrel="noopener noreferrer"を追加しておく処理
  if (props.target === '_blank') {
    if (props.rel) {
      const relArray = props.rel.split(' ');
      REL_BASE_VALUES.forEach((relValue) => {
        if (relArray.indexOf(relValue) === -1) {
          relArray.push(relValue);
        }
      });
      newProps.rel = relArray.join(' ');
    } else {
      newProps.rel = REL_BASE_VALUES.join(' ');
    }
  }
  return React.createElement('a', newProps);
};


// propsの定義

Link.defaultProps = {
  external: false,
  eventType: null,
  eventProperties: null,
  rel: null,
  target: null,
  onClick: null
};

Link.propTypes = {
  external: PropTypes.bool, // 外部サイトかどうか(hrefを見ることでも簡易的に判断)
  eventType: PropTypes.string, // イベント名
  eventProperties: PropTypes.object, // イベントに渡すプロパティ
  rel: PropTypes.string, // aタグのrel属性
  target: PropTypes.string, // aタグのtarget属性
  onClick: PropTypes.func // クリック時のリスナー関数
};

export default Link;
<Link href="https://google.com" eventType="CLICK_GOOGLE_LINK">GOOGLE</Link>
<Link
  href="https://google.com"
  target="_blank"
  eventType="CLICK_GOOGLE_NEW_TAB_LINK"
  eventProperties={{ a: 'test', array: [1, 2, 3] }}
>
  NEW TAB GOOGLE
</Link>
<Link href="#a" eventType="CLICK_LINK">TEST LINK</Link>