Expoを使っていて、Managed Workflowからejectする時のためのメモです。
はっきりとした情報が少なく調べきれていない感じがするので、大体の感じを掴むための参考になればと思います。
[2020/04/03追記]
SDK37がリリースされ、ExpoKitからBare Workflowへのリプレイスが完了した模様です。
https://dev.to/expo/expo-sdk-37-is-now-available-69g
expo ejectしてみる
通常のeject(素のRN環境)、Bare、ExpoKitと3種類の選択肢があるのかと思っていましたが、現在(Expo v34.0以降)のところejectコマンドを行う際BareかExpoKitのどちらかを選ぶことになります。
$ expo eject
? How would you like to eject your app?
  Read more: https://docs.expo.io/versions/latest/expokit/eject/
❯ Bare: I'd like a bare React Native project.
  ExpoKit: I'll create or log in with an Expo account to use React Native and th
e Expo SDK.
  Cancel: I'll continue with my current project structure.
Bare Workflow
Bare(裸の) Workflowは通常のReactNativeプロジェクトにreact-native-unimodulesを導入したものと同じである、と考えて差し支えないと思います(細かく差分はあるかもしれませんが、機能的な違いはないはず)。
react-native-unimodulesは、Expoを使うための最低限のコア部分をまとめたものです。
これを導入することによって、素のReactNativeプロジェクトでもExpo Clientを使ったManaged Workflowと同じような感覚で開発することができます。
unimodulesのなかで使用しないものはPodfileやbuild.gradle内のunimodulesを呼んでいるところに引数を渡して除外することができるようです。
use_unimodules!(exclude: ['expo-face-detector'])
addUnimodulesDependencies([exclude: ['expo-face-detector']])
ただし、このBare Workflow(ejectとしたこと)によって使用できるようになるAPIもあれば使用できなくなるAPIもあります。
詳しくはこちらの一覧を確認してください。
特にNotificationsが使用できなくなるのが痛い...
ちなみに下記の記事ではunimodulesにNotificationsを追加する予定のようなことも書いてあります。
https://blog.expo.io/you-can-now-use-expo-apis-in-any-react-native-app-7c3a93041331#6246
ExpoKitからunimodulesにNotificationsを抜き出すというissueがあって、
https://github.com/expo/expo/issues/4376
SDK37で現在In progressになっているようです。
https://github.com/orgs/expo/projects/5#card-30177888
ただし、unimodulesにNotificationsが移行されればBare WorkflowでNotificationsが使えるということなのかはわかりませんでした。
[2020/04/03]
使えるようになりました。詳しくは以下の記事を参考にしてください。
https://qiita.com/mildsummer/items/5acc267152449c86b2b1
ひとまずBare Workflowの感じを見てみます。先ほどのejectコマンドでBareを選択した後は、app.jsonの内容はこのようにコンパクトになりました。
iosやandroidなどの設定項目やiconやsplashなどExpoの管理から外れることがわかります。
{
  "name": "NotificationTest",
  "displayName": "通知テスト",
  "expo": {
    "name": "NotificationTest",
    "slug": "expo-template-bare",
    "privacy": "unlisted",
    "sdkVersion": "36.0.0",
    "version": "1.0.0",
    "entryPoint": "node_modules/expo/AppEntry.js",
    "platforms": [
      "ios",
      "android",
      "web"
    ]
  }
}
ios/android各ディレクトリがこのように生成され、ネイティブのコードや様々な設定を直接変更できるようになります。
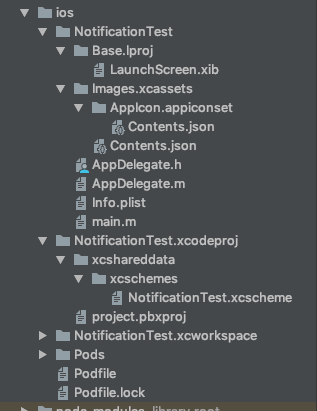
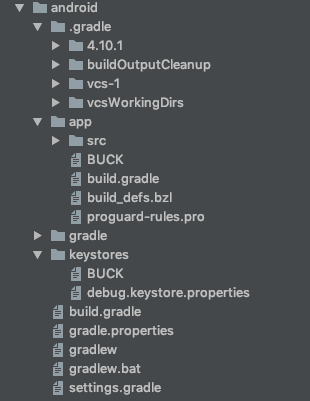
少なくともスプラッシュスクリーンやアプリアイコンを設定すると思いますが、iOSの場合ios/[プロジェクト名]/Base.lproj/LaunchScreen.xib(スプラッシュスクリーン)やios/[プロジェクト名]/Images.xcassets/Appicon.appiconset(アプリアイコン)で、Androidの場合android/app/src/main/res内のリソースを編集することになります。
Androidのbuild.gradleを見ても、Expo特有の処理をしている感じはありません。
// Top-level build file where you can add configuration options common to all sub-projects/modules.

buildscript {
    ext {
        buildToolsVersion = "28.0.3"
        minSdkVersion = 21
        compileSdkVersion = 28
        targetSdkVersion = 27
        supportLibVersion = "28.0.0"
    }
    repositories {
        google()
        jcenter()
    }x
    dependencies {
        classpath 'com.android.tools.build:gradle:3.3.0'

        // NOTE: Do not place your application dependencies here; they belong
        // in the individual module build.gradle files

}

allprojects {
    repositories {
        mavenLocal()
        google()
        jcenter()
        maven {
            // All of React Native (JS, Obj-C sources, Android binaries) is installed from npm
            url "$rootDir/../node_modules/react-native/android"
        }
        maven {
            // Android JSC is installed from npm
            url("$rootDir/../node_modules/jsc-android/dist")
        }
    }
}


task wrapper(type: Wrapper) {
    gradleVersion = '4.7'
    distributionUrl = distributionUrl.replace("bin", "all")
}
基本的な構成はReact Nativeと同様なので、npm startではMetro Bundlerが立ち上がるだけです。
Managed Workflowと同じようにExpo Clientで開発する場合は
$ expo start
こちらを叩くとbundlerに加えてExpoのDev Toolが立ち上がります。
Expo Clientで起動する際はJS層のソースだけが反映されるため、ネイティブ層に追加した機能や設定は使うことができないはずです。
ネイティブ層の変更も反映させて確認したい場合は、まずはiOSのPodsをインストールし、
$ cd ios
$ pod install
もちろんCocoaPodsやXCode、AndroidSDKなどネイティブアプリの開発に必要なものはインストールした上で、通常のReact Nativeと同じ方法でスタンドアロンアプリとしてビルドする必要があります。
ExpoKit
eject時にExpoKitを選択するとReactNativeプロジェクトにExpoのAPIが丸ごと全て搭載される状態になるわけですが、
下記のドキュメントを見ると、やはりこちらもNotificationsがサポートされていません。
Ejecting to ExpoKit
https://docs.expo.io/versions/latest/expokit/eject/#you-should-not-eject-if
また、先ほど引用したunimodulesへの抜き出しに関するissueを含め、
Migrating from ExpoKit
https://docs.expo.io/versions/latest/bare/migrating-from-expokit/
このように、ExpoKitからBare Workflowへの移行に関する案内や、
Ejecting to Bare Workflow
https://docs.expo.io/versions/v35.0.0/workflow/customizing/
Note: We don't recommend the ExpoKit eject option, it is less flexible and we will stop supporting it in the near future.
という注意書きを見る限り今後Expoプロジェクトをejectする際はBare Workflowを選択するのが主流になりそうです。
素のReactNativeと比べてXCodeでビルドする際に失敗することも多い印象です(というか最近のバージョンでは未だ成功していない気がする...)
ちなみに、ejectしてExpoKitを選択した段階でアプリアイコンやスプラッシュ画面はapp.jsonの設定に従ってアセットファイルが作成されます。Bare Workflowと違ってxibやXMLなどを触らなくても最低限の体裁は整います。
また、下記のAPI群はBare Workflowでは使えませんが、ExpoKitでは使うことができます。
- ScreenOrientation
- AppLoading and SplashScreen
- AR
- AuthSession
- Updates