Android初心者なのですが、
Firebase Cloud FunctionsのhttpsCallableを使ってHello Worldするまでをやってみたのでその手順をまとめます。
1. Androidプロジェクトを作成
Android SDK自体はインストール済みという前提で、まずはAndroid Studioを起動してプロジェクトを作成します。
File → New → Create New Projectの順に選択
テンプレートは(お好みですが)Empty Activityを選び、Name、Package name、Save locationを入力。
LanguageはJavaを選択します。
2. Firebase SDKの準備
ブラウザでFirebaseプロジェクト(作成していない場合は作成してください)を開き、Androidアプリを追加します。
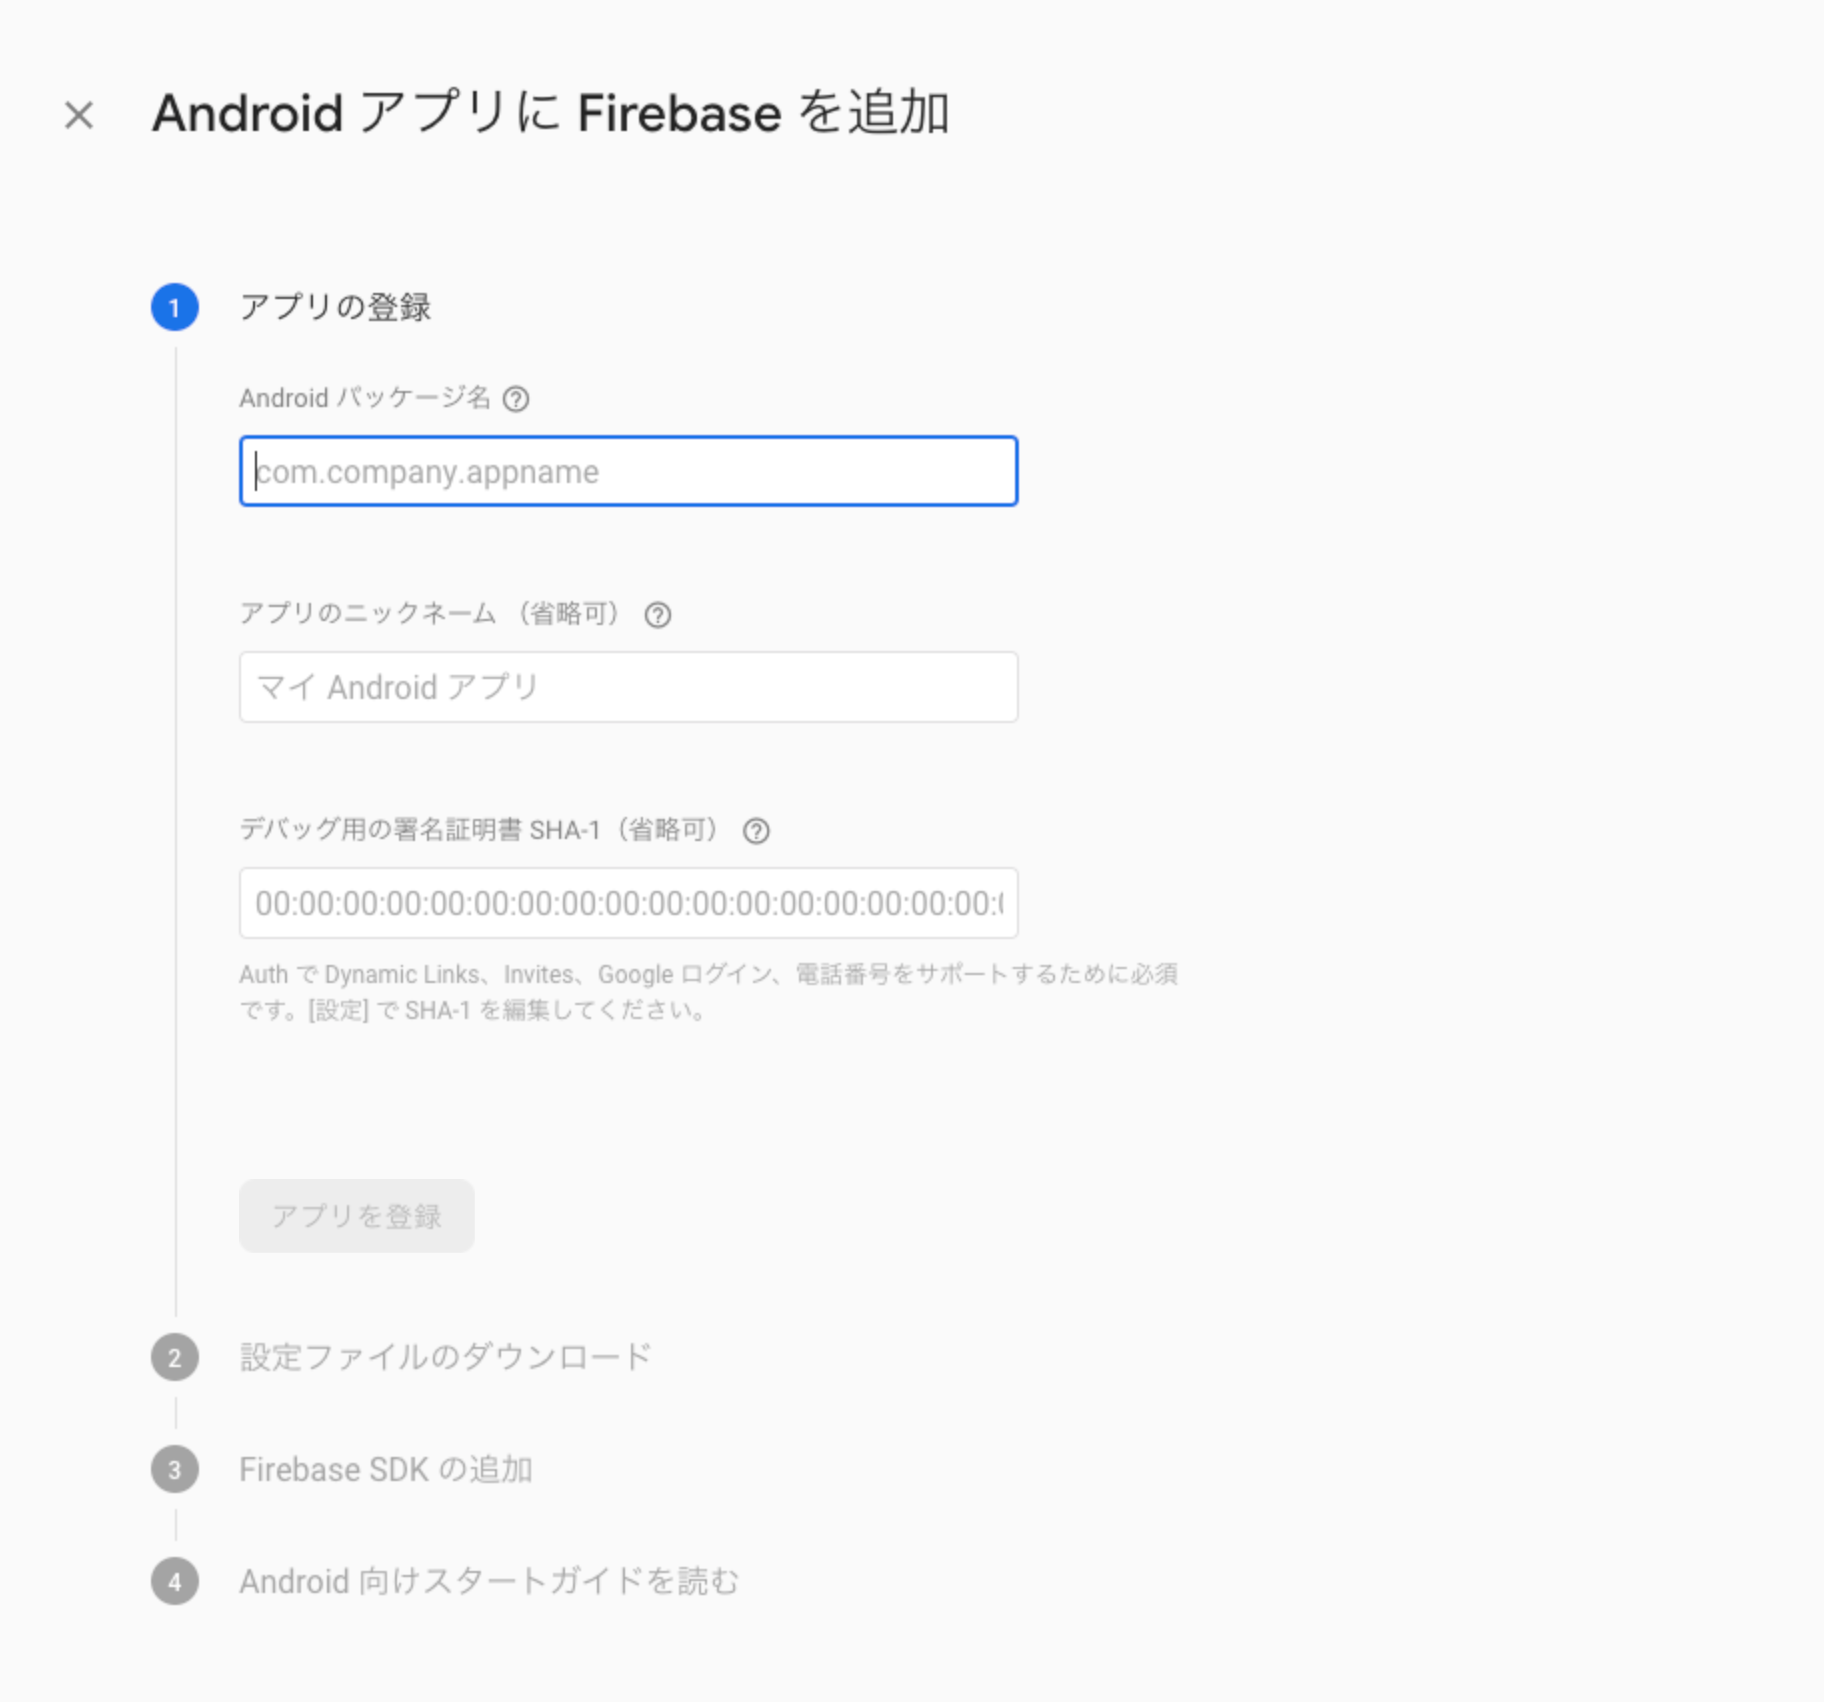
ここからはチュートリアル画面になりますので、概ねその通りに導入します。
1ページ目、まずはパッケージ名に先ほどAndroid Studioで設定したものを入力し、省略可となっている項目は任意で入力してください。
2ページ目、google-services.jsonをダウンロードし、Androidプロジェクトの/appディレクトリ直下に移動します。
3ページ目、まずはプロジェクトルートのbuild.gradleのビルド設定を編集します。
// Top-level build file where you can add configuration options common to all sub-projects/modules.

buildscript {
    repositories {
        google()
        jcenter()

    }
    dependencies {
        classpath 'com.android.tools.build:gradle:3.5.3'

        // NOTE: Do not place your application dependencies here; they belong
        // in the individual module build.gradle files
        classpath 'com.google.gms:google-services:4.3.3'
    }
}

allprojects {
    repositories {
        google()
        jcenter()

    }
}

task clean(type: Delete) {
    delete rootProject.buildDir
}
2箇所にgoogle()があるのを確認し、依存モジュール(com.google.gms:google-services)を追加するという指示になっています。
もう一つ、アプリ単位のbuild.gradleを編集します。
apply plugin: 'com.android.application'
apply plugin: 'com.google.gms.google-services'

android {
    compileSdkVersion 29
    buildToolsVersion "29.0.2"
    defaultConfig {
        applicationId "com.example.firebaseexample"
        minSdkVersion 16
        targetSdkVersion 29
        versionCode 1
        versionName "1.0"
        testInstrumentationRunner "androidx.test.runner.AndroidJUnitRunner"
    }
    buildTypes {
        release {
            minifyEnabled false
            proguardFiles getDefaultProguardFile('proguard-android-optimize.txt'), 'proguard-rules.pro'
        }
    }
}

dependencies {
    implementation fileTree(dir: 'libs', include: ['*.jar'])
    implementation 'androidx.appcompat:appcompat:1.1.0'
    implementation 'androidx.constraintlayout:constraintlayout:1.1.3'
    //implementation 'com.google.firebase:firebase-core:17.2.2' // Analytics等を使う場合は追加
    implementation 'com.google.firebase:firebase-functions:19.0.1'
    testImplementation 'junit:junit:4.12'
    androidTestImplementation 'androidx.test.ext:junit:1.1.1'
    androidTestImplementation 'androidx.test.espresso:espresso-core:3.2.0'
}
2行目のapply plugin: 'com.google.gms.google-services'を追加し、必要な依存パッケージを追加します。パッケージの一覧はこちら。
今回はCloud Functionsのみを使用するので、com.google.firebase:firebase-functionsのみを追加しています。上記のソースでは各バージョンを最新のものに変更しました。
Firebaseのサポートのため、minSdkVersionは16以上にしてください。つまり、Android4.1が現在のFirebaseSDKを使用できる下限になります。
これらの手順はAndroid StudioのTools → FirebaseからAssistantウィンドウを開いて同様のことができるようなのですが、これだけなのでそれほど便利な感じはありませんでした...。
この後、File → Sync Project with Gradle FilesでSyncが通ったらSDKの導入は完了です。
3. アプリ画面の作成

このような感じで、入力したテキストをCloud Functionsに送って返り値を表示するような画面を作ってみます。
<?xml version="1.0" encoding="utf-8"?>
<androidx.constraintlayout.widget.ConstraintLayout xmlns:android="http://schemas.android.com/apk/res/android"
    xmlns:tools="http://schemas.android.com/tools"
    android:layout_width="match_parent"
    android:layout_height="match_parent"
    tools:context=".MainActivity">
    <RelativeLayout
        android:id="@+id/container"
        android:layout_width="match_parent"
        android:layout_height="match_parent">
        <LinearLayout
            android:layout_width="match_parent"
            android:layout_height="wrap_content"
            android:orientation="vertical"
            android:gravity="center"
            android:layout_centerVertical="true">
            <TextView
                android:id="@+id/title"
                android:layout_width="wrap_content"
                android:layout_height="wrap_content"
                android:text="@string/title" />
            <EditText
                android:id="@+id/name"
                android:layout_width="200dp"
                android:layout_height="wrap_content"
                android:layout_marginTop="32dp"
                android:singleLine="true"/>
            <Button
                android:id="@+id/ok_button"
                android:layout_width="wrap_content"
                android:layout_height="wrap_content"
                android:layout_marginTop="32dp"
                android:text="@string/ok_button"
                android:textColor="@color/colorWhite"
                android:background="@color/colorAccent"
                />
            <TextView
                android:id="@+id/result"
                android:layout_width="wrap_content"
                android:layout_height="wrap_content"
                android:layout_marginTop="32dp"
                android:text=""/>
        </LinearLayout>
    </RelativeLayout>
</androidx.constraintlayout.widget.ConstraintLayout>
画面で使うリソースを編集します。
<?xml version="1.0" encoding="utf-8"?>
<resources>
    <color name="colorPrimary">#051E34</color>
    <color name="colorPrimaryDark">#051E34</color>
    <color name="colorAccent">#1A73E8</color>
    <color name="colorWhite">#FFFFFF</color>
</resources>
<resources>
    <string name="app_name">FirebaseExample</string>
    <string name="title">Enter your name!</string>
    <string name="ok_button">OK</string>
</resources>
4. 処理を実装
まずはマニフェストにインターネットアクセスの許可を追加(<application>前に)しておきます。
これを追加しなくても動くようなのですが、念の為。
<uses-permission android:name="android.permission.INTERNET" />
MainActivityに処理を追加します。
package com.example.firebaseexample;

import androidx.annotation.NonNull;
import androidx.appcompat.app.AppCompatActivity;

import android.content.Context;
import android.os.Bundle;
import android.util.Log;
import android.view.View;
import android.view.inputmethod.InputMethodManager;
import android.widget.Button;
import android.widget.EditText;
import android.widget.TextView;

import com.google.android.gms.tasks.Continuation;
import com.google.android.gms.tasks.OnCompleteListener;
import com.google.android.gms.tasks.Task;
import com.google.firebase.functions.FirebaseFunctions;
import com.google.firebase.functions.FirebaseFunctionsException;
import com.google.firebase.functions.HttpsCallableResult;

import java.util.HashMap;
import java.util.Map;

public class MainActivity extends AppCompatActivity {
    private FirebaseFunctions mFunctions;
    private EditText nameInput;
    private TextView resultTextView;

    @Override
    protected void onCreate(Bundle savedInstanceState) {
        super.onCreate(savedInstanceState);
        setContentView(R.layout.activity_main);

        // Cloud Functionsクライアントの取得
        mFunctions = FirebaseFunctions.getInstance();

        // 画面要素の取得
        resultTextView = findViewById(R.id.result);
        nameInput = findViewById(R.id.name);

        // ボタンのクリックイベントリスナーをセット
        final Button okButton = findViewById(R.id.ok_button);
        okButton.setOnClickListener(new View.OnClickListener() {
            public void onClick(View view) {
                final String name = nameInput.getText().toString();
                helloWorld(name);
                hideInput(view);
            }
        });

        // 画面をタップしたらキーボードを閉じる処理
        final View container = findViewById(R.id.container);
        container.setOnClickListener(new View.OnClickListener() {
            @Override
            public void onClick(View view) {
                hideInput(view);
            }
        });
    }

    /**
     * キーボードを閉じる
     * @param view クリックされたview
     */
    private void hideInput(@NonNull View view) {
        InputMethodManager inputMethodManager = (InputMethodManager)
                view.getContext().getSystemService(Context.INPUT_METHOD_SERVICE);
        if (inputMethodManager != null) {
            inputMethodManager.hideSoftInputFromWindow(view.getWindowToken(),0);
        }
    }

    /**
     * Cloud Functionsの関数を叩く
     * @param name 名前
     * @return task
     */
    private Task helloWorld(String name) {
        // 送るデータを作成
        Map<String, Object> data = new HashMap<>();
        data.put("name", name);

        // helloWorld関数をcall
        return mFunctions
                .getHttpsCallable("helloWorld")
                .call(data)
                .continueWith(new Continuation<HttpsCallableResult, String>() {
                    @Override
                    public String then(@NonNull Task<HttpsCallableResult> task) {
                        String result = (String) task.getResult().getData();
                        return result;
                    }
                })
                .addOnCompleteListener(new OnCompleteListener<String>() {
                    @Override
                    public void onComplete(@NonNull Task<String> task) {
                        if (!task.isSuccessful()) { // エラー時
                            Exception e = task.getException();
                            if (e instanceof FirebaseFunctionsException) {
                                // エラーの内容をログに出力
                                FirebaseFunctionsException ffe = (FirebaseFunctionsException) e;
                                FirebaseFunctionsException.Code code = ffe.getCode();
                                Object details = ffe.getDetails();
                                Log.e("functions error", code.toString());
                                Log.e("functions error", String.valueOf(details));
                            }
                        } else {
                            String result = task.getResult();
                            if (result != null) {
                                resultTextView.setText(result); // 返り値を画面にセット
                            }
                        }
                    }
                });
    }
}
Javaでの非同期処理に慣れていないので、ややこしく感じてしまいますが、基本的にはこのチュートリアル通りにやればスムーズにFunctionsが使用できました。
アプリから関数を呼び出す | Firebase(Java Androidタブを選択)
https://firebase.google.com/docs/functions/callable
5. 関数を追加
関数の実装やデプロイはWeb等で使う場合と変わりありません。
Firebase CLIをグローバルにインストールしていなければ以下のようにインストールし、
$ npm install -g firebase-tools
任意のディレクトリ(プロジェクトディレクトリ内でも可)で初期化します。
$ firebase init
アカウントにログインしプロジェクトを選択した後、使用する機能を選択する入力画面が出るので、ここでFunctionsを選択(スペースキー)します。
? Which Firebase CLI features do you want to set up for this folder? Press Space
 to select features, then Enter to confirm your choices. (Press <space> to selec
t, <a> to toggle all, <i> to invert selection)
 ◯ Database: Deploy Firebase Realtime Database Rules
 ◯ Firestore: Deploy rules and create indexes for Firestore
❯◯ Functions: Configure and deploy Cloud Functions
 ◯ Hosting: Configure and deploy Firebase Hosting sites
 ◯ Storage: Deploy Cloud Storage security rules
 ◯ Emulators: Set up local emulators for Firebase features
functionsディレクトリが生成されたら、このように単純に文字列を返すような関数を追加しデプロイします。
const functions = require('firebase-functions');

exports.helloWorld = functions.https.onCall((data, context) => {
  return `Hello ${data.name}`;
});
$ firebase deploy --only functions
6. 実行
Android端末をUSBで繋いでRunすると、
 `httpsCallable`が問題なく使用でき、返り値が表示されるのを確認できました。