はじめに
AWS EC2とは
数分でクラウド上に仮想マシンを立てることができるサービス。
Amazon EC2(安全でスケーラブルなクラウド上の仮想サーバー)| AWS
CyberChefとは
ブラウザ上でデータに対する様々な操作ができるアプリケーション。
AWS EC2でCyberChefを動かす
EC2インスタンスを起動する
今回は以下の設定でEC2インスタンスを起動します。
詳しいやり方はここでは省略するので、必要に応じて各自調べてください。
- 名前
- 適宜設定する (例えば
CyberChef)
- 適宜設定する (例えば
- アプリケーションおよびOSイメージ
- Amazon マシンイメージ (AMI):Ubuntu Server 22.04 LTS (HVM), SSD Volume Type
- アーキテクチャ:64 ビット (x86)
- インスタンスタイプ
- t2.small (無料枠対象のt2.microでは動かないようでした)
- キーペア (ログイン)
- 適宜設定する
- ネットワーク設定
- SSHアクセスができるようにセキュリティグループを設定する
CyberChefを動かすためのソフトウェアをインストールする
起動したEC2インスタンスにSSH接続します。ユーザ名は ubuntu です。
(やり方はクライアントによって違うと思うので、必要に応じて各自調べてください)
とりあえずアップデートします。
sudo apt-get update
sudo apt-get -y upgrade
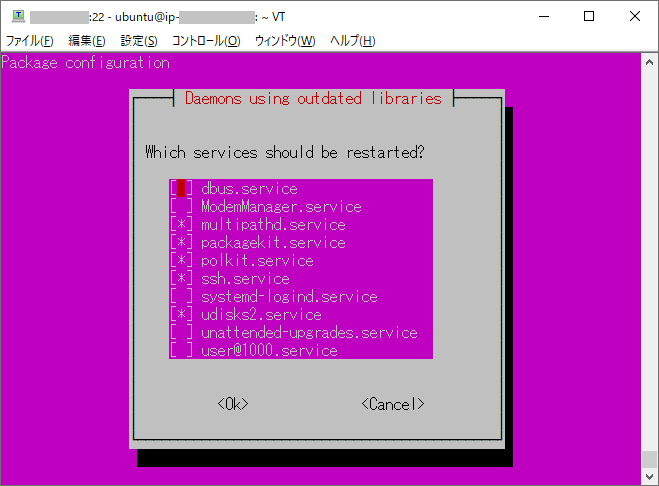
以下のよくわからない選択肢が出てきたので、とりあえず全部にチェック( * )を入れてOkを選択します。
操作方法は
- スペースキー:チェックの有無の切替、OkやCancelの選択
- 矢印キー:チェックの有無を切り替える位置の移動
- タブ:チェックエリア・Ok・Cancel間の移動
のようです。
公式のガイド
Getting started · gchq/CyberChef Wiki
に沿い、以下のソフトウェアをインストールします。
- Git
- Node.js バージョン17
- npm バージョン8
- Grunt
sudo apt-get install -y git npm
このコマンドを実行すると、npmは指定通りのバージョン8がインストールされたようですが、Node.jsのバージョンが違うようでした。
ubuntu@ip-***-**-**-***:~$ npm --version
8.5.1
ubuntu@ip-***-**-**-***:~$ node --version
v12.22.9
apt install nodejs でインストールした後に安定版や最新版のnodejsをインストールする方法 - Useful Edge
を参考に、 n を使用してNode.js バージョン17をインストールします。
まず n をインストールします。
npm cache clean -f
sudo npm i -g n
n lsr コマンドでインストールできるバージョンを確認します。
ubuntu@ip-***-**-**-***:~$ n lsr
Listing remote... Displaying 20 matches (use --all to see all).
18.2.0
18.1.0
18.0.0
17.9.0
17.8.0
17.7.2
17.7.1
17.7.0
17.6.0
17.5.0
17.4.0
17.3.1
17.3.0
17.2.0
17.1.0
17.0.1
17.0.0
16.15.0
16.14.2
16.14.1
とりあえず、17で始まる中で一番大きいやつをインストールします。
sudo n install 17.9.0
さらに、表示される案内に沿って hash -r コマンドを実行し、インストールしたNode.jsを使えるようにします。
ubuntu@ip-***-**-**-***:~$ sudo n install 17.9.0
  installing : node-v17.9.0
       mkdir : /usr/local/n/versions/node/17.9.0
       fetch : https://nodejs.org/dist/v17.9.0/node-v17.9.0-linux-x64.tar.xz
     copying : node/17.9.0
   installed : v17.9.0 (with npm 8.5.5)

Note: the node command changed location and the old location may be remembered in your current shell.
         old : /usr/bin/node
         new : /usr/local/bin/node
If "node --version" shows the old version then start a new shell, or reset the location hash with:
hash -r  (for bash, zsh, ash, dash, and ksh)
rehash   (for csh and tcsh)
ubuntu@ip-***-**-**-***:~$ node --version
v12.22.9
ubuntu@ip-***-**-**-***:~$ hash -r
ubuntu@ip-***-**-**-***:~$ node --version
v17.9.0
最後に、Gruntをインストールします。
sudo npm install -g grunt-cli
公式のガイドでは sudo がついていませんが、sudo をつけないで実行すると以下のエラーになりました。
ubuntu@ip-***-**-**-***:~$ npm install -g grunt-cli
npm ERR! code EACCES
npm ERR! syscall rename
npm ERR! path /usr/local/lib/node_modules/grunt-cli
npm ERR! dest /usr/local/lib/node_modules/.grunt-cli-WPSE2rBv
npm ERR! errno -13
npm ERR! Error: EACCES: permission denied, rename '/usr/local/lib/node_modules/grunt-cli' -> '/usr/local/lib/node_modules/.grunt-cli-WPSE2rBv'
npm ERR!  [Error: EACCES: permission denied, rename '/usr/local/lib/node_modules/grunt-cli' -> '/usr/local/lib/node_modules/.grunt-cli-WPSE2rBv'] {
npm ERR!   errno: -13,
npm ERR!   code: 'EACCES',
npm ERR!   syscall: 'rename',
npm ERR!   path: '/usr/local/lib/node_modules/grunt-cli',
npm ERR!   dest: '/usr/local/lib/node_modules/.grunt-cli-WPSE2rBv'
npm ERR! }
npm ERR!
npm ERR! The operation was rejected by your operating system.
npm ERR! It is likely you do not have the permissions to access this file as the current user
npm ERR!
npm ERR! If you believe this might be a permissions issue, please double-check the
npm ERR! permissions of the file and its containing directories, or try running
npm ERR! the command again as root/Administrator.

npm ERR! A complete log of this run can be found in:
npm ERR!     /home/ubuntu/.npm/_logs/2022-05-20T13_40_22_588Z-debug-0.log
CyberChefをダウンロードし、起動する
引き続き、公式のガイドに沿ってコマンドを実行します。
git clone https://github.com/gchq/CyberChef.git
cd CyberChef
npm install
grunt dev
npm install は1分くらいかかりました。
ubuntu@ip-***-**-**-***:~/CyberChef$ npm install
npm WARN deprecated resolve-url@0.2.1: https://github.com/lydell/resolve-url#deprecated
npm WARN deprecated querystring@0.2.0: The querystring API is considered Legacy. new code should use the URLSearchParams API instead.
npm WARN deprecated opn@6.0.0: The package has been renamed to `open`
npm WARN deprecated uuid@3.4.0: Please upgrade  to version 7 or higher.  Older versions may use Math.random() in certain circumstances, which is known to be problematic.  See https://v8.dev/blog/math-random for details.
npm WARN deprecated loglevel-message-prefix@3.0.0: Use @natlibfi/loglevel-message-prefix instead
npm WARN deprecated request@2.88.2: request has been deprecated, see https://github.com/request/request/issues/3142
npm WARN deprecated har-validator@5.1.5: this library is no longer supported
npm WARN deprecated es6-polyfills@2.0.0: Use @natlibfi/es6-polyfills instead
npm WARN deprecated @babel/polyfill@7.12.1: ? This package has been deprecated in favor of separate inclusion of a polyfill and regenerator-runtime (when needed). See the @babel/polyfill docs (https://babeljs.io/docs/en/babel-polyfill) for more information.
npm WARN deprecated popper.js@1.16.1: You can find the new Popper v2 at @popperjs/core, this package is dedicated to the legacy v1
npm WARN deprecated core-js@2.6.12: core-js@<3.4 is no longer maintained and not recommended for usage due to the number of issues. Because of the V8 engine whims, feature detection in old core-js versions could cause a slowdown up to 100x even if nothing is polyfilled. Please, upgrade your dependencies to the actual version of core-js.
npm WARN deprecated core-js@2.6.12: core-js@<3.4 is no longer maintained and not recommended for usage due to the number of issues. Because of the V8 engine whims, feature detection in old core-js versions could cause a slowdown up to 100x even if nothing is polyfilled. Please, upgrade your dependencies to the actual version of core-js.

> cyberchef@9.37.3 postinstall
> npx grunt exec:fixCryptoApiImports

Running "exec:fixCryptoApiImports" (exec) task
>> /bin/sh: 1:
>> [[: not found
>>

Done.

added 1424 packages, and audited 1425 packages in 1m

120 packages are looking for funding
  run `npm fund` for details

12 vulnerabilities (4 moderate, 8 high)

To address issues that do not require attention, run:
  npm audit fix

To address all issues possible (including breaking changes), run:
  npm audit fix --force

Some issues need review, and may require choosing
a different dependency.

Run `npm audit` for details.
deprecatedとかvulnerabilitiesとかいった怪しい出力が出ていますが、とりあえず無視して次の手順に移ります。
grunt dev も1分くらいかかりました。
また、t2.microのインスタンスでは、ここでメモリを使い果たしてしまうようで、SSHでの操作ができなくなりました。
webpack 5.70.0 compiled successfully in 54467 ms
のような表示が出たら完了です。
起動したCyberChefに接続する
SSHクライアントでポート転送の設定を行います。
ローカルの適当なポート(例えば 8080 )を、リモート側ホスト localhost ポート 8080 に転送します。
(やり方はクライアントによって違うと思うので、必要に応じて各自調べてください)
そして、ローカルマシンのブラウザで http://localhost:8080/ を開くことで、
今回起動したCyberChefに接続できます。
(8080 の部分は、設定したローカル側のポートに合わせてください)
開発用の設定を行う
ここまで紹介した手順でCyberChefを動かすことができますが、
公式のCyberChefをそのまま動かすだけなら公式でWebに公開されているものを使えばよいでしょう。
自前で動かす目的は、主にCyberChefの改造をすることだと考えられます。
そこで、GitHub上で作成したCyberChefのフォークを書き換え、コミットできるような設定をします。
GitとGitHubの設定
Gitでのコミットに用いる名前とメールアドレスを設定します。
git config --global user.email your_name@example.com
git config --global user.name your_name
your_name@example.com および your_name は、自分が使うメールアドレスと名前に置き換えてください。
(例えばローカルのマシンで)設定を確認するには、以下のコマンドを用います。
git config --global -l
GitHubにアクセスするための鍵を作成します。
cd ~/.ssh
ssh-keygen
ssh-keygen コマンドではファイル名やパスフレーズを聞かれますが、(例えば)そのままEnterを押してデフォルトにします。
id_rsa.pub ファイルが作成された公開鍵なので、内容を cat コマンドなどで出力し、GitHubに登録します。
GitHubの右上の自分のアイコンをクリックして「Settings」を選び、
左側のメニューのうち「Access」にある「SSH and GPG keys」を選びます。
そして、「New SSH key」から公開鍵を登録できます。
クローン元の変更
公式のリポジトリのかわりに、自分のフォークをクローンします。
git clone git@github.com:your_account/CyberChef.git
your_account の部分は自分のアカウント名に合わせてください。
まとめ
AWS EC2のt2.smallインスタンス上で、以下のコマンドでCyberChefを動かすことができました。
sudo apt-get update
sudo apt-get -y upgrade
sudo apt-get install -y git npm
npm cache clean -f
sudo npm i -g n
sudo n install 17.9.0
hash -r
sudo npm install -g grunt-cli
git clone https://github.com/gchq/CyberChef.git
cd CyberChef
npm install
grunt dev