 やったこと
やったこと
ほぼTypeScriptだけでバックエンドもフロントエンドも作ってみた
 できたもの
できたもの
 技術スタック
- Backend
- NestJS
- TypeORM
- GraphQL (Code first) / Apollo
- Frontend
- Next.js / React
- GraphQL Code Generator / Apollo Client
- emotion / Semantic UI
- Other
- yarn workspace
- ESLint / Prettier / husky
- Docker / Docker Compose
- Vercel
- GCP (CloudSQL / Cloud Run / Cloud Build)
Backend
NestJS
- TypeScriptでスケーラブルなサーバーサイドアプリを構築するためのNode.jsフレームワークです
- 型安全なので何か誤った記述があれば起動時にすぐに分かるのはもちろん、コードの補完もバッチリですし開発者にも優しいです
- DI(依存性注入)にも対応しており、
@Injectable()をclassに当てることで簡単に実現できます - 他にもclassにデコレーターを当てることで様々な機能(今回はTypeORMとGraphQL)に対応することができ、拡張性が高いのも魅力です
- 英語ですがドキュメントに様々な例が載っているのでじっくり読めば大抵のことはできると思います
- 次のようにCLIで新しいプロジェクトに必要なファイルを一通り作ってくれます
yarn global add @nestjs/cli
nest new project-name
- module/controller/serviceのような構成でディレクトリを分けることができ、今回は次のようにしました
src/
  modules/
  services/
  resolvers/
  models/
  dto/
  migrations/
TypeORM
- TypeScriptでDBの操作を行えるORMで、モデル定義からmigrationを自動生成することも可能です
- MySQLをはじめ、sqlite/postgres/MongoDBなど様々なDBに対応しています
- 次はOneToMany/ManyToManyといったリレーションも含めたモデルの例です(詳しくはGitHub参照)
task.model.ts
import {
  Column,
  CreateDateColumn,
  Entity,
  JoinTable,
  ManyToMany,
  OneToMany,
  PrimaryGeneratedColumn,
  UpdateDateColumn,
} from "typeorm";

import { CategoryModel } from "@/models/category.model";
import { TaskContentModel } from "@/models/taskContent.model";

@Entity("tasks")
export class TaskModel {
  @PrimaryGeneratedColumn()
  id: number;

  @Column()
  title: string;

  @CreateDateColumn()
  createdAt: Date;

  @UpdateDateColumn()
  updatedAt: Date;

  @OneToMany((type) => TaskContentModel, (taskContent) => taskContent.task)
  taskContents: TaskContentModel[];

  @ManyToMany((type) => CategoryModel, (category) => category.tasks)
  @JoinTable({ name: "tasks_categories" })
  categories: CategoryModel[];
}
- モデルを定義した後、
typeorm migration:generate -n AddTaskTableのようにコマンドで次のようなmigrationファイルを自動生成してくれます
import { MigrationInterface, QueryRunner } from "typeorm";

export class AddTaskTable1603379738841 implements MigrationInterface {
  name = "AddTaskTable1603379738841";

  public async up(queryRunner: QueryRunner): Promise<void> {
    await queryRunner.query(
      "CREATE TABLE `tasks` (`id` int NOT NULL AUTO_INCREMENT, `title` varchar(255) NOT NULL, `createdAt` datetime(6) NOT NULL DEFAULT CURRENT_TIMESTAMP(6), `updatedAt` datetime(6) NOT NULL DEFAULT CURRENT_TIMESTAMP(6), PRIMARY KEY (`id`)) ENGINE=InnoDB",
    );
  }

  public async down(queryRunner: QueryRunner): Promise<void> {
    await queryRunner.query("DROP TABLE `tasks`");
  }
}
- TypeORMではRepositoryを通じてモデルを操作することができ、NestJSと併用した場合には
@InjectRepositoryで対象リポジトリを指定して使うことができるようになります -
findsavedeleteといったメソッドで直感的にDBを操作することができます - また、モデルに存在しないカラムを追加しようとすると型の時点でエラーになるなど型安全に開発できます
task.service.ts
import { Injectable } from "@nestjs/common";
import { InjectRepository } from "@nestjs/typeorm";
import { Repository } from "typeorm";

import { AddTaskInput } from "@/dto/task.dto";
import { TaskModel } from "@/models/task.model";
import { CategoryService } from "@/services/category.service";

@Injectable()
export class TaskService {
  constructor(
    @InjectRepository(TaskModel)
    private taskRepository: Repository<TaskModel>,
    private categoryService: CategoryService,
  ) {}

  async findOne(id: number) {
    return this.taskRepository.findOne(id, { relations: ["taskContents", "categories"] });
  }

  async findAll() {
    return this.taskRepository.find({ order: { createdAt: "ASC" }, relations: ["taskContents", "categories"] });
  }

  async save({ categoryIds, ...payload }: AddTaskInput) {
    const categories = await this.categoryService.findByIds(categoryIds);
    return await this.taskRepository.save({ ...payload, categories });
  }

  async delete(id: number) {
    await this.taskRepository.delete(id);
    return await this.findOne(id);
  }
}
- ちなみに最近だとPrismaが注目されつつあるようですが、TypeORMは後述するGraphQLとモデルを共通化して書けるのに対し、Prismaを使う場合は別途Prisma用の定義が必要となり冗長になるため今回はやめました
- NestJSにはPrismaのサンプルもあるためまた試してみようと思います
GraphQL (Code First) / Apollo
- GraphQLを使うことでバックエンド/フロントエンド間の型安全なデータのやりとりが簡単に実現できます
- RestfulAPIの場合もOpenAPIで定義したschemaからTypeScriptの型定義を生成することはできますが、GraphQLの場合は(Code firstの場合)書いたコードから自動でschemaを生成できる上、実際のコードとの一貫性も自動的に担保されるのが開発者にとって素晴らしい体験だと思います
- 次は先ほどのTypeORMのDBモデルにGraphQLのschemaを適用した例です
- プリミティブ型はそのまま変換されるので、ほぼ
@Fieldを追加するだけOKです -
@nestjs/graphqlでは内部的にApolloが使用されています
- プリミティブ型はそのまま変換されるので、ほぼ
task.model.ts
import { Field, ID, ObjectType } from "@nestjs/graphql";
import {
  Column,
  CreateDateColumn,
  Entity,
  JoinTable,
  ManyToMany,
  OneToMany,
  PrimaryGeneratedColumn,
  UpdateDateColumn,
} from "typeorm";

import { CategoryModel } from "@/models/category.model";
import { TaskContentModel } from "@/models/taskContent.model";

@ObjectType()
@Entity("tasks")
export class TaskModel {
  @Field((type) => ID)
  @PrimaryGeneratedColumn()
  id: number;

  @Field()
  @Column()
  title: string;

  @Field()
  @CreateDateColumn()
  createdAt: Date;

  @Field()
  @UpdateDateColumn()
  updatedAt: Date;

  @Field((type) => [TaskContentModel], { defaultValue: [] })
  @OneToMany((type) => TaskContentModel, (taskContent) => taskContent.task)
  taskContents: TaskContentModel[];

  @Field((type) => [CategoryModel], { defaultValue: [] })
  @ManyToMany((type) => CategoryModel, (category) => category.tasks)
  @JoinTable({ name: "tasks_categories" })
  categories: CategoryModel[];
}
- DBにEnum型がある場合は次のようにできます
category.model.ts
import { Field, ID, ObjectType, registerEnumType } from "@nestjs/graphql";
import { Column, CreateDateColumn, Entity, ManyToMany, PrimaryGeneratedColumn, UpdateDateColumn } from "typeorm";

export enum Color {
  red = "red",
  blue = "blue",
  green = "green",
}

registerEnumType(Color, { name: "Color" });

@ObjectType()
@Entity("categories")
export class CategoryModel {

  // 省略

  @Field((type) => Color)
  @Column({ type: "enum", enum: Color })
  color: Color;
}
- さらにResolverでGraphQLのIFと実際の処理を定義していきます
- 今回の構成の場合、各serviceでDB操作を記述しているのでresolverからserviceを呼んでDB操作を行い、結果を返すようになっています
task.resolver.ts
import { Inject } from "@nestjs/common";
import { Args, ID, Mutation, Query, Resolver } from "@nestjs/graphql";

import { AddTaskInput } from "@/dto/task.dto";
import { TaskModel } from "@/models/task.model";
import { TaskService } from "@/services/task.service";

@Resolver((of) => TaskModel)
export class TaskResolver {
  constructor(@Inject(TaskService) private taskService: TaskService) {}

  @Query((returns) => TaskModel, { nullable: true })
  async task(@Args("id", { type: () => ID }) id: number) {
    return await this.taskService.findOne(id);
  }

  @Query((returns) => [TaskModel])
  async tasks() {
    return await this.taskService.findAll();
  }

  @Mutation((returns) => TaskModel)
  async saveTask(@Args("task") task: AddTaskInput) {
    return await this.taskService.save(task);
  }

  @Mutation((returns) => TaskModel, { nullable: true })
  async deleteTask(@Args("id", { type: () => ID }) id: number) {
    return await this.taskService.delete(id);
  }
}
- 複雑なクエリを受け取る場合は次のように
@InputType()を定義して引数として使用できます
task.dto.ts
import { Field, ID, InputType } from "@nestjs/graphql";

@InputType()
export class AddTaskInput {
  @Field()
  title: string;

  @Field((type) => [ID])
  categoryIds: number[];
}
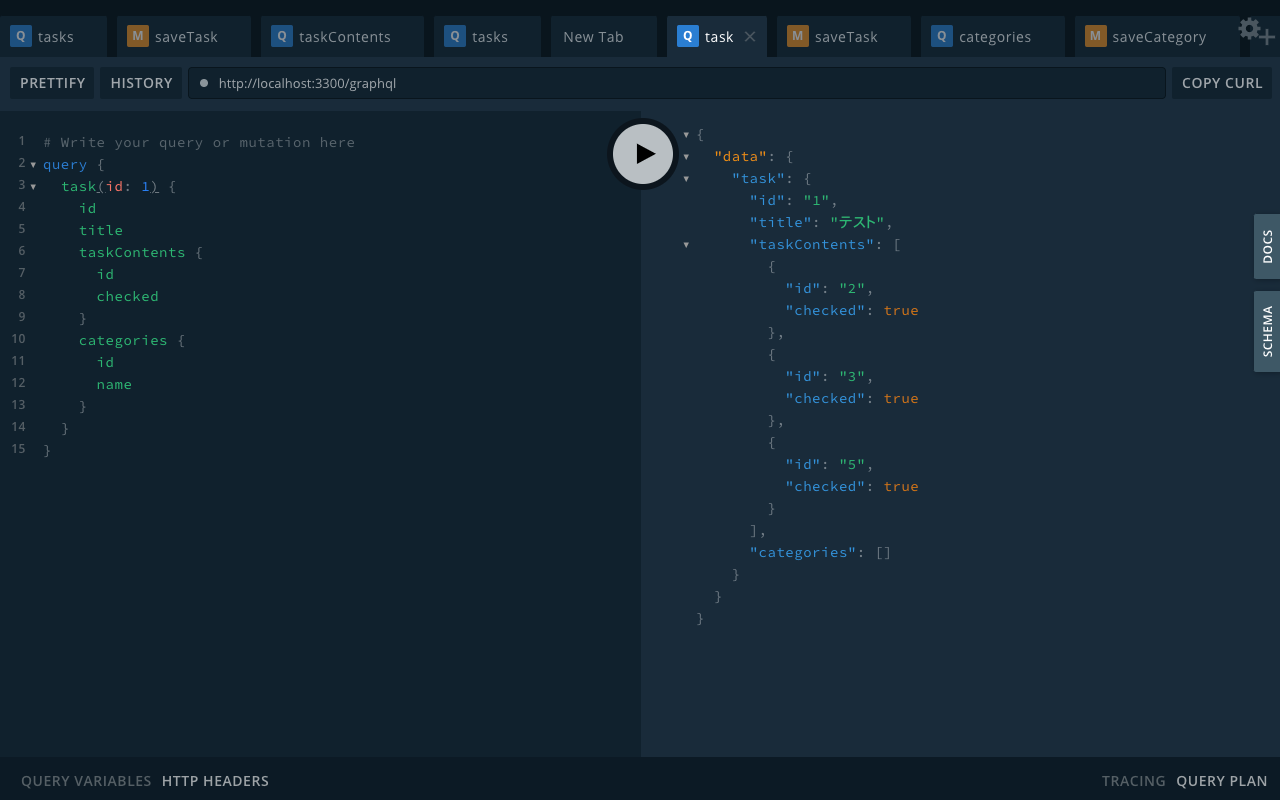
- NestJSを起動すれば即座にGraphQLスキーマが生成されます
-
http://localhost:3300/graphqlに接続すると次のようにGUIでクエリを試すことができます

- また、GraphQLではデフォルトで Int/Float/String/Boolean/ID の型しか用意されていないため、その他の型やオリジナルの型が必要な場合はScalarを用意して変換処理を書く必要があります
- 例えばDate型は次のようにします
date.scalar.ts
import { CustomScalar, Scalar } from "@nestjs/graphql";
import { Kind, ValueNode } from "graphql";

@Scalar("Date", (type) => Date)
export class DateScalar implements CustomScalar<number, Date> {
  description = "Date custom scalar type";

  // value sent to the client
  serialize(value: Date): number {
    return value.getTime();
  }

  // value from the client
  parseValue(value: number): Date {
    return new Date(value);
  }

  parseLiteral(ast: ValueNode): Date {
    if (ast.kind === Kind.INT) {
      return new Date(ast.value);
    }
    return null;
  }
}
- Backend側の主な実装は以上ですが、実際には依存関係についてmoduleでいろいろ記述していたりするので詳しくはGitHubをご確認ください
Frontend
Next.js / React
- Reactでアプリを作成してOGP対応したい場合にはSSRやSSGなどの対応が必要となり、そのためのフレームワークとして人気のあるNext.jsを使いました
- その他にも、ルーティングの仕組みがデフォルトで用意されておりbuild時のファイル分割にも対応しているなど様々な機能を使うことができ、アップデートも活発なのでSSRを使用しないケースでもおすすめです
- こちらも次のようにCLIでプロジェクトに必要なファイルを一通り生成できます
yarn create next-app
-
tsconfig.jsonを作成して起動するだけでTypeScriptを使う準備が整います
touch tsconfig.json
yarn dev
GraphQL Code Generator / Apollo Client
- GraphQL Code Generatorを使うと
.graphqlファイルからTypeScript型定義を自動生成することができます - さらにApolloのPluginを使うことでBackendにリクエストを投げるReact Hooksも自動生成することができます
- 次のような設定ファイルを用意します
codegen.yaml
overwrite: true
schema: "../backend/schema.graphql"
documents:
  - ./graphql/queries/*.graphql
  - ./graphql/mutations/*.graphql
generates:
  graphql/generated.ts:
    plugins:
      - "typescript"
      - "typescript-operations"
      - "typescript-react-apollo"
    config:
      skipTypename: true
      scalars:
        Date: number
    hooks:
      afterOneFileWrite:
        - yarn lint --fix
- React Hooksを使用するPluginを使うためにはoperation(実際に使用するGraphQLのクエリ)を用意する必要があります
- これらのファイルへのpathを先ほどの設定ファイルのdocumentsに指定します
task.graphql
query tasks {
  tasks {
    id
    title
    createdAt
    updatedAt
    taskContents {
      id
      checked
      title
      createdAt
      updatedAt
    }
    categories {
      id
      name
      color
    }
  }
}

mutation addTask($task: AddTaskInput!) {
  saveTask(task: $task) {
    id
  }
}

mutation deleteTask($id: ID!) {
  deleteTask(id: $id) {
    id
  }
}
-
graphql-codegenのCLIコマンドを使うことで次のようなファイルを自動生成できます
import { gql } from "@apollo/client";
import * as Apollo from "@apollo/client";

export const TasksDocument = gql`
  query tasks {
    tasks {
      id
      title
      createdAt
      updatedAt
      taskContents {
        id
        checked
        title
        createdAt
        updatedAt
      }
      categories {
        id
        name
        color
      }
    }
  }
`;

/**
 * __useTasksQuery__
 *
 * To run a query within a React component, call `useTasksQuery` and pass it any options that fit your needs.
 * When your component renders, `useTasksQuery` returns an object from Apollo Client that contains loading, error, and data properties
 * you can use to render your UI.
 *
 * @param baseOptions options that will be passed into the query, supported options are listed on: https://www.apollographql.com/docs/react/api/react-hooks/#options;
 *
 * @example
 * const { data, loading, error } = useTasksQuery({
 *   variables: {
 *   },
 * });
 */
export function useTasksQuery(baseOptions?: Apollo.QueryHookOptions<TasksQuery, TasksQueryVariables>) {
  return Apollo.useQuery<TasksQuery, TasksQueryVariables>(TasksDocument, baseOptions);
}
export function useTasksLazyQuery(baseOptions?: Apollo.LazyQueryHookOptions<TasksQuery, TasksQueryVariables>) {
  return Apollo.useLazyQuery<TasksQuery, TasksQueryVariables>(TasksDocument, baseOptions);
}
export type TasksQueryHookResult = ReturnType<typeof useTasksQuery>;
export type TasksLazyQueryHookResult = ReturnType<typeof useTasksLazyQuery>;
export type TasksQueryResult = Apollo.QueryResult<TasksQuery, TasksQueryVariables>;
- あとはをApolloProviderにApolloClientを渡すとReactコンポーネントでhooksを呼び出せるようになります
client.ts
import { ApolloClient, InMemoryCache } from "@apollo/client";
import getConfig from "next/config";

export const client = new ApolloClient({
  uri: "http://localhost:3300/graphql",
  cache: new InMemoryCache(),
});
_app.tsx
import React from "react";

import { ApolloProvider } from "@apollo/client";
import { AppProps } from "next/app";

import { client } from "@/graphql/client";

function MyApp({ Component, pageProps }: AppProps) {
  return (
    <ApolloProvider client={client}>
      <Component {...pageProps} />
    </ApolloProvider>
  );
}

export default MyApp;
- SSRとCSRの両方に対応した例を載せておきます(大抵の場合は片方だけでいいはずが)
- HooksはComponent内でしか使用できないため、 SSR対応の
getServerSidePropsではclient.query()を使用してデータを取得しています
- HooksはComponent内でしか使用できないため、 SSR対応の
index.tsx
import React, { memo } from "react";

import { InferGetServerSidePropsType } from "next";

import { client } from "@/graphql/client";
import { TasksDocument, TasksQuery, TasksQueryVariables, useTasksQuery } from "@/graphql/generated";

export const getServerSideProps = async () => {
  const { data } = await client.query<TasksQuery, TasksQueryVariables>({
    query: TasksDocument,
  });
  return { props: { initialData: data } };
};

export default memo<InferGetServerSidePropsType<typeof getServerSideProps>>(({ initialData }) => {
  const { data, refetch } = useTasksQuery();
  const tasksData = data ? data.tasks : initialData.tasks;

  return (
    <div>Nest Next TODO Sample</div>
  );
});
emotion / Semantic UI
- 以前はscssをBEM記法で書いてましたが、DOMとstyleを別々に記述することや別々のファイルにあるものをclass名でつなぎ合わせる作業が面倒なので、自分は CSS in JS が好きです
- スタイルのスコープがグローバルな場合はclass名の競合に気をつけないといけなかったり、そもそもclass名の設計を考えること自体が面倒だったりチーム開発の場合は命名規則がズレがち
- styled-componentsの場合はコンポーネントごとにファイルを分けている場合は名前の競合は基本発生しない
- これまでstyled-componentsで記述していたのですが、Gatsbyがemotionを採用していたこともあり使ってみました
- styled-componentsで個人的に気になる点としてはちょっとスタイルを当てたいだけでも
styled.XXXを書かないといけな買った - emotionの場合はstyled-componentと同等の機能が直感的にインラインスタイルで書けるのが普通に便利です
- フロントエンドにおける「関心の分離」は間違っていた
- styled-componentsで個人的に気になる点としてはちょっとスタイルを当てたいだけでも
- また、自分でコンポーネントのデザインを考えるのが面倒なのでSemantic UIを使っています
TaskSection.tsx
import React, { memo } from "react";

import { css } from "@emotion/core";
import { Button, Header, Icon, Input, Label } from "semantic-ui-react";

import { TaskContent, TaskContentType } from "@/components/TaskContent";
import { Color } from "@/graphql/generated";
import { useTaskSection } from "@/hooks/useTaskSection";

export type TaskType = {
  id: string;
  title: string;
  createdAt: number;
  updatedAt: number;
  categories: {
    id: string;
    name: string;
    color: Color;
  }[];
};

export const TaskSection = memo<{
  task: TaskType;
  taskContents: TaskContentType[];
  refetchTasks: () => Promise<unknown>;
}>(({ task, taskContents, refetchTasks }) => {
  const { isActive, tmpTitle, dispatch, handleAddTaskContent, handleDeleteTask } = useTaskSection({
    task,
    refetchTasks,
  });

  const { id, title, categories } = task;

  return (
    <div
      key={id}
      css={css`
        margin-top: 32px;
      `}
    >
      <div
        css={css`
          display: flex;
          justify-content: space-between;
          align-items: flex-start;
        `}
      >
        <div>
          <Header
            as="h2"
            css={css`
              &&& {
                margin: 0;
              }
            `}
          >
            {title}
          </Header>
          <div
            css={css`
              display: flex;
              margin-top: 4px;
            `}
          >
            {categories.map((category) => {
              return (
                <Label
                  key={category.id}
                  content={category.name}
                  color={category.color}
                  tag
                  css={css`
                    &&& {
                      margin-right: 12px;
                    }
                  `}
                />
              );
            })}
          </div>
        </div>
        <Button icon="trash alternate" color="red" onClick={handleDeleteTask} />
      </div>
      <div
        css={css`
          margin-left: 16px;
        `}
      >
        {taskContents.map((taskContent) => {
          return <TaskContent key={taskContent.id} taskContent={taskContent} refetchTasks={refetchTasks} />;
        })}
        {!isActive && (
          <Button
            basic
            color="blue"
            onClick={() => dispatch({ type: "setIsActive", payload: true })}
            css={css`
              &&& {
                margin-top: 8px;
              }
            `}
          >
            <Icon name="plus" />
            追加
          </Button>
        )}
        {isActive && (
          <div
            css={css`
              display: flex;
              align-items: center;
              margin-top: 8px;
              width: 100%;
              padding: 4px;
            `}
          >
            <form
              css={css`
                width: 100%;
              `}
            >
              <Input
                value={tmpTitle}
                action={{
                  content: "保存",
                  disabled: !tmpTitle,
                  onClick: (e: React.MouseEvent<HTMLInputElement, MouseEvent>) => {
                    e.preventDefault();
                    handleAddTaskContent();
                  },
                }}
                onChange={(e, d) => dispatch({ type: "setTmpTitle", payload: d.value })}
                css={css`
                  &&& {
                    width: 100%;
                  }
                `}
              />
            </form>
            <Button
              icon="close"
              onClick={() => dispatch({ type: "setIsActive", payload: false })}
              css={css`
                &&& {
                  margin-left: 8px;
                }
              `}
            />
          </div>
        )}
      </div>
    </div>
  );
});
Other
yarn workspace
- yarn workspaceを使用すると1つのリポジトリで複数のnpmパッケージを管理(いわゆるmonorepo)することができます
- 今回は
packeges/backendとpackeges/frontendで別々のアプリを起動して使えるようにしています - ライブラリの依存関係も一元管理されるため、それぞれに
package.jsonがあってもyarn.lockは1つになります
package.json
{
  "name": "nest-next-sample",
  "version": "1.0.0",
  "private": true,
  "workspaces": [
    "packages/*"
  ]
}
ESLint / Prettier / husky
- ESLintを設定しておけば問題のあるコードを事前に検知&自動修正することができ開発体験がグッと上がります
- さらにtypescript-eslintでより強固な静的解析がされるようになり、prettierも使えばコードもより見やすく整形できます
- また、
eslint-plugin-importを使用するとimportの記述の順序もきれいに直すことができます - 自分は次のようにrecommendedの設定をほぼそのまま使用しています
.eslintrc.json
{
  "ignorePatterns": ["node_modules", ".next", "dist"],
  "extends": [
    "eslint:recommended",
    "plugin:react/recommended",
    "plugin:react-hooks/recommended",
    "plugin:@typescript-eslint/recommended",
    "prettier/@typescript-eslint",
    "plugin:prettier/recommended",
    "plugin:import/errors",
    "plugin:import/warnings",
    "plugin:import/typescript"
  ],
  "plugins": ["react", "react-hooks", "@typescript-eslint", "prettier", "emotion"],
  "env": {
    "node": true,
    "browser": true,
    "jest": true,
    "es6": true
  },
  "rules": {
    "react/display-name": ["off"],
    "react/prop-types": ["error", { "skipUndeclared": true }],
    "@typescript-eslint/no-unused-vars": ["warn", { "args": "none" }],
    "@typescript-eslint/explicit-function-return-type": ["off"],
    "@typescript-eslint/explicit-module-boundary-types": ["off"],
    "sort-imports": ["error", { "ignoreDeclarationSort": true }],
    "import/order": [
      "error",
      {
        "newlines-between": "always",
        "alphabetize": { "order": "asc" },
        "pathGroups": [
          {
            "pattern": "react",
            "group": "external",
            "position": "before"
          }
        ],
        "pathGroupsExcludedImportTypes": ["builtin"]
      }
    ],
    "prettier/prettier": [
      "error",
      {
        "semi": true,
        "printWidth": 120,
        "trailingComma": "all"
      }
    ]
  },
  "parser": "@typescript-eslint/parser",
  "settings": {
    "react": {
      "version": "detect"
    },
    "import/resolver": {
      "typescript": {
        "project": "packages/*/tsconfig.json"
      }
    }
  }
}
- さらにhuskyを利用することで
git commit時にlintを実行してくれるようにできます
Docker / Docker Compose
- 開発環境を簡単に用意できるようにするためにDockerfileとdocker-composeも整備してみました
Dockerfile
FROM node:14-alpine

WORKDIR /app

COPY . .

RUN yarn install
- docker-compose3.4から使えるようになったExtension FieldsとYAMLのAnchorとAliasを使うことで
x-dev-baseの記述をmigrate/backend/frontend`コンテナで省略しています -
docker-compose up時に自動的にマイグレーションを実行したかったため、migrateコンテナを用意しました - ローカルで
yarn installしなくてもnode_modulesを使えるようにvolumesに/app/node_modulesを記述しています
docker-compose.yaml
version: "3"

x-dev-base: &dev-base
  build: .
  environment:
    DB_HOST: mysql
    DB_PORT: 3306
    DB_USERNAME: docker
    DB_PASSWORD: docker
    DB_NAME: nest_next_sample
    SERVER_APOLLO_URI: http://backend:3300
    PUBLIC_APOLLO_URI: http://localhost:3300
  volumes:
    - .:/app
    - /app/node_modules
    - /app/packages/backend/node_modules
    - /app/packages/frontend/node_modules

services:

  mysql:
    image: mysql:5.7
    command: mysqld
    environment:
      MYSQL_ROOT_PASSWORD: root
      MYSQL_USER: docker
      MYSQL_PASSWORD: docker
      MYSQL_DATABASE: nest_next_sample
      TZ: 'Asia/Tokyo'
    ports:
      - 4306:3306
    volumes:
      - ./docker/db/data:/var/lib/mysql
      - ./docker/db/my.cnf:/etc/mysql/conf.d/my.cnf

  migrate:
    << : *dev-base
    working_dir: /app/packages/backend
    command: yarn migrate:run
    depends_on:
      - mysql

  backend:
    << : *dev-base
    working_dir: /app/packages/backend
    command: yarn start:dev
    tty: true
    depends_on:
      - mysql
      - migrate
    ports:
      - "3300:3300"

  frontend:
    << : *dev-base
    working_dir: /app/packages/frontend
    command: yarn dev
    tty: true
    depends_on:
      - backend
    ports:
      - "3000:3000"
- ちなみにSSRとCSRでホストのURLの記述を切り替える必要があるので要注意です
SERVER_APOLLO_URI: http://backend:3300
PUBLIC_APOLLO_URI: http://localhost:3300
Vercel
- FrontendはNext.js公式からおすすめされている通りVercelを使ってホスティングするとGitHubと連携するだけで簡単にホスティングができます
- Vercelを使えばSSRが必要な場合もサーバーサイド用のホスティングを別途用意する必要がありません
- また、PRを作った時にPreviewとしてPRの内容を反映したホスティングも自動でしてくれます

GCP (CloudSQL / Cloud Run / Cloud Build)
- Backendについては今回はGCPで用意してみました
- DBはフルマネージドのCloudSQL for MySQLを使用したため、セットアップもGUIで簡単にできました
- さらにCloud Buildで次のように設定することで、CloudSQLにつないでmigrationを実行し、Cloud Runにコンテナへのデプロイする処理を自動化しました
cloudbuild.yaml
steps:

  - id: 'Build: docker image'
    name: 'gcr.io/cloud-builders/docker'
    args: [
      'build', '.',
      '-f', 'Dockerfile.prod',
      '-t', 'gcr.io/$PROJECT_ID/build:$COMMIT_SHA',
    ]

  - id: 'Run: cloudsql-proxy'
    name: 'gcr.io/cloudsql-docker/gce-proxy:1.16'
    args: [
      '/cloud_sql_proxy',
      '-dir=/cloudsql',
      '-instances=${_CLOUD_SQL_CONNECTION_NAME}'
    ]
    volumes:
      - name: cloudsql
        path: /cloudsql

  - id: 'Migrate: database'
    name: 'gcr.io/cloud-builders/docker'
    args: [
      'run',
      '-v', 'cloudsql:/cloudsql',
      '-w', '/app/packages/backend',
      '-e', 'DB_SOCKET_PATH=/cloudsql/${_CLOUD_SQL_CONNECTION_NAME}',
      '-e', 'DB_HOST=/cloudsql/${_CLOUD_SQL_CONNECTION_NAME}',
      '-e', 'DB_PORT=${_DB_PORT}',
      '-e', 'DB_USERNAME=${_DB_USERNAME}',
      '-e', 'DB_PASSWORD=${_DB_PASSWORD}',
      '-e', 'DB_NAME=${_DB_NAME}',
      'gcr.io/$PROJECT_ID/build:$COMMIT_SHA',
      'yarn', 'migrate:run'
    ]
    volumes:
      - name: cloudsql
        path: /cloudsql
    waitFor:
      - 'Build: docker image'

  - id: 'Kill: cloudsql-proxy'
    name: 'gcr.io/cloud-builders/docker'
    waitFor:
      - 'Migrate: database'
    entrypoint: 'bash'
    args: ['-c', 'docker ps -q --filter ancestor="gcr.io/cloudsql-docker/gce-proxy:1.16"|xargs docker stop']

  - name: 'gcr.io/cloud-builders/docker'
    args: ['push', 'gcr.io/$PROJECT_ID/build:$COMMIT_SHA']
    waitFor:
      - 'Migrate: database'

  - name: 'gcr.io/google.com/cloudsdktool/cloud-sdk'
    entrypoint: gcloud
    args: [
      'run', 'deploy', '$_CLOUD_RUN_SERVICE_NAME',
      '--image', 'gcr.io/$PROJECT_ID/build:$COMMIT_SHA',
      '--region', 'asia-northeast1',
      '--platform', 'managed',
      '--memory', '128Mi',
      '--set-cloudsql-instances', '${_CLOUD_SQL_CONNECTION_NAME}',
      '--allow-unauthenticated',
      '--set-env-vars', '
        DB_SOCKET_PATH=/cloudsql/${_CLOUD_SQL_CONNECTION_NAME},
        DB_HOST=/cloudsql/${_CLOUD_SQL_CONNECTION_NAME},
        DB_PORT=${_DB_PORT},
        DB_USERNAME=${_DB_USERNAME},
        DB_PASSWORD=${_DB_PASSWORD},
        DB_NAME=${_DB_NAME}'
    ]

images:
  - gcr.io/$PROJECT_ID/build:$COMMIT_SHA
- ちなみにCloud SQLは起動したままにすると課金されてしまうので、開発用で利用する場合以外は停止させています
 まとめ
まとめ
- 実際にはいろいろとつまづきポイントがありましたが、TypeScriptでバックエンドとフロントエンドの両方の開発ができました
- あくまで一例ですが参考にしてもらえると嬉しいです
- https://github.com/mikan3rd/nest-next-sample