kotlin学習中メモ
onTouchEventを設定
MainActivity.kt
class MainActivity : AppCompatActivity() {
    override fun onCreate(savedInstanceState: Bundle?) {
        super.onCreate(savedInstanceState)
        setContentView(R.layout.activity_main)
    }

    // 画面タッチ処理はoverride fun onTouchEventの中に書く
    override fun onTouchEvent(event: MotionEvent?): Boolean {
    	// ここに処理を追記していく
        return super.onTouchEvent(event)
    }
}
画面をタップした時になんらかの処理をしたい場合は、onTouchEventを設定してその中に実行したい処理を書いていけばOK
試しに3つの画像を用意して、タップ、移動、指を離した時の3パターンで表示される画像を切り替えてみます。
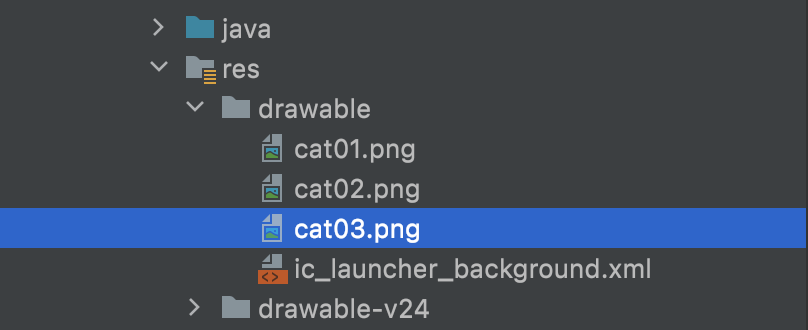
画像の配置
app/src/main/res/drawableに3つの画像を配置。

レイアウトに初期画像を表示
app/src/main/red/layout/activity_main.xml
ImageViewを使ってdrawableに配置した画像1つを表示
私の場合はcat01.pngを設定
activity_main.xml
<?xml version="1.0" encoding="utf-8"?>
<androidx.constraintlayout.widget.ConstraintLayout
        xmlns:android="http://schemas.android.com/apk/res/android"
        xmlns:tools="http://schemas.android.com/tools"
        xmlns:app="http://schemas.android.com/apk/res-auto"
        android:layout_width="match_parent"
        android:layout_height="match_parent"
        tools:context=".MainActivity">

    <ImageView
            android:layout_width="wrap_content"
            android:layout_height="wrap_content" app:srcCompat="@drawable/cat01" android:id="@+id/iv"
            app:layout_constraintStart_toStartOf="parent"
            app:layout_constraintEnd_toEndOf="parent" app:layout_constraintBottom_toBottomOf="parent"
            app:layout_constraintTop_toTopOf="parent"/>
</androidx.constraintlayout.widget.ConstraintLayout>
タップイベントを実行
・MotionEvent.ACTION_DOWN タップされた時のアクション
・MotionEvent.ACTION_MOVE タップされた状態でスワイプしたときのアクション
・MotionEvent.ACTION_UP タップ状態から指がはなれた時のアクション
MainActivity.kt
class MainActivity : AppCompatActivity() {
    override fun onCreate(savedInstanceState: Bundle?) {
        super.onCreate(savedInstanceState)
        setContentView(R.layout.activity_main)
    }

    // 画面タッチ
    override fun onTouchEvent(event: MotionEvent?): Boolean {
        // view取得
        var iv :ImageView = findViewById(R.id.iv)

        // event?で null許容
        // event.actionが呼び出されたら発火
        when(event?.action) {
            MotionEvent.ACTION_DOWN -> iv.setImageResource(R.drawable.cat02) // タップ
            MotionEvent.ACTION_MOVE -> iv.setImageResource(R.drawable.cat03) // 移動
            MotionEvent.ACTION_UP -> iv.setImageResource(R.drawable.cat01) // 移動
        }

        return super.onTouchEvent(event)
    }


}
これでタップした時には、cat02の画像で、スワイプしたらcat03の画像、指を話したらcat01の画像が表示されるようになった。