この投稿は、Androidアプリ開発を学び始めたばかりの初心者向けに、ざっくりとレイアウトについて説明をするために記述しました。
レイアウトの中からRelativeLayout/LinearLayoutの基本についてピックアップしています。
はじめに
androidのアプリは基本的に、実際にアプリを動かす中身の部分と見た目の部分の二種類のファイルで作られています。
中身の部分は、javaというプログラミング言語で書かれていて、見た目の部分はxmlというマークアップ言語で書かれています。
この、見た目を作るxmlファイルのことをレイアウトファイルと呼び、ここで作ったレイアウト(見た目)をjava(中身)で動かしていきます。
レイアウトについて
レイアウトの中には、WidgetsとLayoutsの2種類があります。
Widgetsは部品、Layoutsは枠と考えてください。
Widgets(部品)は必ずLayouts(枠)の中にしか配置できません。また、Layouts(枠)の中にLayouts(枠)を入れることも可能です。
Widgets
Widgetsには、
- TextView
- 文字を表示する部品
- ImageView
- 画像を表示する部品
- ListView
- 要素をリストのように並べて表示させる部品
- Button
- ユーザーからのクリックの入力を得ることのできる部品
などがあります。

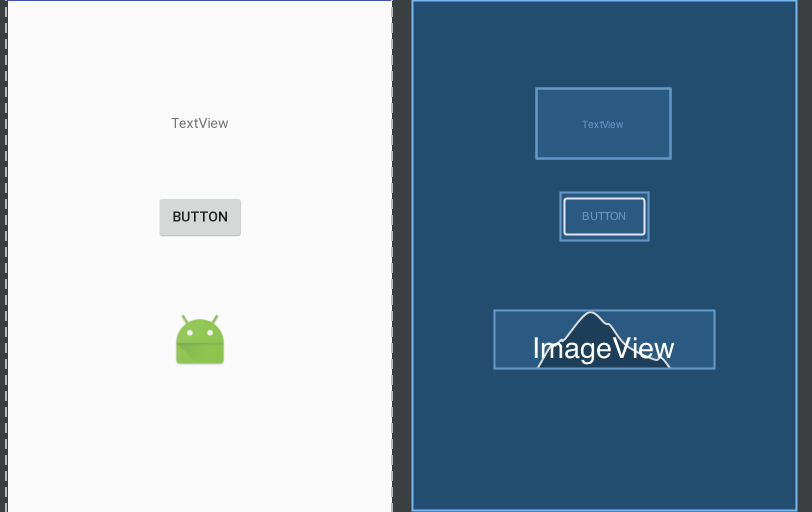
例えばこのように各WidgetsをGUI1上でドラッグアンドドロップして設置すると、裏側でxmlファイルが
    <TextView
        android:id="@+id/textView"
        android:layout_width="wrap_content"
        android:layout_height="wrap_content"
        android:text="TextView"/>

    <Button
        android:id="@+id/button"
        android:layout_width="wrap_content"
        android:layout_height="wrap_content"
        android:text="Button"
        />

    <ImageView
        android:id="@+id/imageView"
        android:layout_width="wrap_content"
        android:layout_height="wrap_content"/>
このように作成されています。(話をわかりやすくするために、位置関係やサイズのプロパティは省いています。)
逆に、xmlファイルに同様の記述をすれば、GUI上に同じようにWidgetsが描画されます。
Layouts
Layoutsには
- RelativeLayout
- 中の要素の位置関係を相対的に決めるレイアウト
- LinearLayout
- 縦か横1列に要素を整列させるレイアウト
- FrameLayout
- 要素を重ねて表示することのできるレイアウト
- ConstraintLayout
- 要素に制約を持たせて位置を決めることのできるレイアウト(去年くらいに出た新しいレイアウト)
などがあります。
これらをまとめてViewと呼び、このView自体はjavaで書かれています。
レイアウトファイルはxmlで書かれていると説明しました。xmlファイルに記述する<TextView />や<Button />などの部品はViewであり、これらの大もとはjavaで書かれています。
よって、これらをjavaから描画することも可能です。
それについてはまた別の機会に説明します。
Layouts(枠)の種類によって、Widgets(部品)の並び方が変わってきます。
この投稿では、まず理解しておくと良い、RelativeLayoutとLinearLayoutの並び方を中心に解説していきます。
レイアウトのプロパティ
各LayoutsによってWidgetsの並び方が変われば、設定できるプロパティも変わってきます。
まずは、様々なLayoutsで共通して設定できるプロパティについて解説します。
id
例えば、同じLayoutの中に複数のButtonがあったとします。当然、それぞれのButtonに対して役割を持たせたいですよね。
このように、Button1つ1つを識別したい時にidを使います。
簡単に言うと、それぞれのButtonに対して名前をつけてあげる役割を持っているのが、idです。
Viewにidを追加する
Viewに対して、idを追加(名前をつける)したいときには、
android:id="@+id/【つけたいid(名前)】"
というふうに記述します。
例えばButtonにButton1というidをつけたいときは
<Button
  android:id="@+id/Button1"
  〜〜中略〜〜/>
このように記述します。
width/height
width・heightはそれぞれ、幅・高さを表します。このプロパティで、各Viewの大きさを決めることが出来ます。
match_parent
- match_parentは、親のViewに対していっぱいに、幅・高さを調節することができるプロパティです。
wrap_content
- wrap_contentは、Viewの内容の大きさに合わせて、幅・高さを調節することができるプロパティです。
dp
- dpは、大きさを数字で絶対的に決める時に用いる単位です。Androidの端末には色々な画面サイズがあるので、色々な画面サイズに対応させるためには、相対的に大きさを決めたほうが好ましいです。
LinarLayout
LinearLayoutは、縦か横1列に要素を整列させることのできるレイアウトです。
orientation
縦に整列させるか、横に整列させるかを決めるには、orientationというプロパティを設定します。
horizontal
- 横に整列させる事ができます。

android:orientation="horizontal"
vertical
- 縦に整列させる事ができます。

android:orientation="vertical"
layout_weight
layout_weightは、余白部分をそれぞれのViewが指定した比率で分け合って使うことのできるプロパティです。
LinearLayoutには、画面いっぱいに均等にViewの大きさを決めてくれる、という特徴があります。
layout_weightを使うと、均等にViewの大きさを決めることができます。

この場合、それぞれにandroid:layout_weight="1"を設定しているため、ブタの横の大きさがすべて等しくなります。
<ImageView
    android:id="@+id/imageViewPink"
    android:layout_width="0dp"
    android:layout_height="match_parent"
    android:layout_weight="1"
    android:tint="@color/colorAccent"
    app:srcCompat="@drawable/icon"/>

<ImageView
    android:id="@+id/imageViewBlue"
    android:layout_width="0dp"
    android:layout_height="match_parent"
    android:layout_weight="1"
    android:tint="@color/colorPrimary"
    app:srcCompat="@drawable/icon"/>

<ImageView
    android:id="@+id/imageViewOrange"
    android:layout_width="0dp"
    android:layout_height="match_parent"
    android:layout_weight="1"
    android:tint="@android:color/holo_orange_dark"
    app:srcCompat="@drawable/icon"/>

<ImageView
    android:id="@+id/imageViewGreen"
    android:layout_width="0dp"
    android:layout_height="match_parent"
    android:layout_weight="1"
    android:tint="@android:color/holo_green_dark"
    app:srcCompat="@drawable/icon"/>
layout_weightを使うときの注意点
layout_weightによって、比でViewの幅・高さを決める場合、その方向の長さを0dpにする必要があります。
- horizontalのときは、横方向に整列させるため、
-
android:layout_width="0dp"とし、横方向の長さ(幅・width)を0dpとします。
-
- verticalのときは、縦方向に整列させるため、
-
android:layout_height="0dp"とし、縦方向の長さ(高さ・height)を0dpとします。
-
RelativeLayout
RelativeLayoutは、各Viewの位置関係を相対的に決めることのできるレイアウトです。

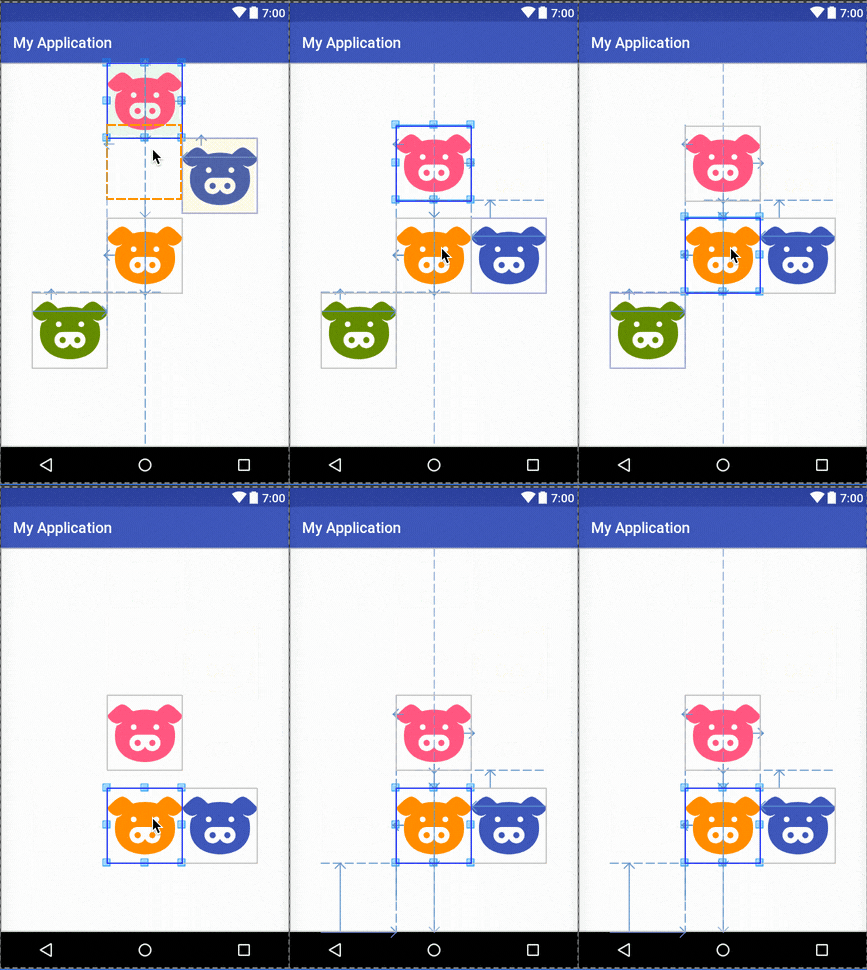
それぞれのブタの色で名前をつけました。名前は
ピンク→ImaveViewPink
青→ImaveViewBlue
オレンジ→ImaveViewOrange
緑→ImaveViewGreen
これらのブタは、一見バラバラに適当に並んでいるように見えますが、実はそれぞれに配置のプロパティが割り振られています。

この場合のコードは以下のようになっています。
<ImageView
        android:id="@+id/imageViewPink"
        android:layout_width="100dp"
        android:layout_height="100dp"
        android:layout_alignParentTop="true"
        android:layout_centerHorizontal="true"
        android:tint="@color/colorAccent"
        app:srcCompat="@drawable/icon"/>

    <ImageView
        android:id="@+id/imageViewBlue"
        android:layout_width="100dp"
        android:layout_height="100dp"
        android:layout_below="@+id/imageViewPink"
        android:layout_toEndOf="@+id/imageViewPink"
        android:tint="@color/colorPrimary"
        app:srcCompat="@drawable/icon"/>

    <ImageView
        android:id="@+id/imageViewOrange"
        android:layout_width="100dp"
        android:layout_height="100dp"
        android:layout_centerInParent="true"
        android:tint="@android:color/holo_orange_dark"
        app:srcCompat="@drawable/icon"/>

    <ImageView
        android:id="@+id/imageViewGreen"
        android:layout_width="100dp"
        android:layout_height="100dp"
        android:layout_below="@+id/imageViewOrange"
        android:layout_toStartOf="@+id/imageViewOrange"
        android:tint="@android:color/holo_green_dark"
        app:srcCompat="@drawable/icon"/>
親Viewに対するプロパティ
まずは親View2に対するプロパティです。
| プロパティ名 | 効果(trueを指定したとき) |
|---|---|
| layout_alignParentTop | 親のViewの上寄せて配置する |
| layout_alignParentBottom | 親のViewの下に寄せて配置する |
| layout_alignParentLeft | 親のViewの左に寄せて配置する |
| layout_alignParentRight | 親のViewの右に寄せて配置する |
| layout_centerHorizontal | 親のViewの水平方向の真ん中に配置する |
| layout_centerVertical | 親のViewの垂直方向の真ん中に配置する |
| layout_centerInParent | 親のViewの水平・垂直方向の真ん中(親のViewのど真ん中)に配置する |
| layout_alignParentStart | 親のViewの左に寄せて配置する |
| layout_alignParentEnd | 親のViewの右に寄せて配置する |
他のViewに対するプロパティ
次は他のViewに対するプロパティです。
| プロパティ名 | 効果 |
|---|---|
| layout_toRightOf | 指定したViewの右側に配置する |
| layout_toLeftOf | 指定したViewの左側に配置する |
| layout_toStartOf | 指定したViewの左側に配置する |
| layout_toEndOf | 指定したViewの右側に配置する |
| layout_above | 指定したViewの上側に配置する |
| layout_below | 指定したViewの下側に配置する |
| layout_alignTop | 指定したViewの上辺とプロパティを設定するViewの上辺を揃えて配置する |
| layout_alignBottom | 指定したViewの下辺とプロパティを設定するViewの下辺を揃えて配置する |
| layout_alignLeft | 指定したidのViewの左辺の位置とプロパティを設定するViewの左辺を揃えて配置する |
| layout_alignRight | 指定したidのViewの右辺の位置とプロパティを設定するViewの右辺を揃えて配置する |
| layout_alignStart | 指定したidのViewの左辺の位置とプロパティを設定するViewの左辺を揃えて配置する |
| layout_alignEnd | 指定したidのViewの右辺の位置とプロパティを設定するViewの右辺を揃えて配置する |
| layout_alignBaseline | 指定したidのViewのベースラインの位置とプロパティを設定するViewのベースラインを揃えて配置する |
ここで、先ほどのxmlを見てみましょう。
<ImageView
    android:id="@+id/imageViewPink"
    android:layout_width="100dp"
    android:layout_height="100dp"
    android:layout_alignParentTop="true"
    android:layout_centerHorizontal="true"
    android:tint="@color/colorAccent"
    app:srcCompat="@drawable/icon"/>

<ImageView
    android:id="@+id/imageViewBlue"
    android:layout_width="100dp"
    android:layout_height="100dp"
    android:layout_below="@+id/imageViewPink"
    android:layout_toEndOf="@+id/imageViewPink"
    android:tint="@color/colorPrimary"
    app:srcCompat="@drawable/icon"/>

<ImageView
    android:id="@+id/imageViewOrange"
    android:layout_width="100dp"
    android:layout_height="100dp"
    android:layout_centerInParent="true"
    android:tint="@android:color/holo_orange_dark"
    app:srcCompat="@drawable/icon"/>

<ImageView
    android:id="@+id/imageViewGreen"
    android:layout_width="100dp"
    android:layout_height="100dp"
    android:layout_below="@+id/imageViewOrange"
    android:layout_toStartOf="@+id/imageViewOrange"
    android:tint="@android:color/holo_green_dark"
    app:srcCompat="@drawable/icon"/>
-
imageViewPink
- ピンクのブタは、
-
android:layout_alignParentTop="true"親Viewの上寄せで配置する。 -
android:layout_centerHorizontal="true"垂直方向の中心に寄せて配置する。
-
- ピンクのブタは、
-
imageViewBlue
- 青のブタは、
-
android:layout_below="@+id/imageViewPink"ピンクのブタの下に配置する。 -
android:layout_toEndOf="@+id/imageViewPink"ピンクのブタの右に合わせて配置する。
-
- 青のブタは、
-
imageViewOrange
- オレンジのブタは、
-
android:layout_centerInParent="true"親Viewのど真ん中に配置する。
-
- オレンジのブタは、
-
imageViewGreen
- 緑のブタは、
-android:layout_below="@+id/imageViewOrange"オレンジのブタの下に配置する。- android:layout_toStartOf="@+id/imageViewOrange"オレンジのブタの左に合わせて配置する。
- 緑のブタは、
このように、配置したい場所を決めることが出来ます。
○○の下に、とか、左に合わせる、という設定(相対的に位置を決めている)をしているため、基準となるViewが動いたら他のViewも動いてしまいます。

確認
- 以下のようなレイアウトを作ってみましょう。
- どのLayoutを使うかわかりますか?
- Layoutの中にLayoutを入れることが出来ます
- 紙に絵を描いて予想を立ててからxmlで組み立ててみましょう

-
文字サイズ変更
-
android:textSize="60sp"~~spのspが文字サイズの単位です。(スクリーンショットのサイズはTextViewが60sp、Buttonが30sp)
-
-
画面いっぱいにきっちりViewを並べるとき
- LinearLayoutを使うのがGood
- Androidスマホには色々な画面サイズの機種があるので、相対的にサイズが決まるLinearLayoutを使うと、どの端末でも画面いっぱいにViewが並びます。
- LinearLayoutを使うのがGood
-
Buttonの幅
- スクリーンショットの数字ボタンは
layout_weight = "2"、計算記号ボタンはlayout_weight = "1"
- スクリーンショットの数字ボタンは