はじめに
この記事では、YOLOv8を使って物体検出、画像分類、セグメンテーションモデルを学習する方法を紹介します。使ってみて躓いた点も記載しています。参考になれば幸いです。
目的
オリジナルデータセットを使い、物体検出、画像分類、セグメンテーションモデルを学習できるようにする。
環境
- Google Colab (GPU)
- Python 3.9.16
- pytorch 1.13.1+cu116
YOLOv8とは?
- YOLOv5を開発したUltralyticsが開発した
- 今までのバージョンのYOLOよりも精度が高く、速い
- 物体検出、セグメンテーション、画像分類を行うことができる
- バックボーン, anchor free detection head, 損失関数が変更された
- 論文はまだ出ていない
使ってみた
以下のノートブックを使い、Google Colabで実行した。
https://github.com/aifield/CV_News/blob/main/materials/2023/202302/yolov8.ipynb
以下のコマンドでライブラリをインストールする。
!pip3 install ultralytics
Detection
データセット の準備
YOLO形式のデータセットをダウンロードし、yamlファイルを作成する。
今回はOpen image dataset からPersonラベルが付いているデータをダウンロードして学習に使用した。学習実行時にFileNotFoundErrorが出る場合は、yamlファイルに絶対パスを記載する。
| class | train data | valid data | test data |
|---|---|---|---|
| 1 (person) |
1000枚 | 333枚 | 500枚 |
例 data.yaml
names: ['person']
nc: 1

test: /content/drive/MyDrive/yolo_practice/yolov8/datasets/person/test/images
train: /content/drive/MyDrive/yolo_practice/yolov8/datasets/person/train/images
val: /content/drive/MyDrive/yolo_practice/yolov8/datasets/person/validation/images
Train
以下を実行して学習する。オプションを設定することができる。
!yolo detect train data=data.yaml model=yolov8n.pt epochs=100 imgsz=416 device=0 batch=96 name=person
オプション
デフォルト値は以下のファイルに書かれている。
https://github.com/ultralytics/ultralytics/blob/main/ultralytics/yolo/cfg/default.yaml
- data: データセットの情報が書かれているyamlファイルのパス
- model: モデルのパス
- epochs: エポック数
- batch: バッチサイズ
- imgsz: 入力する画像サイズ
- optimizer: 最適化関数 ['SGD', 'Adam', 'AdamW', 'RMSProp']の中から選択できる
- close_mosaic: mosaicオーグメンテーションを行わない最後のエポック数(10とした場合最後から10エポックはmosaicオーグメンテーションを行わない)
Test
以下を実行してテストする。オプションを設定することができる。testデータで評価したい場合は、split=testを指定する。
!yolo detect val model="runs/detect/person4/weights/best.pt" data=data.yaml split=test conf=0.25 iou=0.45
オプション
- model: モデルのパス
- data: データセットの情報が書かれたyamlファイル
- split: 評価に使用するデータセット(デフォルトはvalとなっているので注意)
- conf: 信頼度の閾値(デフォルトは0.001)
- iou: NMSのiouの閾値(デフォルトは0.7)
Predict
以下を実行して推論する。オプションを設定することができる。save=Trueを設定しないと推論結果が保存されないので注意。(設定しなくても保存されるようになりました)
!yolo detect predict model="runs/detect/person4/weights/best.pt" source="datasets/images" conf=0.25 iou=0.45 imgsz=416 save=True
オプション
- model: モデルのパス
- source: 画像や動画が入っているフォルダ
- conf: 信頼度の閾値(デフォルトは0.25)
- iou: NMSのiouの閾値(デフォルトは0.7)
- imgsz: 入力画像サイズ
- save:
推論結果を保存する場合はTrueにする必要がある(設定しなくても保存されるようになりました) - save_txt: 推論結果をテキストファイルで出力
- sace_conf: 推論結果をテキストファイルで出力するときに信頼度も記載する
- save_crop: bboxの箇所をcropして保存する(save_crop=Trueと書くとエラーが出る。save_cropのみ記載する)
- hide_labels: 推論結果を画像に表示するときにクラスラベルを表示しない
- hide_conf: 推論結果を画像に表示するときに信頼度を表示しない
- vid_stride: 動画に推論をかけるときのフレーム間隔
hide_labels=True hide_conf=Trueを設定すると、右図のようにバウンディングボックスのテキストを非表示にすることができる。

cropする場合はsave_cropを設定する。
!yolo detect predict model="runs/detect/person4/weights/best.pt" source="datasets/images" conf=0.25 iou=0.45 imgsz=416 save=True save_crop
cropされるとき少しパディングされるので、パディングなしでcropしたい場合は、githubからリポジトリをcloneし、plotting.pyのsave_one_boxのパディングの値を0に変更してから実行する必要がある。
def save_one_box(xyxy, im, file=Path('im.jpg'), gain=1.02, pad=10, square=False, BGR=False, save=True):
    # Save image crop as {file} with crop size multiple {gain} and {pad} pixels. Save and/or return crop
    xyxy = torch.tensor(xyxy).view(-1, 4)
    b = xyxy2xywh(xyxy)  # boxes
    if square:
        b[:, 2:] = b[:, 2:].max(1)[0].unsqueeze(1)  # attempt rectangle to square
    b[:, 2:] = b[:, 2:] * gain + pad  # box wh * gain + pad
    xyxy = xywh2xyxy(b).long()
    clip_coords(xyxy, im.shape)
    crop = im[int(xyxy[0, 1]):int(xyxy[0, 3]), int(xyxy[0, 0]):int(xyxy[0, 2]), ::(1 if BGR else -1)]
    if save:
        file.parent.mkdir(parents=True, exist_ok=True)  # make directory
        f = str(increment_path(file).with_suffix('.jpg'))
        # cv2.imwrite(f, crop)  # save BGR, https://github.com/ultralytics/yolov5/issues/7007 chroma subsampling issue
        Image.fromarray(crop[..., ::-1]).save(f, quality=95, subsampling=0)  # save RGB
    return crop
Classification
追記:
画像の前処理のコードを確認したところ、画像の前処理をする際に、決められたサイズ分だけcenter cropするようになっていたので注意。
issueも上がっているが、2023.07.16時点ではmainのコードは修正されていない。
https://github.com/ultralytics/ultralytics/issues/3029
問題の箇所
yolo/v8/classify/train.py build_dataset
-> yolo/v8/data/dataset.py ClassificationDataset classify_transforms
-> yolo/v8/data/augment.py classify_transforms CenterCrop
class CenterCrop:
    """YOLOv8 CenterCrop class for image preprocessing, i.e. T.Compose([CenterCrop(size), ToTensor()])"""

    def __init__(self, size=640):
        """Converts an image from numpy array to PyTorch tensor."""
        super().__init__()
        self.h, self.w = (size, size) if isinstance(size, int) else size

    def __call__(self, im):  # im = np.array HWC
        imh, imw = im.shape[:2]
        m = min(imh, imw)  # min dimension
        top, left = (imh - m) // 2, (imw - m) // 2
        return cv2.resize(im[top:top + m, left:left + m], (self.w, self.h), interpolation=cv2.INTER_LINEAR)
データセット準備
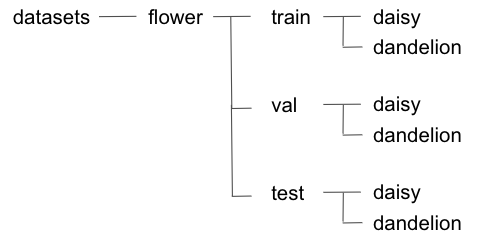
今回はroboflowのflowerデータセットを使用した。

以下のようなフォルダ構成でデータを格納した。

Train
以下を実行して学習する。オプションはDetectionとほぼ同じ。
dataにtrain, valid, testの親ディレクトリを設定する(FileNotFoundErrorが出る場合は絶対パスを記載する)。
dataset_path = "/content/drive/MyDrive/yolo_practice/yolov8/datasets/flowers"
!yolo classify train data={dataset_path} model=yolov8s-cls.pt epochs=100 imgsz=416 batch=96 device=0 name=flower
Test
以下を実行してテストする。valデータセットに対して評価を行うことができる。split=testとすると"TypeError: expected str, bytes or os.PathLike object, not NoneType"が発生するため、testフォルダに入っているデータに対して評価を行う方法がわからなかった。 split=testとするとtestデータに対して評価できるようになりました。
!yolo classify val model="runs/classify/flower2/weights/best.pt" data={dataset_path} imgsz=416
Predict
以下を実行して推論する。オプションはDetectionとほぼ同じ。save=Trueを設定しないと推論結果が保存されない。 (設定しなくても保存されるようになりました)
!yolo classify predict model="runs/classify/flower2/weights/best.pt" source="datasets/flowers_sample" imgsz=416 save=True
Segmentation
データセット準備
YOLO形式のデータセットをダウンロード(またはYOLO形式に変換)し、yamlファイルを作成する。
今回はcoco128-segデータセット(https://ultralytics.com/assets/coco128-seg.zip)を使用した。
1つの画像につき1つのテキストファイルが対応するようにラベルを作成する。
ラベルの形式は以下の通り。

yamlファイルの作成
例 coco128-seg.yaml
学習実行時にFileNotFoundErrorが出る場合は絶対パスを記載する。
今回はtrain, val, testに同じデータセットを設定している。
train: /content/drive/MyDrive/yolo_practice/yolov8/datasets/coco_segmentation/images/train2017
val: /content/drive/MyDrive/yolo_practice/yolov8/datasets/coco_segmentation/images/train2017
test: /content/drive/MyDrive/yolo_practice/yolov8/datasets/coco_segmentation/images/train2017

# Classes
names:
  0: person
  1: bicycle
  2: car
  3: motorcycle
  4: airplane
  5: bus
  :
  :
  :
Train
以下を実行して学習する。オプションはDetectionとほぼ同じ。
!yolo segment train data=coco128-seg.yaml model=yolov8s-seg.pt epochs=100 imgsz=416 batch=16 device=0 name=coco128
Test
以下を実行してテストする。オプションはDetectionとほぼ同じ。
!yolo segment val model=yolov8s-seg.pt data=coco128-seg.yaml split=test conf=0.25 iou=0.45
Predict
以下を実行して推論する。オプションはDetectionとほぼ同じ。save=Trueを設定しないと推論結果が保存されない。 (設定しなくても保存されるようになりました)
!yolo segment predict model=yolov8s-seg.pt source="datasets/images" conf=0.25 iou=0.45 save=True
boxes=Falseとすると右図のようにbboxを非表示にできる。
save_txt=Trueとすると、YOLO形式でラベルが保存される。

おわりに
この記事では、YOLOv8で物体検出、画像分類、セグメンテーションモデルを学習する方法を紹介しました。YOLOv5やYOLOv7を使ったことがある人なら、同じように学習することができると思います!
