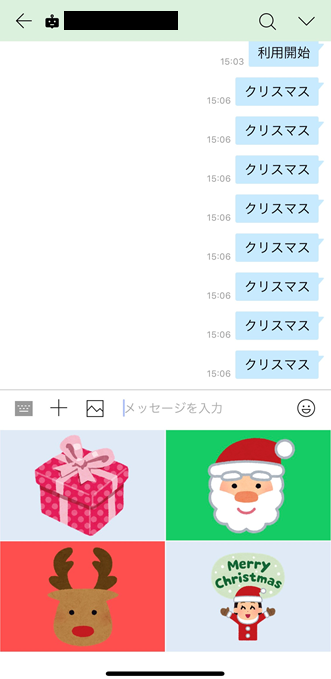
LINE WORKSでBotにリッチメニューを表示させてみた
LINE公式アカウントではボタンぽちぽちっとすれば表示できるリッチメニューも
LINE WORKSだとひと手間かかります。
そんなのめんどくさぁぁぁいというそこのあなた!!!
そんなあなたに簡単にリッチメニューを登録出来るレシピをご紹介致します。
下準備としてJWTの生成は以下をご参照ください。
https://qiita.com/iwaohig/items/5add44b10768eeb7ad6a
-- LINE WORKSリッチメニュー登録の手順
1.はじめに、コンテンツアップロードAPIで画像アップロードをします。
はい。あらかじめ温めておいたコンテンツアップロードのコードがこちらです。
   url = 'http://storage.worksmobile.com/openapi/message/upload.api'

    headers = {
        "consumerKey" : consumer_key,
        "authorization" : "Bearer " + token,
        "x-works-apiid": api_id,
     }

    files = {
         'resourceName': open('~/lineworks/script/Qiita.png', 'rb')

     }
    #リッチメニューの画像フォルダを指定する。


    r = requests.post(url=url, files=files, headers=headers)
こちらにさらに、
2.リッチメニュー登録APIでリッチメニュー登録
を追記していきます。
    url = 'https://apis.worksmobile.com/r/{}/message/v1/bot/{}/richmenu'.format(api_id,bot_no)

    headers = {
        "consumerKey" : consumer_key,
        "authorization" : "Bearer " + token,
        "x-works-apiid": api_id,
        'Content-Type' : 'application/json; charset=UTF-8'
    }

    payload ={
        "size": {
            "width": 2500,
            "height": 1686
        },
        "name": "Qiita richmenu",
        "areas": [{
             "bounds": {
                "x": 0,
                "y": 0,
                "width": 1250,
                "height": 843
            },
            "action": {
                "type": "message",
                "label": "クリスマス",
                "text": "クリスマス"
            }
        },{
             "bounds": {
                "x": 1250,
                "y": 0,
                "width": 1250,
                "height": 843
            },
            "action": {
                "type": "message",
                "label": "クリスマス",
                "text": "クリスマス"
             }
        },{
             "bounds": {
                "x": 0,
                "y": 843,
                "width": 1250,
                "height": 843
            },
            "action": {
                "type": "message",
                "label": "クリスマス",
                "text": "クリスマス"
             }
        },{
             "bounds": {
                "x": 1250,
                "y": 843,
                "width": 1250,
                "height": 843
            },
            "action": {
                "type": "message",
                "label": "クリスマス",
                "text": "クリスマス"
             }
        }]
        }
はい。これでリッチメニュー登録まで出来ました。
次に、
3.リッチメニュー画像設定APIでリッチメニュー画像設定
のひと手間を加えてあげます。
この時、あらかじめ用意しておいたリッチメニューの画像の格納先を加えてあげます。
    url = 'https://apis.worksmobile.com/r/{}/message/v1/bot/{}/richmenu/{}/content'.format(
        api_id,bot_no,rich_menu_id)

    headers = {
        "consumerKey" : consumer_key,
        "authorization" : "Bearer " + token,
        "x-works-apiid": api_id,
        'Content-Type' : 'application/json; charset=UTF-8'
    }

    payload ={
        "resourceId": resource_id
    }
はい。リッチメニューの画像設定が出来ました。
つづいて、
4.基本リッチメニュー設定APIで聞き本リッチメニューに登録
します。こちら、アカウント別に登録するリッチメニューを変えることもできるのですが、
今回は、すべての登録アカウントが使える想定で作っていきます。
    url = 'https://apis.worksmobile.com/r/{}/message/v1/bot/{}/richmenu/{}/account/all'.format(
        api_id,bot_no,rich_menu_id)

    headers = {
        "consumerKey" : consumer_key,
        "authorization" : "Bearer " + token,
        "x-works-apiid": api_id,
        'Content-Type' : 'application/json; charset=UTF-8'
    }

    r = requests.post(url=url,headers=headers)
はい!たったの4ステップでBot上にリッチメニュー表示が完成しましたーーー。
素敵ですねー。
それでは、今回のレシピのおさらいです。
- 登録の際に必要になるもの
- 登録済みBotのBotナンバー
- API ID
- サーバーAPI ID
- アクセストークン
- コンシューマーキー
- リッチメニュー用のjpg画像
リッチメニュー登録用画像はいつもペイントツールでピクセルを合わせた画像を作り、
それをパワーポイントに張り付け&さらに画像も張り付けで作ってます。
全体のバランスも整えやすいのでおススメです。
