記載日 : 2023/1/8
Angularで作った静的ページを、GithubPagesで公開するやり方を記述します。
なお、GithubPagesを使うには、対象レポジトリをpublicに設定する必要があります。
手順0,2はAngularでなくても基本的に同じだと思いますので、Reactなどを使う方にも参考に使って頂けるかと思います。
Angularのページを公開する上で、.gitignoreにdistフォルダを含めておくとGithubPagesへの公開作業がしやすいです。angular newコマンドでプロジェクトを作ると、自動でやってくれると思います。
環境
OS : Ubuntu
node.js : 12.22.9
Angular CLI : 15.0.4
Gitインストール済
Githubアカウント作成済
VSCodeインストール済(拡張機能からGit Graphをインストール済)
作業の流れ
0.Githubでプロジェクト用のレポジトリを用意する
1.Angularでページを作る
2.GithubPagesの設定をする
作業 (計30分)
0.Githubでプロジェクト用のレポジトリを用意する (3分)
Githubのウェブサイトでレポジトリを作る。
”your repositories”を選び、”New”ボタンから新しいレポジトリを作る。
このレポジトリのsettingsタブを選び、GithubPagesのURLをメモする。後で、このURLを使うことになる。
1.Angularでページを作る
開発環境でAngularプロジェクトを用意する。
以降では、以下のディレクトリ構成で記述していく。
プロジェクト配置用ディレクトリ
|
|ー プロジェクトディレクトリ(Pages_Trying)
|
|ーsrcディレクトリやangular.jsonなどの、
angularのプロジェクトファイル。
1.1.プロジェクト作成 (3分)
プロジェクト配置用ディレクトリで、Githubレポジトリをクローンする。
git clone [レポジトリURL]
プロジェクト配置用ディレクトリで、新しいプロジェクトを作成する。
”ng new [プロジェクト名]”でプロジェクトを作る。
.gitignoreも自動作成される。この中にはdistが記載されているので、自分で”dist”を記述する必要はない。
例として、以下プロジェクトを作る。
ng new Pages_Trying
1.2.ページ作成 (10分)
新しいページを作成する。
”ng g component [コンポネント名]”でコンポネントを作る 。
例として、以下ページを作る。
ng g component FirstPage
ng g component SecondPage
各ページのコードを見たい場合はこちら。
first-page.component.html
<p>first-page works!</p>
<button (click)="GoSecondPage()">Go Second Page</button>
first-page.component.ts
import { Component, OnInit } from '@angular/core';
import { Router } from '@angular/router'

@Component({
  selector: 'app-first-page',
  templateUrl: './first-page.component.html',
  styleUrls: ['./first-page.component.scss']
})
export class FirstPageComponent implements OnInit{
  constructor(private router: Router){}
  ngOnInit(): void {}

  GoSecondPage(){
    this.router.navigate(['home/secondpage']);
  }
}
second-page.component.html
<p>second-page works!</p>
<button (click)="GoFirstPage()">Go First Page</button>
second-page.component.ts
import { Component, OnInit } from '@angular/core';
import { Router } from '@angular/router'

@Component({
  selector: 'app-second-page',
  templateUrl: './second-page.component.html',
  styleUrls: ['./second-page.component.scss']
})
export class SecondPageComponent implements OnInit{
  constructor(private router: Router){}
  ngOnInit(): void {}

  GoFirstPage(){
    this.router.navigate(['home/firstpage']);
  }
}
1.3.ページのルーティング設定をする (5分)
ページ遷移を行えるように、ルーティングを設定する。
app.component.htmlの記述は決まり文句。
pp-routing.module.tsにはページ用のコンポネントをRoutes配列に設定する。
src/app/app.component.html
<router-outlet></router-outlet>
src/app/app-routing.module.ts
import { NgModule } from '@angular/core';
import { RouterModule, Routes } from '@angular/router';
import { FirstPageComponent } from 'src/app/pages/first-page/first-page.component'
import { SecondPageComponent } from 'src/app/pages/second-page/second-page.component'

const routes: Routes = [
  {
    path: '',
    redirectTo: 'home/firstpage',
    pathMatch: 'full'
  },
  {
    path: 'home',
    children: [
      {
        path: 'firstpage',
        component: FirstPageComponent
      },
      {
        path: 'secondpage',
        component: SecondPageComponent
      }
    ]
  }
];

@NgModule({
  imports: [RouterModule.forRoot(routes)],
  exports: [RouterModule]
})
export class AppRoutingModule { }
変更内容をgithubへプッシュする。
1.4.プロダクション ビルドする (1分)
公開ページ用のファイルをビルドする。
以下コマンドでプロダクションビルドを行うと、distフォルダ下に公開ページ用のファイルが出力される。
ng build --configuration=production
2.GithubPagesの設定をする
2.1.公開ブランチを用意する (3分)
まず、VSCodeでgh-pagesブランチを新しく作る。
次にdist/[プロジェクト名ディレクトリ]内のファイル全て(7つ)をプロジェクトディレクトリ下へ移動させる。
mv ./dist/[プロジェクト名ディレクトリ]/* ./
移動させたindex.htmlの<base href="/">を変更する。ドメインはhttps://[ユーザ名].github.io/[リポジトリ名]/にするのが無難。
<base href="https://middle-aged-rookie-programmer.github.io/Pages_Trying/">
変更内容をgithubへプッシュする。
2.2.githubPagesの設定をする (5分)
GithubのウェブサイトでGithubPagesを使うための設定を行う。
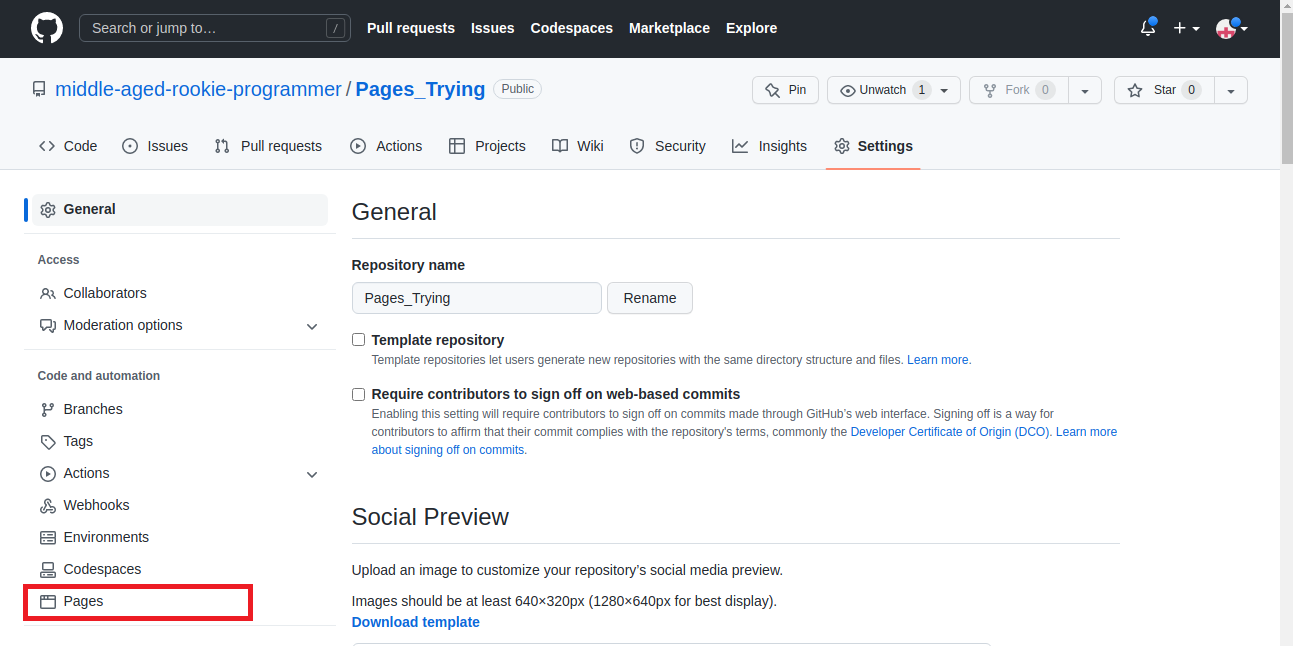
対象リポジトリの”settings”から左メニューの”Pages”を選ぶ。
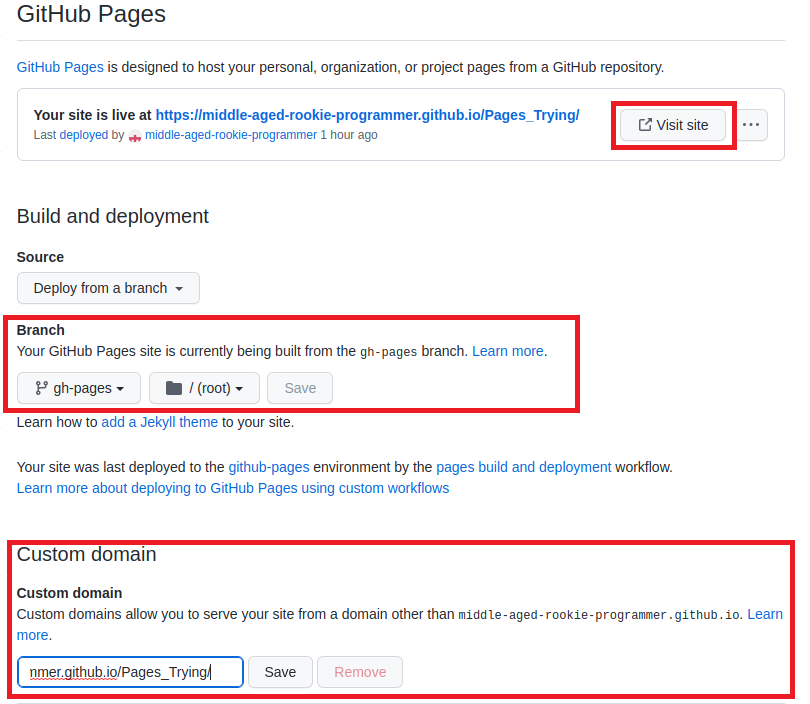
”Branch”に、先の公開用ブランチ(gh-pages)を設定する。
2つめのセレクタは”/ (root)”を設定する。
”Custom domain”に、2.1.のドメインを設定して”Save”ボタンを押す。
https://middle-aged-rookie-programmer.github.io/Pages_Trying/
作業がうまく出来ていれば、画面の上に方に”Visit site”ボタンが表示されるので、それを押すと作ったページを見ることができる。(ページが見れるようになるまでに少し時間が必要なので、1分ほど待つのが良い。)
参考までに、上記例のサイトを載せる。
GithubPages例
参考にさせて頂いたサイト
・プロダクション ビルドについて
https://angular.jp/guide/build