記載日:2021/4/24
リモートのブラウザをSeleniumで操作する環境を試しに作ろうと思ったのですが、色々手間取ってしまったので忘れないように記載します。
目標
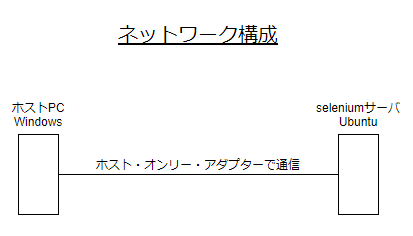
WindowsマシンにインストールしたVirtualBoxでseleniumサーバ(Ubuntu)を起動し、ホストのWindowsマシンのブラウザを操作すること。
なお、SeleniumサーバとWindowsマシンとは、ホスト・オンリー・アダプタ経由で通信する。
SeleniumのテストコードはPythonを用いる。
システム構成やネットワーク構成は以下の通り。

バージョン情報
・Windowsマシン:Windows10
・Seleniumサーバ:Ubuntu20.04
・Python:3.8.5(pip:20.0.2)
・Selenium:3.141.0
・Selenium-Server-Standalone:3.9.1
流れ
1.サーバ側で Selenium インストール。
2.クライアント側で WebDriver ダウンロード。
3.クライアント側で Selenium-Server-Standalone インストール。
Seleniumサーバからブラウザ操作までの道筋は、
Seleniumサーバ ⇒ Selenium-Server-Standalone ⇒ WebDriver ⇒ ブラウザ
の流れ。
4.サーバ側でテストファイル作成。
5.テスト実行。
作業
0.事前準備
・WindowsマシンにVirtualBoxをインストールする。
・Windowsにjavaをインストールする。
・VirtualBoxでUbuntuマシンを立ち上げる。
ホスト・オンリー・アダプタの設定を行う。
・UbuntuマシンにPython、pipをインストールする。
1.Seleniumのインストール
・本章はUbuntuマシンで行う。
・Seleniumサーバにプロジェクトディレクトリを作成する。
mkdir ~/Desktop/selenium
cd ~/Desktop/selenium
・Seleniumをインストールする。
pip3 install selenium
2.Selenium-Server-Standalone立上げ
・本章はWindowsホストマシンで行う。
・Selenium-Server-Standaloneをダウンロードする。
https://www.selenium.dev/downloads/
・WebDriverをダウンロードする。
※注意:適切なバージョンをダウンロードすること。
・Selenium-Server-StandaloneとWebDriverを同一フォルダ下へ移動させる。
(WebDriverのパスを通した場合は、同一フォルダ下へ移動させる必要は無いと思います。)
・Selenium-Server-Standaloneを起動する。
cd C:\Users\xxx\Downloads\selenium
java -jar selenium-server-standalone-x.x.x.jar
なお、Edgeも操作する場合は、以下のようにオプションを含めて実行する必要がある。
java -Dwebdriver.edge.driver=msedgedriver.exe -jar selenium-server-standalone-x.x.x.jar
3.テストコード作成
・本章はUbuntuマシンで行う。
・プロジェクトディレクトリ下に、テストファイルを作成する。
touch ~/Desktop/selenium/test.py
ディレクトリ構成は以下のようになる。
selenium
|- test.py
・test.pyに以下コードを記載する。
なお、ホスト・オンリー・アダプタ―経由でUbuntuマシンから見たWindowsホストマシンのIPアドレスが10.0.2.2なので、以下コードで10.0.2.2と記載している。
from selenium import webdriver
from selenium.webdriver.common.desired_capabilities import DesiredCapabilities
driver = webdriver.Remote(
  command_executor='http://10.0.2.2:4444/wd/hub',
  desired_capabilities=DesiredCapabilities.CHROME
  # desired_capabilities=DesiredCapabilities.FIREFOX
  # desired_capabilities=DesiredCapabilities.EDGE
)
driver.get("https://[IPやドメイン]")
4.テスト実行
・本章はUbuntuマシンで行う。
・プロジェクトディレクトリ下のテストファイルを実行する。WindowsホストマシンのChromeが立上り、目的のサイトが表示される。
python3 ~/Desktop/selenium/test.py
参考にさせて頂いたサイト
・基本について
https://www.selenium.dev/documentation/ja/
・Remote Web Driverについて
http://unagi-tabetai.hatenablog.com/entry/2015/05/25/125030
・Edge対応について
https://github.com/microsoft/edge-selenium-tools/issues/13