ElasticStack 6.0がGAされましたねー
てことで、ElasticStackのインストール方法について書きたいと思います( ゚Д゚)ゞビシッ
構成について
AWS上にサーバを構築してElasticStack6.0を導入します。
また、AmazonLinuxの基本的な設定は完了していることを前提とします。
- InstanceType: t2.medium
- OS: Amazon Linux AMI 2017.09.1 (HVM)
こんな感じの流れで書きますー
- Install OpenJDK 1.8
- Install Elasticsearch
- Install Kibana
- Install Logstash
- Install X-Pack in Elasticsearch
- Setup Password
- Install X-Pack in Kibana
- Install X-Pack in Logstash
- Test
参考サイト
Install Elasticsearch: Elasticsearchのインストール方法
Install Kibana: Kibanaのインストール方法
Install Logstash: Logstashのインストール方法
Install X-Pack: Elasticsearch/Kibana/LogstashのX-Packインストール方法
Install OpenJDK 1.8
$ java -version
java version "1.7.0_151"
OpenJDK Runtime Environment (amzn-2.6.11.0.74.amzn1-x86_64 u151-b00)
OpenJDK 64-Bit Server VM (build 24.151-b00, mixed mode)
$ sudo yum -y install java-1.8.0-openjdk-devel
$ sudo alternatives --config java

There are 2 programs which provide 'java'.

  Selection    Command
-----------------------------------------------
*+ 1           /usr/lib/jvm/jre-1.7.0-openjdk.x86_64/bin/java
   2           /usr/lib/jvm/jre-1.8.0-openjdk.x86_64/bin/java

Enter to keep the current selection[+], or type selection number: 2
$ java -version
openjdk version "1.8.0_151"
OpenJDK Runtime Environment (build 1.8.0_151-b12)
OpenJDK 64-Bit Server VM (build 25.151-b12, mixed mode)
PGPキーのインポートとリポジトリ設定
### Import PGP Key
$ rpm --import https://artifacts.elastic.co/GPG-KEY-elasticsearch
$ sudo vim /etc/yum.repos.d/elasticstack.repo
[elasticsearch-6.x]
name=Elasticsearch repository for 6.x packages
baseurl=https://artifacts.elastic.co/packages/6.x/yum
gpgcheck=1
gpgkey=https://artifacts.elastic.co/GPG-KEY-elasticsearch
enabled=1
autorefresh=1
type=rpm-md
Install Elasticsearch
Elasticsearchをインストールし、自動起動設定を行います。
$ sudo yum install elasticsearch
### 自動起動設定
$ sudo chkconfig --add elasticsearch
$ chkconfig --list | grep elasticsearch
elasticsearch  	0:off	1:off	2:on	3:on	4:on	5:on	6:off
Elasticsearchへのアクセスを制限しないため"network.host"を"0.0.0.0"とします。
もし、セキュリティ要件でアクセスを絞る必要がある場合は、任意の値で絞って頂ければと思います。
Elasticsearchの設定と動作確認
Elasticsearch.ymlに設定し、curlでレスポンスを確認します。
$ sudo vim /etc/elasticsearch/elasticsearch.yml
network.host: 0.0.0.0
$ service elasticsearch restart
Stopping elasticsearch:                                    [  OK  ]
### 動作確認
$ curl localhost:9200
{
  "name" : "5LbIuQE",
  "cluster_name" : "elasticsearch",
  "cluster_uuid" : "FpDjXOQXTBOzfiY9FH8Oaw",
  "version" : {
    "number" : "6.0.0",
    "build_hash" : "8f0685b",
    "build_date" : "2017-11-10T18:41:22.859Z",
    "build_snapshot" : false,
    "lucene_version" : "7.0.1",
    "minimum_wire_compatibility_version" : "5.6.0",
    "minimum_index_compatibility_version" : "5.0.0"
  },
  "tagline" : "You Know, for Search"
}
Install Kibana
Kibanaをインストールし、自動起動設定を行います。
$ sudo yum install kibana
$ sudo chkconfig --add kibana
$ chkconfig --list | grep kibana
kibana         	0:off	1:off	2:on	3:on	4:on	5:on	6:off
Kibana設定
Elasticsearch同様にKibanaへのアクセス制限はしないため、"server.host"を"0.0.0.0"とします。
あれ?フルアクセスを許可していいの?と思う方もいるかもですが、AWSで構築しているため、SecurityGroupで制限をかけている前提としています。
KibanaからアクセスするElasticsearchは、同一のサーバのためlocalhostに設定します。
$ sudo vim /etc/kibana/kibana.yml
server.host: 0.0.0.0
elasticsearch.url: "http://localhost:9200"
$ service kibana start
Install Logstah
Logstashをインストールします。
$ sudo yum install logstash
### Logstashのステータス確認
$ initctl status logstash
logstash stop/waiting
Install X-Pack in Elasticsearch
ここからX-Packのインストールを実施します。
対話型で聞かれるので全て"y"とします。
$ cd /usr/share/elasticsearch/
$ bin/elasticsearch-plugin install x-pack
-> Downloading x-pack from elastic
[=================================================] 100%
@@@@@@@@@@@@@@@@@@@@@@@@@@@@@@@@@@@@@@@@@@@@@@@@@@@@@@@@@@@
@     WARNING: plugin requires additional permissions     @
@@@@@@@@@@@@@@@@@@@@@@@@@@@@@@@@@@@@@@@@@@@@@@@@@@@@@@@@@@@
* java.io.FilePermission \\.\pipe\* read,write
* java.lang.RuntimePermission accessClassInPackage.com.sun.activation.registries
* java.lang.RuntimePermission getClassLoader
* java.lang.RuntimePermission setContextClassLoader
* java.lang.RuntimePermission setFactory
* java.net.SocketPermission * connect,accept,resolve
* java.security.SecurityPermission createPolicy.JavaPolicy
* java.security.SecurityPermission getPolicy
* java.security.SecurityPermission putProviderProperty.BC
* java.security.SecurityPermission setPolicy
* java.util.PropertyPermission * read,write
* java.util.PropertyPermission sun.nio.ch.bugLevel write
See http://docs.oracle.com/javase/8/docs/technotes/guides/security/permissions.html
for descriptions of what these permissions allow and the associated risks.

Continue with installation? [y/N]y
@@@@@@@@@@@@@@@@@@@@@@@@@@@@@@@@@@@@@@@@@@@@@@@@@@@@@@@@@@@
@        WARNING: plugin forks a native controller        @
@@@@@@@@@@@@@@@@@@@@@@@@@@@@@@@@@@@@@@@@@@@@@@@@@@@@@@@@@@@
This plugin launches a native controller that is not subject to the Java
security manager nor to system call filters.

Continue with installation? [y/N]y
Elasticsearch keystore is required by plugin [x-pack], creating...
-> Installed x-pack
Setup Password
以下、ユーザのパスワード設定を行います。
6系からはパスワード設定を行うことで認証が行えるようになります。
- Built-in User
- elastic
- kibana
- logstash_system
$ bin/x-pack/setup-passwords interactive
Initiating the setup of reserved user elastic,kibana,logstash_system passwords.
You will be prompted to enter passwords as the process progresses.
Please confirm that you would like to continue [y/N]y

### 任意のパスワードを入力
Enter password for [elastic]: password
Reenter password for [elastic]: password
Enter password for [kibana]: password
Reenter password for [kibana]: password
Enter password for [logstash_system]: password
Reenter password for [logstash_system]: password
Changed password for user [kibana]
Changed password for user [logstash_system]
Changed password for user [elastic]
Install X-Pack in Kibana
次は、KibanaにX-Packをインストールします。
$ cd /usr/share/elasticsearch/
$ bin/kibana-plugin install x-pack
Attempting to transfer from x-pack

Attempting to transfer from https://artifacts.elastic.co/downloads/kibana-plugins/x-pack/x-pack-6.0.0.zip
Transferring 120307264 bytes....................
Transfer complete
Retrieving metadata from plugin archive
Extracting plugin archive
Extraction complete
Optimizing and caching browser bundles...
Plugin installation complete
KibanaからElasticsearchへアクセスするための認証情報を設定します。
$ sudo vim /etc/kibana/kibana.yml
### 44-45行目
elasticsearch.username: "kibana"
elasticsearch.password: "passowrd"
Install X-Pack in Logstash
Logstashも同様にX-Packのインストールをします。
$ bin/logstash-plugin install x-pack
Downloading file: https://artifacts.elastic.co/downloads/logstash-plugins/x-pack/x-pack-6.0.0.zip
Downloading [=============================================================] 100%
Installing file: /tmp/studtmp-50bc41a0e0c29dab53052053c168c4c9701ba564991a07c9bc8fd22030c2/x-pack-6.0.0.zip
Install successful
LogstashからElasticsearchへアクセスするための認証情報を設定します。
logstash.ymlの末尾に記載します。
$ sudo vim /etc/logstash/logstash.yml
xpack.monitoring.elasticsearch.url: "http://localhost:9200"
xpack.monitoring.elasticsearch.username: "logstash_system"
xpack.monitoring.elasticsearch.password: "password"
Test
Monitoringされていることを確認するため、テストでLogstashからElasticsearchに対してデータを格納します。
### テストデータ作成
$ sudo vim /etc/logstash/test.log
test
### configファイル作成
$ sudo vim /etc/logstash/conf.d/test.conf
input {
  file{
    path => "/etc/logstash/test.log"
    start_position => "beginning"
  }
}
output {
  elasticsearch {
    hosts => "localhost"
    user => "elastic"
    password => "password"
  }
}
### Logstashの起動
$ initctl start logstash
Kibanaで確認
Kibanaにアクセスして確認します。
(SecurityGroupが空いていることを前提)
- http://Global_IP:5601
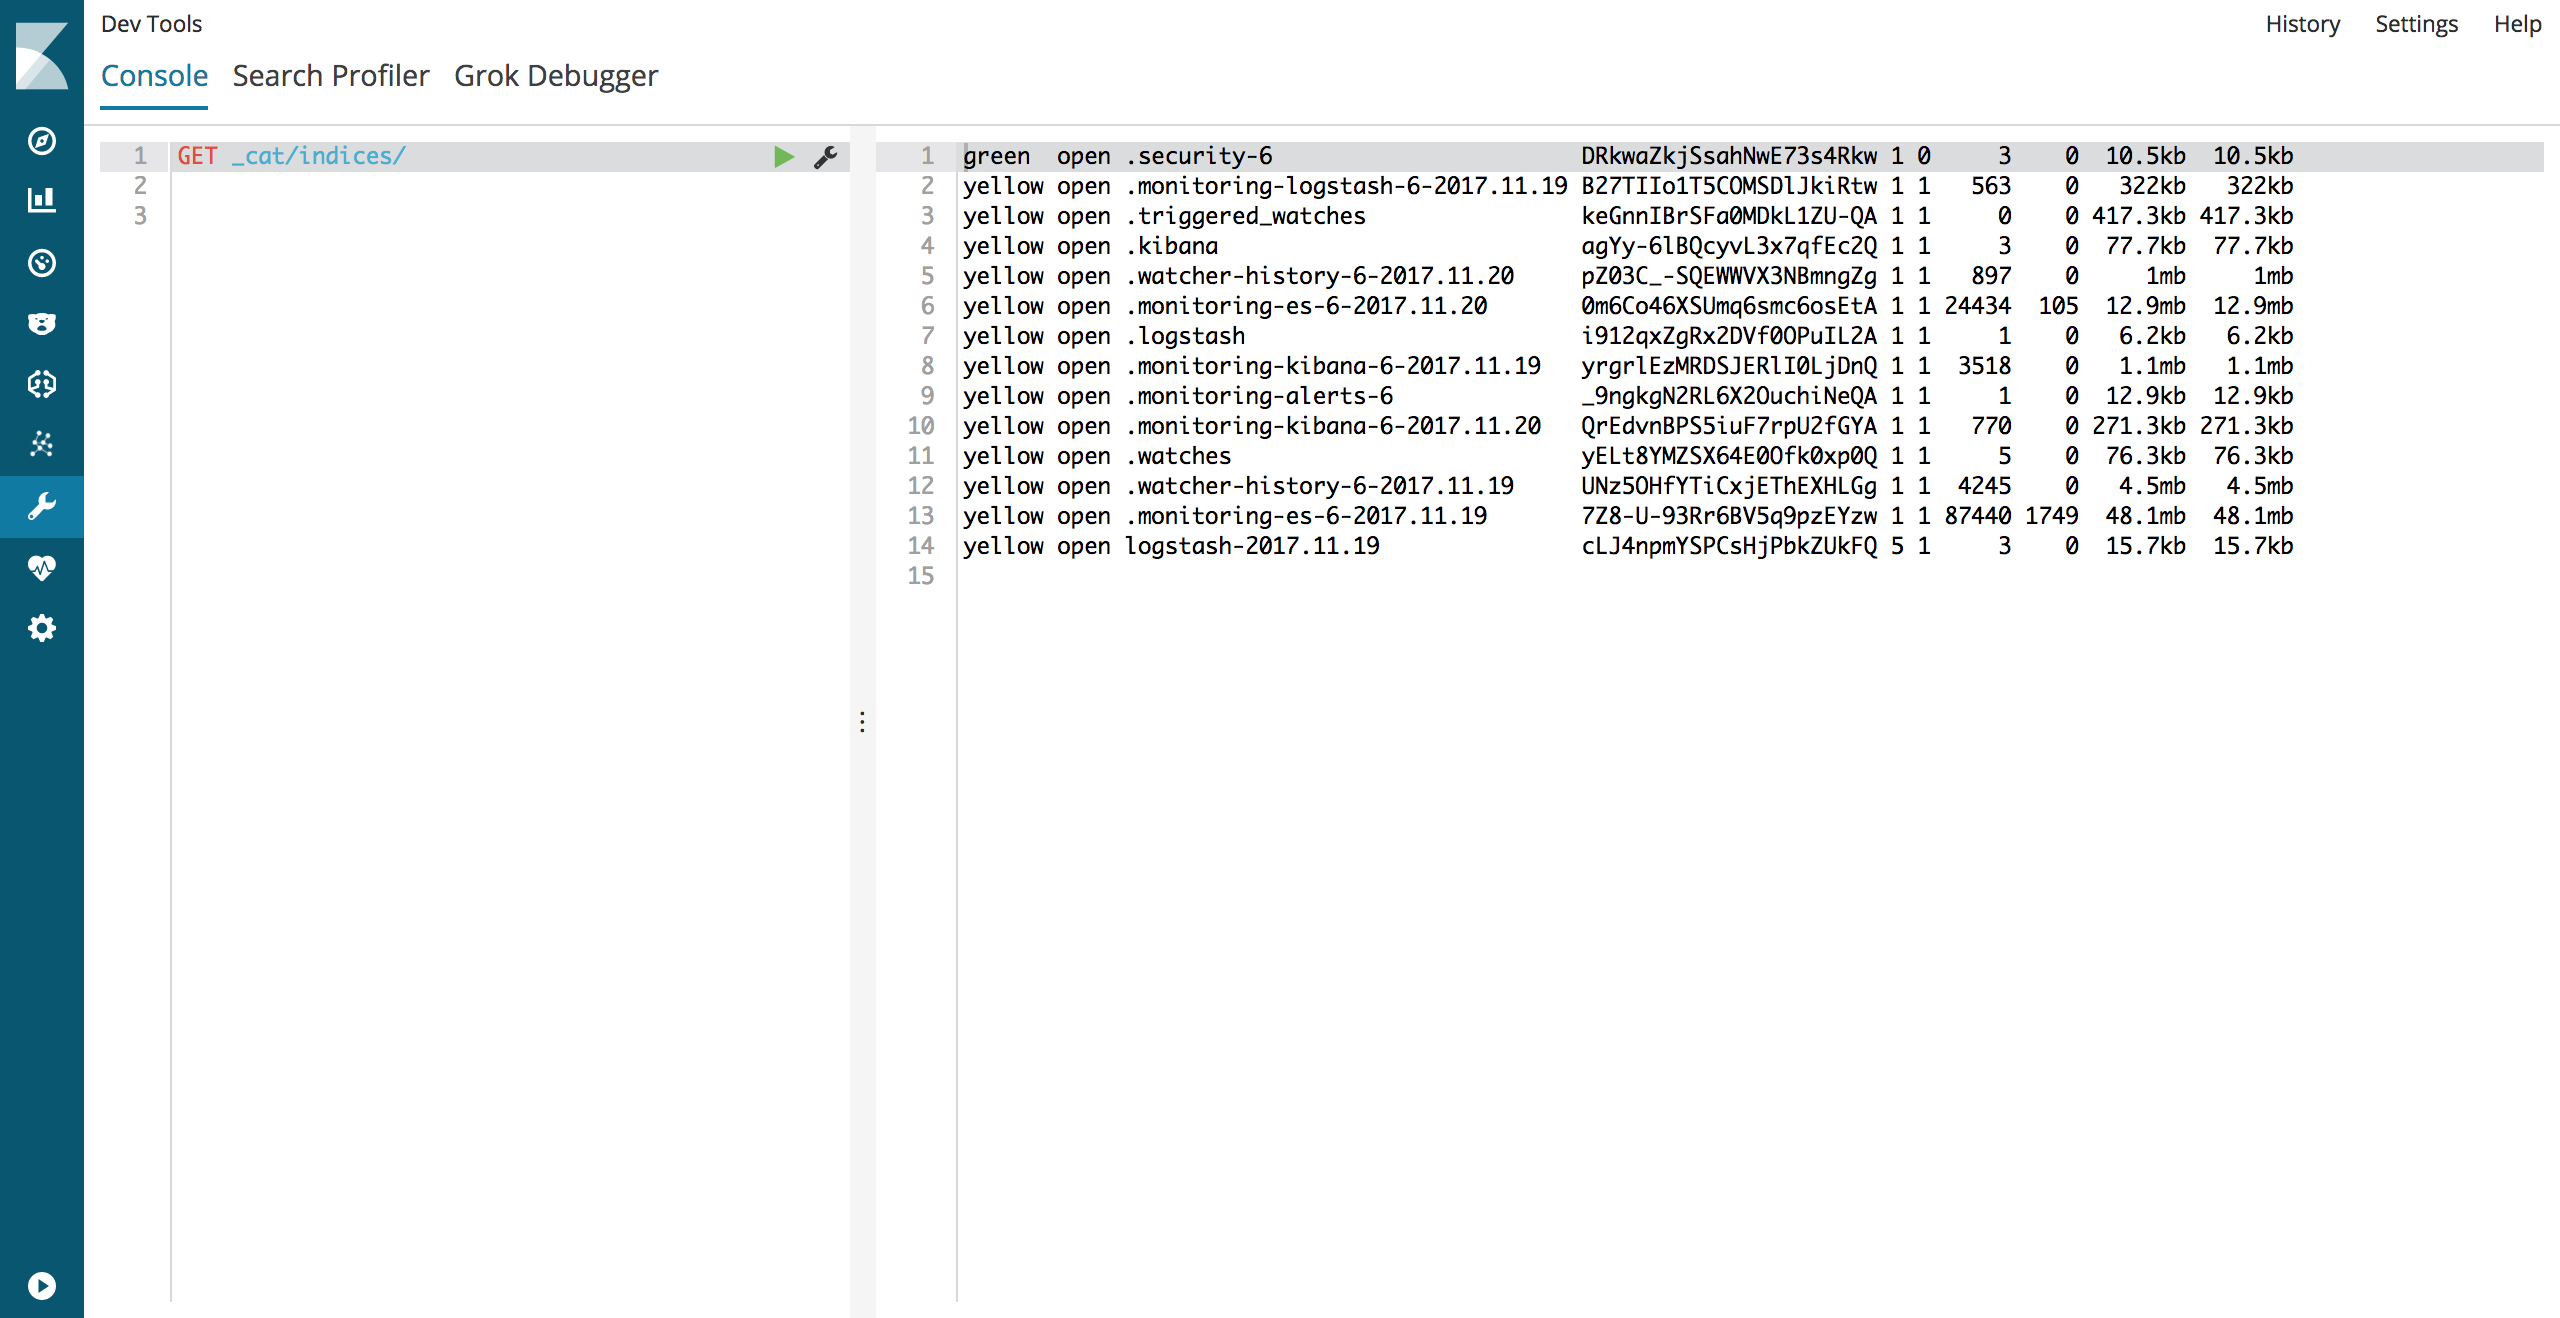
インデクシングされていることを"Dev Tools"で確認します。
以下のコマンドを実行し、インデクシングされていることが確認できますねヽ(*゚д゚)ノ
- GET _cat/indices/
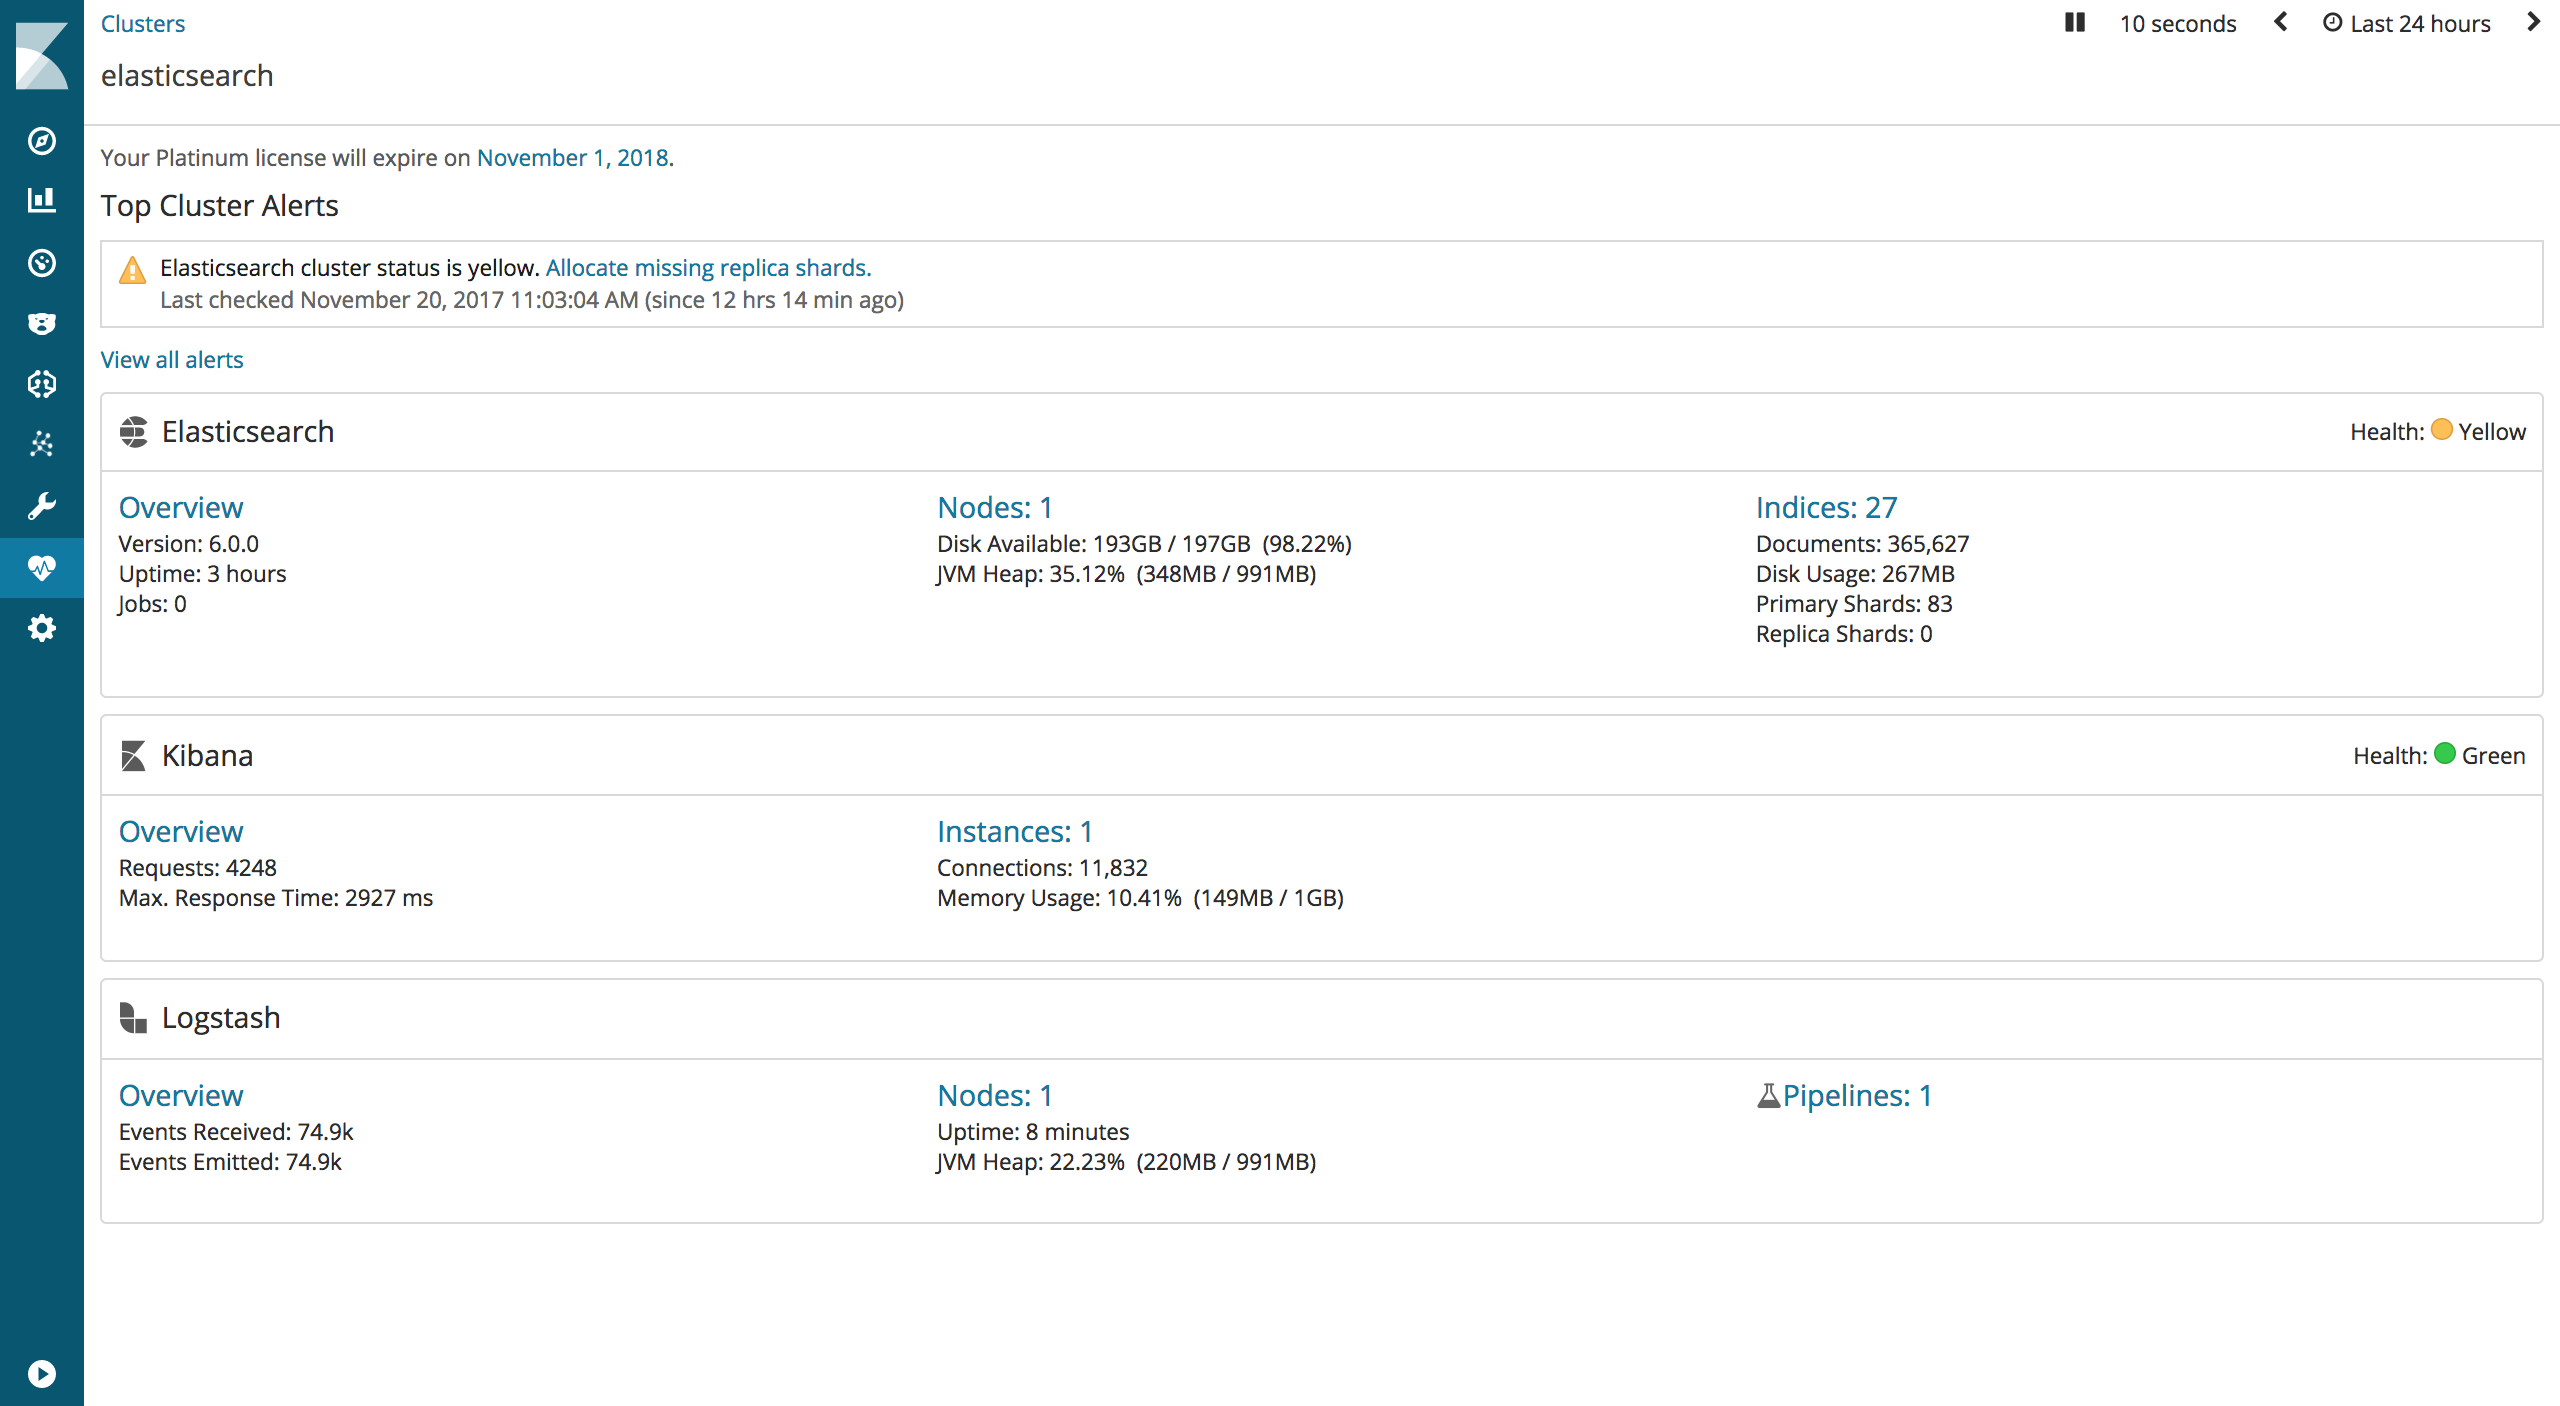
Monitoringをクリックし、以下の画面が表示されているかと思います。
もし、インデクシングされているのに表示されていない場合は、Time Rangeの確認をお願いします。
これにてElasticStack環境の構築は完了です。
ありがとうございましたー
Elasticsearchがロックかかって起動できない時
X-Packをインストールして、Elasticsearchが起動しようとしたら起動できず、ステータスを確認すると以下のメッセージが発生。
$ service elasticsearch status
elasticsearch dead but subsys locked
上記のメッセージが出たのでElasticsearchのログを確認します。
### /var/log/elasticsearch/elasticsearch.logを確認
[2017-xx-xxTxx:xx:xx7,937][ERROR][o.e.b.Bootstrap          ] [xxxxxx] node validation exception
[1] bootstrap checks failed
[1]: Transport SSL must be enabled for setups with production licenses. Please set [xpack.security.transport.ssl.enabled] to [true] or disable security by setting [xpack.security.enabled] to [false]
TLS/SSLを有効にするのか、X-Packのセキュリティを無効化するのかどっちかにしろと怒られている。
なので、TLS/SSLを有効にします。
$ vim /etc/elasticsearch/elasticsearch.yml
### 最終行に追記
xpack.security.transport.ssl.enabled: true
あとは、ロックかかっている削除し、起動します。
$ rm -f /var/lock/subsys/elasticsearch
### 起動
$ service elasticsearch start
Starting elasticsearch:                                    [  OK  ]
では、動作確認します。
### test
$ curl -u elastic localhost:9200
Enter host password for user 'elastic':
{
  "name" : "xxxxxx",
  "cluster_name" : "elasticsearch",
  "cluster_uuid" : "FpDjXOQXTBOzfiY9FH8Oaw",
  "version" : {
    "number" : "6.0.0",
    "build_hash" : "8f0685b",
    "build_date" : "2017-xx-xxTxx:xx:xx.xxxZ",
    "build_snapshot" : false,
    "lucene_version" : "7.0.1",
    "minimum_wire_compatibility_version" : "5.6.0",
    "minimum_index_compatibility_version" : "5.0.0"
  },
  "tagline" : "You Know, for Search"
}
問題なくアクセスできましたね。
以下は、参考サイトです。
捕捉
X-Packは、Trial版でインストールされているので、継続的にMonitoringを使用したい場合は、Basicライセンスの登録をお願いします(Monitoring以外は、有償版のライセンスが必要)
また、ライセンスを適用する際は、Securityを無効化してからライセンスファイルの更新作業を行ってください。