この記事は
今更だけど、DataBindingのやり方をまとめます。
実はDataBinding理解できるようになったのつい最近で、いまだに過去の自分の実装を見ながら、おぼつかない手付きでコード書いているので、そろそろQiitaにまとめた方がいいなと思いました。
なーんでこんな覚えられないんだろうな〜。
DataBindingとは
DataBindingとは、変更されたデータをコードからUI側(View)へ伝えるためのライブラリです。
似たようなライブラリにViewBindingもあります。
DataBindingとViewBindingの違いはこちらを参考にしてください。
DataBindingのやり方
では実際のコードを見つつ、databindingの使い方を見ていきましょう。
 概要
概要
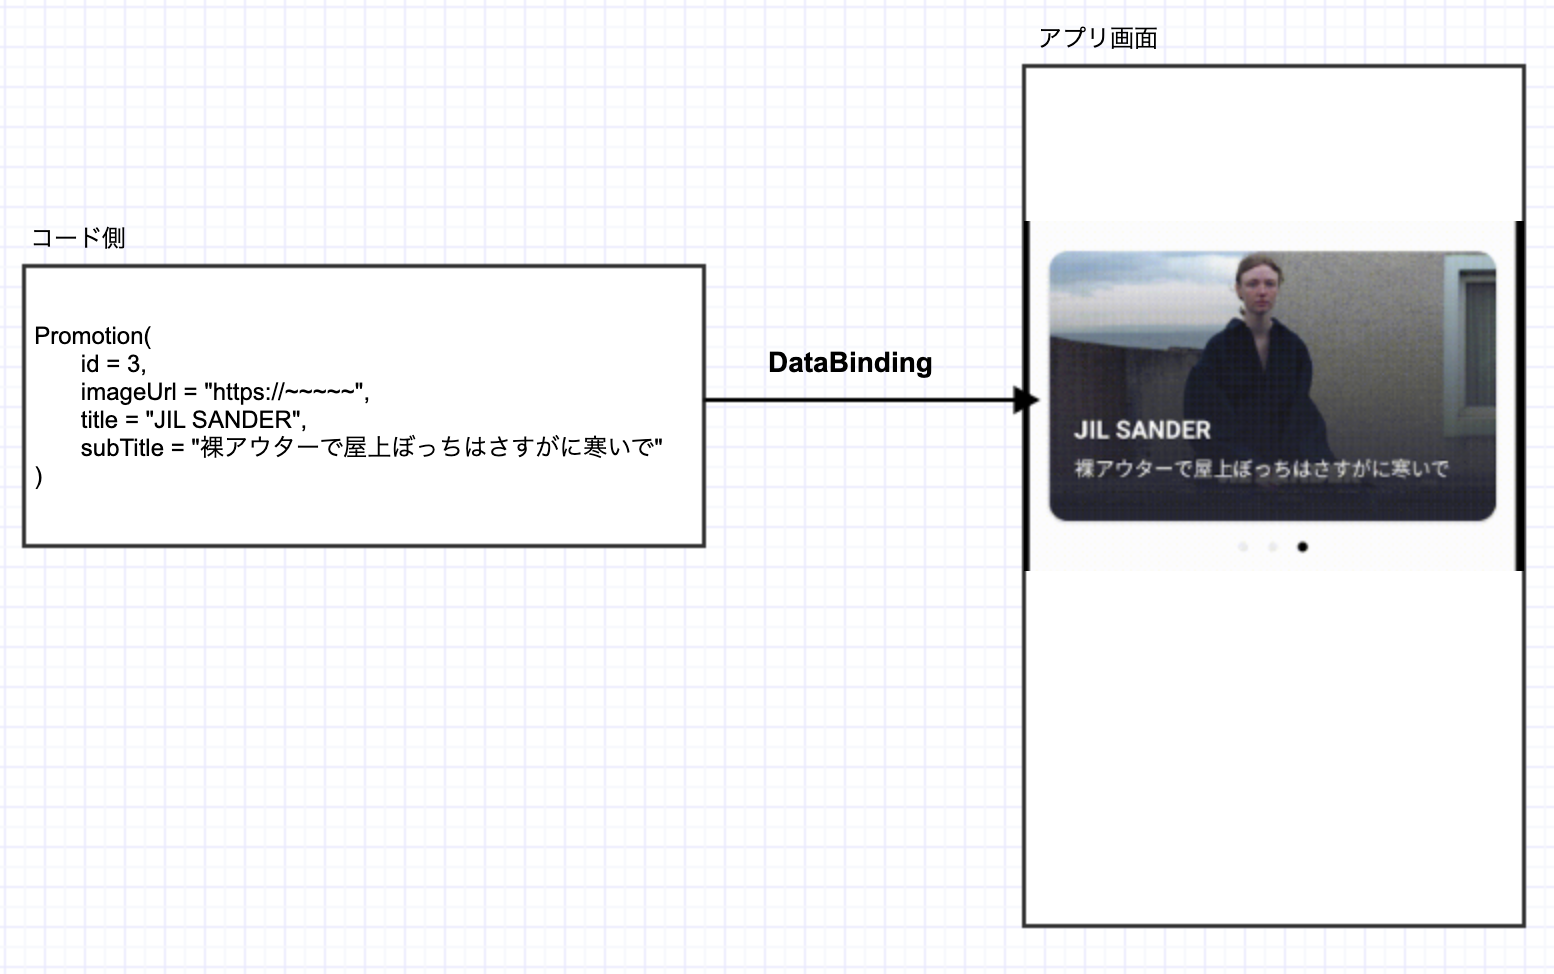
例えば、今回は以下のようなプロモーションカードの情報をコードからView側へ伝えることを考えます。
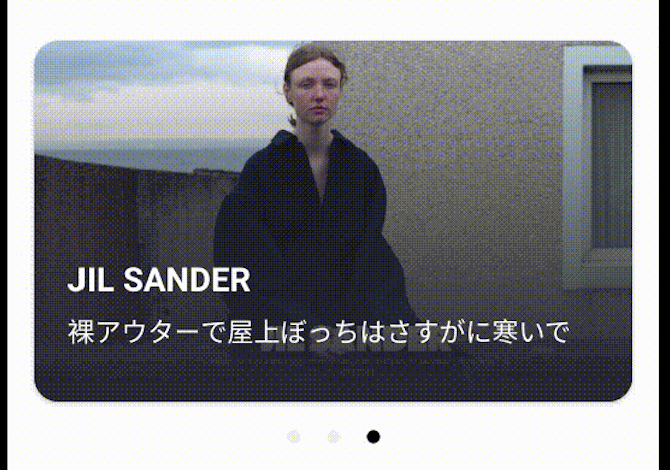
画像の下にあるドットインジケータを見ると分かると思いますが、このプロモーションカードは3枚あって、スワイプすると次のプロモーションが見れます。
この実装にあたってDataBindingを使う部分のイメージはこんな感じです。
かなりざっくりですが。。
 実践
実践
まずUI側に渡したいデータのデータクラスを作成します。
プロモーションカードは「画像」「画像のタイトル」「サブタイトル」で構成されていて、合計で三つのカードを表示するのでidも持っている方がいいかもしれません。
なので、今回は以下のようなデータクラスを作成しました。
data class Promotion(
    val id: Int,
    val imageUrl: String,
    val title: String,
    val subTitle: String
)
次に、データを表示したいView側にdatabindingの設定をします。
表示したいlayout xmlに移動して、一番上にカーソルをおいて右クリックするとShow Context Actionsが出てきます。
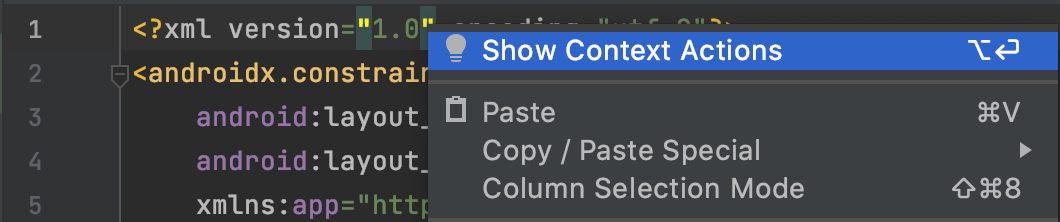
これをクリックするとConvert to databinding layoutと出てくるので、それを選択します。

そうすると自動でdatabindingの雛形がxmlに導入されます。
あとはdatabindingにnameとtypeを設定します。
-
name...コード側から受け取るデータクラスをどのような名前で受け取るか -
type...受け取りたいデータクラス
て感じです。
<data>
  <variable
     name="promotion"
	 type="com.nemo.androiduitraining.entity.Promotion" />
</data>
次に、表示したい画面(layout xml)の詳細設定を実装するためのclassで、xml側で設定したdatabidingとコード側から渡したいデータをバインド(紐付け)します。
class HomePromotionItem(
    private val promotion: Promotion,
) : BindableItem<HomePromotionItemBinding>() {
    override fun bind(viewBinding: HomePromotionItemBinding, position: Int) {
	    // viewBinding.[layout側で設定したname] = コンストラクタで受け取ったdataclass
		viewBinding.promotion = promotion
        viewBinding.executePendingBindings()
    }
}
これによって、ViewModelでdataclassの変更を受け取った場合に、更新されたデータを画面に渡すことができます。
ちなみにViewModelはこんな感じ。
@HiltViewModel
class HomeAllViewModel @Inject constructor() : ViewModel() {
    val renderData = MutableLiveData<RenderData>(RenderData(generatePromotionList()))
    data class RenderData(
        val promotionList: List<Promotion>
    )

    private fun generatePromotionList() : List<Promotion> {
        return listOf(
            Promotion(
                1,
                "https://media.wwdjapan.com/wp-content/uploads/2018/09/10101619/180910_parco_01.jpg",
                "私は裸になれない。",
                "みんなそうやろ。"
            ),
            Promotion(
                2,
                "https://m-78.jp/wp-content/uploads/2015/08/amu-02-660x466.jpg",
                "AMU EST",
                "ネコチャカワイレチュネヨチヨチヨチヨチ"
            ),
            Promotion(
                3,
                "https://s3-ap-northeast-1.amazonaws.com/statics.pen-online.jp/image/upload/creator/jil-sander-19-aw/jil-sander-19-aw_N0lDkYA.jpg",
                "JIL SANDER",
                "裸アウターで屋上ぼっちはさすがに寒いで"
            )
        )
    }
}
ここでは渡したいデータ(プロモーションカードの情報が入っているリスト)を、RenderDataという名前のデータクラスで管理し、レンダリングしたいデータとリストを紐付けています。紐付けができたら、RenderDataクラスをMutableLiveDataを使ってサブスクライブ可能にします。
最後に、更新されたデータをUIのどの位置に表示したいかを設定します。
<ImageView
	  android:id="@+id/promotion_image"
	  android:layout_width="0dp"
	  android:layout_height="0dp"
	  android:scaleType="centerCrop"
	  app:imageUrl="@{promotion.imageUrl}"   // here
	  app:layout_constraintDimensionRatio="W,16:9"
	  app:layout_constraintBottom_toBottomOf="parent"
	  app:layout_constraintEnd_toEndOf="parent"
	  app:layout_constraintStart_toStartOf="parent"
	  app:layout_constraintTop_toTopOf="parent" />


<TextView
	  android:id="@+id/promotion_title"
	  android:layout_width="wrap_content"
	  android:layout_height="wrap_content"
	  android:layout_marginStart="20dp"
	  android:layout_marginBottom="8dp"
	  android:text="@{promotion.title}"   // here
	  android:textColor="@color/white"
	  android:textSize="20sp"
	  android:textStyle="bold"
	  app:layout_constraintBottom_toTopOf="@id/promotion_sub_title"
	  app:layout_constraintStart_toStartOf="parent" />

<TextView
	  android:id="@+id/promotion_sub_title"
	  android:layout_width="wrap_content"
	  android:layout_height="wrap_content"
	  android:layout_marginStart="20dp"
	  android:layout_marginBottom="32dp"
	  android:text="@{promotion.description}"   // here
	  android:textColor="@color/white"
	  android:textSize="13sp"
	  app:layout_constraintBottom_toBottomOf="@id/promotion_image"
	  app:layout_constraintStart_toStartOf="parent" />
これで、
View側のステータスの変化を受け取る
→ データを更新する
→ 更新したデータをViewに表示する(レンダリングする)
という一連の流れが実装できました。