はじめに
以前、Zabbix6.0を使用したOpenShiftクラスター監視を行い、こちらで公開してから2年が経過しました。
先日リリースされたZabbix7.0 LTSを使用し、再度OpenShiftの監視設定を行いましたので、手順および考慮事項をまとめます。
Zabbix7.0 Kubernetes監視機能
Zabbix6.0と変わらず、Zabbix Helm Chartを使用してKubernetesクラスタにZabbixプロキシとZabbixエージェントをインストールし、KubernetesノードやPodに関する情報を収集します。
提供されるKubernetes監視用テンプレートは以下の6つです。
- Kubernetes nodes by HTTP
- Kubernetes cluster state by HTTP
- Kubernetes API server by HTTP
- Kubernetes Controller manager by HTTP
- Kubernetes Scheduler by HTTP
- Kubernetes kubelet by HTTP
Prerequisites
Kuberbetes監視の前提条件は、以下の通りです。
- Kubernetes cluster 1.26
- Helm 3.0+
- Zabbix server 6.0+
- kube-state-metrics 2.2.0, 2.9.2
今回使用した環境
・Zabbix Server 7.0.0(こちらで記事にした環境です)
・OpenShift(Red Hat OpenShift on IBM Cloud):v4.14.24_1566
構成手順
1. OpenShiftクラスターへのZabbix Helm Chartのインストール
1.1 Helm 3 のインストール
前提となっているHelmが入っていない場合は、事前にインストールする必要があります。
# curl -fsSL -o get_helm.sh  https://raw.githubusercontent.com/helm/helm/main/scripts/get-helm-3
# chmod 700 get_helm.sh
# ./get_helm.sh
1.2 リポジトリをクローン
# git clone https://git.zabbix.com/scm/zt/kubernetes-helm.git
Cloning into 'kubernetes-helm'...
remote: Enumerating objects: 403, done.
remote: Counting objects: 100% (403/403), done.
remote: Compressing objects: 100% (401/401), done.
remote: Total 403 (delta 266), reused 0 (delta 0), pack-reused 0
Receiving objects: 100% (403/403), 172.47 KiB | 254.00 KiB/s, done.
Resolving deltas: 100% (266/266), done.
1.3 Chartのデフォルト設定値をzabbix_values.yamlにエクスポート
# cd kubernetes-helm
# helm show values . > ./zabbix_values.yaml
1.4 Valueの編集
以下の2点を修正します。
- (必須)zabbixProxy.env.ZBX_SERVER_HOSTをZabbix ServerのIPアドレスに変更
- (任意)kube-state-metrics.enabledパラメータ
デフォルトでは、チャートで3種(zabbix-proxy/zabbix-agent/zabbix-kube-state-metrics)のPodがデプロイされます。 ただし、kube-state-metricsが既ににKubernetesクラスターにインストールされている場合は、kube-state-metrics.enabledパラメータの値をfalseに設定することで、zabbix-kube-state-metricsをデプロイすることなく既存のkube-state-metricsを使用することができます。OpenShiftは、ClusterMonitoringとしてkube-state-metricsが存在しますので、今回はkube-state-metrics.enabled:falseとしました。
# vi zabbix_values.yaml

kube-state-metrics:
- enabled: true
+ enabled: false

zabbixProxy:
  env:
    - name: ZBX_SERVER_HOST
-     value: "127.0.0.1"
+     value: "<zabbix serverのIPアドレス>"
1.5 Zabbix用Namespaceの作成
今回は、zabbix-monitoringというNamespaceにしましたが、任意に設定可能です。
# oc new-project zabbix-monitoring
1.6 Kubernetes Helmをインストール
# helm install zabbix . --dependency-update -f ./zabbix_values.yaml -n zabbix-monitoring

Getting updates for unmanaged Helm repositories...
...Successfully got an update from the "https://prometheus-community.github.io/helm-charts" chart repository
Hang tight while we grab the latest from your chart repositories...
...Successfully got an update from the "zabbix-chart-6.4" chart repository
Update Complete. ⎈Happy Helming!⎈
Saving 1 charts
Downloading kube-state-metrics from repo https://prometheus-community.github.io/helm-charts
Deleting outdated charts
W0607 10:26:47.761596   91442 warnings.go:70] would violate PodSecurity "restricted:v1.24": host namespaces (hostNetwork=true, hostPID=true), hostPort (container "zabbix-agent" uses hostPort 10050), allowPrivilegeEscalation != false (container "zabbix-agent" must set securityContext.allowPrivilegeEscalation=false), unrestricted capabilities (container "zabbix-agent" must set securityContext.capabilities.drop=["ALL"]), restricted volume types (volumes "proc", "sys", "root" use restricted volume type "hostPath"), runAsNonRoot != true (pod or container "zabbix-agent" must set securityContext.runAsNonRoot=true), seccompProfile (pod or container "zabbix-agent" must set securityContext.seccompProfile.type to "RuntimeDefault" or "Localhost")
NAME: zabbix
LAST DEPLOYED: Fri Jun  7 10:26:46 2024
NAMESPACE: zabbix-monitoring
STATUS: deployed
REVISION: 1
TEST SUITE: None
NOTES:
Thank you for installing zabbix-helm-chrt.

Your release is named zabbix.
Zabbix agent installed:  "zabbix/zabbix-agent2:alpine-trunk"
Zabbix proxy installed:  "zabbix/zabbix-proxy-sqlite3:alpine-trunk"

Annotations:
app.kubernetes.io/name: zabbix-zabbix-helm-chrt
helm.sh/chart: zabbix-helm-chrt-1.3.3
app.kubernetes.io/version: "trunk"
app.kubernetes.io/managed-by: Helm


Service account created:
    zabbix-service-account

To learn more about the release, try:

  $ helm status zabbix -n zabbix-monitoring
  $ helm get all zabbix -n zabbix-monitoring
以上で、インストールは完了です。
ただし、Warningメッセージが出力されている通り、この状態ではzabbix-agentのDaemonSetはエラーでPodが作成されません。
1.7 カスタムSCCの作成
Gitの手順では、特に記載されていませんが、OpenShiftの場合は、本手順の1.6で出力されたWarningメッセージのような問題が発生し、追加で設定が必要となる場合があります。
本環境では、OpenShift4.11から追加されているrestricted-v2 SCCにより、kubernetes-helmのいくつかの設定が非準拠となりリソースが作成されませんでした。
参考)OpenShift Container Platform 4.11 Security and compliance
具体的には、以下のイベントが出力されていました。
# oc get events
LAST SEEN   TYPE      REASON              OBJECT                               MESSAGE
4m52s       Warning   FailedCreate        daemonset/zabbix-agent               Error creating: pods "zabbix-agent-" is forbidden: unable to validate against any security context constraint: [provider "anyuid": Forbidden: not usable by user or serviceaccount, provider restricted-v2: .spec.securityContext.hostNetwork: Invalid value: true: Host network is not allowed to be used, provider restricted-v2: .spec.securityContext.hostPID: Invalid value: true: Host PID is not allowed to be used, spec.volumes[0]: Invalid value: "hostPath": hostPath volumes are not allowed to be used, spec.volumes[1]: Invalid value: "hostPath": hostPath volumes are not allowed to be used, spec.volumes[2]: Invalid value: "hostPath": hostPath volumes are not allowed to be used, provider restricted-v2: .containers[0].hostNetwork: Invalid value: true: Host network is not allowed to be used, provider restricted-v2: .containers[0].containers[0].hostPort: Invalid value: 10050: Host ports are not allowed to be used, provider restricted-v2: .containers[0].hostPID: Invalid value: true: Host PID is not allowed to be used, provider "restricted": Forbidden: not usable by user or serviceaccount, provider "ibm-restricted-scc": Forbidden: not usable by user or serviceaccount, provider "nonroot-v2": Forbidden: not usable by user or serviceaccount, provider "nonroot": Forbidden: not usable by user or serviceaccount, provider "ibm-anyuid-scc": Forbidden: not usable by user or serviceaccount, provider "hostmount-anyuid": Forbidden: not usable by user or serviceaccount, provider "ibm-anyuid-hostpath-scc": Forbidden: not usable by user or serviceaccount, provider "hostnetwork-v2": Forbidden: not usable by user or serviceaccount, provider "hostnetwork": Forbidden: not usable by user or serviceaccount, provider "hostaccess": Forbidden: not usable by user or serviceaccount, provider "ibm-anyuid-hostaccess-scc": Forbidden: not usable by user or serviceaccount, provider "node-exporter": Forbidden: not usable by user or serviceaccount, provider "collectorforopenshift": Forbidden: not usable by user or serviceaccount, provider "ibm-privileged-scc": Forbidden: not usable by user or serviceaccount, provider "privileged": Forbidden: not usable by user or serviceaccount]
主な内容としては、Podの作成が以下のセキュリティコンテキスト制約(Security Context Constraints, SCC)に違反しているために拒否されています。
- hostNetwork 使用不可
- hostPID 使用不可
- hostPath ボリューム使用不可
- hostPort(ポート10050)使用不可
- anyuid 使用不可
これらの許可を設定したカスタムSCCを restricted-v2 から作成します。
# oc get scc restricted-v2 -o yaml > zabbix-scc.yaml
# vi zabbix-scc.yaml
Pod作成に影響した制限設定を許可し、SCC名をzabbix-scc(任意の名前)に指定します。
allowHostDirVolumePlugin: true
allowHostIPC: true
allowHostNetwork: true
allowHostPID: true
allowHostPorts: true
allowPrivilegeEscalation: true
allowPrivilegedContainer: true
allowedCapabilities:
- NET_BIND_SERVICE
apiVersion: security.openshift.io/v1
defaultAddCapabilities: null
fsGroup:
  type: MustRunAs
groups: []
kind: SecurityContextConstraints
metadata:
  annotations:
   (省略)
  name: zabbix-scc
  ownerReferences:
  - apiVersion: config.openshift.io/v1
    controller: true
    kind: ClusterVersion
    name: version
    uid: e3b6c13a-13cb-4146-b7f9-f156fe6fa3d4
  resourceVersion: "9067"
  uid: 24722fec-cc55-4913-84aa-675196eef991
priority: null
readOnlyRootFilesystem: false
requiredDropCapabilities:
- ALL
runAsUser:
  type: RunAsAny
seLinuxContext:
  type: MustRunAs
seccompProfiles:
- runtime/default
supplementalGroups:
  type: RunAsAny
users: []
volumes:
- configMap
- csi
- downwardAPI
- emptyDir
- ephemeral
- persistentVolumeClaim
- projected
- secret
- hostPath
SCCを作成し、サービスアカウントに適用します。
# oc create -f zabbix-scc.yaml
securitycontextconstraints.security.openshift.io/zabbix-scc created
# oc adm policy add-scc-to-user zabbix-scc -z zabbix-agent-service-account
clusterrole.rbac.authorization.k8s.io/system:openshift:scc:zabbix-scc added: "zabbix-agent-service-account"
1.8 Helm再デプロイ
# helm delete zabbix -n zabbix-monitoring
release "zabbix" uninstalled

# helm install zabbix . --dependency-update -f ./zabbix_values.yaml -n zabbix-monitoring
全てのPodが起動していることを確認します。(当環境の場合、2WorkerNodeの為、DaemonSetのzabbix-agentは2つ起動します)
 oc get pod -n zabbix-monitoring
NAME                            READY   STATUS    RESTARTS   AGE
zabbix-agent-fzp9j              1/1     Running   0          34m
zabbix-agent-kbd9k              1/1     Running   0          34m
zabbix-proxy-67bc7dbfd9-4wff6   1/1     Running   0          20m
2.Zabbix Server側の設定
テンプレートを適用し、ZabbixServerからOpenShiftのリソース情報を取得していきます。
2.1 Zabbix Proxyの作成
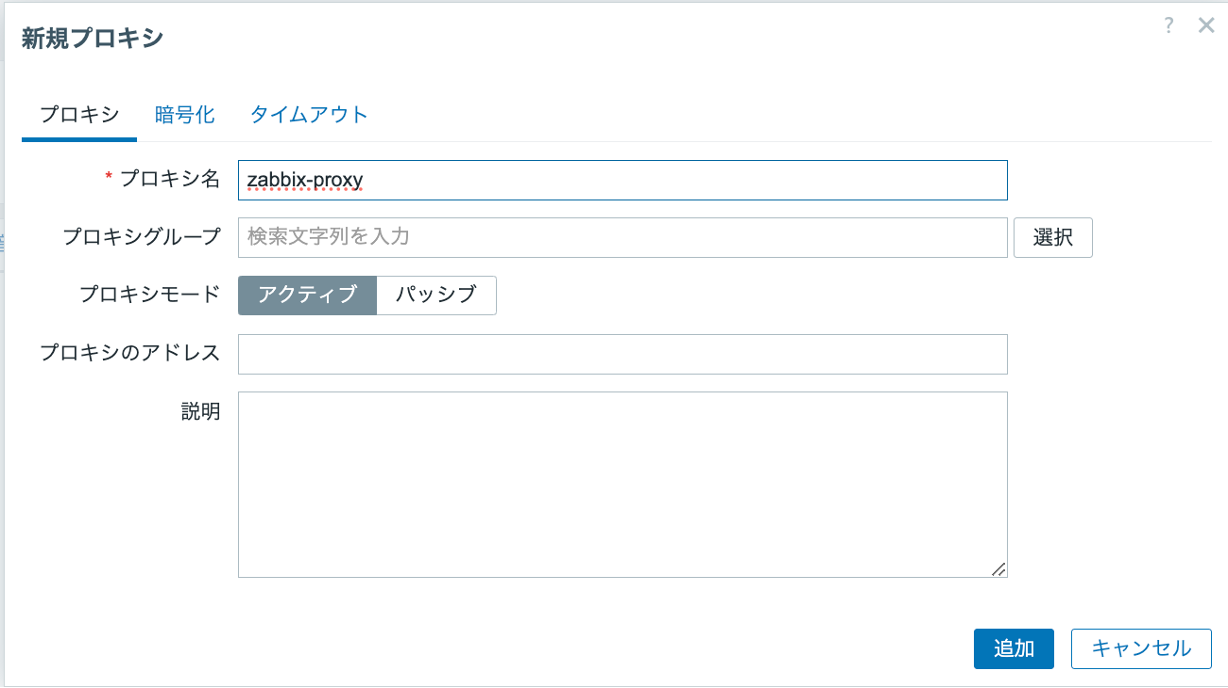
管理>プロキシ>プロキシの作成 をクリックして、Zabbix-Proxyを追加します。
2.2 Kubernetes nodes by HTTP テンプレートの適用
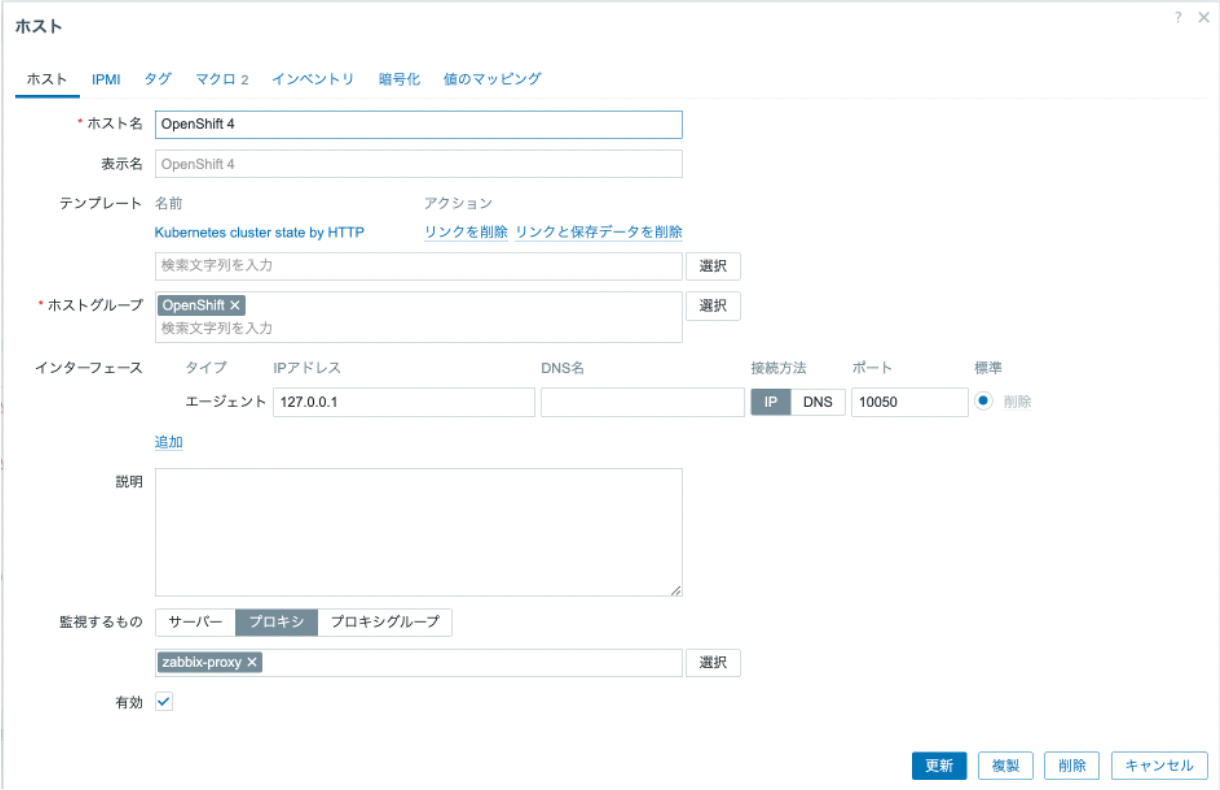
ノード監視用テンプレート "Kubernetes nodes by HTTP"を適用するため、ホストを作成します。
データ取集>ホスト>ホストの作成 をクリックしてホストを追加します。

- テンプレートは、"Kubernetes nodes by HTTP" を選択
- インターフェース > エージェント IPアドレス・ポートはデフォルトのまま入力
- プロキシによる監視で、作成したProxyを指定
作成したホストに対して、ホストマクロを設定します。
| マクロ | 値 |
|---|---|
| {$KUBE.API.URL} | https://<ホスト>:<ポート> 当環境ではhttps://c100.private.jp-tok.containers.cloud.ibm.com:31403 |
| {$KUBE.API.TOKEN} | zabbix-service-accountシークレットから取得する[※] |
※Tokenは以下のコマンドで取得
#oc get secret zabbix-service-account -n monitoring -o jsonpath={.data.token} | base64 -d
2.3 Kubernetes cluster state by HTTP テンプレートの適用
クラスター監視用テンプレート "Kubernetes cluster state by HTTP"を適用するため、ホストを作成します。
(2.2で"Kubernetes nodes by HTTP"テンプレートを適用したホストに、"Kubernetes cluster state by HTTP"を適用することはできません。ディスカバリーがバッティングし、エラーとなりますので、別のホストを設定する必要があります)
データ収集>ホスト>ホストの作成 をクリックしてホストを追加します。
- テンプレートは、"Kubernetes cluster state by HTTP" を選択
- インターフェース > エージェント IPアドレス・ポートはデフォルトのまま入力
- プロキシによる監視で、作成したProxyを指定
マクロは、2.2のKubernetes nodes by HTTP テンプレートの適用で作成したホストに設定した2つのマクロに加え、{$KUBE.STATE.ENDPOINT.NAME}を定義します。
| マクロ | 値 |
|---|---|
| {$KUBE.API.URL} | https://<ホスト>:<ポート> |
| {$KUBE.API.TOKEN} | zabbix-service-accountシークレットから取得 |
| {$KUBE.STATE.ENDPOINT.NAME} | kube-state-metrics |
{$KUBE.STATE.ENDPOINT.NAME}は、 Helmデプロイ時にzabbix_value.yamlでzabbixProxy.enabled: falseを指定し、既存のkube-state-metricsを使用する場合のみ設定する必要があります。
3. 取得データの確認
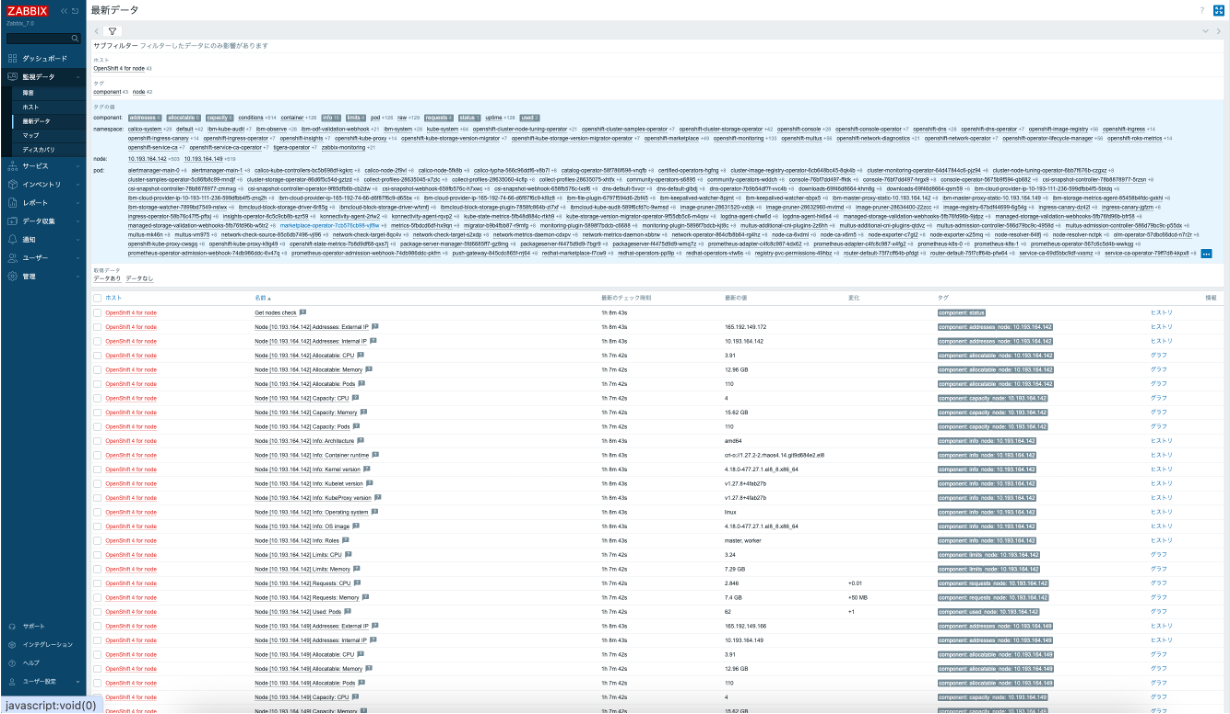
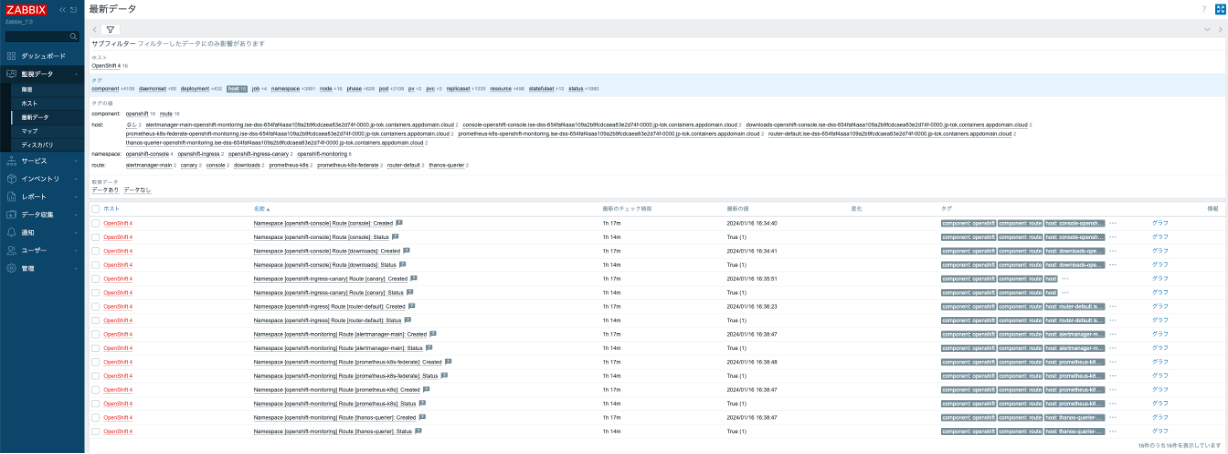
設定完了後、OpenShiftからのアイテムデータが取得できていることを確認します。
テンプレートによりzabbixに連携されるOpenShiftクラスター上のリソースデータは大変多いため、ここでは一部のアイテムと取得されるデータを参考に添付します。
4.ダッシュボード作成
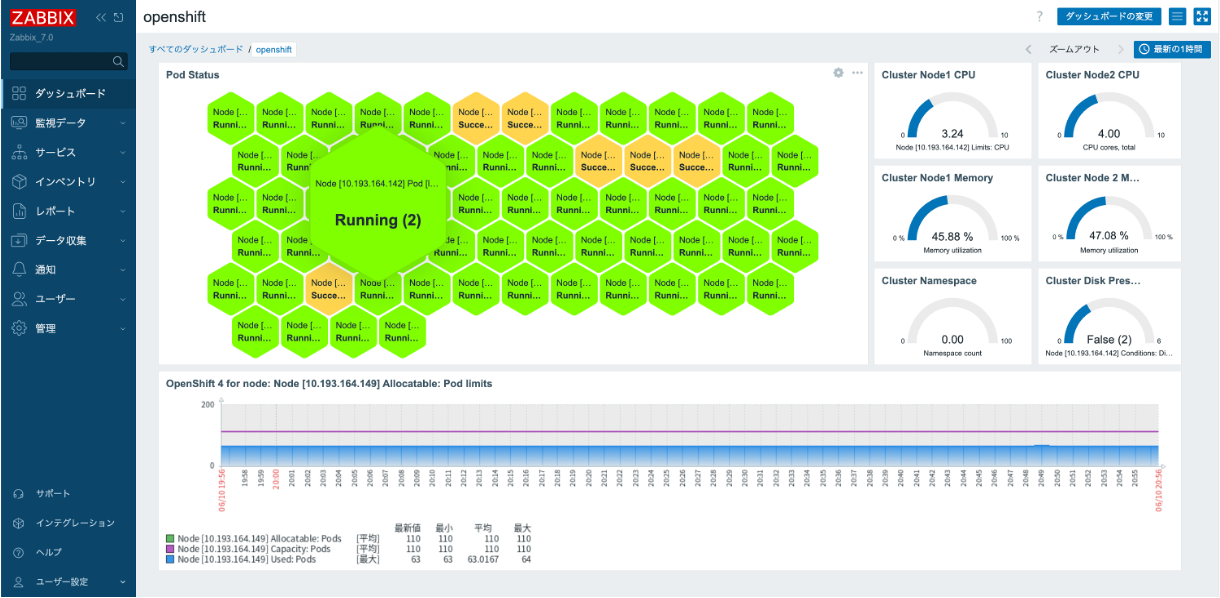
Zabbixコンソールでは、Kubernetes用のダッシュボードは提供されていないため、カスタム作成する必要があります。
Zabbix7.0から提供されたハニカムウィジェットを使用してOpenShift用ダッシュボードを作ってみました。
なお、六角形のセルをクリックした時にグラフやアイテムにリンクするような機能はなく、アイテムの値が表示されるのみです。
その他
-
コンポーネントバージョンの不一致
今回、Zabbix7.0リリース当日(2024/06/04)と3日後(2024/06/07)にそれぞれ別の環境でZabbix-OpenShift監視環境を構成したのですが、06/07に導入した環境のみ、Zabbix-proxyがバージョン7.2.0で導入されてしまい、以下のように接続できないという事象が発生しました。

zabbix_value.yamlにて、zabbix-proxyのimageはtrunkが指定されているため、タイミングによってはこのような事象が発生すると思われます。
対応:
zabbix_value.yamlのzabbixProxy.image.tagで”alpine-7.0.0”のように明示的にバージョンを指定することで解消します。
ちなみに、リリース当日(2024/06/04)に導入した環境のzabbix-proxyは、7.0.0rc3になっていました。


