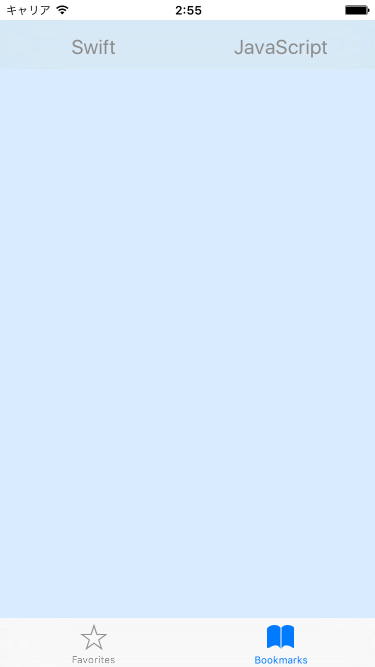
こんな感じのタブバーを作りたい
やること
- UIの実装
- タブバーの機能実装
- タブバーのデザインの変更
実装環境
- Xcode 7.2.1
- Swift 2.2
- iOS 9.2
参考にしたもの
【Swift】Tab Barの使い方。タブで画面を切り替える。(Swift 2.1、XCode 7.2、Android:無、iOS:有、興奮度:C)
タブバーの高さと、文字の位置・大きさを変えて、文字だけのタブバーを作る
Cocoaの日々: UIAppearance で色や画像を変える
1.UIの実装
この部分はStoryBoardで作成すればいいのでさっくり。(詳しいことはこちらのサイトに書いてある)
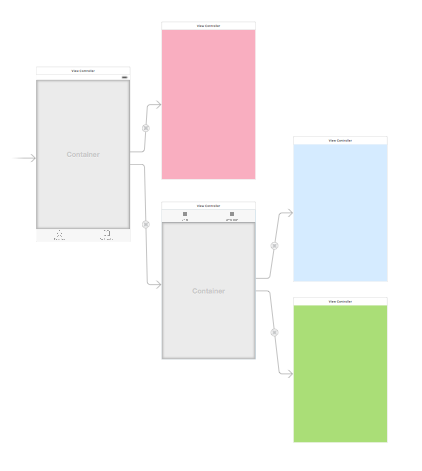
こんな感じにした。
ポイントはUITabBarControllerは使わず、UITabBarを使って実装している。
UITabBarItemのTagに数字を入力するのを忘れないようにすること。
このTagを使って切り替え機能を実装していく。
2.タブバーの機能実装
タブバー自体の動きは簡単。
UITabBarのボタン押して、ContainerViewの表示非表示を切り替えるだけである。
ただし、今回はTabBarを2つ扱うので、ViewControllerを二つ実装する必要がある。
class TabBar1ViewController: UIViewController, UITabBarDelegate {

    @IBOutlet weak var tabBar: UITabBar!
    @IBOutlet weak var view1: UIView!
    @IBOutlet weak var view2: UIView!

    override func viewDidLoad() {
        super.viewDidLoad()
        // Do any additional setup after loading the view, typically from a nib.
        tabBar.delegate = self;

        view1.hidden = false;
        view2.hidden = true;
    }

    func tabBar(tabBar: UITabBar, didSelectItem item: UITabBarItem) {
        if(item.tag == 1){
            view1.hidden = false;
            view2.hidden = true;
        }else if(item.tag == 2){
            view1.hidden = true;
            view2.hidden = false;
        }
    }
}
参考:【Swift】Tab Barの使い方。タブで画面を切り替える。(Swift 2.1、XCode 7.2、Android:無、iOS:有、興奮度:C)
同様のものをもう一つ作成し、両方のタブバーで切り替えられるようにする。
ここまでで機能そのものは完成した。
3.タブバーのデザインの変更
今回は上部のタブバーのみで文字のみの表示を行いたいのだが、ひとまず、文字を大きくして表示位置を変えてみる。
//タブバーアイテムのデザイン変更
UITabBarItem.appearance().setTitleTextAttributes([
    NSFontAttributeName: UIFont.systemFontOfSize(20), //文字の大きさを変更
    NSForegroundColorAttributeName: UIColor(red: 0.55, green: 0.55, blue: 0.55, alpha: 1.0) //文字の色を変更
    ], forState: UIControlState.Normal); //通常時
UITabBarItem.appearance().setTitleTextAttributes([
    NSForegroundColorAttributeName: UIColor(red: 0.55, green: 0.55, blue: 0.80, alpha: 1.0) //文字の色を変更
    ], forState: UIControlState.Selected); //選択時
UITabBarItem.appearance().titlePositionAdjustment = UIOffsetMake(0, -9); //文字の場所を移動
参考:タブバーの高さと、文字の位置・大きさを変えて、文字だけのタブバーを作る
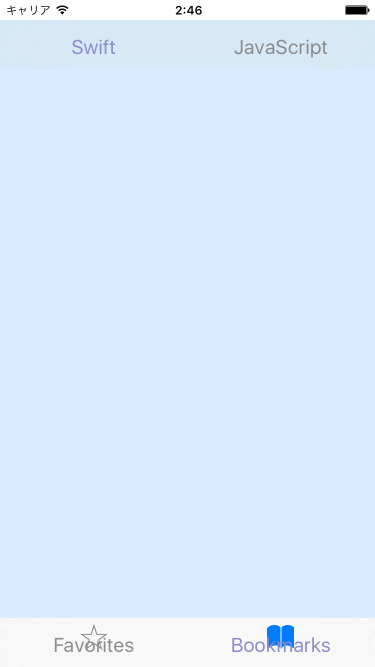
上部のタブバーはきれいに表示されているが、変更するつもりのない下部のタブバーまで変更されてしまった。
UITabBarItem全体に変更の影響が出るようになっているようだ。
どうにかして片方だけに影響を与えることができないものか……。
いろいろ探しているうちに下のようなブログ記事を見つけた。
Cocoaの日々: UIAppearance で色や画像を変える
こちらによれば、appearanceWhenContainedIn:(Objective-Cの場合, Swiftの場合はappearanceWhenContainedInInstancesOfClasses:)というメソッドで所属ビューを指定することができるらしい。
やり方も書いてあるので、早速試してみる。
//タブバーアイテムのデザイン変更
UITabBarItem.appearanceWhenContainedInInstancesOfClasses([UITabBar.self]).setTitleTextAttributes([
    NSFontAttributeName: UIFont.systemFontOfSize(20), //文字の大きさを変更
    NSForegroundColorAttributeName: UIColor(red: 0.55, green: 0.55, blue: 0.55, alpha: 1.0) //文字の色を変更
    ], forState: UIControlState.Normal); //通常時
UITabBarItem.appearanceWhenContainedInInstancesOfClasses([UITabBar.self]).setTitleTextAttributes([
    NSForegroundColorAttributeName: UIColor(red: 0.55, green: 0.55, blue: 0.80, alpha: 1.0) //文字の色を変更
    ], forState: UIControlState.Selected); //選択時
UITabBarItem.appearanceWhenContainedInInstancesOfClasses([UITabBar.self]).titlePositionAdjustment = UIOffsetMake(0, -9); //文字の場所を移動
appearence()をappearanceWhenContainedInInstancesOfClasses([UITabBar.self])へ変換。
結果がこちら。
残念ながら変わったように見えない。
ここで気がついた。
UITabBarItemはどちらもUITabBarに入っているのだから、今の変更は適用されて当然であった。
4.クラスを作る。
原因に気がついたので、入れられているUITabBarの方のクラスを変更すれば、変更が可能なのではないか、と気づいた。
というわけで、UITabBarのサブクラスを作る。
import Foundation
import UIKit

class CustomTabBar: UITabBar {

}
appearanceで指定するときの親要素が欲しいだけだから、中に何か書く必要はない。
上部タブバーのclassをCustomTabBarに変更し、appearanceWhenContainedInInstancesOfClasses:の引数をCustomTabBar.selfにしてやる。
上部のタブバーだけにデザイン変更が効くようになった。
5.まとめ
TabBarのサブクラスを作れば、比較的簡単にデザインが異なる複数のタブバーを設置することが可能なようだ。
自分が次に困らないようにと作ったものだが、他の誰かの役に立ってくれたら嬉しい。
サンプルコード
GitHub SwiftSample/DoubleTabBar
参考文献
【Swift】Tab Barの使い方。タブで画面を切り替える。(Swift 2.1、XCode 7.2、Android:無、iOS:有、興奮度:C)
タブバーの高さと、文字の位置・大きさを変えて、文字だけのタブバーを作る
Cocoaの日々: UIAppearance で色や画像を変える
appearanceWhenContainedInInstancesOfClasses: - UIAppearance | Apple Developer Documentation


