この記事は、ニフティグループ Advent Calendar 2021 5日目の記事です。
昨日は @hajimete さんの「Slackに追加されたカスタム絵文字を通知するBOTを作った」でした。
毎日のように絵文字が追加されているとこういうBOTもありがたいですね!
はじめに
Picture in Picture(PiP)は、<video>要素を常に最前面に表示されるウィンドウ上に表示できる機能です。
本記事では、<canvas>要素に描画された内容をPicture in Pictureで表示したいと思います。
おおまかな流れは以下のとおりです。
- <canvas>要素に色々描画する。
- <canvas>要素の内容を<video>要素のメディアソースにする。
- <video>要素をPicture in Pictureで表示する。
今回は例として現在時刻をPicture in Pictureで表示してみたいと思います。
(1) <canvas>要素に現在時刻を描画する。
まずは<canvas>要素に現在時刻を描画してみます。
<!DOCTYPE html>
<html>

<head>
    <meta charset="utf-8" />
    <title>現在時刻</title>
    <script type="text/javascript">
        function draw() {
            const canvas = document.querySelector('#canvas');
            const ctx = canvas.getContext('2d');

            // キャンバスをクリアする
            ctx.clearRect(0, 0, canvas.width, canvas.height);

            // 現在時刻を描画
            ctx.font = "48px serif";
            ctx.fillText(getCurrentTimeStr(), 10, 50);
        }

        function getCurrentTimeStr() {
            const date = new Date();
            const hour = String(date.getHours()).padStart(2, '0');
            const min = String(date.getMinutes()).padStart(2, '0');
            const sec = String(date.getSeconds()).padStart(2, '0');
            return `${hour}:${min}:${sec}`;
        }

        // <body>が読み込まれたら呼び出される。
        function init() {
            draw();

            // 1秒以内のズレが生じるが1000ミリ秒ごとに描画
            setInterval(draw, 1000);
        }
    </script>
</head>

<body onload="init();">
    <canvas id="canvas" width="200" height="60"></canvas>
</body>

</html>
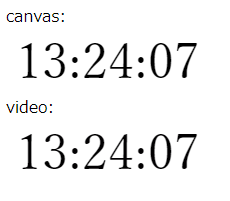
ブラウザで開くと現在時刻が表示されていること(さらに1秒毎に更新されていること)が確認できます。

(2) <canvas>要素の内容を<video>要素のメディアソースにする。
次に<canvas>要素に描画された内容を<video>要素のメディアソースとしてみます。
変更箇所を抜粋したソースコードは以下の通りです。
・・・
    <script type="text/javascript">
        ・・・

        function init() {
            ・・・

            const canvas = document.querySelector('#canvas');
            const video = document.querySelector('#video');
            // <canvas>要素の内容を<video>要素のメディアソースに設定する。
            video.srcObject = canvas.captureStream();
            // <video>要素を自動再生するためにmuteにする
            video.muted = true;
            video.play();
        }
    </script>
</head>

<body onload="init();">
    canvas:<br>
    <canvas id="canvas" width="200" height="60"></canvas><br>
    video:<br>
    <video id="video" width="200" height="60"></video>
</body>

</html>
ここでポイントなのが、以下の部分です。
HTMLCanvasElement.captureStream() で<canvas>要素からリアルタイムにキャプチャした動画を取得し、それを<video>要素のメディアソース(srcObject)に設定しています。
こうすることで、<canvas>要素で描画された内容が<video>要素に描画されます。
const canvas = document.querySelector('#canvas');
const video = document.querySelector('#video');
// <canvas>要素の内容を<video>要素のメディアソースに設定する。
video.srcObject = canvas.captureStream();
また、<video>要素を自動再生するために<video>要素のミュートをONにしています。
video.muted = true;
video.play();
Chrome's autoplay policies are simple:
- Muted autoplay is always allowed.
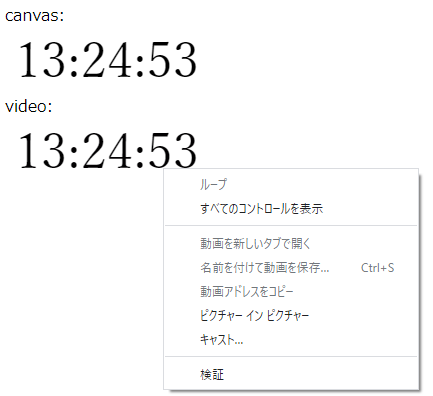
ブラウザで開くと<canvas>要素(上)、<video>要素(下)に現在時刻が表示されています。
下の現在時刻を右クリックすると<video>要素特有のメニューが表示されるかと思います。
現時点での全体のソースコード
<!DOCTYPE html>
<html>

<head>
    <meta charset="utf-8" />
    <title>現在時刻</title>
    <script type="text/javascript">
        function draw() {
            const canvas = document.querySelector('#canvas');
            const ctx = canvas.getContext('2d');

            // キャンバスをクリアする
            ctx.clearRect(0, 0, canvas.width, canvas.height);

            // 現在時刻を描画
            ctx.font = "48px serif";
            ctx.fillText(getCurrentTimeStr(), 10, 50);
        }

        function getCurrentTimeStr() {
            const date = new Date();
            const hour = String(date.getHours()).padStart(2, '0');
            const min = String(date.getMinutes()).padStart(2, '0');
            const sec = String(date.getSeconds()).padStart(2, '0');
            return `${hour}:${min}:${sec}`;
        }

        // <body>が読み込まれたら呼び出される。
        function init() {
            draw();

            // 1秒以内のズレが生じるが1000ミリ秒ごとに描画
            setInterval(draw, 1000);

            const canvas = document.querySelector('#canvas');
            const video = document.querySelector('#video');
            // <canvas>要素の内容を<video>要素のメディアソースに設定する。
            video.srcObject = canvas.captureStream();
            // <video>要素を自動再生するためにmuteにする
            video.muted = true;
            video.play();
        }
    </script>
</head>

<body onload="init();">
    canvas:<br>
    <canvas id="canvas" width="200" height="60"></canvas><br>
    video:<br>
    <video id="video" width="200" height="60"></video>
</body>

</html>
(3) Picture in Pictureで表示する。
次に、<video>要素の動画(<canvas>要素の内容)をPicture in Pictureで表示するボタンを作ってみます。
(<video>要素の右クリックメニューからでも出来なくはないですが…)
変更箇所を抜粋したソースコードは以下の通りです。
・・・
    <script type="text/javascript">
        ・・・

        function init() {
            ・・・・

            const pip = document.querySelector('#button-pip');
            pip.addEventListener('click', function () {
                video.requestPictureInPicture();
            });
        }
    </script>
</head>

<body onload="init();">
    ・・・
    <br>
    <input type="button" id="button-pip" value="enter picture in picture">
</body>
HTMLVideoElement.requestPictureInPicture() で<video>要素の動画をPicture in Pictureで表示するようにしています。
ブラウザで開いて「enter picture in picture」ボタンを押すと、Picture in Pictureのウィンドウは表示されますが時刻が表示されていません。
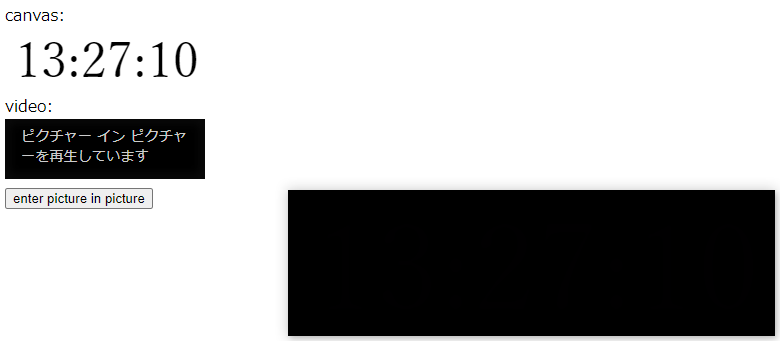
これはただ、Picture in Pictureのウィンドウの背景色と現在時刻を表示するテキストの文字色が同じなだけなので、<canvas>要素の背景を白色に塗りつぶしましょう。
・・・
    <script type="text/javascript">
        function draw() {
            const canvas = document.querySelector('#canvas');
            const ctx = canvas.getContext('2d');

            // キャンバスをクリアする
            ctx.clearRect(0, 0, canvas.width, canvas.height);

            // 背景を白色にする
            ctx.fillStyle = "rgb(255, 255, 255)";
            ctx.fillRect(0, 0, canvas.width, canvas.height);

            // 現在時刻を描画
            ctx.fillStyle = "rgb(0, 0, 0)";
            ctx.font = "48px serif";
            ctx.fillText(getCurrentTimeStr(), 10, 50);
        }

        ・・・
    </script>
・・・
再度ブラウザで開いて「enter picture in picture」ボタンを押すと、Picture in Pictureのウィンドウに現在時刻が表示されていることが確認できるかと思います。
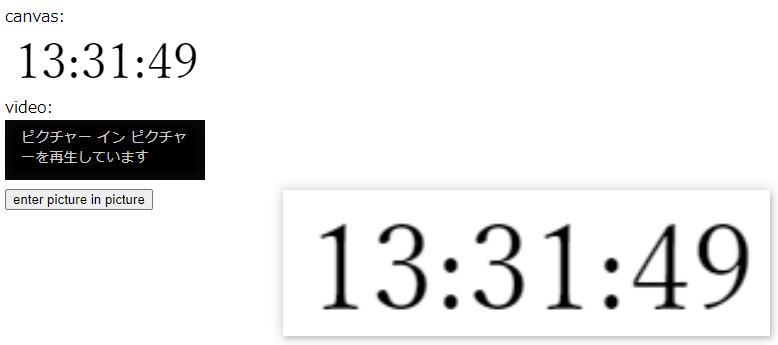
<canvas>要素の内容をPicture in Pictureで表示できました!
完成品のソースコード
<!DOCTYPE html>
<html>

<head>
    <meta charset="utf-8" />
    <title>現在時刻</title>
    <script type="text/javascript">
        function draw() {
            const canvas = document.querySelector('#canvas');
            const ctx = canvas.getContext('2d');

            // キャンバスをクリアする
            ctx.clearRect(0, 0, canvas.width, canvas.height);

            // 背景を白色にする
            ctx.fillStyle = "rgb(255, 255, 255)";
            ctx.fillRect(0, 0, canvas.width, canvas.height);

            // 現在時刻を描画
            ctx.fillStyle = "rgb(0, 0, 0)";
            ctx.font = "48px serif";
            ctx.fillText(getCurrentTimeStr(), 10, 50);
        }

        function getCurrentTimeStr() {
            const date = new Date();
            const hour = String(date.getHours()).padStart(2, '0');
            const min = String(date.getMinutes()).padStart(2, '0');
            const sec = String(date.getSeconds()).padStart(2, '0');
            return `${hour}:${min}:${sec}`;
        }

        // <body>が読み込まれたら呼び出される。
        function init() {
            draw();

            // 1秒以内のズレが生じるが1000ミリ秒ごとに描画
            setInterval(draw, 1000);

            const canvas = document.querySelector('#canvas');
            const video = document.querySelector('#video');
            // <canvas>要素の内容を<video>要素のメディアソースに設定する。
            video.srcObject = canvas.captureStream();
            // <video>要素を自動再生するためにmuteにする
            video.muted = true;
            video.play();

            const pip = document.querySelector('#button-pip');
            pip.addEventListener('click', function () {
                video.requestPictureInPicture();
            });
        }
    </script>
</head>

<body onload="init();">
    canvas:<br>
    <canvas id="canvas" width="200" height="60"></canvas><br>
    video:<br>
    <video id="video" width="200" height="60"></video>
    <br>
    <input type="button" id="button-pip" value="enter picture in picture">
</body>

</html>
注意:自動でPicture in Pictureを表示することはできない。
ページを開いた瞬間にPicture in Pictureで自動表示するということは出来ません。
・・・
    <script type="text/javascript">
        ・・・

        function init() {
            ・・・

            // エラー:自動でPicture in Pictureを実行することはできない。
            video.addEventListener('loadeddata', function () {
                video.requestPictureInPicture();
            })
        }
    </script>
・・・
ブラウザで開いても、Picture in Pictureで自動表示されていないことが確認できるかと思います。
Chrome開発者ツールでコンソールを確認すると以下のようなエラーが出ています。
Uncaught (in promise) DOMException: Failed to execute 'requestPictureInPicture' on 'HTMLVideoElement': Must be handling a user gesture if there isn't already an element in Picture-in-Picture.

ユーザージェスチャー経由でないとPicture in Pictureで表示することが出来ないそうです。
The good news is that a Picture-in-Picture Web API specification is being drafted as we speak. This spec aims to allow websites to initiate and control this behavior by exposing the following set of properties to the API:
- Notify the website when a video enters and leaves Picture-in-Picture mode.
- Allow the website to trigger Picture-in-Picture on a video element via a user gesture.
- Allow the website to exit Picture-in-Picture.
- Allow the website to check if Picture-in-Picture can be triggered.
Picture in Pictureを表示することができるユーザージェスチャーの一覧は以下のとおりです。
An activation triggering input event is any event whose isTrusted attribute is true and whose type is one of:
- keydown, provided the key is neither the Esc key nor a shortcut key reserved by the user agent.
- mousedown.
- pointerdown, provided the event's pointerType is "mouse".
- pointerup, provided the event's pointerType is not "mouse".
- touchend.
参考:javascript - Why video.requestPictureInPicture() works only once? - Stack Overflow
参考:HTML Standard (WebArchive 2019/05/21 10:47:15)
おわりに
今回は、<canvas>要素に描画された現在時刻をPicture in Pictureで表示しました。
<canvas>要素に描けるものであれば、カウントダウンタイマーといったものもPicture in Pictureで表示することができたりします。
みなさんも色々試してみてください!
明日の担当は@kasayu さんです。
よろしくおねがいします!
参考サイト
- <video>: 動画埋め込み要素 - HTML: HyperText Markup Language | MDN
- <canvas>: グラフィックキャンバス要素 - HTML: HyperText Markup Language | MDN
- HTMLCanvasElement.captureStream() - Web API | MDN
- HTMLMediaElement.srcObject - Web API | MDN
- Autoplay policy in Chrome - Chrome Developers
- HTMLVideoElement.requestPictureInPicture() - Web APIs | MDN
- Picture-in-Picture (PiP) | Web | Google Developers
- HTML Standard #6.4.2 Processing model
- javascript - Why video.requestPictureInPicture() works only once? - Stack Overflow
- HTML Standard (WebArchive 2019/05/21 10:47:15)
- Let's make a Picture in Picture Countdown timer on the Web | The Mindless