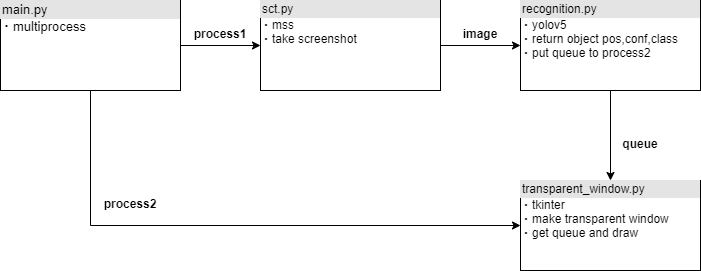
今回はこういうものをつくります。
過去記事と同じようなことをしているのですが、今回は検出画面は透過処理してそのままデスクトップに表示してみました。
リポジトリを置いておきます。必要モジュールのインストール後にpython main.pyですぐ実行できるのでぜひ試してみてください。
大きく分けて画像認識プロセスと画面表示プロセスに分かれているのがわかると思います。
それぞれ解説します。
画像認識プロセス
このプロセスの構造は単純です。スクリーンショットを撮って,検出器に渡すだけです。
・スクリーンショット
import mss
import mss.tools

def screenshot(monitor_number = 0,output="sct.png"):
    with mss.mss() as sct:
        output = sct.shot(mon=monitor_number, output=output)

    return output
スクリーンショットはmssというモジュールを使用しています。処理が早く実装も簡単なので気に入って使用しています。
・検出器
import torch
from sct import screenshot
from multiprocessing import Queue

# Model
model = torch.hub.load('ultralytics/yolov5', 'yolov5s', pretrained=True)

def yolo():
    while True:
        img = screenshot(monitor_number = 2,output="sct.png")
        results = model(img)
        return result_tolist(results)

def result_tolist(results):
    rpd = results.pandas().xyxy[0]
    rpd.iloc[:,:4] = rpd.iloc[:,:4].astype('int')
    return rpd.values.tolist()

def yolo_loop(q:Queue):
    while True:
        res = yolo()
        q.put(res)
検出器にはyoloを使用しました。torchhubから落として使用するだけなのでコードはかなりすっきりしています。yolo_loop関数で画面表示プロセスに渡すためのデータをqueueとして入力しています。データはリスト形式で[[x1,y1,x2,y2],confidence,class]としています。
画面表示プロセス
import tkinter
import time
from multiprocessing import Queue


def tk_preload():
    root = tkinter.Tk()
    root.wm_attributes("-transparentcolor", "snow")
    w, h = root.winfo_screenwidth(), root.winfo_screenheight()
    root.geometry("%dx%d+0+0" % (w, h))
    root.attributes('-fullscreen', True)
    root.attributes('-topmost', True)
    canvas = tkinter.Canvas(root, width=w, height=h, bg="snow")
    canvas.place(x=0, y=0)
    return root, canvas

def transparent_window(q:Queue):
    root, canvas = tk_preload()

    while True:
        result = q.get()

        for i ,res in enumerate(result):
            x1,y1,x2,y2 = res[0],res[1],res[2],res[3]
            conf = res[4]
            cls = res[6]

            n = canvas.create_rectangle(
            x1,y1,x2,y2, tags='o', outline="red", width=3)
            canvas.create_text(
            x1-20, y1-20, text=f"{cls}:{str(conf)[:4]}", font=('MS Gothic', 20, "bold"),fill="red", tags='o'
        )

        canvas.pack()
        canvas.update()
        if q.empty():
            time.sleep(0.1)
        canvas.delete('o')
GUIモジュールはpysimplegui, tkinter, Kivy, PyQt, wxPythonなど挙げればキリがないのでどれを使うか選定に非常に時間がかかりましたが,tkinterが画面の透過処理が一番シンプルに実装できました。
root.wm_attributes("-transparentcolor", "snow")の行で指定色を透過しています。あとはウィンドウの背景色を同色に指定してやれば透過画面が表示できる仕組みです。
透過画面が表示できればあとは検出器のアウトプットをqueue.get()で受け取り矩形とテキストを表示しループ処理で回してやれば完成です。
main
最後に画像認識プロセスと画面表示プロセスをmultiprocessで連携して並列処理とすれば大きな遅延なく実装できます。
import time
from multiprocessing import Process, Queue

from transparent_window import transparent_window
from AI.recognition import yolo_loop

def main():
    q = Queue()
    p1 = Process(target=yolo_loop, args=(q,))
    p2 = Process(target=transparent_window, args=(q,))
    p1.start()
    while q.empty():
        time.sleep(0.1)
    p2.start()
    p1.join()
    p2.join()
最後に
目ですぐ確かめることができる実装はとても楽しいですね。
最終的なコードもかなりスリムにできあがったのでとても満足しています。
画像認識の部分はyoloに限らず他のライブラリでも実装可能なので試してみてください。
