本記事は、めんどい太郎の Advent Calendar 2023 3日目の記事です。
はじめに
この記事は初心者が書いています。
私がDiscord.pyでBOTを作成した際に引っかかったポイントをご紹介します。
宣伝
GitHubでDiscordのBOTを公開しています。
現神の聖遺物のスコアを計算して画像を生成する「ArtifacterImageGen」をDiscordで使用するためのBOTです。
本題
それでは紹介します。
環境
Python 3.9.2
Discord.py  2.3.3
Pythonと普段書いてる言語の違い
普段Pythonを書いていないのもあって、Pythonの書き方に慣れる必要がありました。
というのも、普段Node.jsなどを使っているのとPythonをほぼ書いたことがないということで少し戸惑いました。
まぁそんなもんです。慣れればオッケー!
例を示しておきます。
ifの記述とか関数とかわかりやすいですね。
# 関数
def example():
  print("example!")

#if
if(hoge == "hoge"):
  print("hogehoge~~")
else:
  print("not hoge...")
// 関数
function example() {
  console.log("example!");
}

// if
if(hoge == "hoge") {
  console.log("hogehoge~");
} else {
  console.log("not hoge...");
}
Pythonでは{}ではなく、:とインデントを用います。
関数もPythonだとdefですね。
functionに慣れていたので、ちょっと引っかかりました。
細かいことですが、コメントもPythonだと、#です。
/* */とかもPythonだとコメントになりません。
Discord.py
入力受付関連
最近のDiscordはコマンドの引数以外にも入力を受け付けることができます。
全然Discord BOTを触ってなかったので、私からしたら最近です()
その中でも、メニューとボタンの実装に手間取ったので紹介します。
メニュー作成
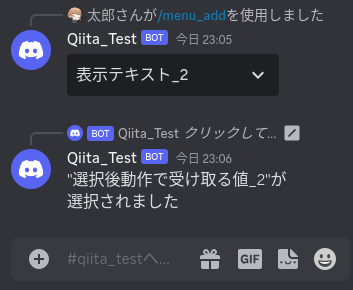
こんなやつです。
選択すると
結論から。
下のようにかけばできます。
# ライブラリ読み込み
import discord

class Select_Menu(discord.ui.View):
  @discord.ui.select(
    cls=discord.ui.Select,
    placeholder="未選択時に表示されるテキスト",
    options=[
      #選択肢をここに記述
      discord.SelectOption(value='選択後動作で受け取る値', label='表示テキスト', description='説明'),
    ],
  )
  async def selectMenu(self, interaction: discord.Interaction, select: discord.ui.Select):
    # 選択後の動作
    await interaction.response.send_message(f'{str(select.values[0])}が選択されました')

# あとから選択肢を追加したい場合
def select_menu_add():
  # メニュー取得
  select_menu = Select_Menu()
  # 項目追加
  select_menu.selectMenu.add_option(
    label='表示テキスト_2',
    value='選択後動作で受け取る値_2',
    description='説明_2'
  )
  return select_menu

# メニュー送信
@tree.command(name='menu',description='メニューを送信します。')
async def menu_send(interaction: discord.Interaction):
  # メニュー取得
  select_menu = Select_Menu()
  await interaction.response.send_message(view=select_menu)

# 項目追加後送信
@tree.command(name='menu_add',description='メニューにあとから項目を追加して送信します。')
async def menu_add_send(interaction: discord.Interaction):
  # メニュー取得
  select_menu = select_menu_add()
  await interaction.response.send_message(view=select_menu)
こんな感じで書けばメニューを作って、コマンドが実行されるとそのメニューを返すといった感じに動いてくれると思います。
軽く解説
まずはメニューのクラスを作成します。
class ~~(discord.ui.View)でクラスを作ります。
discord.ui.Viewが大事です。
どうやら、Viewの中にメニューがあるみたいです。
class select_menu(discord.ui.View):
次に、メニューの設定(?)をします。
先程のクラスの中に書きます。
@discord.ui.select()の中に記述していきます。
class select_menu(discord.ui.View):
  @discord.ui.select(
    cls=discord.ui.Select,
    placeholder="未選択時に表示されるテキスト",
  )
ここに選択肢も記述していきます。
optionsの中に、discord.SelectOptionで追加します。
class select_menu(discord.ui.View):
  @discord.ui.select(
    cls=discord.ui.Select,
    placeholder="未選択時に表示されるテキスト",
    options=[
      # 選択肢をここに記述
      discord.SelectOption(value='選択後動作で受け取る値', label='表示テキスト', description='説明'),
    ],
  )
あとは、選択後の動作を記述すれば完成です。
クラスの中、@discord.ui.select()の外に関数を作成して記述します。
async def ~~(self, interaction: discord.Interaction, select: discord.ui.Select)で関数を作成します。
select.value[0]の中に、選択された選択肢のvalueが入ります。
strで処理してあげないとエラーが出ます。
(配列になってます。)
class select_menu(discord.ui.View):
  @discord.ui.select(
    cls=discord.ui.Select,
    placeholder="未選択時に表示されるテキスト",
    options=[
      # 選択肢をここに記述
      discord.SelectOption(value='選択後動作で受け取る値', label='表示テキスト', description='説明'),
    ],
  )
  async def selectMenu(self, interaction: discord.Interaction, select: discord.ui.Select):
    await interaction.response.send_message(f'"{str(select.values[0])}"が選択されました')
interaction.response.send_messageなどで送信するときは、viewにメニューのクラスを指定してあげると送信できます。
select_menu = select_menu()
interaction.response.send_message(view=select_menu)
こんな感じでやれば、送信できます。
クラスの中以外でも選択肢を追加できます。
クラスを取得して、.{関数名}.add_option()で記述します。
class select_menu(discord.ui.View):
  @discord.ui.select(
    cls=discord.ui.Select,
    placeholder="未選択時に表示されるテキスト",
    options=[
      # 選択肢をここに記述
      discord.SelectOption(value='選択後動作で受け取る値', label='表示テキスト', description='説明'),
    ],
  )
  async def selectMenu(self, interaction: discord.Interaction, select: discord.ui.Select):
    await interaction.response.send_message(f'"{str(select.values[0])}"が選択されました')

def add_menu():
  select_menu = select_menu()
  select_menu.selectMenu.add_option(
    label='表示テキスト_2',
    value='選択後動作で受け取る値_2',
   description='説明_2'
  )
あとはこれを送信すればOKです。
以下のように動作します。
ボタン作成
こんなやつです。
結論から。
下のようにかけばできます。
# ライブラリ読み込み
import discord

# ボタン作成
class button_one(discord.ui.Button):
  def __init__(self, *, style: discord.ButtonStyle = discord.ButtonStyle.secondary, label: str = "ボタン1"):
    super().__init__(style=style, label=label)
  async def callback(self, interaction: discord.Interaction)
    await interaction.response.send_message('ボタン1が押されました')

class button_two(discord.ui.Button):
  def __init__(self, *, style: discord.ButtonStyle = discord.ButtonStyle.secondary, label: str = "ボタン2"):
    super().__init__(style=style, label=label)
  async def callback(self, interaction: discord.Interaction)
    await interaction.response.send_message('ボタン2が押されました!')

@tree.command(name='button_send', sescription='ボタン送信')
async def button_send(interaction: discord.Interaction):
  view = discord.ui.View()
  view.add_item(button_one(style=discord.ButtonStyle.primary))
  view.add_item(button_two(style=discord.ButtonStyle.secondary))
  await interaction.response.send_message(view=view)
こんな感じでやれば、ボタンが作成されコマンドを実行するとボタンが返されます。
軽く解説
先程のメニューとは違い、discord.ui.Buttonを使用します。
ここも引っかかったポイントです。
class button_one(discord.ui.Button):
次に、ボタンの設定(?)です。
関数を作成し、そこに記述していきます。
ここに関しては私の理解不足でどの様になっているかが理解できていません。
class button_one(discord.ui.Button):
  def __init__(self, *, style: discord.ButtonStyle = discord.ButtonStyle.secondary, label: str = "ボタン1"):
    super().__init__(style=style, label=label)
このように記述します。
label: str = にボタンに表示するテキストを指定します。
あとは、ボタンが押されたあとの動作を記述すればOKです。
async def callback(self, interaction: discord.Interaction)これで関数を作成して動作を記述します。
class button_one(discord.ui.Button):
  def __init__(self, *, style: discord.ButtonStyle = discord.ButtonStyle.secondary, label: str = "ボタン1"):
    super().__init__(style=style, label=label)
  async def callback(self, interaction: discord.Interaction):
    await interaction.response.send_message("ボタン1が押されました")
このボタンを送信するときは、discord.ui.Viewを作成しその項目に追加します。
@tree.command(name='button_send', sescription='ボタン送信')
async def button_send(interaction: discord.Interaction):
  view = discord.ui.View()
  view.add_item(button_one(style=discord.ButtonStyle.primary))
  await interaction.response.send_message(view=view)
このとき、ボタンの種類を決めることができます。
style=に指定します。
discord.ButtonStyle.でボタンの種類を指定します。
ボタンの種類は公式ドキュメントを参照してください。
Discord API関連
Discord APIの制約(?)で引っかかったところがあるので紹介します。
「アプリケーションが応答しませんでした」
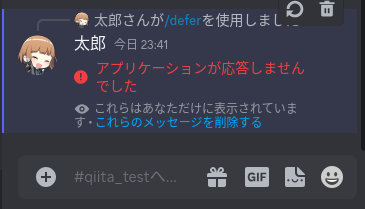
Discordはユーザーへ3秒以内にレスポンスを送信しないと以下のように「アプリケーションが応答しませんでした」と表示されてしまいます。
(表示されるメッセージが前は「インタラクションに失敗しました」でした。)
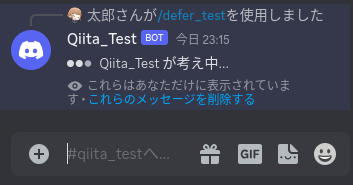
時間がかかる処理をする場合は、事前に「待たせるよ〜」というレスポンスを送っておくことで対処できます。
# ライブラリ読み込み
import discord
import time# sleep関数のため

@tree.command(name='defer_test', description='遅延テスト')
async def defer_test(interaction: discord.Interaction):
  await interaction.response.defer(ephemeral=True)
  time.sleep(6)
  await interaction.followup.send(content='処理完了!')
こんな感じで処理に時間がかかっても待機してくれます。
interaction.followup.sendすることでテキストなどに置き換えることができます。
ただし、deferを使っても最大15分です。
まぁ...DiscordのBOTで15分以上かかる処理をさせるなんて稀だとは思いますが...
ここで大事なのが、followup以外でメッセージなどの送信は基本的にできません。
response.send_messageなんかは、deferですでにresponseしてるよね!って怒られます。
また、followupでテキストなどに書き換えられるのでedit_original_responseなんかもできません。
大人しくfollowup使うのをおすすめしておきます。
今回のコード
GitHubに上げておきました。
おわりに
普段はDiscord.jsでBOT作っていたのでDiscord.pyの仕様が全然わからずそこそこ苦労しました。
最近のDiscordBOTは便利ですね。
コマンドも簡単に登録できて...
みなさんの参考になればと思います。
それでは!よいDiscord.pyライフを!


