#はじめに
Azure Blockchain Serviceを使ってみて、使用感を調べることが目的です
#予算
https://azure.microsoft.com/ja-jp/pricing/details/blockchain-service/
以上で予算を組めます
#Azure portalで管理する台帳を作成
- Azure Portalにサインインします
-
リソースの作成をクリック -
ブロックチェーン>Azure Blockchain Serviceを選択
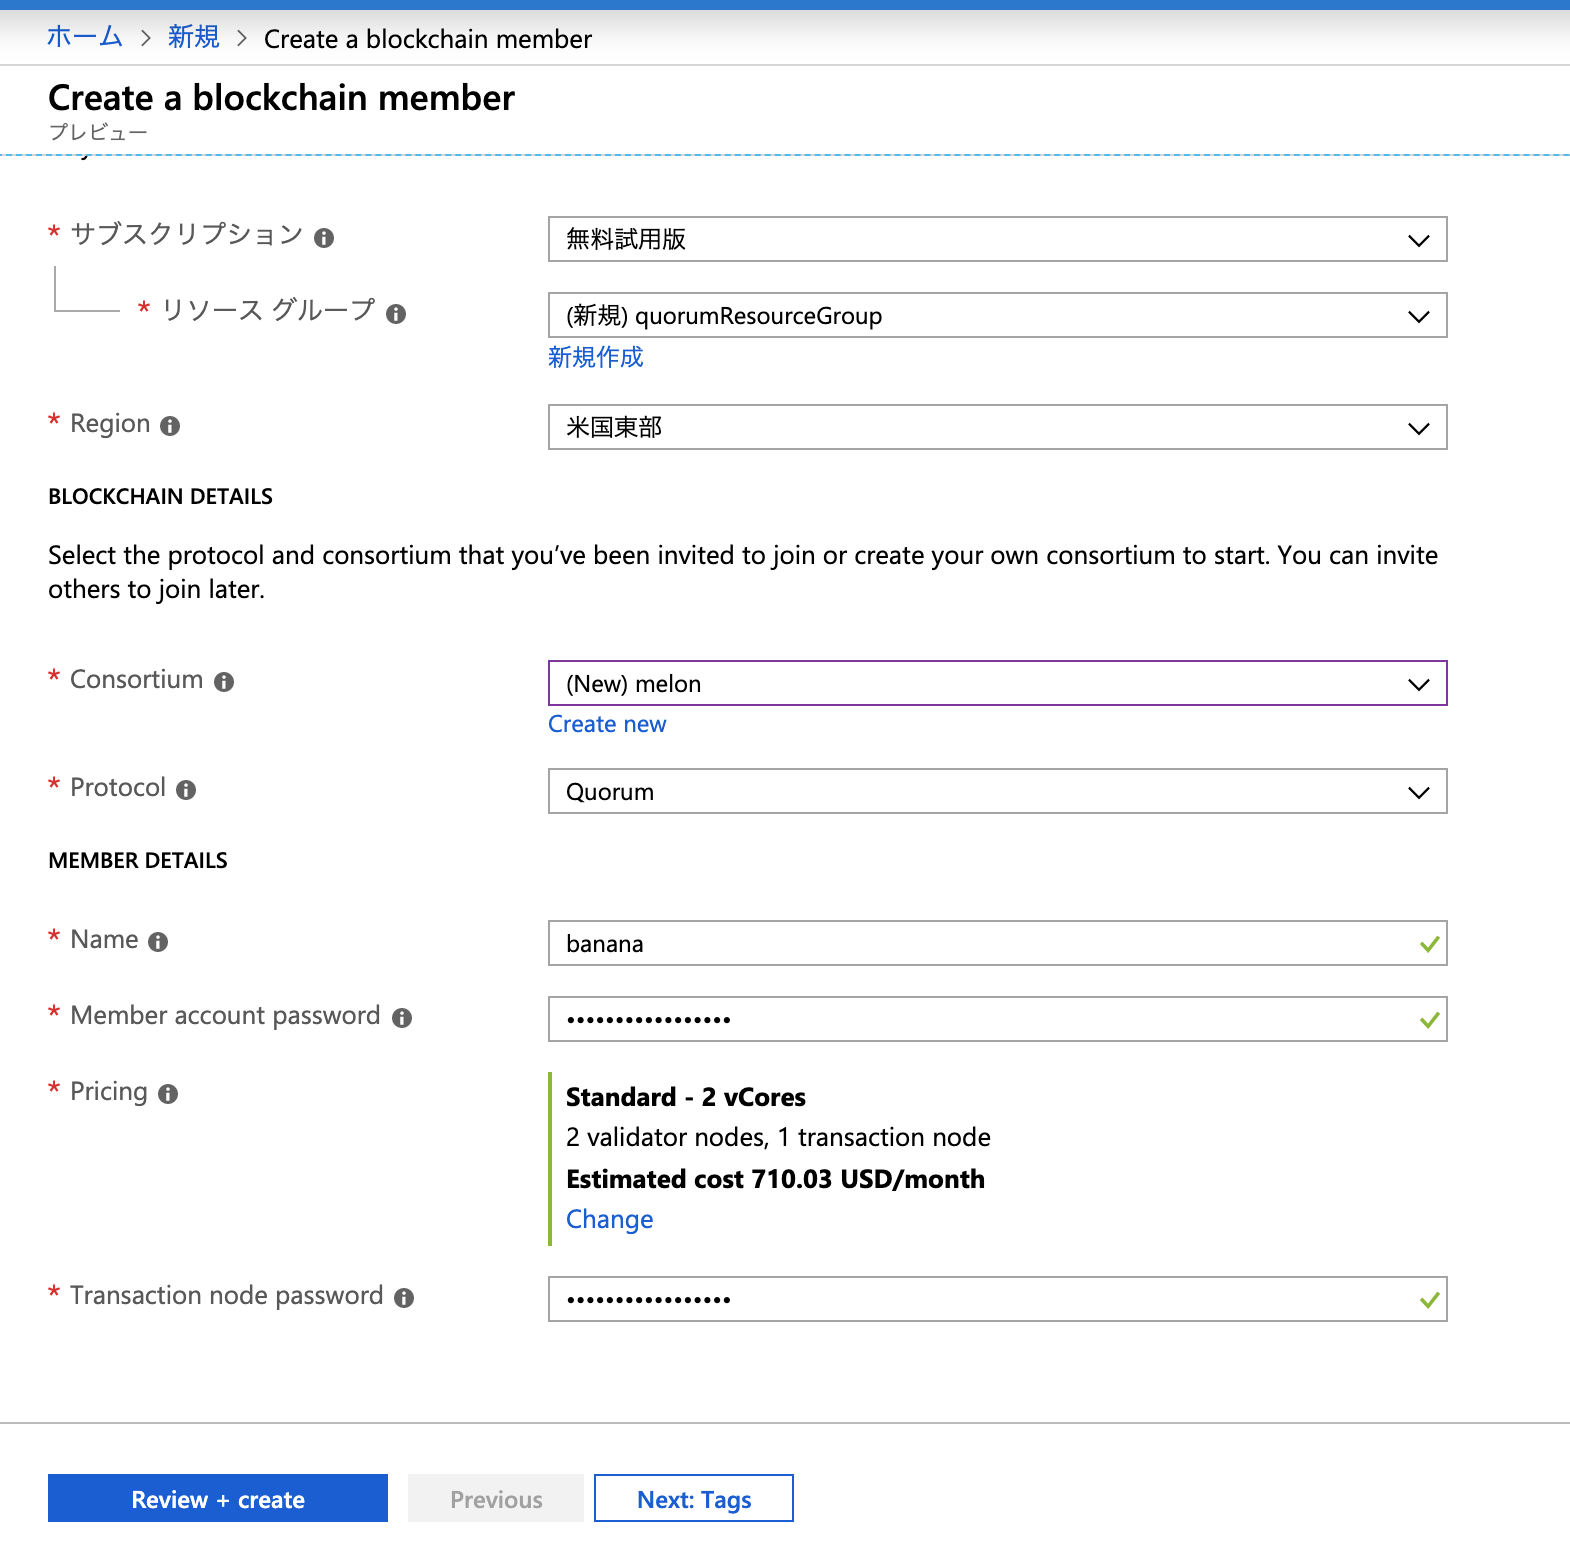
こんな感じで書いてReview + createをクリック
createをクリック
15分くらいかかります
#truffleでネットワークに接続してみる
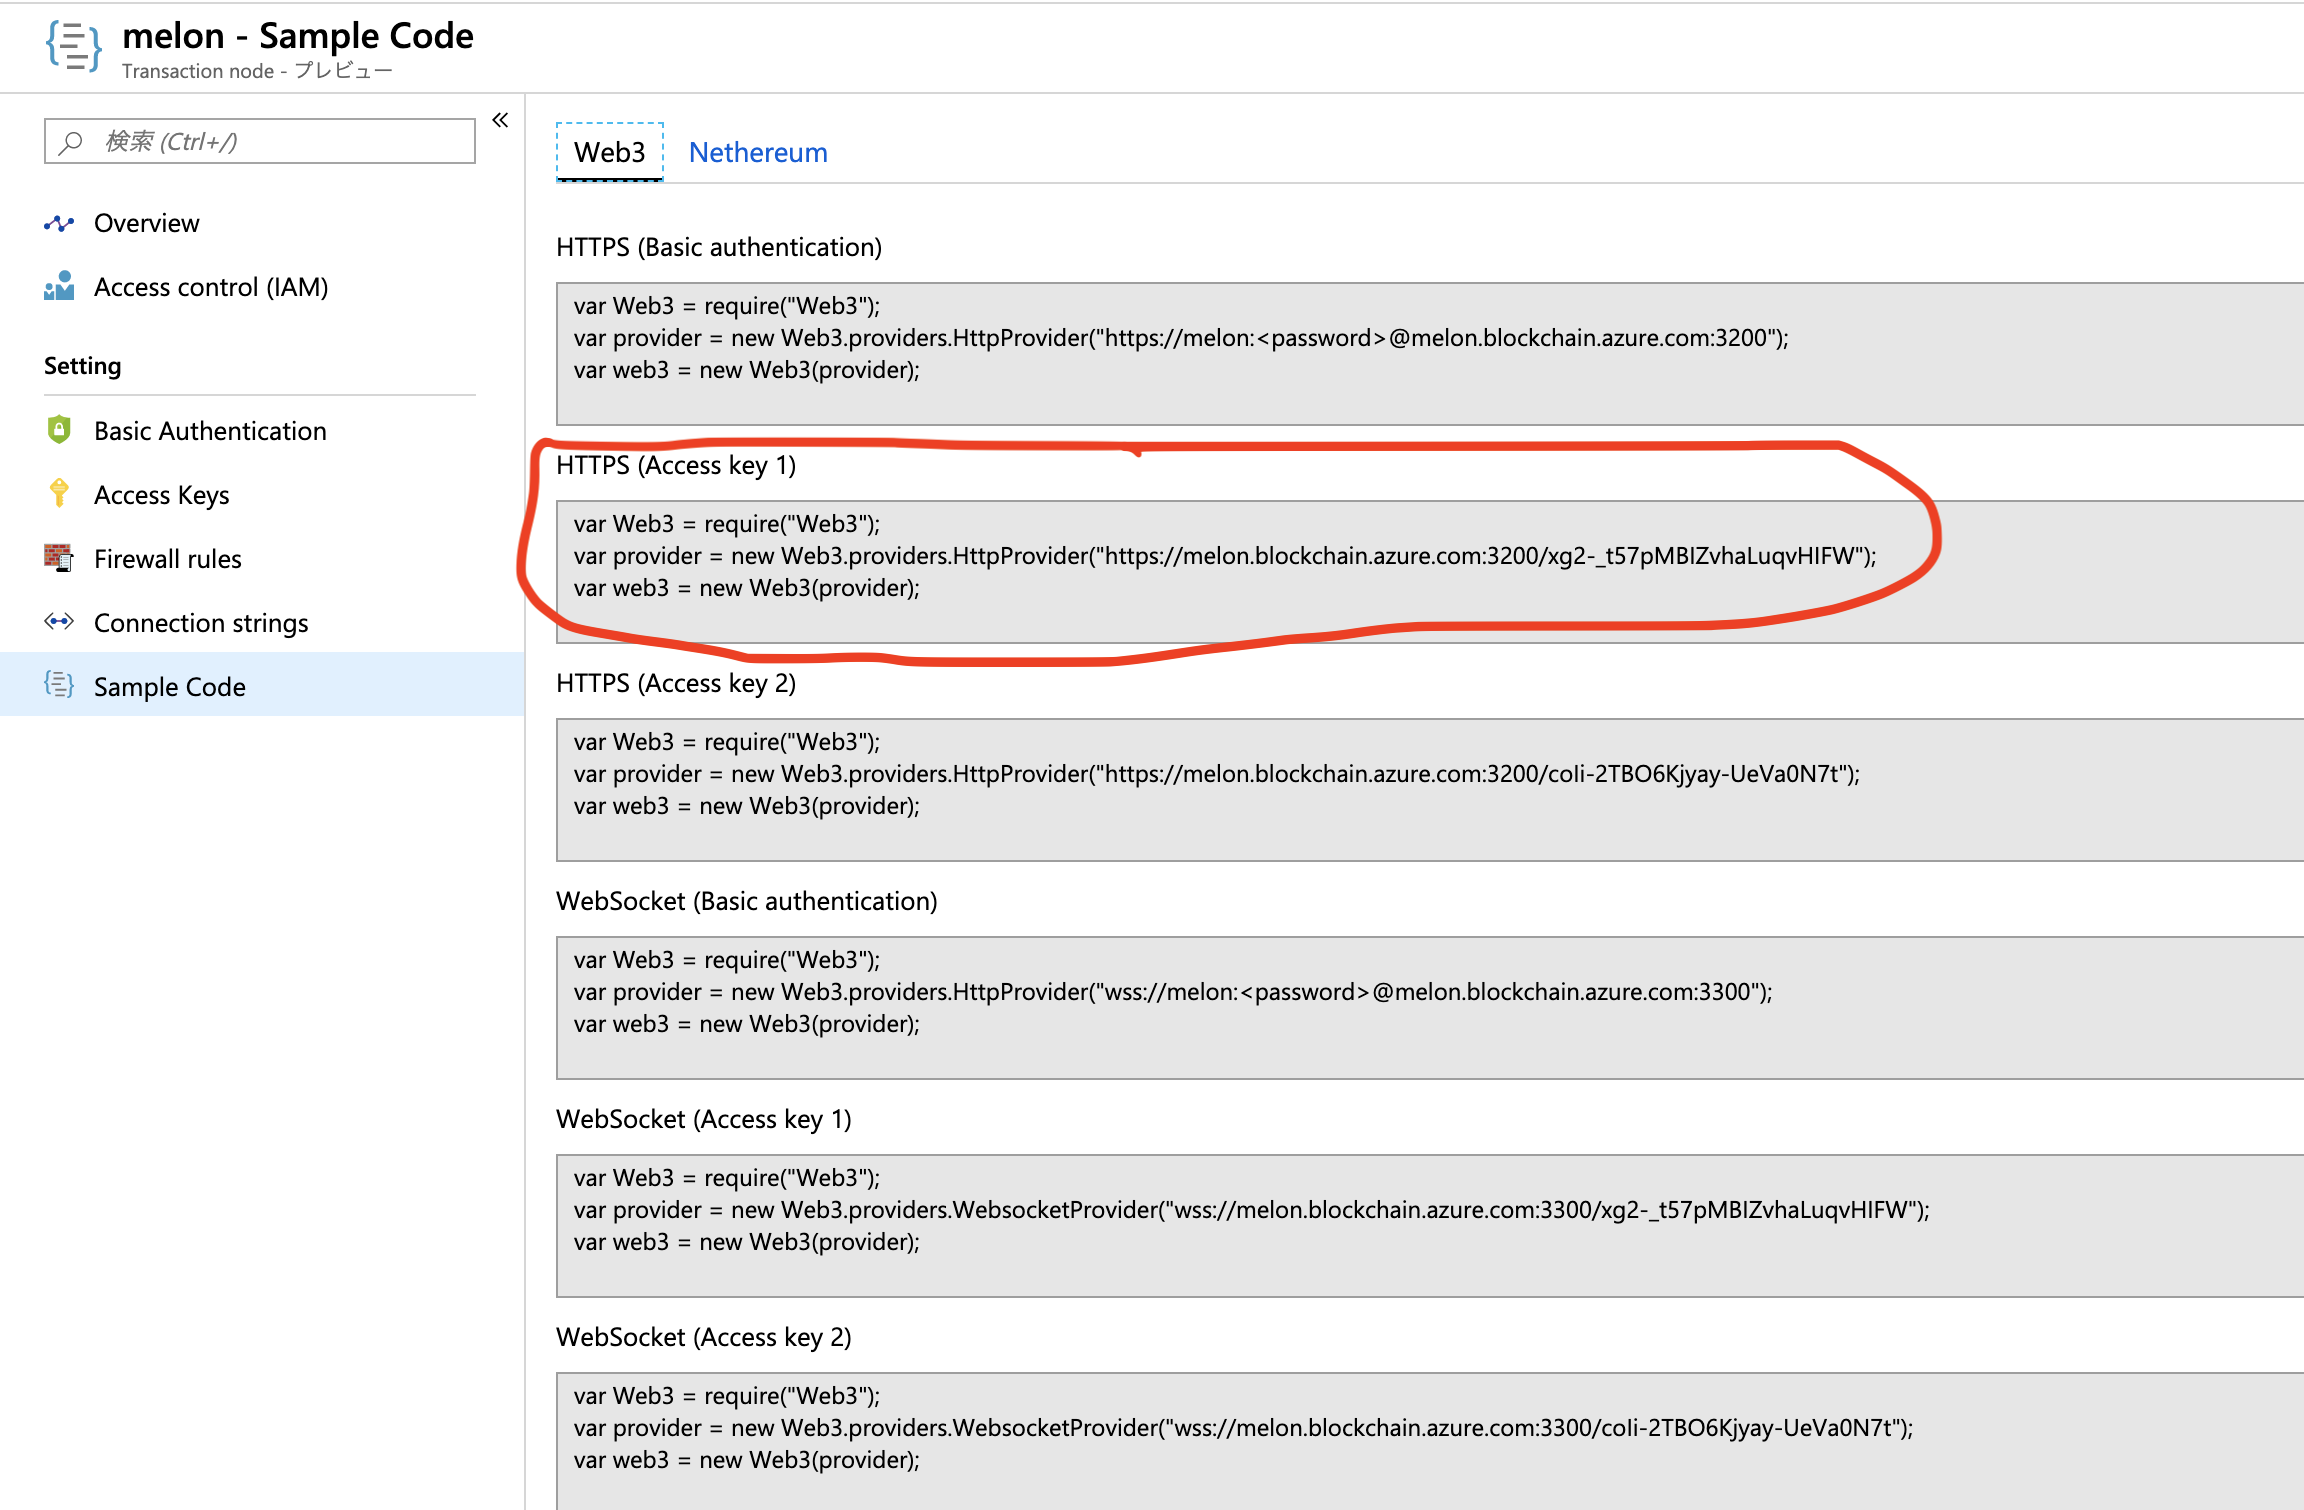
default nodeをクリック
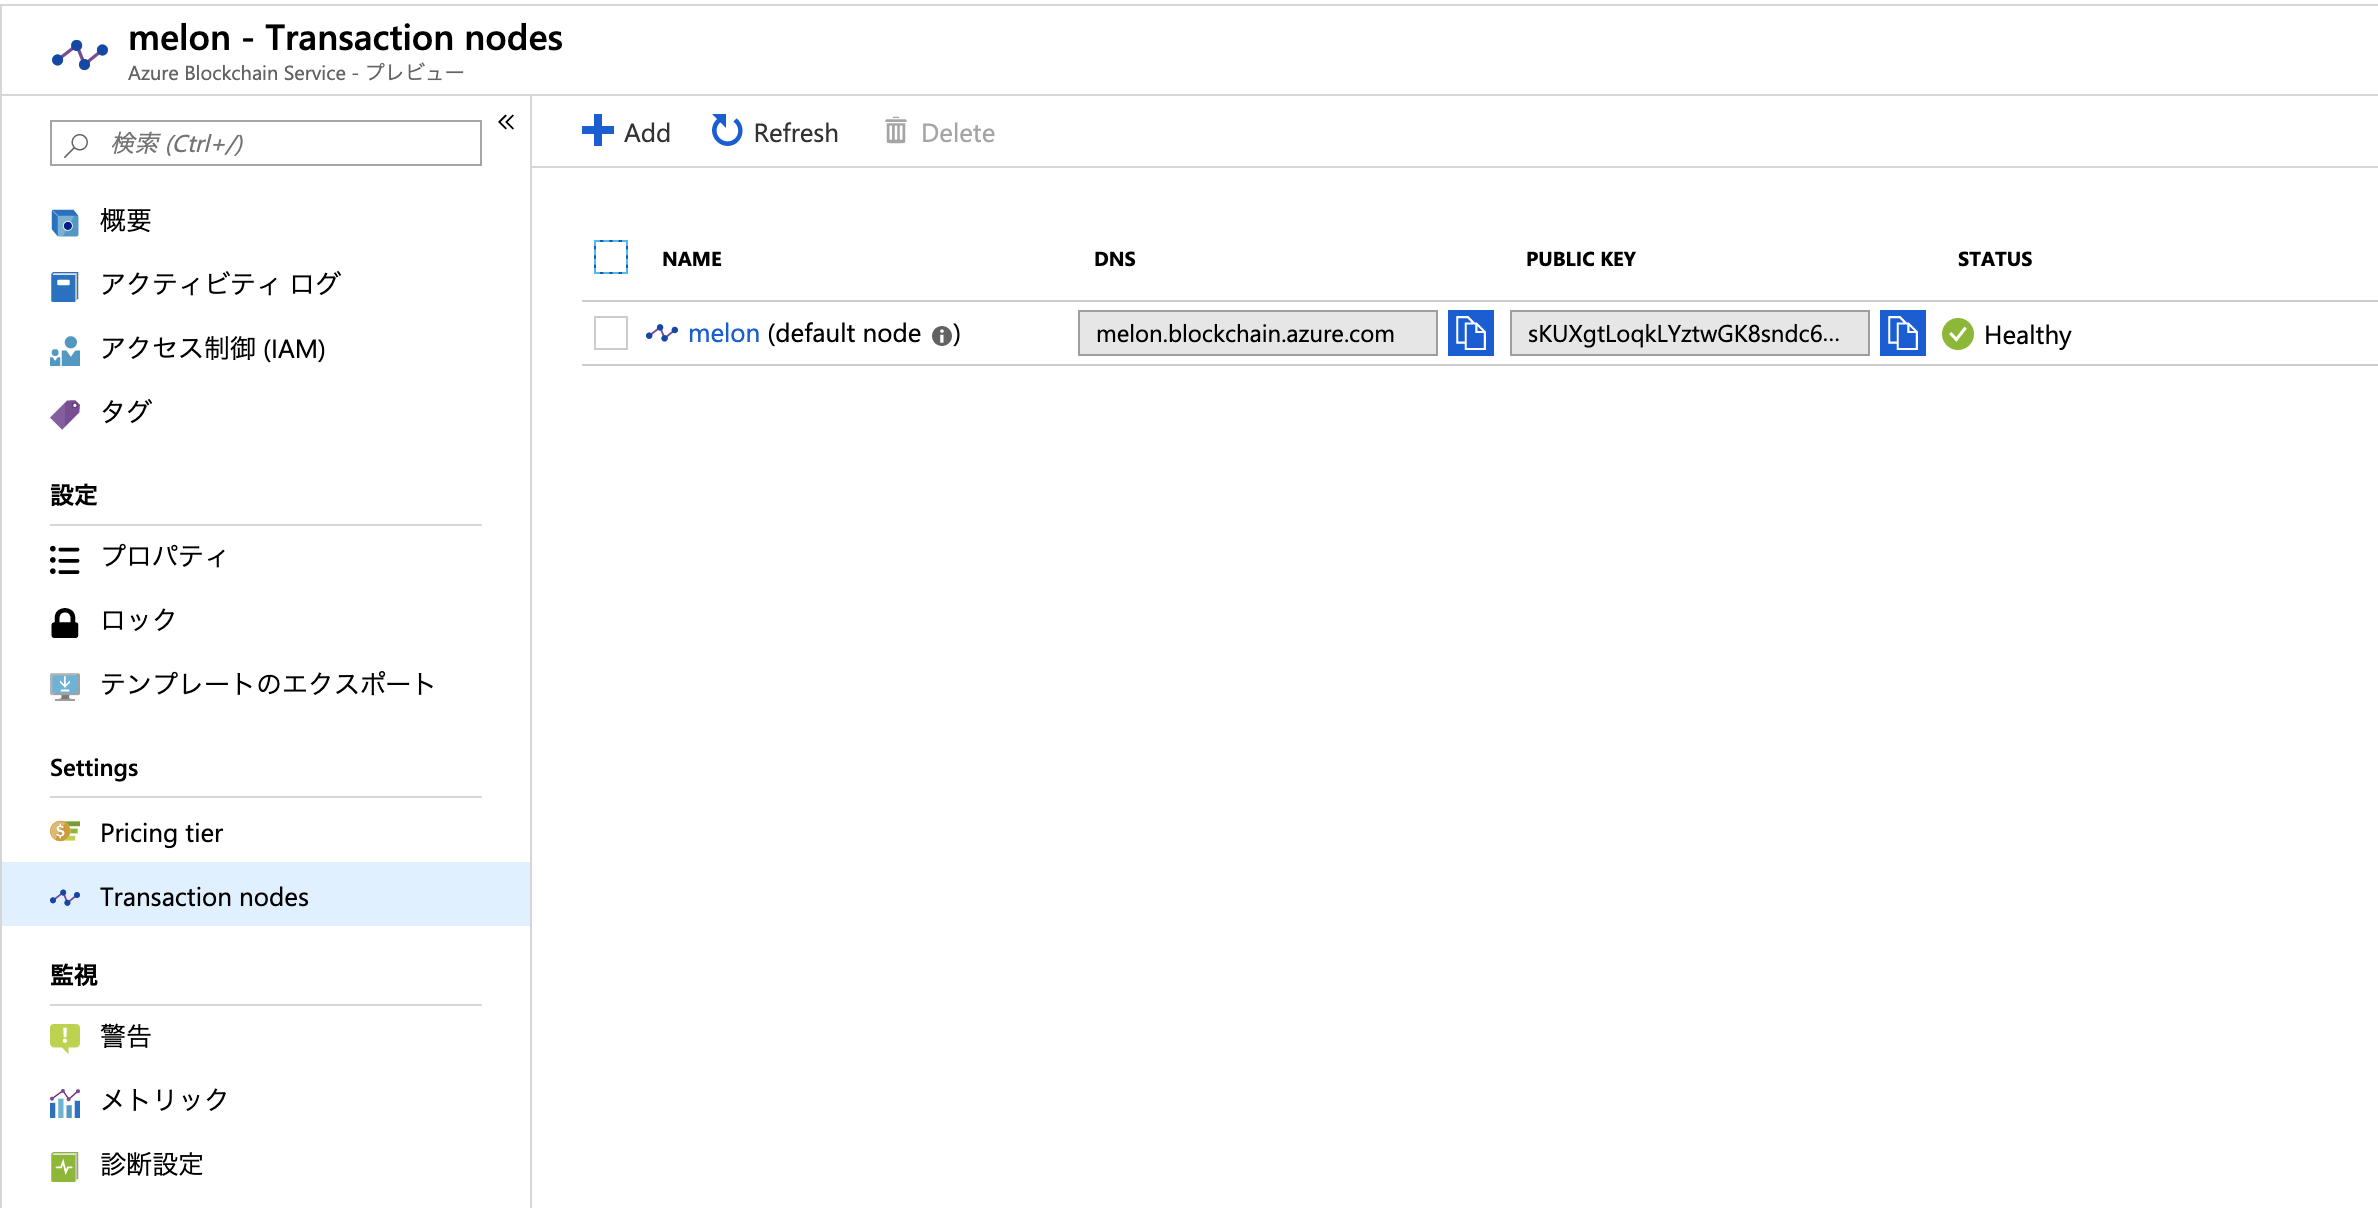
truffleプロジェクトを作成します
$ mkdir truffledemo && cd truffledemo
$ truffle init
$ npm init -y
$ npm install web3@1.0.0-beta.37
truffleのコンソールを起動します
$ truffle develop
truffle(develop)> var Web3 = require("Web3");
truffle(develop)> var provider = new Web3.providers.HttpProvider("");
truffle(develop)> var web3 = new Web3(provider);
ブロック番号を取得してみます
truffle(develop)> web3.eth.getBlockNumber();
168
コンソールを終了します
.exit
#コントラクトをデプロイする
##トランザクションノードの作成
自分のAzure Blockchain メンバーに移動して、Transaction nodes > addをクリック
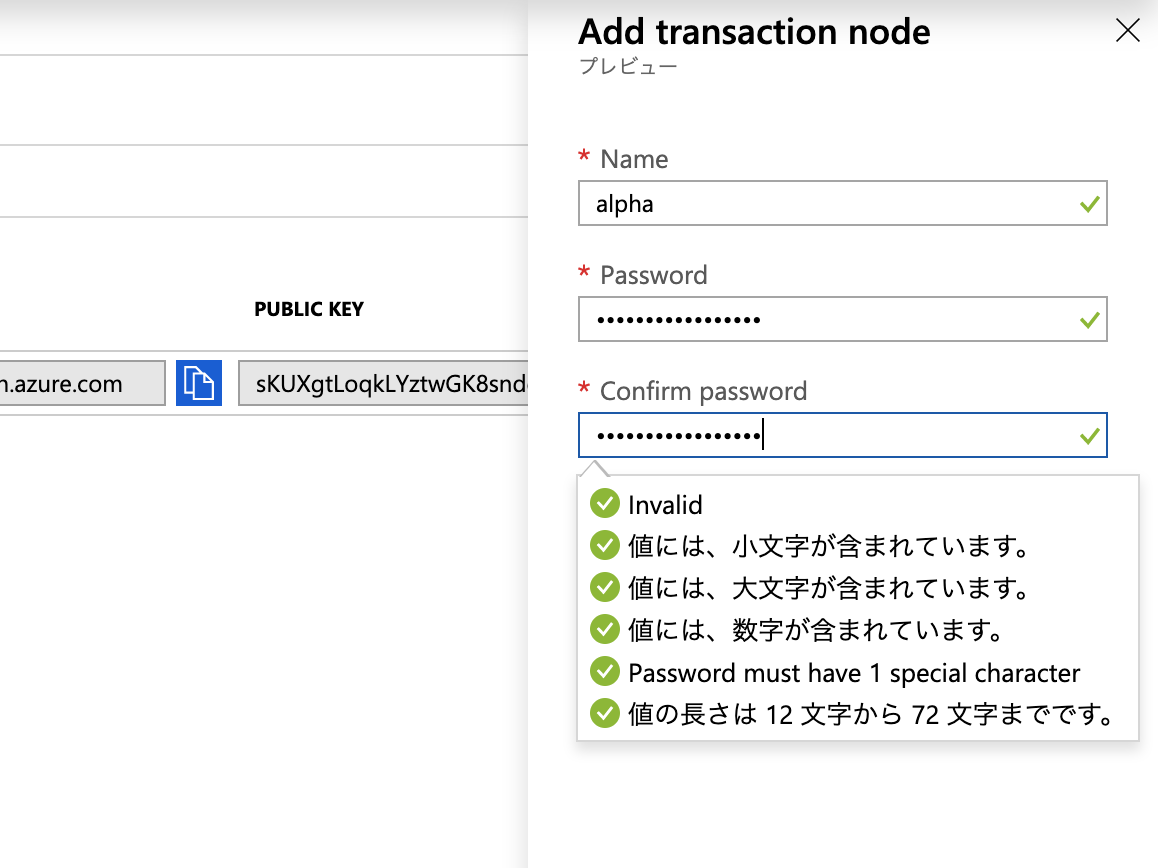
上のようにしてalphaノードとbetaノードを作成します
少し時間がかかります
##Ethereumアカウントの作成
$ truffle develop
上で使ったサンプルコードをもう一度使います
truffle(develop)> var Web3 = require("Web3");
truffle(develop)> var provider = new Web3.providers.HttpProvider("");
truffle(develop)> var web3 = new Web3(provider);
truffle(develop)> web3.eth.personal.newAccount("1@myStrongPassword");
使用したパスワードと返り値のアドレスをメモしておきます
##トランザクションノードの情報を取得する
alphaトランザクションノードのみにトランザクションを送信するのでalphaノードの公開鍵が必要です
メモしておきましょう
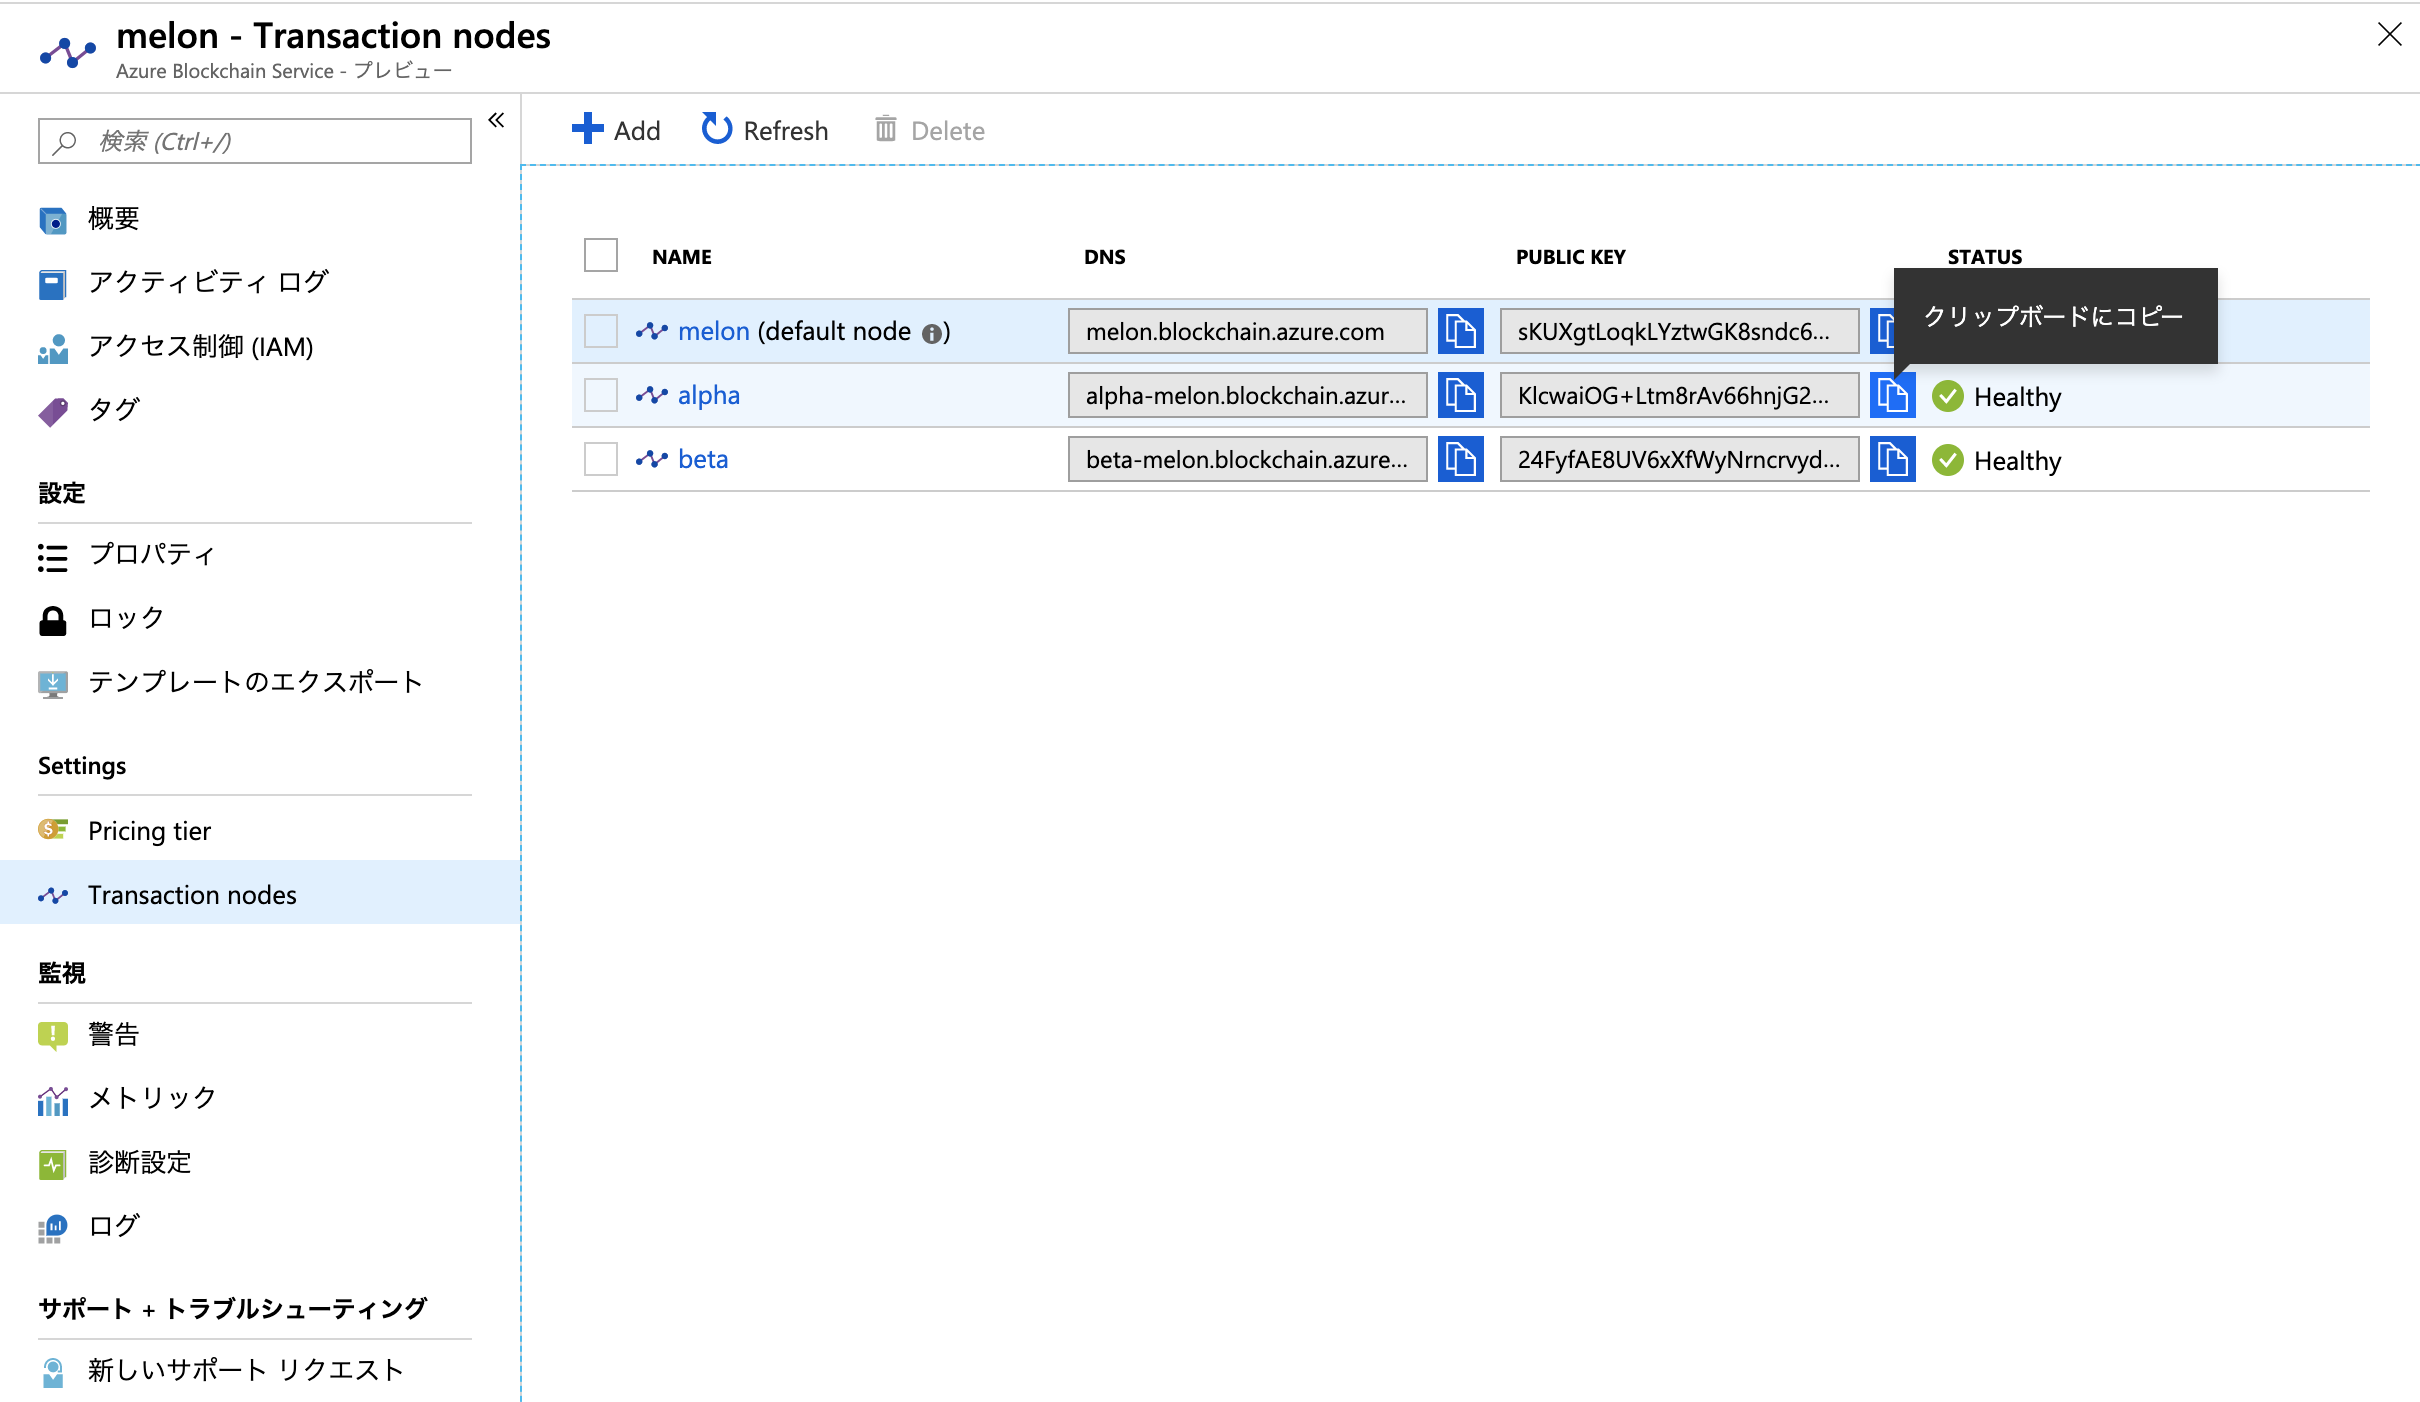
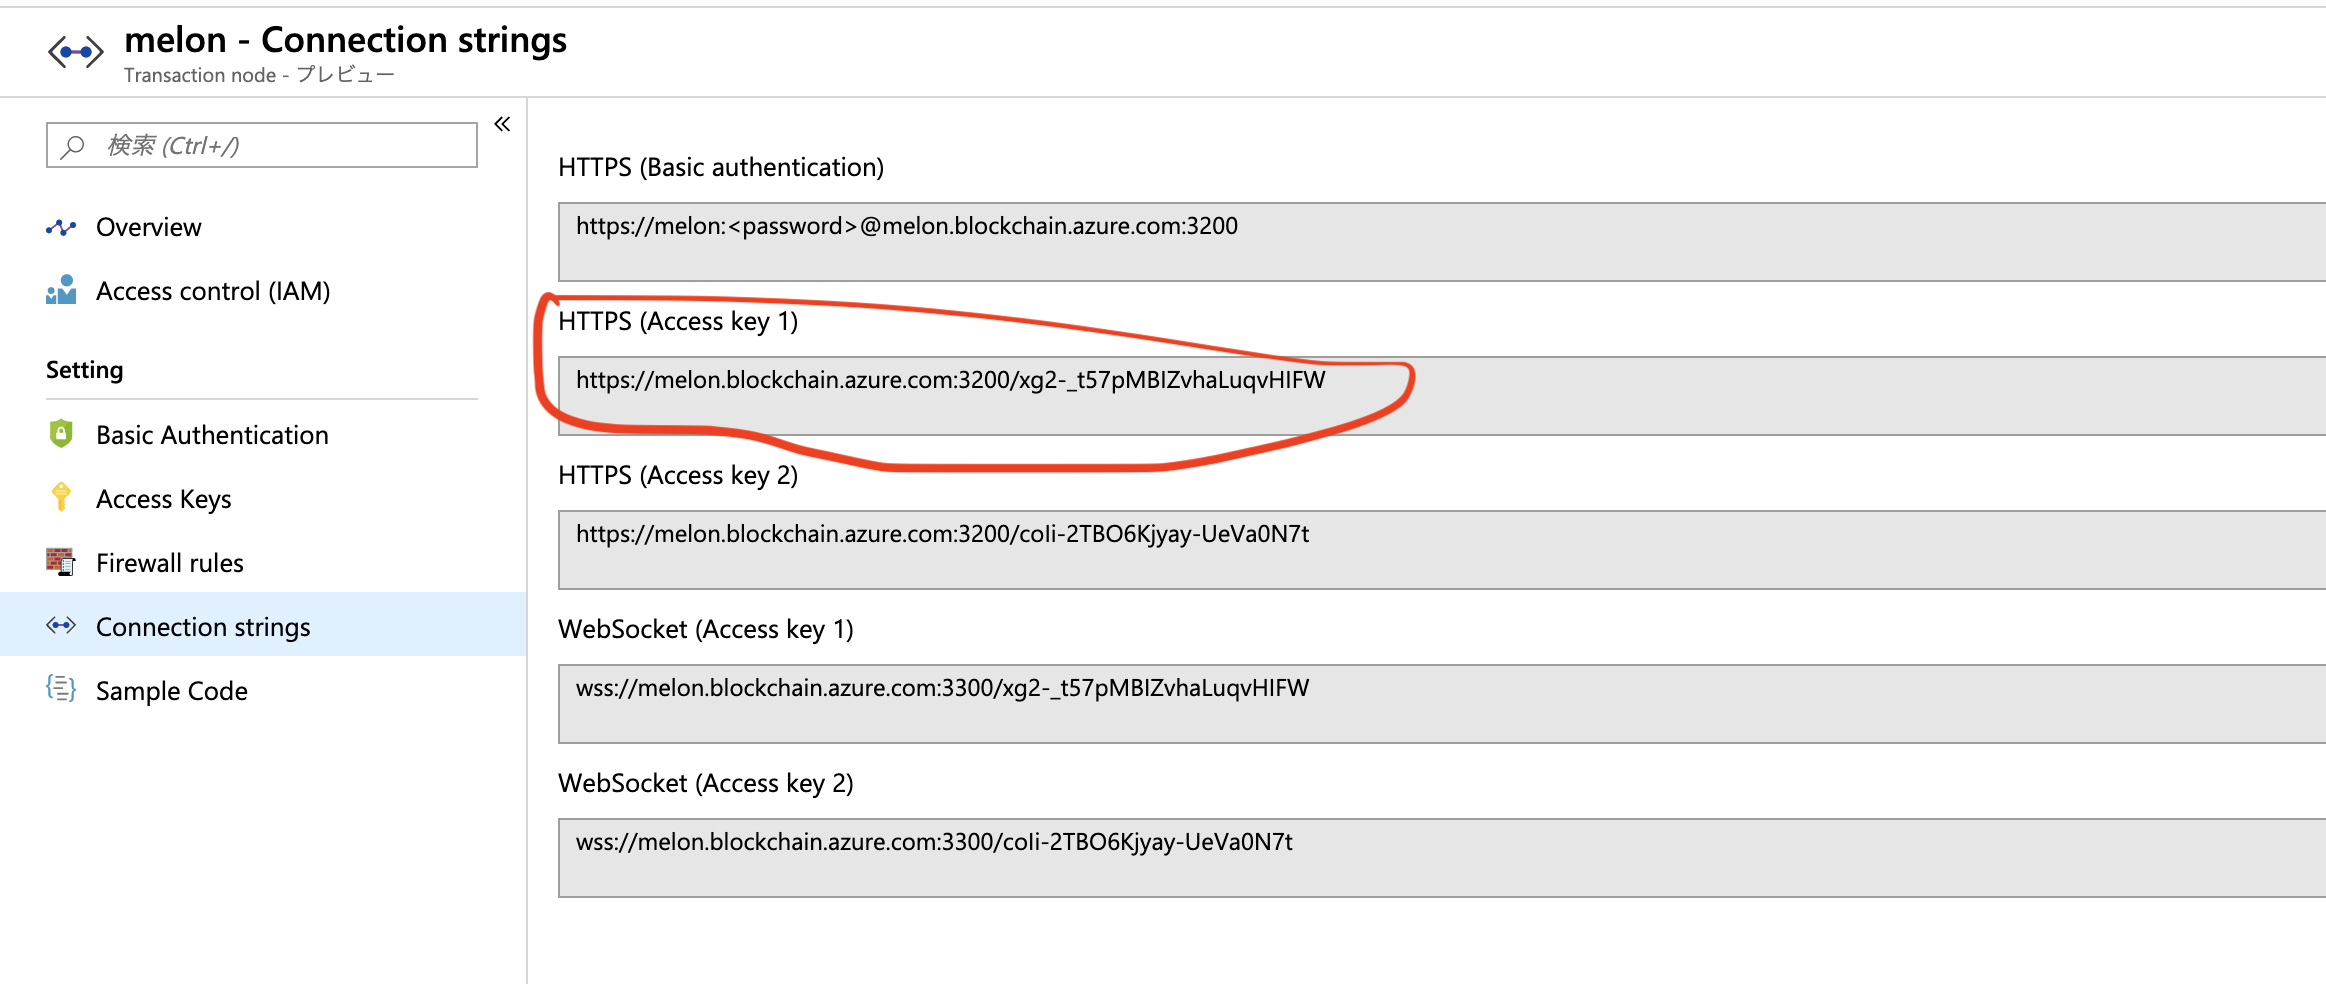
各トランザクションノードのエンドポイントがのちに必要になります。
Transaction nodes>Connection stringsでHTTPS(Acceess key 1)をメモしましょう
truffle-config.jsを次のように編集します
var defaultnode = "<default transaction node connection string>";
var alpha = "<alpha transaction node connection string>";
var beta = "<beta transaction node connection string>";

var myAccount = "<Ethereum account address>";
var myPassword = "<Ethereum account password>";

var Web3 = require("web3");

module.exports = {
  networks: {
    defaultnode: {
      provider:(() =>  {
      const AzureBlockchainProvider = new Web3.providers.HttpProvider(defaultnode);

      const web3 = new Web3(AzureBlockchainProvider);
      web3.eth.personal.unlockAccount(myAccount, myPassword);

      return AzureBlockchainProvider;
      })(),

      network_id: "*",
      gas: 0,
      gasPrice: 0,
      from: myAccount
    },
    alpha: {
      provider: new Web3.providers.HttpProvider(alpha),
      network_id: "*",
      gas: 0,
      gasPrice: 0
    },
    beta: {
      provider: new Web3.providers.HttpProvider(beta),
      network_id: "*",
      gas: 0,
      gasPrice: 0
    }
  }
}
contractsフォルダにSimpleStorage.solというファイルを作成し以下のように編集
pragma solidity >=0.4.21 <0.6.0;

contract SimpleStorage {
    string public storedData;

    constructor(string memory initVal) public {
        storedData = initVal;
    }

    function set(string memory x) public {
        storedData = x;
    }

    function get() view public returns (string memory retVal) {
        return storedData;
    }
}
migrationsフォルダに2_deploy_simplestorage.jsを作成し以下のように編集
var SimpleStorage = artifacts.require("SimpleStorage.sol");

module.exports = function(deployer) {

  // Pass 42 to the contract as the first constructor parameter
  deployer.deploy(SimpleStorage, "42", {privateFor: ["<alpha node public key>"], from:"<Ethereum account address>"})
};
コントラクトのstoredDataの初期値を42に設定しています
privateForオプションをつけてalphaノードしかコントラクトを使用できないようにします
SimpleStorage.solをトランザクションノードにデプロイします
$ truffle migrate --network defaultnode
うまくいけばこのようになります
$ truffle migrate --network defaultnode
Compiling ./contracts/Migrations.sol...
Compiling ./contracts/SimpleStorage.sol...
Writing artifacts to ./build/contracts

...

2_deploy_simplestorage.js
=========================

   Deploying 'SimpleStorage'
   -------------------------
   > transaction hash:    0x7864e565a7c74e940e5c5240fd9c51ffef99cdcbf2be89b3771db903996e80ee
   > Blocks: 1            Seconds: 4
   > contract address:    0x474A96cEb7054dc988de1876fFd8c04acb3a361b
   > account:             0x1cB2113565bD7fe0087f4A05Da70Ae2E60850B23
   > balance:             0
   > gas used:            0
   > gas price:           0 gwei
   > value sent:          0 ETH
   > total cost:          0 ETH

   > Saving artifacts
   -------------------------------------
   > Total cost:                   0 ETH


Summary
=======
> Total deployments:   2
> Final cost:          0 ETH
#コントラクトのプライバシーを検証する
コントラクトをデプロイする時にprivateForで定義したalphaノードとコントラクトを送信したdefaultノードのみ、コントラクトの値をみることができるはずです。それを検証します。
$ truffle console --network defaultnode
> SimpleStorage.deployed().then(function(instance){return instance.get();})
'42'
ちゃんと値が返ってきました
次はlphaノードで検証します
> .exit
$ truffle console --network alpha
> SimpleStorage.deployed().then(function(instance){return instance.get();})
'42'
次はbetaノードで検証します
> .exit
$ truffle console --network beta
> SimpleStorage.deployed().then(function(instance){return instance.get();})
truffle(beta)> SimpleStorage.deployed().then(function(instance){return instance.get();})
Error: Returned values aren't valid, did it run Out of Gas?
こんな感じで期待通りにエラーが返ってきます
コンソールを終了します
> .exit
#トランザクションを送信する
プロジェクトのルートにsampletx.jsファイルを作成し、以下のように編集します
var SimpleStorage = artifacts.require("SimpleStorage");

module.exports = function(done) {
  console.log("Getting deployed version of SimpleStorage...")
  SimpleStorage.deployed().then(function(instance) {
    console.log("Setting value to 65...");
    return instance.set("65", {privateFor: ["<alpha node public key>"], from:"<Ethereum account address>"});
  }).then(function(result) {
    console.log("Transaction:", result.tx);
    console.log("Finished!");
    done();
  }).catch(function(e) {
    console.log(e);
    done();
  });
};
alphaノードとトランザクションを送信するdefaultノードのみステートをみることができます
トランザクションを送信します
truffle exec sampletx.js --network defaultnode
truffleコンソールで以下のコードを実行するとdefault, alphaノードのみ65が返ってきます
> SimpleStorage.deployed().then(function(instance){return instance.get();})
#リソースのクリーアップ
必要なくなったらリソースグループを削除しておきましょう
- Azure portalで
リソースグループに移動し、削除するリソースグループを選択します -
リソースグループの削除を選択します
#まとめ
圧倒的フルマネージドという感じでした
ワンクリックでノードのデプロイができてしまい、エンドポイントも提供してくれるので、開発者はアプリケーションの開発だけに集中できます
#参考
メンバーの作成
https://docs.microsoft.com/ja-jp/azure/blockchain/service/create-member
truffleでノードに接続
https://docs.microsoft.com/ja-jp/azure/blockchain/service/connect-truffle
truffleでコントラクトデプロイ%&トランザクション送信
https://docs.microsoft.com/ja-jp/azure/blockchain/service/send-transaction
