HerokuとLINE APIを繋いでリプライ機能を作る!
LINE APIを使ってラーメンBOTを作りたい!と、いうわけで
まずは手始めにJava LINE Bot SDKを使ってオウム返しを行う "echo" ボットを作る。
▼以下のURLを参考に実装
「Herokuでサンプルボットを作成する」
https://developers.line.me/ja/docs/messaging-api/building-sample-bot-with-heroku/
利用したツール
・LINE Messaging API
・Java LINE Bot SDK
・Heroku
・java
手順
1.LINE Messaging APIを設定する
2.Herokuを設定する
3.Maven Projectを生成
4.Herokuにデプロイ
※今回、LINE Messaging APIとHerokuの設定は割愛します。
Maven projectを作成
1.pom.xml
.
.
.

<parent>
		<groupId>org.springframework.boot</groupId>
		<artifactId>spring-boot-starter-parent</artifactId>
		<version>1.5.9.RELEASE</version>
	</parent>
	<properties>
		<project.build.sourceEncoding>UTF-8</project.build.sourceEncoding>
		<project.reporting.outputEncoding>UTF-8</project.reporting.outputEncoding>
		<java.version>1.8</java.version>
	</properties>

	<dependencies>
		<dependency>
			<groupId>org.springframework.boot</groupId>
			<artifactId>spring-boot-starter-web</artifactId>
		</dependency>
		<dependency>
			<groupId>org.springframework.boot</groupId>
			<artifactId>spring-boot-starter-test</artifactId>
			<scope>test</scope>
		</dependency>
		<dependency>
			<groupId>org.apache.tomcat.embed</groupId>
			<artifactId>tomcat-embed-jasper</artifactId>
		</dependency>
		<dependency>
			<groupId>com.linecorp.bot</groupId>
			<artifactId>line-bot-api-client</artifactId>
			<version>1.12.0</version>
			<scope>compile</scope>
			<exclusions>
				<exclusion>
					<artifactId>commons-logging</artifactId>
					<groupId>commons-logging</groupId>
				</exclusion>
			</exclusions>
		</dependency>
		<dependency>
			<groupId>com.linecorp.bot</groupId>
			<artifactId>line-bot-model</artifactId>
			<version>1.12.0</version>
			<scope>compile</scope>
			<exclusions>
				<exclusion>
					<artifactId>commons-logging</artifactId>
					<groupId>commons-logging</groupId>
				</exclusion>
			</exclusions>
		</dependency>
		<dependency>
			<groupId>com.linecorp.bot</groupId>
			<artifactId>line-bot-spring-boot</artifactId>
			<version>1.11.0</version>
		</dependency>
	</dependencies>
	<build>
		<plugins>
			<plugin>
				<groupId>org.springframework.boot</groupId>
				<artifactId>spring-boot-maven-plugin</artifactId>
			</plugin>
		</plugins>
	</build>
2.application.yml
AcccessTokenとChannel Secretは、LINE Messaging APIで新規Channel作成すると生成されます
line.bot:
  channel-token: 'AcccessToken'
  channel-secret: 'Channel Secret'
  handler.path: /callback
3.Procfile
★☆ポイント☆★
1.ルートディレクトリ配下にfileを生成
2.file名は「Procfile」※はじめの「P」は大文字で!
https://devcenter.heroku.com/articles/procfile
web: java $JAVA_OPTS -jar target/{APPNAME}-0.0.1-SNAPSHOT.jar --server.port=$PORT
4.App.java
Java LINE Bot SDKにあるコードをコピペしました。
@SpringBootApplication
@LineMessageHandler
public class App {
	public static void main(String[] args) {
		SpringApplication.run(App.class, args);
		System.out.println("hello");
	}

	@EventMapping
	public TextMessage handleTextMessageEvent(MessageEvent<TextMessageContent> event) {
		System.out.println("event: " + event);
		return new TextMessage(event.getMessage().getText());
	}

	@EventMapping
	public void handleDefaultMessageEvent(Event event) {
		System.out.println("event: " + event);
	}
}
Herokuにデプロイ!
//ローカルでリポジトリ生成、コミット
$ git init
$ git add -A
$ git commit

//herokuにCLIツールからログイン
$ heroku login

//Heroku内にwebアプリケーション生成(このときリモートリポジトリも生成される)
$ heroku create APPNAME

//ローカルリポジトリとリモートリポジトリを紐づけ
$ heroku git:remote --app APPNAME

git push heroku master
Webhookの設定
・Webhook送信⇒利用する
・Webhook URL⇒https://{APPNAME}.herokuapp.com/callback
{APPNAME}は自分の作ったアプリケーション名を入れる
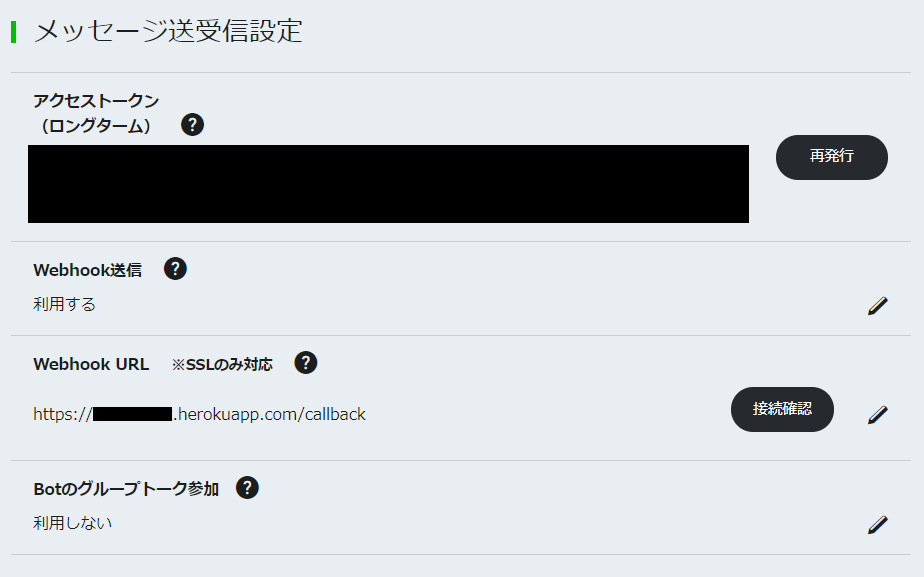
接続確認で成功すればOK!!
これで、リプライ機能が実装できました!!
簡単だと思っていましたが、LINE Message APIとherokuがつながらず苦戦しました。
是非参考にしてくださいね☆
次回は、ラーメンBOTを実装します。