この記事はリンク情報システムの「TechConnect!2022年2月」のリレー記事です。
engineer.hanzomon のグループメンバによってリレーされます。
(リンク情報システムのFacebookはこちらから)
TechConnect!2022年2月のインデックスはこちら
アドカレ4回目にして、トリっぽいですが、通常運営でインフラの話です![]()
ここ最近、mysqlを色々検証したのでまとめました!
余談ですが限定共有記事を消すと、下書きまで消えるんですね。。泣きながらキャッシュを漁って復活した記事ですw
目次
1. Group Replication + Proxy SQL構成
2. MySQL Replication(GTID) + MHA + Proxy SQL構成
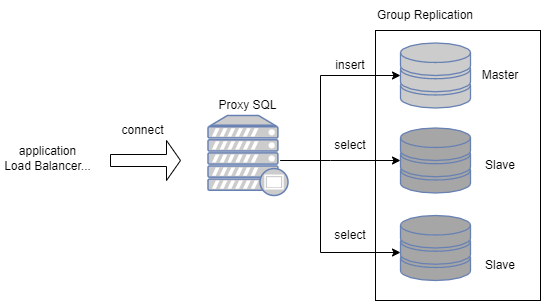
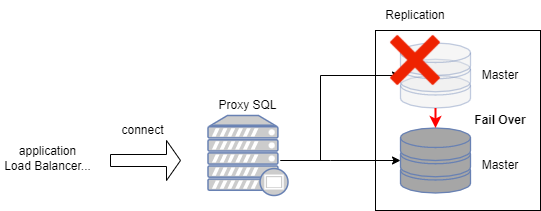
1. Group Replication + Proxy SQL構成
MySQL Server へのプラグインの1つ。単一プライマリモードでも、マルチプライマリモードでも動作可能。グループメンバーシップ制でグループから自由に退出、参加ができる。メンバーが予期せずグループから離脱した場合は障害検出メカニズムが検知し、他メンバーに離脱を自動通知する。
■ 要件
| 項目 | 要件/仕様 |
|---|---|
| 最小構成 | 3台 |
| 最大構成 | 9台 |
| ストレージ | InnoDB |
| 要求帯域 | 中~高 |
| 稼働中の拡張 | 可能 |
| 自動復旧 | 可能 |
☆ memo
ネットワークが高~中水準で安定していれば、トランザクションが多いシステムでも運用が可能な印象。SQL Routerと組み合わせることで、マスターはinsertのみ、スレーブはselectのみに処理を分散させることが可能。
ネットワークの状態によってはメンバーが離脱しやすい傾向があったが、帯域が確保できる環境では安定稼働している。(パラメータ調整で何とかなるが、限界もある。)
そのため、遠隔地レプリケーションには向いてないと思われる。
1ノード(マスター or スレーブ)が離脱しても、フェイルオーバーし、疎通が取れるようになった時点で自動的にメンバーを追加してくれるので、メンテでスレーブだけを再起動する運用も可能。また、全台停止後のGroup Replicationの起動もコマンド1つ打てばよいので、頻繁に停止する環境でもそれなりに組みやすいかも?
ただ、ディスクフル等のどうしようもない障害が起きた時は手動リカバリになり、それなりに手順が複雑になる。
インストール方法
環境:CentOS7
Group Replication:3台
Proxy SQL:1台
全台共通
(1) 事前準備
selinux無効
# vi /etc/selinux/config
> SELINUX=disabled

fierewalld無効
# systemctl disable firewalld

timezone変更
# timedatectl set-timezone Asia/Tokyo

パッケージアップデート
♯ yum update

再起動
# reboot
(2) hostnameでお互いに疎通できるか確認する
手順9.で利用する。
# hostname
# ping [自分以外のhost名称]
解決できなければ/etc/hostsに設定を追加し、その名称を利用する。
# vi /etc/hosts
127.0.0.1 localhost localhost.localdomain localhost4 localhost4.localdomain4
::1 localhost localhost.localdomain localhost6 localhost6.localdomain6
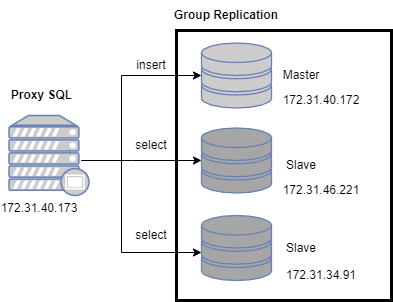
172.31.40.172 DB1
172.31.46.221 DB2
172.31.34.91 DB3
Group Replication用の3台の構築
(3) mysqlをインストールする
mysqlリポジトリの追加
# rpm -Uvh https://dev.mysql.com/get/mysql80-community-release-el7-4.noarch.rpm

MySQL 8.0 Community Serverが有効になっているか確認
# yum repolist all | grep mysql

mysqlをインストールする
# yum install mysql-community-server mysql-shell

log用ディレクトリを作成する
# mkdir /var/log/mysql
# touch /var/log/mysql/slow.log
# chown mysql. -R /var/log/mysql

自動起動を有効化
# systemctl enable mysqld
(4) my.cnfの設定をする
server_idはDB毎に違う値を設定する。また、server_idに0は設定できない。
# vi /etc/my.cnf

# For advice on how to change settings please see
# http://dev.mysql.com/doc/refman/8.0/en/server-configuration-defaults.html

[mysqld]
#
# Remove leading # and set to the amount of RAM for the most important data
# cache in MySQL. Start at 70% of total RAM for dedicated server, else 10%.
# innodb_buffer_pool_size = 128M
#
# Remove the leading "# " to disable binary logging
# Binary logging captures changes between backups and is enabled by
# default. It's default setting is log_bin=binlog
# disable_log_bin
#
# Remove leading # to set options mainly useful for reporting servers.
# The server defaults are faster for transactions and fast SELECTs.
# Adjust sizes as needed, experiment to find the optimal values.
# join_buffer_size = 128M
# sort_buffer_size = 2M
# read_rnd_buffer_size = 2M
#
# Remove leading # to revert to previous value for default_authentication_plugin,
# this will increase compatibility with older clients. For background, see:
# https://dev.mysql.com/doc/refman/8.0/en/server-system-variables.html#sysvar_default_authentication_plugin
# default-authentication-plugin=mysql_native_password

datadir=/var/lib/mysql
socket=/var/lib/mysql/mysql.sock
log-error=/var/log/mysql/mysqld.log
pid-file=/var/run/mysqld/mysqld.pid

# slow query
slow_query_log=1
slow_query_log_file=/var/log/mysql/slow.log
long_query_time=5

# DB毎に変更する。ex DB1:1, DB2:2, DB:3
server_id=1

default_authentication_plugin=mysql_native_password
# super_read_only=on
innodb_flush_log_at_trx_commit=2
log_timestamps=SYSTEM

# バイナリログの設定
sync_binlog=500
binlog_expire_logs_seconds=259200

# memory(全テーブルのサイズが望ましい)
# innodb_buffer_pool_size=2048M

# connextion
# MySQLがクライアントからの接続パケットを待機する時間(秒)
connect_timeout=10
# アプリケーションなどから接続された非対話型の接続に対してのアイドルタイムアウト時間(秒)
wait_timeout=300
# mysqlクライアントでログインした時などの対話型の接続に対してのアイドルタイムアウト時間(秒)
interactive_timeout=28800
# MySQLの同時接続数
max_connections=2000
(5) mysqldを起動する
# systemctl start mysqld
# systemctl status mysqld

(6) mysqlのパスワード変更する
defaultのパスワードを抽出
# grep 'temporary password' /var/log/mysql/mysqld.log | cut -d' ' -f13
抽出したパスワードでログインし、パスワードを設定する
# mysql -uroot -p'抽出したパスワード' --connect-expired-password -e "ALTER USER root@localhost IDENTIFIED WITH mysql_native_password BY 'P@ssw0rd'"
(7) 読み取り専用で再起動する
コメントアウト解除
# vi /etc/my.cnf
super_read_only=on

# mysqld再起動
# systemctl restart mysqld
(8) クラスター用のユーザを作成する
# mysqlsh -e "dba.configureLocalInstance('root@localhost:3306',{clusterAdmin:'icroot@\'%\'', clusterAdminPassword:'P@ssw0rd'})"
Please provide the password for 'root@localhost:3306': P@ssw0rd
Save password for 'root@localhost:3306'? [Y]es/[N]o/Ne[v]er (default No): Y
Do you want to perform the required configuration changes? [y/n]: y
Do you want to restart the instance after configuring it? [y/n]: y
Do you want to disable super_read_only and continue? [y/N]:y
(9) クラスター用のパスワードを保存する
Masterにする1台のみ実行する
# mysqlsh -e "shell.connect('icroot@DB1:3306')"
Please provide the password for 'icroot@DB1:3306': P@ssw0rd
Save password for 'icroot@DB1:3306'? [Y]es/[N]o/Ne[v]er (default No): Y

# mysqlsh -e "shell.connect('icroot@DB2:3306')"
Please provide the password for 'icroot@DB2:3306': ********
Save password for 'icroot@DB2:3306'? [Y]es/[N]o/Ne[v]er (default No): Y

# mysqlsh -e "shell.connect('icroot@DB3:3306')"
Please provide the password for 'icroot@DB3:3306': ********
Save password for 'icroot@DB3:3306'? [Y]es/[N]o/Ne[v]er (default No): Y
(10) クラスターの作成を行う
Masterにする1台のみ実行する
The instance 'XXXX' was successfully added to the cluster.と出力されたら問題無し
# mysqlsh -e "shell.connect('icroot@DB1:3306');cluster=dba.createCluster('cluster');cluster.addInstance('icroot@DB2:3306',{'recoveryMethod':'clone'});cluster.addInstance('icroot@DB3:3306',{'recoveryMethod':'clone'})"
クラスターの状態を確認する。MEMBER_STATEがONLINEになっていればOK。
PRIMARY: Masterノード
SECONDARY: Slaveノード
# mysql -uroot -p'P@ssw0rd' -e 'select * from performance_schema.replication_group_members;'
mysql: [Warning] Using a password on the command line interface can be insecure.
+---------------------------+--------------------------------------+--------------------------------------------------+-------------+--------------+-------------+----------------+----------------------------+
| CHANNEL_NAME              | MEMBER_ID                            | MEMBER_HOST                                      | MEMBER_PORT | MEMBER_STATE | MEMBER_ROLE | MEMBER_VERSION | MEMBER_COMMUNICATION_STACK |
+---------------------------+--------------------------------------+--------------------------------------------------+-------------+--------------+-------------+----------------+----------------------------+
| group_replication_applier | 0ee34962-6873-11ec-897b-065f00176f79 | ip-172-31-40-172.ap-northeast-1.compute.internal |        3306 | ONLINE       | PRIMARY     | 8.0.27         | XCom                       |
| group_replication_applier | 2bb61bf7-6873-11ec-899b-06da60501adb | ip-172-31-46-221.ap-northeast-1.compute.internal |        3306 | ONLINE       | SECONDARY   | 8.0.27         | XCom                       |
| group_replication_applier | 3317cb98-6873-11ec-898c-06c5c712ef6f | ip-172-31-34-91.ap-northeast-1.compute.internal  |        3306 | ONLINE       | SECONDARY   | 8.0.27         | XCom                       |
+---------------------------+--------------------------------------+--------------------------------------------------+-------------+--------------+-------------+----------------+----------------------------+
(11) DBの作成・ユーザーの設定を行う
Masterにする1台のみ実行する
DBを作成
# mysql -uroot -p'P@ssw0rd'  -e "create database if not exists world"

管理ユーザ作成
# mysql -uroot -p'P@ssw0rd' -e "create user admin@'%' identified by 'P@ssw0rd'"
# mysql -uroot -p'P@ssw0rd' -e "grant all on world.* to admin@'%'"
# mysql -uroot -p'P@ssw0rd' -e "grant super on *.* to admin@'%'"

参照ユーザ作成
# mysql -uroot -p'P@assw0rd' -e "create user operator@'%' identified by 'P@assw0rd'"
# mysql -uroot -p'P@assw0rd' -e "grant select on world.* to operator@'%'"
(12) パラメータ設定
全台
デフォルトだと「あるノードに障害が発生し、グループレプリケーションから離脱した時の挙動は更新不可。参照可能」になる。そのため、更新されなくなった当該DBがProxySQLから参照できてしまい、 古いデータがselectされる事態になる。 これを避けるため、以下の設定をする。
# mysql -uroot -p
mysql> select @@group_replication_exit_state_action;
+---------------------------------------+
| @@group_replication_exit_state_action |
+---------------------------------------+
| READ_ONLY                             |
+---------------------------------------+
1 row in set (0.00 sec)

mysql> SET persist group_replication_exit_state_action = ABORT_SERVER;
Query OK, 0 rows affected (0.00 sec)

mysql> select @@group_replication_exit_state_action;
+---------------------------------------+
| @@group_replication_exit_state_action |
+---------------------------------------+
| ABORT_SERVER                          |
+---------------------------------------+
1 row in set (0.00 sec)

mysql>
また、古いバージョンのmysqlだと、以下の値が0に設定されるため頻繁に離脱するようになる。
※頻繁に離脱する際はこの値を変更する。
mysql> select @@group_replication_member_expel_timeout;
+------------------------------------------+
| @@group_replication_member_expel_timeout |
+------------------------------------------+
|                                        5 |
+------------------------------------------+
1 row in set (0.00 sec)

mysql> select @@group_replication_autorejoin_tries;
+--------------------------------------+
| @@group_replication_autorejoin_tries |
+--------------------------------------+
|                                    3 |
+--------------------------------------+
1 row in set (0.00 sec)

mysql>
■設定の意味
| パラメータ | 設定値 | 設定の意味 | 設定方法 |
|---|---|---|---|
| group_replication_exit_state_action | ABORT_SERVER(サーバ停止) | サーバーインスタンスが意図せずにグループを離れたとき、グループを追放した場合のグループレプリケーションの動作を構成する。 | SET persist group_replication_exit_state_action = ABORT_SERVER; |
| group_replication_member_expel_timeout | 5 | グループレプリケーショングループメンバーが離脱疑惑を作成した後、失敗した疑いのあるメンバーをグループから追放するまで待機する時間を秒単位で指定する。8.0.22以降デフォルト値が5に変更。 | SET persist group_replication_member_expel_timeout = 5; |
| group_replication_autorejoin_tries | 1 | メンバーが追放された場合、またはgroup_replication_unreachable_majority_timeout 設定に達する前にグループの過半数に連絡できない場合に、メンバーがグループに自動的に再参加するために行う試行回数。 | SET group_replication_autorejoin_tries = 1; |
ここまででグループレプリケーションの構築は完了。
ProxySQL用の1台の構築
(1) mysql clientをインストールする
mysqlリポジトリの追加
# rpm -Uvh https://dev.mysql.com/get/mysql80-community-release-el7-4.noarch.rpm

MySQL 8.0 Community Serverが有効になっているか確認
# yum repolist all | grep mysql

mysql clientをインストールする
# yum install mysql-community-client
(2) proxySQLをインストールする
proxysqlリポジトリの追加
# cat <<EOF | tee /etc/yum.repos.d/proxysql.repo
[proxysql_repo]
name= ProxySQL YUM repository
baseurl=https://repo.proxysql.com/ProxySQL/proxysql-2.2.x/centos/7
gpgcheck=1
gpgkey=https://repo.proxysql.com/ProxySQL/repo_pub_key
EOF
(3) proxysqlをインストールする
# yum install proxysql

proxysql用のログディレクトリを作成する
# mkdir /var/log/proxysql
# touch /var/log/proxysql/proxysql.log
# chown -R proxysql. /var/log/proxysql

自動起動を有効化
# systemctl enable proxysql
(4) ProxySQLを起動する
# systemctl start proxysql
(5) proxysql.cnfの設定をする
adminユーザは更新専用(Masterに行く)、operatorユーザは参照専用(Slaveに行く)に設定をしています。
※この設定の場合Slaveが全台落ちた場合に参照できなくなります。
# vi /etc/proxysql.cnf

# file proxysql.cfg

########################################################################################
# This config file is parsed using libconfig , and its grammar is described in:
# http://www.hyperrealm.com/libconfig/libconfig_manual.html#Configuration-File-Grammar
# Grammar is also copied at the end of this file
########################################################################################

########################################################################################
# IMPORTANT INFORMATION REGARDING THIS CONFIGURATION FILE:
########################################################################################
# On startup, ProxySQL reads its config file (if present) to determine its datadir.
# What happens next depends on if the database file (disk) is present in the defined
# datadir (i.e. "/var/lib/proxysql/proxysql.db").
#
# If the database file is found, ProxySQL initializes its in-memory configuration from
# the persisted on-disk database. So, disk configuration gets loaded into memory and
# then propagated towards the runtime configuration.
#
# If the database file is not found and a config file exists, the config file is parsed
# and its content is loaded into the in-memory database, to then be both saved on-disk
# database and loaded at runtime.
#
# IMPORTANT: If a database file is found, the config file is NOT parsed. In this case
#            ProxySQL initializes its in-memory configuration from the persisted on-disk
#            database ONLY. In other words, the configuration found in the proxysql.cnf
#            file is only used to initial the on-disk database read on the first startup.
#
# In order to FORCE a re-initialise of the on-disk database from the configuration file
# the ProxySQL service should be started with "systemctl start proxysql-initial".
#
########################################################################################

datadir="/var/lib/proxysql"
errorlog="/var/lib/proxysql/proxysql.log"

admin_variables=
{
        admin_credentials="admin:P@ssw0rd"
        mysql_ifaces="127.0.0.1:6032;/var/lib/proxysql/admin.sock"
#       mysql_ifaces="0.0.0.0:6032"
#       refresh_interval=2000
#       debug=true
}

mysql_variables=
{
        threads=4
        max_connections=2000
        default_query_delay=0
        default_query_timeout=36000000
        have_compress=true
        poll_timeout=2000
        interfaces="0.0.0.0:3306;/var/lib/proxysql/proxysql.sock"
#       interfaces="0.0.0.0:6033"
        default_schema="information_schema"
        stacksize=1048576
        server_version="8.0.27"
        connect_timeout_server=3000
# make sure to configure monitor username and password
# https://github.com/sysown/proxysql/wiki/Global-variables#mysql-monitor_username-mysql-monitor_password
        monitor_username="icroot"
        monitor_password="P@ssw0rd"
        monitor_history=600000
        monitor_connect_interval=60000
        monitor_ping_interval=10000
        monitor_read_only_interval=1500
        monitor_read_only_timeout=500
        monitor_writer_is_also_reader="false"
        ping_interval_server_msec=120000
        ping_timeout_server=500
        commands_stats=true
        sessions_sort=true
        connect_retries_on_failure=10
}


# defines all the MySQL servers
mysql_servers =
(
#       {
#               address = "127.0.0.1" # no default, required . If port is 0 , address is interpred as a Unix Socket Domain
#               port = 3306           # no default, required . If port is 0 , address is interpred as a Unix Socket Domain
#               hostgroup = 0           # no default, required
#               status = "ONLINE"     # default: ONLINE
#               weight = 1            # default: 1
#               compression = 0       # default: 0
#   max_replication_lag = 10  # default 0 . If greater than 0 and replication lag passes such threshold, the server is shunned
#       },
#       {
#               address = "/var/lib/mysql/mysql.sock"
#               port = 0
#               hostgroup = 0
#       },
#       {
#               address="127.0.0.1"
#               port=21891
#               hostgroup=0
#               max_connections=200
#       },
        { address="DB1" , port=3306 , hostgroup=1 },
        { address="DB2" , port=3306 , hostgroup=1 },
        { address="DB3" , port=3306 , hostgroup=1 }
)


# defines all the MySQL users
mysql_users:
(
        {
                username = "icroot"
                password = "P@ssw0rd"
                default_hostgroup = 1
                active = 1
                max_connections = 100
                default_schema = "mysql"
        },
        {
                username = "admin"
                password = "P@ssw0rd"
                default_hostgroup = 1
                active = 1
                max_connections = 1000
                default_schema = "mysql"
        },
        {
                username = "operator"
                password = "P@ssw0rd"
                default_hostgroup = 1
                active = 1
                max_connections = 1000
                default_schema = "mysql"
        }
)


# defines MySQL Query Rules
mysql_query_rules:
(
        {
                rule_id=1
                active=1
                username="admin"
                destination_hostgroup=0
                apply=1
        },
        {
                rule_id=2
                active=1
                username="operator"
                destination_hostgroup=1
                apply=1
       }
)

scheduler=
(
#  {
#    id=1
#    active=0
#    interval_ms=10000
#    filename="/var/lib/proxysql/proxysql_galera_checker.sh"
#    arg1="0"
#    arg2="0"
#    arg3="0"
#    arg4="1"
#    arg5="/var/lib/proxysql/proxysql_galera_checker.log"
#  }
)


mysql_replication_hostgroups=
(
        {
                writer_hostgroup=0
                reader_hostgroup=1
                comment="replication"
        }
)
(6) proxysql.dbを削除する
設定はここで持っているため、一旦初期化する。
※ 稼働中にproxysqlの設定を変えたい場合はUPDATE global_variables SET variable_value='XXXX' WHERE variable_name = 'XXXX'で設定値を更新した後、LOAD MYSQL VARIABLES TO RUNTIME;でproxySQLに反映して、SAVE MYSQL VARIABLES TO DISK;を叩けば、proxysql.dbに保存され、再起動後も設定が維持されます。
# rm -i /var/lib/proxysql/proxysql.db
(7) ProxySQLを再起動する
# systemctl restart proxysql
(8) ProxySQL側からMySQL GroupReplicationが参照できていることを確認する。
※ちなみに、ここのステータスはProxySQLからSQLが発行された際に検証されます。DBが落ちていてもSQL発行していなければSQL Router側からはONLINEで見えることもあるので注意。
# mysql -u icroot -p'P@ssw0rd' --socket=/var/lib/proxysql/admin.sock -e  'select * from stats_mysql_connection_pool;'
mysql: [Warning] Using a password on the command line interface can be insecure.
+-----------+----------+----------+--------+----------+----------+--------+---------+-------------+---------+-------------------+-----------------+-----------------+------------+
| hostgroup | srv_host | srv_port | status | ConnUsed | ConnFree | ConnOK | ConnERR | MaxConnUsed | Queries | Queries_GTID_sync | Bytes_data_sent | Bytes_data_recv | Latency_us |
+-----------+----------+----------+--------+----------+----------+--------+---------+-------------+---------+-------------------+-----------------+-----------------+------------+
| 1         | DB3      | 3306     | ONLINE | 0        | 0        | 0      | 0       | 0           | 0       | 0                 | 0               | 0               | 541        |
| 1         | DB2      | 3306     | ONLINE | 0        | 0        | 0      | 0       | 0           | 0       | 0                 | 0               | 0               | 566        |
| 0         | DB1      | 3306     | ONLINE | 0        | 0        | 0      | 0       | 0           | 0       | 0                 | 0               | 0               | 495        |
+-----------+----------+----------+--------+----------+----------+--------+---------+-------------+---------+-------------------+-----------------+-----------------+------------+
ProxySQL側からGroup Replicationへの接続確認
Master更新ユーザ
# mysql -u admin -p'P@ssw0rd' --socket=/var/lib/proxysql/proxysql.sock

Slave参照ユーザ
# mysql -u operator -p'P@ssw0rd' --socket=/var/lib/proxysql/proxysql.sock
以上。
再起動方法
★サーバを個別に再起動したい場合
Master/Slaveでもsystemctlから再起動すれば、自動的にグループレプリケーションに組み込んでくれる。
# systemctl restart mysqld

# mysql -uroot -p'P@ssw0rd' -e 'select * from performance_schema.replication_group_members;'
mysql: [Warning] Using a password on the command line interface can be insecure.
+---------------------------+--------------------------------------+--------------------------------------------------+-------------+--------------+-------------+----------------+----------------------------+
| CHANNEL_NAME              | MEMBER_ID                            | MEMBER_HOST                                      | MEMBER_PORT | MEMBER_STATE | MEMBER_ROLE | MEMBER_VERSION | MEMBER_COMMUNICATION_STACK |
+---------------------------+--------------------------------------+--------------------------------------------------+-------------+--------------+-------------+----------------+----------------------------+
| group_replication_applier | 0ee34962-6873-11ec-897b-065f00176f79 | ip-172-31-40-172.ap-northeast-1.compute.internal |        3306 | ONLINE       | PRIMARY     | 8.0.27         | XCom                       |
| group_replication_applier | 2bb61bf7-6873-11ec-899b-06da60501adb | ip-172-31-46-221.ap-northeast-1.compute.internal |        3306 | RECOVERING   | SECONDARY   | 8.0.27         | XCom                       |
| group_replication_applier | 3317cb98-6873-11ec-898c-06c5c712ef6f | ip-172-31-34-91.ap-northeast-1.compute.internal  |        3306 | ONLINE       | SECONDARY   | 8.0.27         | XCom                       |
+---------------------------+--------------------------------------+--------------------------------------------------+-------------+--------------+-------------+----------------+----------------------------+
★グループレプリケーション全体を再起動したい場合
例えば、DBサーバを全台停止→起動後、グループレプリケーションを起動したいケース
再起動後の状態
# mysql -uroot -p'P@ssw0rd' -e 'select * from performance_schema.replication_group_members;'
mysql: [Warning] Using a password on the command line interface can be insecure.
+---------------------------+--------------------------------------+--------------------------------------------------+-------------+--------------+-------------+----------------+----------------------------+
| CHANNEL_NAME              | MEMBER_ID                            | MEMBER_HOST                                      | MEMBER_PORT | MEMBER_STATE | MEMBER_ROLE | MEMBER_VERSION | MEMBER_COMMUNICATION_STACK |
+---------------------------+--------------------------------------+--------------------------------------------------+-------------+--------------+-------------+----------------+----------------------------+
| group_replication_applier | 0ee34962-6873-11ec-897b-065f00176f79 | ip-172-31-40-172.ap-northeast-1.compute.internal |        3306 | OFFLINE      |             |                | XCom                       |
+---------------------------+--------------------------------------+--------------------------------------------------+-------------+--------------+-------------+----------------+----------------------------+

# mysqlsh

masterだったノードに接続する
 MySQL  JS > shell.connect('icroot@db1:3306')

再起動する
 MySQL  db1:3306 ssl  JS > dba.rebootClusterFromCompleteOutage()
Would you like to rejoin it to the cluster? [y/N]: y

以下が出力されればOK。
The cluster was successfully rebooted.

<Cluster:cluster>
 MySQL  db1:3306 ssl  JS >\q

全台ONLINEになっていることを確認する
# mysql -uroot -p'P@ssw0rd' -e 'select * from performance_schema.replication_group_members;'
★手動リカバリ方法
Group Replicationは自動リカバリしてくれるが、バイナリログ保持期間が過ぎた、もしくはDBに不整合が起きた場合は手動でリカバリする必要がある。
★1ノード離脱で、バイナリログの保持期間も過ぎた場合
Plugin group_replication reported: 'Member with address db3:3306 has become unreachable.やMember was expelled from the group due to network failures, changing member status to ERROR.がログに出て、離脱したケース。他のPRIMARY、およびSLAVEはONLINEの状態。
オンラインの方のスレーブノードでダンプを取得し、離脱サーバに配布する。
# mysqldump --all-databases -uroot --triggers --routines --events -p > /tmp/backup_db.sql
# scp /tmp/backup_db.sql db3:/tmp
離脱ノードにログインして、リストアする
# mysql -u root;
mysql> reset master;
mysql> reset slave;
mysql> set global super_read_only=off;
mysql> source /tmp/backup_db.sql;

リストア後
mysql> set global super_read_only=on;
離脱ノードを再参加させる
# mysqlsh
マスターノードにログインする
MySQL  JS > shell.connect('icroot@db1:3306')
MySQL  JS > cluster = dba.getCluster()

離脱ノードを再参加させる
MySQL  JS > cluster.addInstance('icroot@db3:3306')

ノードが再参加したか確認する
MySQL  JS > cluster.status()
再参加時にCluster.addInstance: The instance 'db3:3306' is already part of another InnoDB cluster (RuntimeError)と出る場合は、cluster.removeInstance('icroot@db3:3306', {force:true})で離脱ノードを一旦グループレプリケーションから消して再参加させる。
★全ノード離脱で、DBの整合が取れなくなった場合
各サーバにログインしてgtidが最新のものを確認する。
全サーバで確認
# mysql -uroot -p
mysql> show global variables like "gtid%";
+----------------------------------+---------------------------------------------------------------------------------------------+
| Variable_name                    | Value                                                                                       |
+----------------------------------+---------------------------------------------------------------------------------------------+
| gtid_executed                    | 08099b3b-f646-11ea-b99d-005056a3841b:1-300406342, ★ここの数値が一番進んでいるものが新しい
・・・
gtidが最新のDBでダンプを取得し、離脱サーバに配布する。
# mysqldump --all-databases -uroot --triggers --routines --events -p > /tmp/backup_db.sql
# scp /tmp/backup_db.sql db2:/tmp
# scp /tmp/backup_db.sql db3:/tmp
各サーバでリストア
# mysql -u root;
mysql> reset master;
mysql> reset slave;
mysql> set global super_read_only=off;
mysql> source /tmp/backup_db.sql;

リストア後
mysql> set global super_read_only=on;
クラスター全体を再起動する
# mysqlsh
gtidが最新だったノードにログインする
MySQL  JS > shell.connect('icroot@db1:3306')
MySQL  JS > cluster = dba.getCluster()

クラスター全体を再起動する
MySQL  JS > dba.rebootClusterFromCompleteOutage()

ノードが再参加したか確認する
MySQL  JS > cluster.status()
※MISSINGのノードが存在する場合は当該ノードのmysqldを再起動すると改善する場合がある。
※全ノードがONLINEの状態だが、1DBだけERRORステータスで、addによる再参加もできないケースが発生した場合、以下のようなエラーがでることがある。
Cluster.addInstance: Operation not allowed. No cluster change operations can be executed because the installed metadata version 1.0.1 is lower than the version required by Shell which is version 2.0.0. Upgrade the metadata to remove this restriction. See \? dba.upgradeMetadata for additional details. (RuntimeError)
dba.upgradeMetadataを実行しても上記と同じようなエラーで実行できない。おそらく、グループ再構成時にMASTERではないノードから起動した場合に、二つグループができてしまったことが原因?
この場合は、STOP GROUP_REPLICATION;を実行し、MASTERのダンプファイルをERRORになっているノードでリストア後、いったん全ノードのグループレプリケーションを停止し、(サーバ再起動、もしくはSTOP GROUP_REPLICATION;)。マスターノードからdba.rebootClusterFromCompleteOutage()を実行する。
※リストアで断片化して、SQLが遅延するケースが発生することもあるので、リストア→グループレプリケーション再構成後は各DB毎にoptimize table [テーブル名]を打つのが安全。
★バイナリログ削除
保持期間の関係でバイナリログが増大してしまった時の対処。通常、バイナリログを削除するコマンドを打つが、この構成の場合は 各DBサーバ毎に実行する必要がある。
■DB1~DB3
# mysql -uroot -p
バイナリログ一覧を出力する
mysql> show master logs;
mysql> purge master logs  to 'binlog.000044';
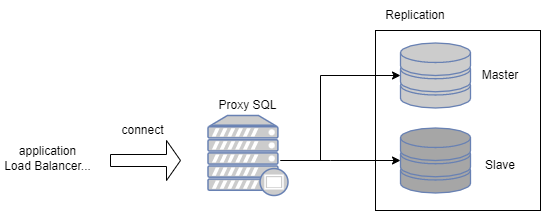
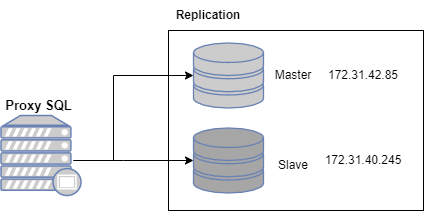
2. MySQL Replication(GTID) + MHA + Proxy SQL構成
MySQLのデータを複数の MySQL データベースサーバー (レプリカと呼ばれる) にコピーできる機能を使った冗長化構成。MHA + ProxySQLと合わせて冗長化・分散アクセスが可能。
ソースから更新を受信するためにレプリカを永続的に接続する必要はないという特性のため、group replicationの様な永続的アクセスが不要になり、遠距離のデータ分散にも向いている。
また、GTIDでレプリケーションを組むことで本構成 + マルチソースレプリケーション構成にもしやすい。
Masterが落ちた場合はMHAでフェイルオーバー
■ 要件
| 項目 | 要件/仕様 | 備考 |
|---|---|---|
| 最小構成 | 2台 | フェイルオーバーソフト次第 |
| 最大構成 | 2台 | フェイルオーバーソフト次第 |
| ストレージエンジン | InnoDB | |
| 要求帯域 | 小 | フェイルオーバーソフト次第 |
| 稼働中の拡張 | 不可 | フェイルオーバーソフト次第 |
☆ memo
サーバ台数が2台とお手頃なため、小~中規模のシステムに採用される印象。台数は少ないが、サーバ単体のスペックは高めにして、ある程度の負荷にも耐えられるように設計していることが多い。
MHAはLinux8以降の対応パッケージが今のところ無いので、将来的には代替フェイルオーバーのミドルが必要かもしれない。※一応、特定の設定をすれば8系でも動作はしますが、自己責任でお願い致します。
1度フェイルオーバーするとMHA側の再設定が必要なため、運用上はZabbixなどでフェイルオーバーを検知後、手動で再設定が必要になる。
インストール方法
環境:Rocky Linux8
Replication:2台
Proxy SQL:1台
全台共通
(1) 事前準備
# vi /etc/selinux/config
> SELINUX=disabled

fierewalld無効
# systemctl disable firewalld

timezone変更
# timedatectl set-timezone Asia/Tokyo

パッケージアップデート
♯ yum update

再起動
# reboot
(2) hostnameでお互いに疎通できるか確認する
# hostname
# ping [自分以外のhost名称]

解決できなければ/etc/hostsに設定を追加し、その名称を利用する。
# vi /etc/hosts

127.0.0.1   localhost localhost.localdomain localhost4 localhost4.localdomain4
::1         localhost localhost.localdomain localhost6 localhost6.localdomain6

172.31.42.85 DB1
172.31.40.245 DB2
Replication2台の構築
(1) mysqlをインストールする
mysqlモジュールの無効化
# dnf module disable mysql

mysqlリポジトリの追加
# rpm -Uvh https://dev.mysql.com/get/mysql80-community-release-el8-2.noarch.rpm

MySQL 8.0 Community Serverが有効になっているか確認
# dnf repolist all | grep mysql

mysqlをインストールする
# dnf install mysql-community-server

log用ディレクトリを作成する
# mkdir /var/log/mysql
# touch /var/log/mysql/slow.log
# chown mysql. -R /var/log/mysql

自動起動を有効化
# systemctl enable mysqld
(2) my.cnfを設定する
GTIDを有効化する。
■MasterにするDB
# vi /etc/my.cnf

# For advice on how to change settings please see
# http://dev.mysql.com/doc/refman/8.0/en/server-configuration-defaults.html

[mysqld]
#
# Remove leading # and set to the amount of RAM for the most important data
# cache in MySQL. Start at 70% of total RAM for dedicated server, else 10%.
# innodb_buffer_pool_size = 128M
#
# Remove the leading "# " to disable binary logging
# Binary logging captures changes between backups and is enabled by
# default. It's default setting is log_bin=binlog
# disable_log_bin
#
# Remove leading # to set options mainly useful for reporting servers.
# The server defaults are faster for transactions and fast SELECTs.
# Adjust sizes as needed, experiment to find the optimal values.
# join_buffer_size = 128M
# sort_buffer_size = 2M
# read_rnd_buffer_size = 2M
#
# Remove leading # to revert to previous value for default_authentication_plugin,
# this will increase compatibility with older clients. For background, see:
# https://dev.mysql.com/doc/refman/8.0/en/server-system-variables.html#sysvar_default_authentication_plugin
# default-authentication-plugin=mysql_native_password


datadir=/var/lib/mysql
socket=/var/lib/mysql/mysql.sock
log-error=/var/log/mysql/mysqld.log
pid-file=/var/run/mysqld/mysqld.pid

# slow query
slow_query_log=1
slow_query_log_file=/var/log/mysql/slow.log
long_query_time=5

# DB毎に変更する。ex DB1:1, DB2:2
server_id=1

default_authentication_plugin=mysql_native_password
innodb_flush_log_at_trx_commit=2
log_timestamps=SYSTEM

# GTIDの有効化
gtid_mode=ON
enforce_gtid_consistency

# バイナリログの設定
log-bin = mysql-bin
sync_binlog=500
binlog_expire_logs_seconds=259200

# memory(全テーブルのサイズが望ましい)
# innodb_buffer_pool_size=2048M

# connextion
# MySQLがクライアントからの接続パケットを待機する時間(秒)
connect_timeout=10
# アプリケーションなどから接続された非対話型の接続に対してのアイドルタイムアウト時間(秒)
wait_timeout=300
# mysqlクライアントでログインした時などの対話型の接続に対してのアイドルタイムアウト時間(秒)
interactive_timeout=28800
# MySQLの同時接続数
max_connections=2000
■slaveにするDB
# vi /etc/my.cnf

# For advice on how to change settings please see
# http://dev.mysql.com/doc/refman/8.0/en/server-configuration-defaults.html

[mysqld]
#
# Remove leading # and set to the amount of RAM for the most important data
# cache in MySQL. Start at 70% of total RAM for dedicated server, else 10%.
# innodb_buffer_pool_size = 128M
#
# Remove the leading "# " to disable binary logging
# Binary logging captures changes between backups and is enabled by
# default. It's default setting is log_bin=binlog
# disable_log_bin
#
# Remove leading # to set options mainly useful for reporting servers.
# The server defaults are faster for transactions and fast SELECTs.
# Adjust sizes as needed, experiment to find the optimal values.
# join_buffer_size = 128M
# sort_buffer_size = 2M
# read_rnd_buffer_size = 2M
#
# Remove leading # to revert to previous value for default_authentication_plugin,
# this will increase compatibility with older clients. For background, see:
# https://dev.mysql.com/doc/refman/8.0/en/server-system-variables.html#sysvar_default_authentication_plugin
# default-authentication-plugin=mysql_native_password

datadir=/var/lib/mysql
socket=/var/lib/mysql/mysql.sock
log-error=/var/log/mysql/mysqld.log
pid-file=/var/run/mysqld/mysqld.pid

# slow query
slow_query_log=1
slow_query_log_file=/var/log/mysql/slow.log
long_query_time=5

# DB毎に変更する。ex DB1:1, DB2:2
server_id=2

default_authentication_plugin=mysql_native_password
innodb_flush_log_at_trx_commit=2
log_timestamps=SYSTEM

# スレーブSQLスレッドによって実行される更新をバイナリログに書き込む
log_slave_updates

# リレーログファイルの名前
relay_log=mysql-relay-bin

# クラッシュセーフなレプリケーション設定
relay_log_info_repository=TABLE
relay_log_recovery=ON
relay_log_purge=ON

# GTIDの有効化
gtid_mode=ON
enforce_gtid_consistency

# バイナリログの設定
log-bin = mysql-bin
sync_binlog=500
binlog_expire_logs_seconds=259200

# memory(全テーブルのサイズが望ましい)
# innodb_buffer_pool_size=2048M

# connextion
# MySQLがクライアントからの接続パケットを待機する時間(秒)
connect_timeout=10
# アプリケーションなどから接続された非対話型の接続に対してのアイドルタイムアウト時間(秒)
wait_timeout=300
# mysqlクライアントでログインした時などの対話型の接続に対してのアイドルタイムアウト時間(秒)
interactive_timeout=28800
# MySQLの同時接続数
max_connections=2000
(3) mysqlを起動する
# systemctl start mysqld
6.mysqlのパスワード変更する
defaultのパスワードを抽出
# grep 'temporary password' /var/log/mysql/mysqld.log | cut -d' ' -f13
抽出したパスワードでログインし、パスワードを変更する
# mysql -uroot -p'抽出したパスワード' --connect-expired-password -e "ALTER USER root@localhost IDENTIFIED WITH mysql_native_password BY 'P@ssw0rd'"
(4) DBの作成・ユーザの設定を行う。
Masterにする1台のみ実行する
DBを作成
# mysql -uroot -p'P@ssw0rd' -e "create database if not exists world"
レプリケーション用のユーザ作成
# mysql -uroot -p'P@ssw0rd' -e "create user repl@'%' identified by 'P@ssw0rd'"
# mysql -uroot -p'P@ssw0rd' -e "grant replication slave on *.* to 'repl'@'%';"
(5) DBをDumpし、slaveサーバに送信する。
Masterにする1台のみ実行する
# mysqldump -u root -p \
--single-transaction \
--flush-logs \
--master-data=2 \
--all-databases \
--hex-blob \
--triggers \
--routines \
--events > /tmp/master_db.sql
スレーブにするサーバに送信
# scp /tmp/master_db.sql root@172.31.40.245:/tmp
(6) ダンプファイルをリストアする
Slaveにする1台のみ実行する
# mysql -u root -p
mysql> reset master;
mysql> source /tmp/master_db.sql
(7) レプリケーションを設定する
Slaveにする1台のみ実行する
# mysql -u root -p

CHANGE MASTER TO
 MASTER_HOST='172.31.42.85',
 MASTER_PORT=3306,
 MASTER_USER='repl',
 MASTER_PASSWORD='P@ssw0rd',
 MASTER_AUTO_POSITION=1;
(8) Replicationを起動する
Slaveにする1台のみ実行する
# mysql -u root -p
mysql> start slave;
mysql> show slave status\G;
Authentication plugin 'caching_sha2_password' reported error: Authentication requires secure connection.エラーが出るときは、
SHA2側にキャッシュされていないことが問題なので一度スレーブサーバ側からログインする。
# mysql -u repl -h 172.31.42.85 -p
GTIDによるレプリケーションここまで
(9) MHAをダウンロード・インストールする
# dnf install wget

EPEL/PowerToolsを有効化
# dnf install https://dl.fedoraproject.org/pub/epel/epel-release-latest-8.noarch.rpm
# vi /etc/yum.repos.d/Rocky-PowerTools.repo ※cntosの場合は/etc/yum.repos.d/CentOS-Linux-PowerTools.repo
以下のよう書き換える。
enabled=1

# wget https://github.com/KyojiOsada/mha4mysql/raw/master/mha4mysql-node-0.57-0.el7.noarch.rpm
# wget https://github.com/KyojiOsada/mha4mysql/raw/master/mha4mysql-manager-0.57-0.el7.noarch.rpm
# dnf install perl-DBD-MySQL perl-Time-HiRes perl-Config-Tiny perl-Specio
# yum localinstall mha4mysql-node-0.57-0.el7.noarch.rpm mha4mysql-manager-0.57-0.el7.noarch.rpm
(10) mha.confを設定する
$ vi /etc/mha.conf

[server default]
user=mha
password=P@ssw0rd
manager_workdir=/var/lib/mha
manager_log=/var/log/mha.log
remote_workdir=/var/lib/mha
repl_user=repl
repl_password=P@assw0rd
ssh_user=mha

[server1]
hostname=172.31.42.85
[server2]
hostname=172.31.40.245
(11) MHA用のユーザを作成する
# useradd -m mha

ssh準備
# su - mha
$ mkdir .ssh
$ chmod 700 .ssh

ディレクトリ作成
# mkdir /var/lib/mha
# chown mha. /var/lib/mha

ログ作成
# touch /var/log/mha.log
# chown mha. /var/log/mha.log
(12) ssh認証鍵を生成する
Masterにする1台のみ
# su - mha
$ cd .ssh
$ ssh-keygen -t rsa
Enter3回
$ mv id_rsa.pub authorized_keys

鍵を送信する。
$ scp id_rsa.pub mha@172.31.40.245:/home/mha/.ssh/.
$ scp authorized_keys mha@172.31.40.245:/home/mha/.ssh/.

$ vi authorized_keys
末尾を相手のホスト名に変更する。
ssh-rsa ・・・・ mha@ip-172-31-40-245.ap-northeast-1.compute.internal
疎通確認
$ ssh 172.31.40.245
(13) mhaユーザを作成する
Masterにする1台のみ
# mysql -uroot -p'P@ssw0rd' -e "create user mha@'%' identified by 'P@ssw0rd'"
# mysql -uroot -p'P@ssw0rd' -e "grant all on *.* to 'mha'@'%';"
(14) mha疎通
Slaveにする1台のみ実行する
sshチェック
$ su - mha
$ /usr/bin/masterha_check_ssh --conf=/etc/mha.cnf
レプリケーションチェック
MySQL8系の場合は以下エラーになる。
$ /usr/bin/masterha_check_repl --conf=/etc/mha.cnf
Fri Dec 31 21:33:37 2021 - [warning] Global configuration file /etc/masterha_default.cnf not found. Skipping.
Fri Dec 31 21:33:37 2021 - [info] Reading application default configuration from /etc/mha.cnf..
Fri Dec 31 21:33:37 2021 - [info] Reading server configuration from /etc/mha.cnf..
Fri Dec 31 21:33:37 2021 - [info] MHA::MasterMonitor version 0.57.
        (in cleanup) cannot chdir to /root from /tmp/yj731UNUpw: Permission denied, aborting. at /usr/share/perl5/vendor_perl/Parallel/ForkManager.pm line 327.
Fri Dec 31 21:33:38 2021 - [error][/usr/share/perl5/vendor_perl/MHA/MasterMonitor.pm, ln427] Error happened on checking configurations. Redundant argument in sprintf at /usr/share/perl5/vendor_perl/MHA/NodeUtil.pm line 190.
Fri Dec 31 21:33:38 2021 - [error][/usr/share/perl5/vendor_perl/MHA/MasterMonitor.pm, ln525] Error happened on monitoring servers.
Fri Dec 31 21:33:38 2021 - [info] Got exit code 1 (Not master dead).

MySQL Replication Health is NOT OK!
バージョンが取得できないのが原因なので、MHAのソースを下記の様に修正する。
〇/usr/share/perl5/vendor_perl/MHA/NodeUtil.pm
sub parse_mysql_major_version($) {
  my $str = shift;
  $str =~ /(\d+)\.(\d+)/;
  my $strmajor = "$1.$2";
  my $result = sprintf( '%03d%03d', $strmajor =~ m/(\d+)/g );
  return $result;
}
通る
$ /usr/bin/masterha_check_repl --conf=/etc/mha.cnf
・・・
MySQL Replication Health is OK.
(15) MHAを起動する
$ nohup /usr/bin/masterha_manager --conf=/etc/mha.cnf &
(16) ProxySQLインストール
前述の[13proxy-sql用の1台]mysql-clientをインストールするを参照。
以上
動作確認
DB1号機のmysqldを止めると、2号機にフェイルオーバーする
# tail -f /var/log/mha.log
----- Failover Report -----

mha: MySQL Master failover 172.31.42.85(172.31.42.85:3306) to 172.31.40.245(172.31.40.245:3306) succeeded

Master 172.31.42.85(172.31.42.85:3306) is down!

Check MHA Manager logs at ip-172-31-40-245.ap-northeast-1.compute.internal:/var/log/mha.log for details.

Started automated(non-interactive) failover.
Selected 172.31.40.245(172.31.40.245:3306) as a new master.
172.31.40.245(172.31.40.245:3306): OK: Applying all logs succeeded.
172.31.40.245(172.31.40.245:3306): Resetting slave info succeeded.
Master failover to 172.31.40.245(172.31.40.245:3306) completed successfully.
ただし、mhaプロセスは終了するので、再度nohup /usr/bin/masterha_manager --conf=/etc/mha.cnf &でプロセスを上げる必要がある。
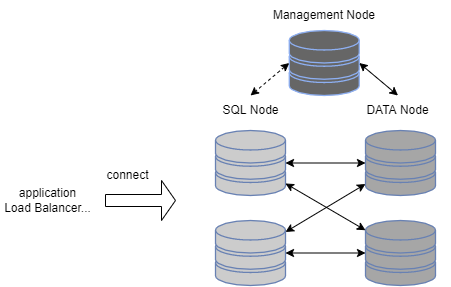
3. MySQL Cluster構成
遠隔地レプリケーションに実績があるミドルウェア。単一障害点が存在しないのが特徴。
データを保管するデータノード、SQLの調停をする管理ノード、SQL実行を受け付けるSQLノードの3つに分かれる。1サーバに「SQL + データノード」や、「管理 + データノード」 と同居させることも可能なので、割と柔軟に構成を変えられる。また、余談だがNDBエンジンでMySQL CLusterを組み、InoDBエンジンでMySQLレプリケーションを組む構成も可能。
■ 要件
| 項目 | 要件/仕様 |
|---|---|
| 最大データノード | 145 |
| 最大管理ノード | 255 |
| 最大SQLノード | 記載なし |
| 合計最大ノード数 | 255 |
| ストレージエンジン | NDB |
| 要求帯域 | 中~高 |
| 稼働中の拡張 | 可 |
インストール方法
環境:Rocky Linux8
Management:1台
DataNode: 2台
SQL Node:1台

全台共通
(1) 事前準備
selinux無効
# vi /etc/selinux/config
> SELINUX=disabled

fierewalld無効
# systemctl disable firewalld

timezone変更
# timedatectl set-timezone Asia/Tokyo

パッケージアップデート
♯ dnf update

再起動
# reboot
(2) mysqlユーザの追加
# grep mysql /etc/passwd
# groupadd mysql -g 27
# useradd -g mysql -s /bin/false mysql -u 27
# id mysql
uid=27(mysql) gid=27(mysql) groups=27(mysql)
(3) rpmファイルのダウンロード&解凍
# cd /tmp
# dnf install wget
# mkdir work
# wget https://dev.mysql.com/get/Downloads/MySQL-Cluster-8.0/mysql-cluster-community-8.0.28-1.el8.x86_64.rpm-bundle.tar
# tar xf mysql-cluster-community-8.0.28-1.el8.x86_64.rpm-bundle.tar  -C work/

不要ファイル削除
# rm -f mysql-cluster-community-8.0.28-1.el8.x86_64.rpm-bundle.tar
SQLノード2台の構築
MySQL ClusterでSQLノードにするサーバで実行する。
(1) SQLノードをインストールする
依存パッケージのインストール
# dnf install perl libaio libaio-devel net-tools

# cd /tmp/work/
# rpm -Uhv mysql-cluster-community-debuginfo-8.0.28-1.el8.x86_64.rpm
# rpm -Uhv mysql-cluster-community-client-* mysql-cluster-community-common-8.0.28-1.el8.x86_64.rpm mysql-cluster-community-libs-* mysql-cluster-community-icu-data-files-8.0.28-1.el8.x86_64.rpm
# rpm -Uhv mysql-cluster-community-server-8.0.28-1.el8.x86_64.rpm

不要ファイル削除
# cd /tmp
# rm -rf work
(2) mysqlログ出力用のディレクトリを作成する
※デフォルト値(/var/log/mysqld.log)から/var/log/mysql/mysqld.logに変えた場合
# cd /var/log
# mkdir mysql
# chown mysql. mysql
(3) my.cnfを設定する
# vi /etc/my.cnf

# For advice on how to change settings please see
# http://dev.mysql.com/doc/refman/8.0/en/server-configuration-defaults.html

[mysqld]
#
# Remove leading # and set to the amount of RAM for the most important data
# cache in MySQL. Start at 70% of total RAM for dedicated server, else 10%.
# innodb_buffer_pool_size = 128M
#
# Remove the leading "# " to disable binary logging
# Binary logging captures changes between backups and is enabled by
# default. It's default setting is log_bin=binlog
# disable_log_bin
#
# Remove leading # to set options mainly useful for reporting servers.
# The server defaults are faster for transactions and fast SELECTs.
# Adjust sizes as needed, experiment to find the optimal values.
# join_buffer_size = 128M
# sort_buffer_size = 2M
# read_rnd_buffer_size = 2M
#
# Remove leading # to revert to previous value for default_authentication_plugin,
# this will increase compatibility with older clients. For background, see:
# https://dev.mysql.com/doc/refman/8.0/en/server-system-variables.html#sysvar_default_authentication_plugin
# default-authentication-plugin=mysql_native_password

datadir=/var/lib/mysql
socket=/var/lib/mysql/mysql.sock

log-error=/var/log/mysql/mysqld.log
pid-file=/var/run/mysqld/mysqld.pidi

slow_query_log=ON
long_query_time=5
slow_query_log_file=/var/log/mysql/slow.log

server-id=1 # サーバ毎に変更する
gtid_mode=ON
enforce-gtid-consistency
innodb_flush_log_at_trx_commit=2
sync_binlog=500
log_bin=/var/lib/mysql/mysql-bin.log
# innodb_buffer_pool_size=2048M
default_authentication_plugin=mysql_native_password
binlog_expire_logs_seconds=259200
log_timestamps=SYSTEM
connect_timeout=10
wait_timeout=300
interactive_timeout=28800
max_connections=1000

[mysqld]
ndbcluster

[mysql_cluster]
ndb-connectstring="172.31.38.31:1186,172.31.47.41:1186"
データノードのインストール
MySQL Clusterでデータノードにするサーバで実行する。
(1) データノードをインストールする
# cd /tmp/work
データノードインストール
# rpm -Uhv mysql-cluster-community-data-node-8.0.28-1.el8.x86_64.rpm

mysqlclient、commonのインストール
# dnf install perl
# rpm -Uhv mysql-cluster-community-debuginfo-8.0.28-1.el8.x86_64.rpm
# rpm -Uhv mysql-cluster-community-client-* mysql-cluster-community-common-8.0.28-1.el8.x86_64.rpm mysql-cluster-community-libs-*

不要ファイル削除
# cd /tmp
# rm -rf work
(2) データ用のディレクトリを削除する
# cd /var/lib
# mkdir mysql
# chown mysql. mysql
監理ノードのインストール
MySQL Clusterで管理ノードにするサーバで実行する。
(1) 監理ノードをインストールする
# cd /tmp/work
監理ノードインストール
# rpm -Uhv mysql-cluster-community-management-server-8.0.28-1.el8.x86_64.rpm

mysqlclient、commonのインストール
# dnf install perl
# rpm -Uhv mysql-cluster-community-debuginfo-8.0.28-1.el8.x86_64.rpm
# rpm -Uhv mysql-cluster-community-client-* mysql-cluster-community-common-8.0.28-1.el8.x86_64.rpm mysql-cluster-community-libs-*

不要ファイル削除
# cd /tmp
# rm -rf work
(2) 監理用のディレクトリを削除する
# mkdir /var/lib/mysql-cluster
# chown mysql. /var/lib/mysql-cluster
(3) 管理用の設定ファイルの作成
# cd /var/lib/mysql-cluster
# vi config.ini
# chown mysql. config.ini
■設定
[tcp default]
SendBufferMemory=2M
ReceiveBufferMemory=2M

[ndb_mgmd default]
DataDir=/var/lib/mysql-cluster

[ndb_mgmd]
# 管理ノードを設定
# Management process options:
HostName=172.31.41.195
NodeId=1

[ndbd default]
# Options affecting ndbd processes on all data nodes:
NoOfReplicas=2
LockPagesInMainMemory=1
DataMemory=90M
# IndexMemory=384M
# NoOfFragmentLogFiles=300
# MaxNoOfConcurrentOperations=100000
MaxNoOfTables=1024
MaxNoOfOrderedIndexes=256

[ndbd]
# データノードを設定
# Options for data node "A":
                                # (one [ndbd] section per data node)
HostName=172.31.44.196          # Hostname or IP address
NodeId=3                        # Node ID for this data node
DataDir=/var/lib/mysql          # Directory for this data node's data files

[ndbd]
# Options for data node "B":
HostName=172.31.32.52
NodeId=4
DataDir=/var/lib/mysql

[mysqld]
# SQLノードを設定
# SQL node options:
HostName=172.31.38.31           # Hostname or IP address
                                # (additional mysqld connections can be
                                # specified for this node for various
                                # purposes such as running ndb_restore)

[mysqld]
HostName=172.31.47.41
初回起動
(1) MySQLクラスターの初回起動
管理ノードから実行
# ndb_mgmd -f /var/lib/mysql-cluster/config.ini --reload
ログイン
# ndb_mgm
ndb_mgm> show
Connected to Management Server at: localhost:1186
Cluster Configuration
---------------------
[ndbd(NDB)]     2 node(s)
id=3 (not connected, accepting connect from 172.31.44.196)
id=4 (not connected, accepting connect from 172.31.32.52)

[ndb_mgmd(MGM)] 1 node(s)
id=1    @172.31.41.195  (mysql-8.0.28 ndb-8.0.28)

[mysqld(API)]   2 node(s)
id=5 (not connected, accepting connect from 172.31.38.31)
id=6 (not connected, accepting connect from 172.31.47.41)

ndb_mgm>
(2) NDBデーモンの起動
データノードでNDBデーモン起動。マネージャーを指定しないとERROR: Unable to connect with connect string: nodeid=0,localhost:1186になる。
# ndbd --ndb-mgmd-host=172.31.41.195
(3) SQLノードの初回起動
SQLノードで実行
# systemctl start mysqld
(4) rootのパスワードを変更
パスワードを確認
# grep 'temporary password' /var/log/mysql/mysqld.log

# mysql -uroot -p
mysql> ALTER USER root@localhost IDENTIFIED WITH mysql_native_password BY 'P@ssw0rd';
(5)ノードが全て起動していることを確認する
監理ノードで
# ndb_mgm
ndb_mgm> show
以上。
あとがき
今年のアドカレは如何だったでしょうか。筆者記事はテキトーになりつつあるのに(もはやメモ)、他記事の皆様は年々クオリティが上がってきているような。。。
いいな!来年こそ!面白い記事を書きたい!
読んでくださりありがとうございました~👍
参考
以下サイトを参考にさせて頂きました!
https://blog.apar.jp/linux/6725/