この記事はリンク情報システムの2021新春アドベントカレンダー Tech Connect!のインデックス記事です。
Tech Connect! は勝手に始めるアドベントカレンダーとして、engineer.hanzomon のグループメンバによってリレーされます。
アドベントカレンダー2日目です。好きにアプリを作ってAWSにデプロイしてみました。
1.アプリケーションを作る
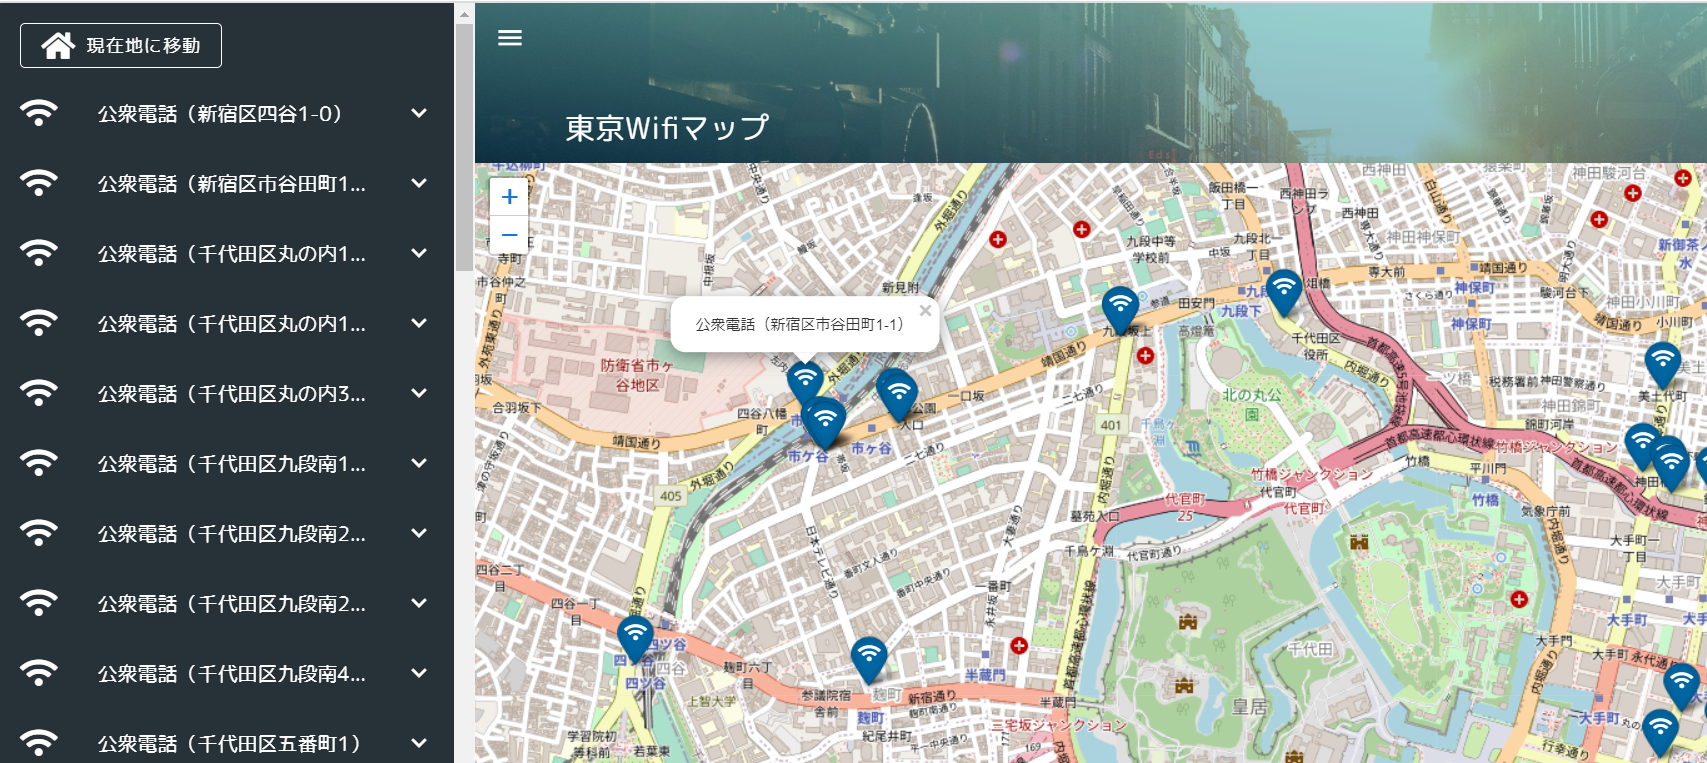
作成したアプリは下記のような感じ。データの元ネタは東京都オープンデータの公衆無線LANアクセスポイント。
- Vue:2.5.2
- Vuetify:2.3.19
- vuex:3.0.1
- leaflet:1.7.1

Leaflet含めたMapの実装は下記となります。地図が動いて緯度経度情報が変わったら、storeに情報をセットします。mount時に現在値情報を取得し、現在地情報があれば地図描画時に付近を表示するように実装しました。
マーカーアイコンはLeaflet.awesome-markers、アイコンはFont Awesomeです。
Leaflet.awesome-markersはLeaflet後に宣言する必要があります。(「Uncaught ReferenceError: L is not defined」になる)
<template>
  <v-container id="mapid" class="com-map">
  </v-container>
</template>

<script>
import "leaflet/dist/leaflet.css";
import L from "leaflet";
import "../../static/js/leaflet.awesome-markers.js";
export default {
  name: "map",
  data() {
    return {
      map: null,
      twnCd: 130001
    };
  },
  mounted() {
    // Wifi情報と現在地情報を取得する
    this.getWifiList();
    this.getLocation();
  },
  computed: {
    /** Wifi情報 */
    wifiList: {
      get() {
        return this.$store.state.Map.wifiList;
      }
    },
    /** 地図表示範囲 */
    bounds: {
      get() {
        return this.$store.state.Map.bounds;
      }
    },
    /** 現在地 */
    crtLocation: {
      get() {
        return this.$store.state.Map.crtLocation;
      }
    },
    /** 現在地ズームフラグ */
    crtZmFlg: {
      get() {
        return this.$store.state.Map.crtZmFlg;
      }
    },
    /** ズーム情報 */
    zmInfo: {
      get() {
        return this.$store.state.Map.zmInfo;
      }
    }
  },
  methods: {
    /** WiFi情報を取得する */
    getWifiList() {
      setTimeout(() => {
        this.$store.dispatch("Map/getWifiList", {
          twnCd: this.twnCd
        });
      }, 500);
    },
    /** Map情報を設定する */
    setMapConfig() {
      let zmLat = 35.6825;
      let zmLon = 139.752778;
      if (this.crtLocation != null) {
        // 現在地が取得できた場合は現在地を設定する
        zmLat = this.crtLocation.latitude;
        zmLon = this.crtLocation.longitude;
      }

      this.map = L.map("mapid").setView([zmLat, zmLon], 13);
      // map情報を取得する
      const map = this.map;
      // mapの表示緯度経度を設定する
      this.setBounds();

      L.tileLayer("http://{s}.tile.osm.org/{z}/{x}/{y}.png", {
        maxZoom: 18
      }).addTo(map);

      // ダブルクリック時のズームをOFFにする
      map.doubleClickZoom.disable();
      // マップ動作時にmap表示範囲を設定する
      map.on("move", this.setBounds);

      // アイコンの設定をする
      var wifiMarker = L.AwesomeMarkers.icon({
        icon: "fa-wifi",
        markerColor: "darkblue",
        prefix: "fa"
      });

      for (var wifi of this.wifiList) {
        if (wifi.lat !== undefined && wifi.lon !== undefined) {
          let mark = L.marker([wifi.lat, wifi.lon], { icon: wifiMarker }).addTo(
            map
          );
          mark.on("click", function(e) {
            map.setView(e.latlng, 16);
          });
          mark.bindPopup(wifi.equipName);
        }
      }
    },
    /** 表示範囲情報を設定する */
    setBounds() {
      let bounds = this.map.getBounds();
      this.$store.commit("Map/setBounds", bounds);
    },
    /** 現在地を取得する */
    getLocation() {
      if (!navigator.geolocation) {
        return;
      }
      const options = {
        enableHighAccuracy: false,
        timeout: 5000,
        maximumAge: 0
      };
      navigator.geolocation.getCurrentPosition(
        this.success,
        this.error,
        options
      );
    },
    success(position) {
      // 成功した場合は現在の表示情報を取得する
      this.$store.commit("Map/setCrtLocation", position.coords);
    },
    error(error) {
      console.warn(`ERROR(${error.code}): ${error.message}`);
    }
  },
  watch: {
    /** Wifi情報を監視 */
    wifiList() {
      this.setMapConfig();
    },
    /** 現在地ズームフラグを監視 */
    crtZmFlg() {
      if (this.crtZmFlg && this.crtLocation != null) {
        // ズームフラグON、かつ現在地情報が取得できた場合
        let zmLat = this.crtLocation.latitude;
        let zmLon = this.crtLocation.longitude;
        const map = this.map;
        // 現在地にズームする
        map.flyTo([zmLat, zmLon], 15);
      }
      // エラー処理

      // 現在地ズームフラグOFF
      this.$store.commit("Map/setCrtZmFlg", false);
    },
    /** ズーム情報を監視 */
    zmInfo() {
      const map = this.map;
      // 公衆Wifiリスト押下時にズームする
      map.flyTo([this.zmInfo.lat, this.zmInfo.lon], 18);
    }
  }
};
</script>
横のWifiリスト一覧は下記のような感じ。地図の表示範囲情報を監視し、緯度経度情報が変わったら、actionを呼んで表示範囲内のWifiリストを生成します。
<template>
  <v-card class="mx-auto blue-grey darken-4" height="100%">
    <v-spacer></v-spacer>
    <v-btn
      class="mt-4 ml-4"
      dark
      depressed
      outlined
      justify="center"
      @click="setCrtZmFlg"
    >
      <v-icon dark large class="mr-2 fas fa-home home_icon"> </v-icon>
      <span>現在地に移動</span>
    </v-btn>

    <v-list>
      <v-list-group
        v-for="item in dispRangeWifiList"
        :key="item.no"
        v-model="item.active"
        :prepend-icon="item.action"
        no-action
        @click="setZmInfo(item.lat, item.lon)"
      >
        <template v-slot:activator>
          <v-list-item-icon>
            <v-icon class="fas fa-wifi"></v-icon>
          </v-list-item-icon>
          <v-list-item-content>
            <v-list-item-title v-text="item.equipName"></v-list-item-title>
          </v-list-item-content>
        </template>

        <v-list-item>
          <v-list-item-content>
            <div>住所:{{ item.address }}</div>
            <div v-if="item.phoneNum">電話番号: {{ item.phoneNum }}</div>
            <div v-else>電話番号: -</div>
            <div>設置者:{{ item.installer }}</div>
            <div>最終確認日:{{ item.updateDate }}</div>
          </v-list-item-content>
        </v-list-item>
      </v-list-group>
    </v-list>
  </v-card>
</template>

<script>
export default {
  name: "panel",
  data() {
    return {
      clickFlg: true
    };
  },
  mounted() {},
  computed: {
    /** Wifi情報 */
    wifiList: {
      get() {
        return this.$store.state.Map.wifiList;
      }
    },
    /** 地図表示範囲 */
    bounds: {
      get() {
        return this.$store.state.Map.bounds;
      }
    },
    /** Wifi情報 */
    dispRangeWifiList: {
      get() {
        return this.$store.state.Map.dispRangeWifiList;
      }
    },
    /** 現在地 */
    crtLocation: {
      get() {
        return this.$store.state.Map.crtLocation;
      }
    },
    /** 現在地ズームフラグ */
    crtZmFlg: {
      get() {
        return this.$store.state.Map.crtZmFlg;
      }
    },
    /** ズーム情報 */
    zmInfo: {
      get() {
        return this.$store.state.Map.zmInfo;
      }
    }
  },
  methods: {
    /** 表示範囲内のWifiの情報を取得する */
    getDispRangeWifiList() {
      setTimeout(() => {
        this.$store.dispatch("Map/getDispRangeWifiList", {
          wifiList: this.wifiList,
          bounds: this.bounds
        });
      }, 500);
    },
    /** 現在地ズームフラグON */
    setCrtZmFlg() {
      this.$store.commit("Map/setCrtZmFlg", true);
    },
    /** Wifi一覧押下時のズーム */
    setZmInfo(lat, lon) {
      if (this.clickFlg) {
        let info = {
          lat: lat,
          lon: lon
        };
        this.$store.commit("Map/setZmInfo", info);
        // リストを閉じる時はズームは動作しない
        this.clickFlg = false;
      } else {
        this.clickFlg = true;
      }
    }
  },
  watch: {
    /** 地図表示範囲を監視 */
    bounds() {
      if (this.wifiList.length) {
        this.getDispRangeWifiList();
      }
    }
  }
};
</script>
2.AWS Elastic Beanstalkデプロイ用にアプリを構成する
AWS Elastic BeanstalkでVue(静的コンテンツ)をデプロイする場合は下記のような構成になります。Nginx側に静的コンテンツを配置するのではなく、HTTPサーバとしてExpressを立てて動くイメージです。
(ここを誤解していて随分時間を無駄にしました。。)
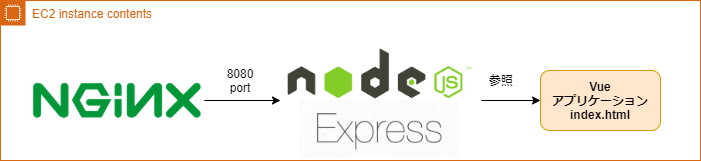
Vueとは別にExpressのプロジェクトを作成し、index.htmlにルーティングするように設定します。
AWS Elastic Beanstalkにデプロイするにあたっては2つ注意点があります。
- package.jsonに「start」コマンドを定義すること
- AWS Elastic Beanstalkではポート8080で動くので、expressの起動を3000ポートで固定しないこと
package.jsonは下記のような感じです。
{
  "name": "proxy",
  "version": "1.0.0",
  "description": "",
  "main": "app.js",
  "scripts": {
    "start": "node app.js",
    "test": "echo \"Error: no test specified\" && exit 1"
  },
  "author": "",
  "license": "ISC",
  "dependencies": {
    "del": "^6.0.0",
    "express": "^4.17.1",
    "fancy-log": "^1.3.3",
    "gulp": "^4.0.2",
    "gulp-zip": "^5.0.2",
    "nodemon": "^2.0.4",
    "webpack": "^4.43.0",
    "webpack-cli": "^3.3.11",
    "webpack-stream": "^5.2.1"
  }
}
ルーティング設定は下記の様にしました。
静的コンテンツがある場合(static)、定義を入れる必要があります。(入れないとGET http://~.js net::ERR_ABORTED 404 (Not Found)になり、画面が真っ白になる。)
const express = require("express");
const app = express(),
  port = process.env.PORT || 3000;

// 静的コンテンツを定義
app.use("/static", express.static(__dirname + "/wifi-map-app/dist/static"));
// ルートアクセスはindex.htmlを参照するようにする
app.get("/", (req, res) => {
  res.sendFile(process.cwd() + "/wifi-map-app/dist/index.html");
});

app.listen(port, () => {
  console.log(`Server listening on the port::${port}`);
});
最終的にはExpressとVue合わせてzip圧縮した資材をAWSにアップロードします。自動で圧縮ファイルを構築できるようにgulpを利用してビルド定義を書きます。配置先はpackage.jsonと同ディレクトリです。
この辺の話しは下記サイトが詳しいので、ご参照ください。
https://medium.com/bb-tutorials-and-thoughts/aws-deploying-vue-js-with-nodejs-backend-on-elastic-beanstalk-e055314445c5
const { src, dest, series, parallel } = require("gulp");
const del = require("del");
const fs = require("fs");
const zip = require("gulp-zip");
const log = require("fancy-log");
var exec = require("child_process").exec;

const paths = {
  prod_build: "../prod-build",
  server_file_name: "./app.js",
  server_package_json: "package.json",
  server_module: "node_modules/**/*",
  server_module_dist: "../prod-build/node_modules",
  vue_src: "../wifi-map-app/dist/**/*",
  vue_dist: "../prod-build/wifi-map-app/dist",
  zipped_file_name: "vuejs-nodejs.zip",
};

function clean() {
  log("removing the old files in the directory");
  return del("../prod-build/**", { force: true });
}

function createProdBuildFolder() {
  const dir = paths.prod_build;
  log(`Creating the folder if not exist  ${dir}`);
  if (!fs.existsSync(dir)) {
    fs.mkdirSync(dir);
    log("folder created:", dir);
  }

  return Promise.resolve("the value is ignored");
}

function buildVueCodeTask(cb) {
  log("building Vue code into the directory");
  return exec("cd ../wifi-map-app && yarn build", function (
    err,
    stdout,
    stderr
  ) {
    log(stdout);
    log(stderr);
    cb(err);
  });
}

function copyVueCodeTask() {
  log("copying Vue code into the directory");
  return src(`${paths.vue_src}`).pipe(dest(`${paths.vue_dist}`));
}

function copyNodeJSCodeTask() {
  log("building and copying server code into the directory");
  return src([
    `${paths.server_file_name}`,
    `${paths.server_package_json}`,
  ]).pipe(dest(`${paths.prod_build}`));
}

function copyNodeJSModules() {
  log("copying nodejs modules into the directory");
  return src(`${paths.server_module}`).pipe(dest(`${paths.server_module_dist}`));
}

function zippingTask() {
  log("zipping the code ");
  return src(`${paths.prod_build}/**`)
    .pipe(zip(`${paths.zipped_file_name}`))
    .pipe(dest(`${paths.prod_build}`));
}

exports.default = series(
  clean,
  createProdBuildFolder,
  buildVueCodeTask,
  parallel(copyVueCodeTask, copyNodeJSCodeTask, copyNodeJSModules),
  zippingTask
);
Expressプロジェクト配下で「glup」コマンドを実行して、ビルドします。
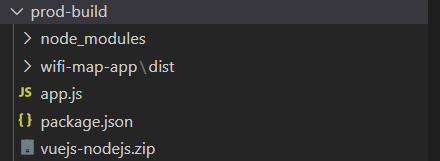
下記のようにVueのビルド資材とexpressが配置できたらOKです。vuejs-node.zipがAWS Elastic Beanstalkでアップロードする資材となります。
3.AWS Elastic Beanstalkでインフラ環境をつくる
AWS Elastic Beanstalkを利用すれば下記が自動で生成されます。
※詳しいチュートリアルはこちらから
・Amazon Elastic Compute Cloud (Amazon EC2) インスタンス (仮想マシン)
・Amazon EC2 セキュリティグループ
・Amazon Simple Storage Service (Amazon S3) バケット
・Amazon CloudWatch アラーム
・AWS CloudFormation スタック
・ドメイン名
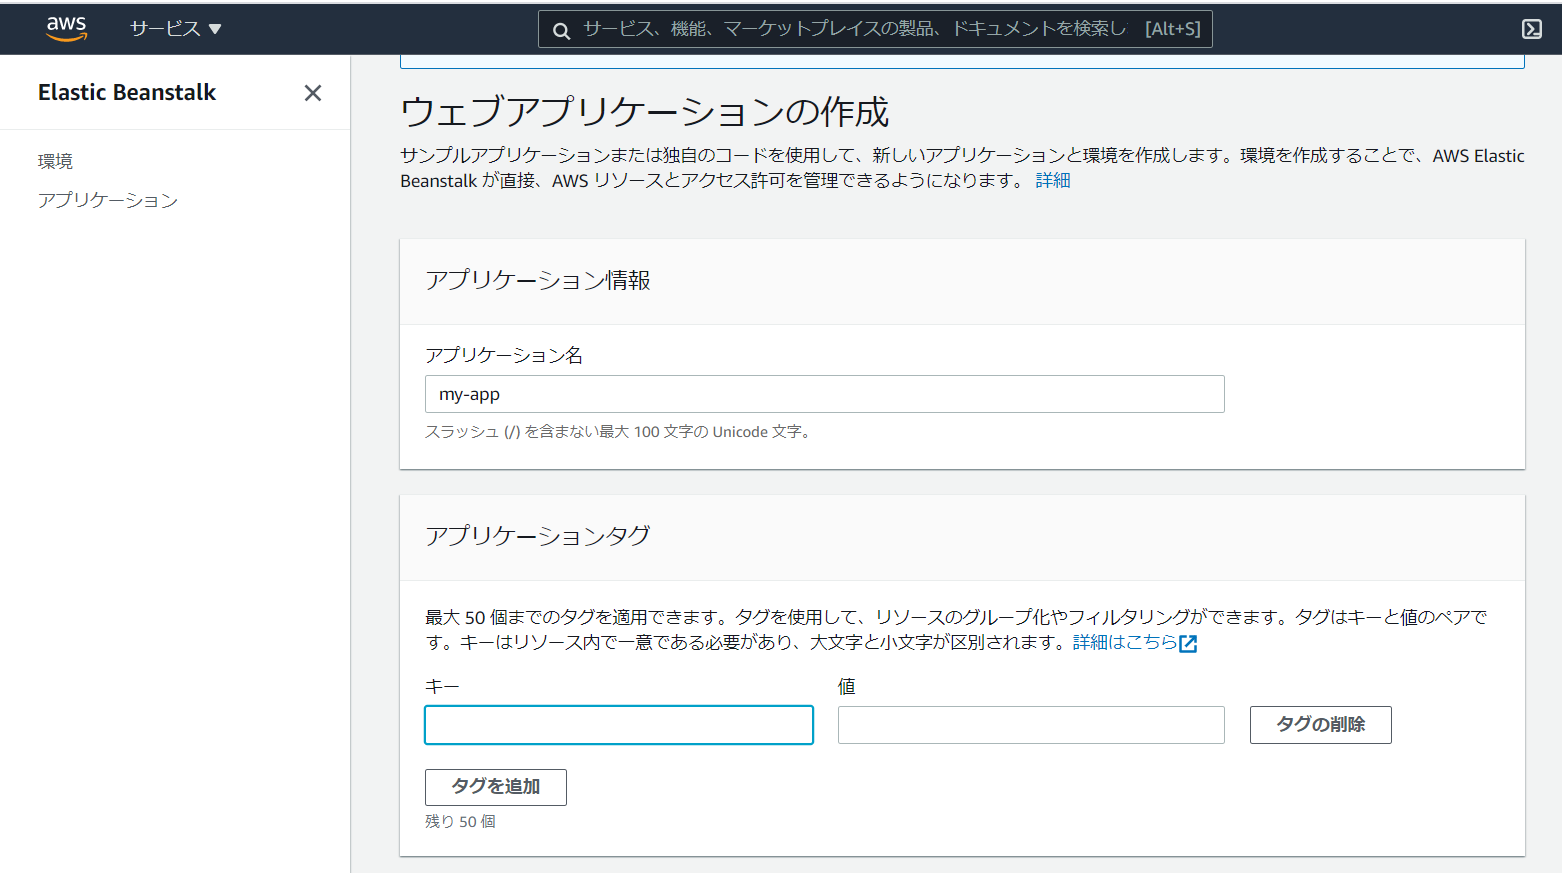
Elastic Beanstalkの画面を開いて、ウェブアプリケーションを作成します。
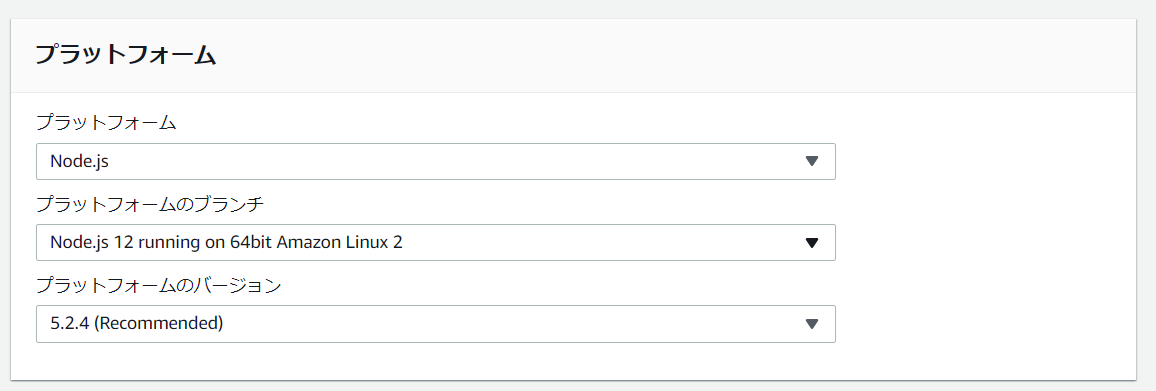
プラットフォームはNode.jsを選択します。デプロイするアプリケーションは、上記で作成したvuejs-node.zipでも良いですが、一旦サンプルアプリケーションで動作確認をするのをお勧めします。
「環境の作成」を押下し、完了するまでしばし待ちます。
無事に作成が完了すると下記のような画面になります。
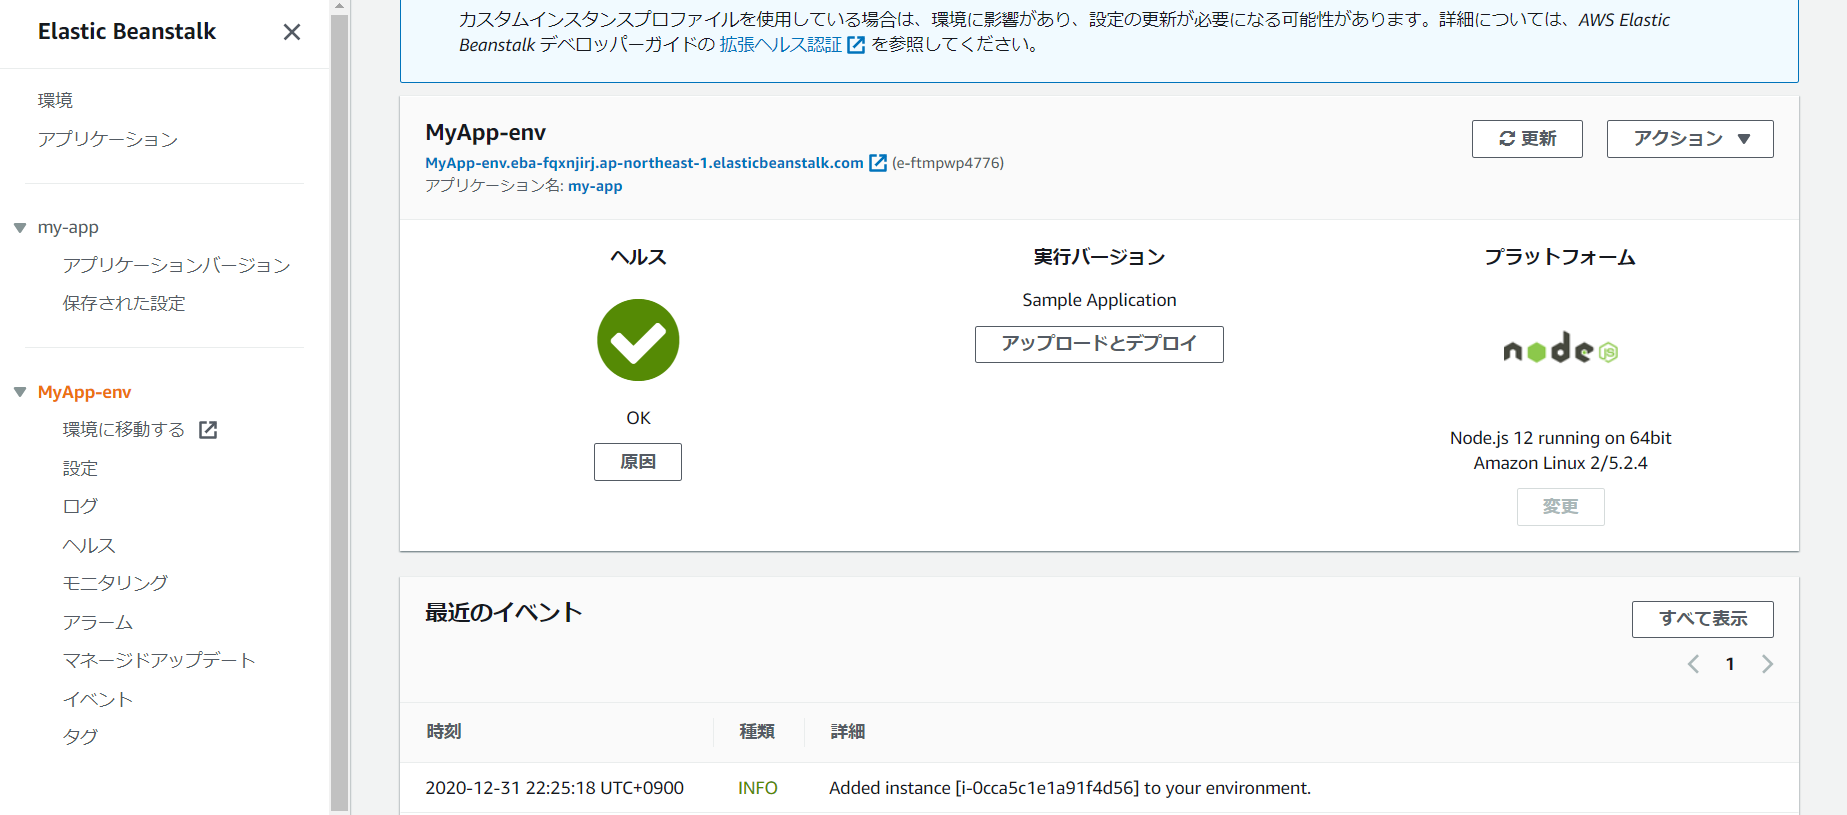
EC2に行ってみるとインスタンスも追加されています。

4.アプリをデプロイする
アプリケーションバージョン>アップロードで、glupでビルドした資材を選択して、アップロードを押下します。

アップロードした資材を選択して「デプロイ」を押下すると、環境の変更が開始されます。
アプリは履歴になっているので前のバージョンに戻ってデプロイすることも可能です。(便利!)

http://作成されたドメイン/でアクセスすると、アプリがデプロイできていることを確認できます。
AWS Elastic Beanstalkを利用したインフラ構築+デプロイは以上です。
あとがき
フロント側の仕事が増えたので、今回画面も作ってみました。AWS Elastic Beanstalkを利用すればインフラ気にしないでアプリのデプロイが可能なので手っ取り早いです。オートスケールとかLB、ドメインも自動設定されるので便利だと思いました。IP制限とかすれば、開発用の環境としても使い勝手良さそうです。
3日目は@usankusaiさんです!引き続きよろしくお願いします!
リンク情報システム株式会社では**一緒に働く仲間を随時募集**しています!
また、お仕事のご依頼、ビジネスパートナー様も募集しております。お気軽にご連絡ください。
Facebookはこちら。