BERTを利用した文章分類の実装は探すとたくさん見つかるのですが、固有表現抽出についてはあまり日本語の情報がヒットしなかったため実装内容をメモします。
本記事では、日本語のWikipediaから作られた固有表現抽出のデータセットを用いて、ファインチューニングとモデル性能の評価を行います。
実装については、BERTによる自然言語処理入門を参考にさせていただきました。
こちらの書籍ではPyTorch Lightningを用いた実装がなされているのですが、本記事においては自身のPyTorchの理解も兼ねて、PyTorchで実装しています。
また、実行環境はgoogle colabを想定しています。
コードの全量はgithubにも載せています。
https://github.com/nukano0522/pytorch/blob/master/bert_ner/torch_bert_ner.ipynb
実行環境
- Google Colab (GPU)
- Python 3.7.13
- torch==1.12.1+cu113
- transformers==4.21.2
1. 必要なライブラリをインストール/インポート
colab上で必要なライブラリをインストール
!pip install transformers==4.21.2 fugashi==1.1.2 ipadic==1.0.0
日本語学習済みモデルは東北大学が公開しているBERTモデルを使います。
import os
import json
import unicodedata
import itertools
from tqdm import tqdm
import numpy as np
import pandas as pd
import torch
from torch.utils.data import Dataset, DataLoader
from transformers import BertJapaneseTokenizer, BertForTokenClassification

# 日本語学習済みモデル
MODEL_NAME = 'cl-tohoku/bert-base-japanese-whole-word-masking'
2. データのダウンロードと前処理
データはストックマーク社さんが公開している、日本語のWikipediaから作られた固有表現抽出のデータセットを使わせていただきます。
# データのダウンロード
!git clone --branch v2.0 https://github.com/stockmarkteam/ner-wikipedia-dataset
データをロードします。今回学習・推論に用いる固有表現の種類は8つです。
# データのロード
dataset = json.load(open('ner-wikipedia-dataset/ner.json','r'))

# 固有表現のタイプとIDを対応付る辞書
type_id_dict = {
    "人名": 1,
    "法人名": 2,
    "政治的組織名": 3,
    "その他の組織名": 4,
    "地名": 5,
    "施設名": 6,
    "製品名": 7,
    "イベント名": 8
}
全角や半角の文字が混ざっているので、文字列を正規化します。
また、固有表現名称をID化します。
# カテゴリーをラベルに変更、文字列の正規化する。
for sample in dataset:
    sample['text'] = unicodedata.normalize('NFKC', sample['text'])
    for e in sample["entities"]:
        e['type_id'] = type_id_dict[e['type']]
        del e['type']
データセットを学習用・検証用・テスト用に分割します。
# データセットの分割
n = len(dataset)
n_train = int(n*0.6)
n_val = int(n*0.2)
dataset_train = dataset[:n_train]
dataset_val = dataset[n_train:n_train+n_val]
dataset_test = dataset[n_train+n_val:]

print(f"Length of train: {len(dataset_train)}")
print(f"Length of val: {len(dataset_val)}")
print(f"Length of test: {len(dataset_test)}")
3. トークナイザの定義
文章をトークンに分割してから、トークンの符号化とトークンに対応するラベルを付与(タグ付け)します。
タグ付けについては一般的な方法としてBIO法がありますが、本記事ではIO法を使用しています。
メインの処理を行っている関数はencode_plus_taggedです。
コメントでどのような処理をしているか例も交えながら説明しています。
class NerTokenizerForTrain(BertJapaneseTokenizer):

  def create_tokens_and_labels(self, splitted):
      """分割された文字列をトークン化し、ラベルを付与
      Args:
        splitted: 分割された文字列
          例:
          [{'text': 'レッドフォックス株式会社', 'label': 2},
          {'text': 'は、', 'label': 0},
          {'text': '東京都千代田区', 'label': 5},
          {'text': 'に本社を置くITサービス企業である。', 'label': 0}]
      Return:
        tokens, labels
          例:
          ['レッド', 'フォックス', '株式会社', 'は', '、', '東京', '都', '千代田', '区', 'に', '本社', 'を', '置く', 'IT', 'サービス', '企業', 'で', 'ある', '。']
          [2, 2, 2, 0, 0, 5, 5, 5, 5, 0, 0, 0, 0, 0, 0, 0, 0, 0, 0]
      """
      tokens = [] # トークン格納用
      labels = [] # トークンに対応するラベル格納用
      for s in splitted:
          text = s['text']
          label = s['label']
          tokens_splitted = self.tokenize(text) # BertJapaneseTokenizerのトークナイザを使ってトークンに分割
          labels_splitted = [label] * len(tokens_splitted)
          tokens.extend(tokens_splitted)
          labels.extend(labels_splitted)

      return tokens, labels


  def encoding_for_bert(self, tokens, labels, max_length):
      """符号化を行いBERTに入力できる形式にする
      Args:
        tokens: トークン列
        labels: トークンに対応するラベルの列
      Returns:
        encoding: BERTに入力できる形式
        例:
        {'input_ids': [2, 3990, 13779, 1275, 9, 6, 391, 409, 9674, 280, 7, 2557, 11, 3045, 8267, 1645, 1189, 12, 31, 8, 3, 0, 0, 0, 0, 0, 0, 0, 0, 0, 0, 0],
         'token_type_ids': [0, 0, 0, 0, 0, 0, 0, 0, 0, 0, 0, 0, 0, 0, 0, 0, 0, 0, 0, 0, 0, 0, 0, 0, 0, 0, 0, 0, 0, 0, 0, 0],
         'attention_mask': [1, 1, 1, 1, 1, 1, 1, 1, 1, 1, 1, 1, 1, 1, 1, 1, 1, 1, 1, 1, 1, 0, 0, 0, 0, 0, 0, 0, 0, 0, 0, 0]},
          'labels': [0, 2, 2, 2, 0, 0, 5, 5, 5, 5, 0, 0, 0, 0, 0, 0, 0, 0, 0, 0, 0, 0, 0, 0, 0, 0, 0, 0, 0, 0, 0, 0]}

      """
      encoding = self.encode_plus(
          tokens,
          max_length=max_length,
          padding='max_length',
          truncation=True
      )
      # トークン[CLS]、[SEP]のラベルを0
      labels = [0] + labels[:max_length-2] + [0]
      # トークン[PAD]のラベルを0
      labels = labels + [0]*( max_length - len(labels) )
      encoding['labels'] = labels

      return encoding


  def encode_plus_tagged(self, text, entities, max_length):
      """文章とそれに含まれる固有表現が与えられた時に、符号化とラベル列の作成
      Args:
        text: 元の文章
        entities: 文章中の固有表現の位置(span)とラベル(type_id)の情報

      """
      # 固有表現の前後でtextを分割し、それぞれのラベルをつけておく。
      entities = sorted(entities, key=lambda x: x['span'][0]) # 固有表現の位置の昇順でソート
      splitted = [] # 分割後の文字列格納用
      position = 0
      for entity in entities:
          start = entity['span'][0]
          end = entity['span'][1]
          label = entity['type_id']
          # 固有表現ではないものには0のラベルを付与
          splitted.append({'text': text[position:start], 'label':0})
          # 固有表現には、固有表現のタイプに対応するIDをラベルとして付与
          splitted.append({'text': text[start:end], 'label':label})
          position = end

      # 最後の固有表現から文末に、0のラベルを付与
      splitted.append({'text': text[position:], 'label':0})
      # positionとspan[0]の値が同じだと空白文字にラベル0が付与されるため、長さ0の文字列は除く(例:{'text': '', 'label': 0})
      splitted = [ s for s in splitted if s['text'] ]

      # 分割された文字列をトークン化し、ラベルを付与
      tokens, labels = self.create_tokens_and_labels(splitted)

      # 符号化を行いBERTに入力できる形式にする
      encoding = self.encoding_for_bert(tokens, labels, max_length)

      return encoding
実際にトークナイザに文章を投入したときの出力結果を見てみます。
tokenizer = NerTokenizerForTrain.from_pretrained(MODEL_NAME)
import pprint
tmp = dataset_train[1]
pprint.pprint(tmp)
pprint.pprint(tokenizer.encode_plus_tagged(text=tmp["text"], entities=tmp["entities"], max_length=32), width=200)
出力は下記のようになります。
文章がトークンに分割・ID化(input_ids)され、各トークンのラベル列(labels)が作成されました。
{'curid': '2415078',
 'entities': [{'name': 'レッドフォックス株式会社', 'span': [0, 12], 'type_id': 2},
              {'name': '東京都千代田区', 'span': [14, 21], 'type_id': 5}],
 'text': 'レッドフォックス株式会社は、東京都千代田区に本社を置くITサービス企業である。'}
{'attention_mask': [1, 1, 1, 1, 1, 1, 1, 1, 1, 1, 1, 1, 1, 1, 1, 1, 1, 1, 1, 1, 1, 0, 0, 0, 0, 0, 0, 0, 0, 0, 0, 0],
 'input_ids': [2, 3990, 13779, 1275, 9, 6, 391, 409, 9674, 280, 7, 2557, 11, 3045, 8267, 1645, 1189, 12, 31, 8, 3, 0, 0, 0, 0, 0, 0, 0, 0, 0, 0, 0],
 'labels': [0, 2, 2, 2, 0, 0, 5, 5, 5, 5, 0, 0, 0, 0, 0, 0, 0, 0, 0, 0, 0, 0, 0, 0, 0, 0, 0, 0, 0, 0, 0, 0],
 'token_type_ids': [0, 0, 0, 0, 0, 0, 0, 0, 0, 0, 0, 0, 0, 0, 0, 0, 0, 0, 0, 0, 0, 0, 0, 0, 0, 0, 0, 0, 0, 0, 0, 0]}
4. データセットとデータローダの作成
上で作成したトークナイザの処理を、各文章に適用するためにデータセットクラスを定義します。
class CreateDataset(Dataset):
  """データセット作成
  """
  def __init__(self, dataset, tokenizer, max_length):
    self.dataset = dataset
    self.tokenizer = tokenizer
    self.max_length = max_length

  def __len__(self):
    return len(self.dataset)

  def __getitem__(self, index):
    text = self.dataset[index]["text"]
    entities = self.dataset[index]["entities"]
    encoding = tokenizer.encode_plus_tagged(text, entities, max_length=self.max_length)

    input_ids = torch.tensor(encoding["input_ids"])
    token_type_ids = torch.tensor(encoding["token_type_ids"])
    attention_mask = torch.tensor(encoding["attention_mask"])
    labels = torch.tensor(encoding["labels"])

    return {
      "input_ids": input_ids,
      "token_type_ids": token_type_ids,
      "attention_mask": attention_mask,
      "labels": labels
    }
学習用と検証用のデータセットを作成し、ミニバッチ学習のためのデータローダを作成します。
# データセットの作成
dataset_train_for_loader = CreateDataset(dataset_train, tokenizer, max_length=128)
dataset_val_for_loader = CreateDataset(dataset_val, tokenizer, max_length=128)

# データローダーの作成
dataloader_train = DataLoader(dataset_train_for_loader, batch_size=32, shuffle=True, pin_memory=True)
dataloader_val = DataLoader(dataset_val_for_loader, batch_size=256, shuffle=True, pin_memory=True)

dataloaders_dict = {"train": dataloader_train, "val": dataloader_val}
5. 学習済モデルをロード
学習済みのモデルは、HuggingFaceさんで公開されているBertForTokenClassificationを使います。
11層のBERTとクラス分類のための全結合層がつながったモデルとなっており、呼び出すだけでネットワークの定義は不要になります。もちろんネットワークを自前で定義してもよいですが、簡単のためこちらのライブラリを使います。
# GPU使えるならGPU使う
device = torch.device("cuda:0" if torch.cuda.is_available() else "cpu")

# 学習済みモデルのロード
model = BertForTokenClassification.from_pretrained(MODEL_NAME, num_labels=9)

# モデルをGPUへ転送
model.to(device)
6. モデル学習
最適化器を定義します。
# 最適化器
optimizer = torch.optim.Adam(params=model.parameters(), lr=2e-5)
モデル学習の関数を定義します。
def train_model(net, dataloaders_dict, optimizer, num_epochs):

    # GPUが使えるかを確認
    device = torch.device("cuda:0" if torch.cuda.is_available() else "cpu")
    print("使用デバイス:", device)
    print('-----start-------')

    # ネットワークをGPUへ
    net.to(device)

    # ネットワークがある程度固定であれば、高速化させる
    torch.backends.cudnn.benchmark = True

    # ミニバッチのサイズ
    batch_size = dataloaders_dict["train"].batch_size

    # epochのループ
    for epoch in range(num_epochs):
        # epochごとの訓練と検証のループ
        for phase in ['train', 'val']:
            if phase == 'train':
                net.train()  # モデルを訓練モードに
            else:
                net.eval()   # モデルを検証モードに

            epoch_loss = 0.0  # epochの損失和
            iteration = 1

            # データローダーからミニバッチを取り出すループ
            for batch in (dataloaders_dict[phase]):
                # batchはTextとLableの辞書型変数

                # GPUが使えるならGPUにデータを送る
                input_ids = batch["input_ids"].to(device)
                attention_mask = batch["attention_mask"].to(device)
                labels = batch["labels"].to(device)

                # optimizerを初期化
                optimizer.zero_grad()

                # 順伝搬(forward)計算
                with torch.set_grad_enabled(phase == 'train'):

                    # BERTに入力
                    loss, logits = model(input_ids=input_ids,
                                          token_type_ids=None,
                                          attention_mask=attention_mask,
                                          labels=labels,
                                          return_dict=False)

                    # 訓練時はバックプロパゲーション
                    if phase == 'train':
                        loss.backward()
                        torch.nn.utils.clip_grad_norm_(model.parameters(), 1.0)
                        optimizer.step()

                        if (iteration % 10 == 0):  # 10iterに1度、lossを表示
                            print(f"イテレーション {iteration} || Loss: {loss:.4f}")

                    iteration += 1

                    # 損失の合計を更新
                    epoch_loss += loss.item() * batch_size

            # epochごとのloss
            epoch_loss = epoch_loss / len(dataloaders_dict[phase].dataset)

            print(f"Epoch {epoch+1}/{num_epochs} | phase {phase} |  Loss: {epoch_loss:.4f}")

    return net
学習を実行します。
# 学習・検証を実行
num_epochs = 3
net_trained = train_model(model, dataloaders_dict, optimizer, num_epochs=num_epochs)
こんな感じのログが出力されます
使用デバイス: cuda:0
-----start-------
イテレーション 10 || Loss: 0.0033
イテレーション 20 || Loss: 0.0082
イテレーション 30 || Loss: 0.0061
.
.
.
イテレーション 90 || Loss: 0.0057
イテレーション 100 || Loss: 0.0024
Epoch 3/3 | phase train |  Loss: 0.0030
Epoch 3/3 | phase val |  Loss: 0.0041
7. 推論
テストデータを使って固有表現の推論を行います。
7.1. テスト用のトークナイザの定義
テストデータの推論を行う前に、
テストデータの文章をトークン化し、各トークンの文章中の位置を特定してするトークナイザ処理を定義します。
これは推論結果(トークンごとにラベルが予測された結果)を使って元の文章から固有表現を得るのに必要な処理です。
メインの処理は関数encode_plus_untaggedです。
class NerTokenizerForTest(BertJapaneseTokenizer):

    def encoding_for_bert(self, tokens, max_length):
        """符号化を行いBERTに入力できる形式にする
        Args:
          tokens: トークン列
        Returns:
          encoding: BERTに入力できる形式
          例:
          {'input_ids': [2, 106, 6, 946, 674, 5, 12470, 9921, 5, 859, 6, 2446, 22903, 35, 24831, 11614, 35, 2176, 2200, 35, 3700, 29650, 2446, 333, 9, 6, 2409, 109, 5, 333, 3849, 3],
          'token_type_ids': [0, 0, 0, 0, 0, 0, 0, 0, 0, 0, 0, 0, 0, 0, 0, 0, 0, 0, 0, 0, 0, 0, 0, 0, 0, 0, 0, 0, 0, 0, 0, 0],
          'attention_mask': [1, 1, 1, 1, 1, 1, 1, 1, 1, 1, 1, 1, 1, 1, 1, 1, 1, 1, 1, 1, 1, 1, 1, 1, 1, 1, 1, 1, 1, 1, 1, 1]}
        """
        encoding = self.encode_plus(
            tokens,
            max_length=max_length,
            padding='max_length',
            truncation=True,
            return_tensors = "pt"
        )

        return encoding


    def create_spans_of_token(self, tokens_original, encoding):
        """ 各トークン(サブワード)の文章中での位置を調べる
          Args:
            tokens_original: トークン列をさらにサブワードに分割した列
            encoding:
            例:tokens_original
              ['元々', 'は', '前作', '「', 'The', 'Apple', 's', '」', 'の', 'アウト', ...]

          Return:
            spans: 各トークンの文章中の位置([CLS][PAD]などの特殊トークンはダミーで置き換える)
            例:
              [[-1, -1], [0, 2], [2, 3], [3, 5], [5, 6], [6, 9], [10, 15], [15, 16], ...]
        """
        position = 0
        spans = [] # トークンの位置を追加していく。
        for token in tokens_original:
            l = len(token)
            while 1:
                if token != text[position:position+l]:
                    """例:英語文章のように空白が混ざっていると下記のようにずれるケースがあることを考慮
                          token: "Digital"
                          text[position:position+l]: " Digita"
                    """
                    position += 1
                else:
                    spans.append([position, position+l])
                    position += l
                    break

        sequence_length = len(encoding['input_ids'])
        # 特殊トークン[CLS]に対するダミーのspanを追加。
        spans = [[-1, -1]] + spans[:sequence_length-2]
        # 特殊トークン[SEP]、[PAD]に対するダミーのspanを追加。
        spans = spans + [[-1, -1]] * ( sequence_length - len(spans) )

        return spans


    def encode_plus_untagged(self, text, max_length=None):
        """文章をトークン化し、それぞれのトークンの文章中の位置も特定しておく。
        """
        # 文章のトークン化を行い、
        # それぞれのトークンと文章中の文字列を対応づける。
        tokens = [] # トークン格納用
        tokens_original = [] # トークンに対応する文章中の文字列格納用
        words = self.word_tokenizer.tokenize(text) # MeCabで単語に分割
        for word in words:
            # 単語をサブワードに分割
            tokens_word = self.subword_tokenizer.tokenize(word)
            tokens.extend(tokens_word)
            if tokens_word[0] == '[UNK]': # 未知語への対応
                tokens_original.append(word)
            else:
                tokens_original.extend([
                    token.replace('##','') for token in tokens_word
                ])


        # 符号化を行いBERTに入力できる形式にする
        encoding = self.encoding_for_bert(tokens, max_length)

        # 各トークン(サブワード)の文章中での位置を調べる
        spans = self.create_spans_of_token(tokens_original, encoding)

        return encoding, spans


    def convert_bert_output_to_entities(self, text, labels, spans):
        """文章、ラベル列の予測値、各トークンの位置から固有表現を得る。
        """
        # labels, spansから特殊トークンに対応する部分を取り除く
        labels = [label for label, span in zip(labels, spans) if span[0] != -1]
        spans = [span for span in spans if span[0] != -1]

        # 同じラベルが連続するトークンをまとめて、固有表現を抽出する。
        entities = []
        position = 0
        for label, group in itertools.groupby(labels):
            """
            例:labelsは予測結果
            labels: [0, 0, 0, 3, 3, 5, 7, 7, 7, 0, 0, 0]
            """
            start_idx = position # 連続するラベルの先頭位置
            end_idx = position + len(list(group)) - 1 # 連続するラベルの最終位置

            # (encode_plus_untaggedで計算した)spansから、文章中の位置を特定
            start = spans[start_idx][0]
            end = spans[end_idx][1]

            # 次のspanの位置に更新
            position = end_idx + 1

            if label != 0: # ラベルが0以外ならば、新たな固有表現として追加。
                entity = {
                    "name": text[start:end],
                    "span": [start, end],
                    "type_id": label
                }
                entities.append(entity)

        return entities
7.2. 推論処理
7.1で定義したテスト用のトークナイザーをロードします。
# テスト時に使うトークナイザーをロード
tokenizer = NerTokenizerForTest.from_pretrained(MODEL_NAME)
推論の関数を定義します。
def predict(text, tokenizer, model):
    """BERTで固有表現抽出を行うための関数。
    """
    # 符号化
    encoding, spans = tokenizer.encode_plus_untagged(text)
    encoding = { k: v.cuda() for k, v in encoding.items() }

    # ラベルの予測値の計算
    with torch.no_grad():
        output = model(**encoding)
        scores = output.logits
        labels_predicted = scores[0].argmax(-1).cpu().numpy().tolist()

    # ラベル列を固有表現に変換
    entities = tokenizer.convert_bert_output_to_entities(
        text, labels_predicted, spans
    )

    return entities

# 固有表現抽出
entities_list = [] # 正解の固有表現
entities_predicted_list = [] # 予測された固有表現
for sample in tqdm(dataset_test):
    text = sample['text']
    entities_predicted = predict(text, tokenizer, net_trained) # BERTで予測
    entities_list.append(sample['entities'])
    entities_predicted_list.append( entities_predicted )
テストデータを1行ずつ推論をおこないます。
entities_list = [] # 正解の固有表現
entities_predicted_list = [] # 予測された固有表現
for sample in tqdm(dataset_test):
    text = sample['text']
    entities_predicted = predict(text, tokenizer, net_trained) # BERTで予測
    entities_list.append(sample['entities'])
    entities_predicted_list.append( entities_predicted )
推論結果の一部を確認します。
i = 1
print("# 正解 #")
print(entities_list[i])
print("# 推論 #")
print(entities_predicted_list[i])
print("# もとの文章 #")
print(dataset_test[i]["text"])
出力は下記のとおりです。「セカンダリースクール」の推論結果は間違っていますが、「南アフリカ高等弁務局」は正しく推論できています。
# 正解 #
[{'name': 'セカンダリースクール', 'span': [0, 10], 'type_id': 2}, {'name': '南アフリカ高等弁務局', 'span': [24, 34], 'type_id': 3}]
# 推論 #
[{'name': 'セカンダリースクール', 'span': [0, 10], 'type_id': 6}, {'name': '南アフリカ高等弁務局', 'span': [24, 34], 'type_id': 3}]
# もとの文章 #
セカンダリースクールを卒業後、ホテルなどで働いた南アフリカ高等弁務局の秘書官として従事した折に政治への興味を持ったとされる。
8. モデルの評価
推論結果をもとにモデルを評価します。
評価指標は適合率(precision)・再現率(recall)・F1値です。
評価指標を計算する関数を定義します。
def evaluate_model(entities_list, entities_predicted_list, type_id=None):
    """
    正解と予測を比較し、モデルの固有表現抽出の性能を評価する。
    type_idがNoneのときは、全ての固有表現のタイプに対して評価する。
    type_idが整数を指定すると、その固有表現のタイプのIDに対して評価を行う。
    """
    num_entities = 0 # 固有表現(正解)の個数
    num_predictions = 0 # BERTにより予測された固有表現の個数
    num_correct = 0 # BERTにより予測のうち正解であった固有表現の数

    # それぞれの文章で予測と正解を比較。
    # 予測は文章中の位置とタイプIDが一致すれば正解とみなす。
    for entities, entities_predicted in zip(entities_list, entities_predicted_list):

        if type_id:
            entities = [ e for e in entities if e['type_id'] == type_id ]
            entities_predicted = [
                e for e in entities_predicted if e['type_id'] == type_id
            ]

        get_span_type = lambda e: (e['span'][0], e['span'][1], e['type_id'])
        set_entities = set( get_span_type(e) for e in entities )
        set_entities_predicted = set( get_span_type(e) for e in entities_predicted )

        num_entities += len(entities)
        num_predictions += len(entities_predicted)
        num_correct += len( set_entities & set_entities_predicted )

    # 指標を計算
    precision = num_correct/num_predictions # 適合率
    recall = num_correct/num_entities # 再現率
    f_value = 2*precision*recall/(precision+recall) # F値

    result = {
        'num_entities': num_entities,
        'num_predictions': num_predictions,
        'num_correct': num_correct,
        'precision': precision,
        'recall': recall,
        'f_value': f_value
    }

    return result
評価結果を確認します。
# 評価結果
import pandas as pd
eval_df = pd.DataFrame()
for k, v in type_id_dict.items():
  eval_res = evaluate_model(entities_list, entities_predicted_list, type_id=v)
  eval_df[k] = eval_res.values()

eval_res_all = evaluate_model(entities_list, entities_predicted_list, type_id=None)
eval_df["ALL"] = eval_res_all.values()

eval_df.index = eval_res_all.keys()
eval_df
出力は下記のようになりました。
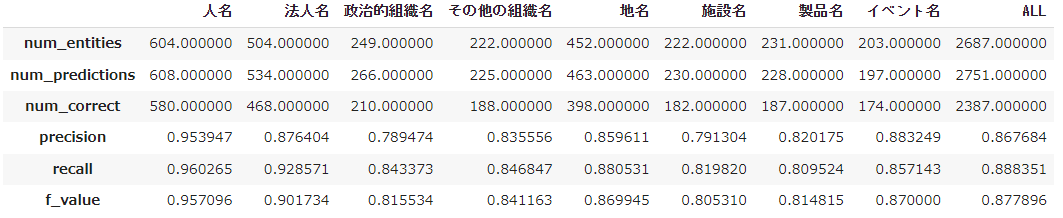
全体のF1値は0.88です。人名の分類精度は高く、施設名や製品名は低い結果となりました。
まとめ
以上です。
精度向上に向けては、
- ネットワークを
BertForTokenClassificationではなく、自前で定義し試行錯誤- やってみました→PyTorch+BERTによる固有表現抽出(NER)の実装②
- タグ付けにBIO法を使う
- 評価方法を工夫する
などがあるのかなと思いました。
3点目については、↓のように「地区」まで含めてラベル予測できていないのですが、こういった例は正解にしてしまってもいいかもしれません。

※上段が正解、下段が推論結果
単純な文章分類と比較すると、トークン単位の分類なので想定通りの結果にならないことも多く難しいタスクだと感じました。
以上でした。
説明に至らない点もあるかと思います、間違いなどありましたらご指摘いただけると幸いです。