 Ben White
はじめに
機械学習周りのツールの進歩はあまりに早く、数か月確認していないといつの間にか新しい機能が実装されていた経験は多い。
CatBoostがいつの間にかテキスト項目までモデル内部で処理できるようになっていたらしい。
CatBoostのテキストカラム指定機能を試す
調べてみると、2020/3/3にリリースされたv0.22から追加されたようだ。
そりゃ知りませんわ…笑
どういった処理がされるのか気になったので、さっそく調べてみた。
環境
- Windows10
- Python 3.7.4
- catboost 0.22
- テキスト項目の処理にはGPUのみ対応、CPUは未対応
参考
詳細は下記参照、ここでは適宜抜粋していく。
使い方
データ準備
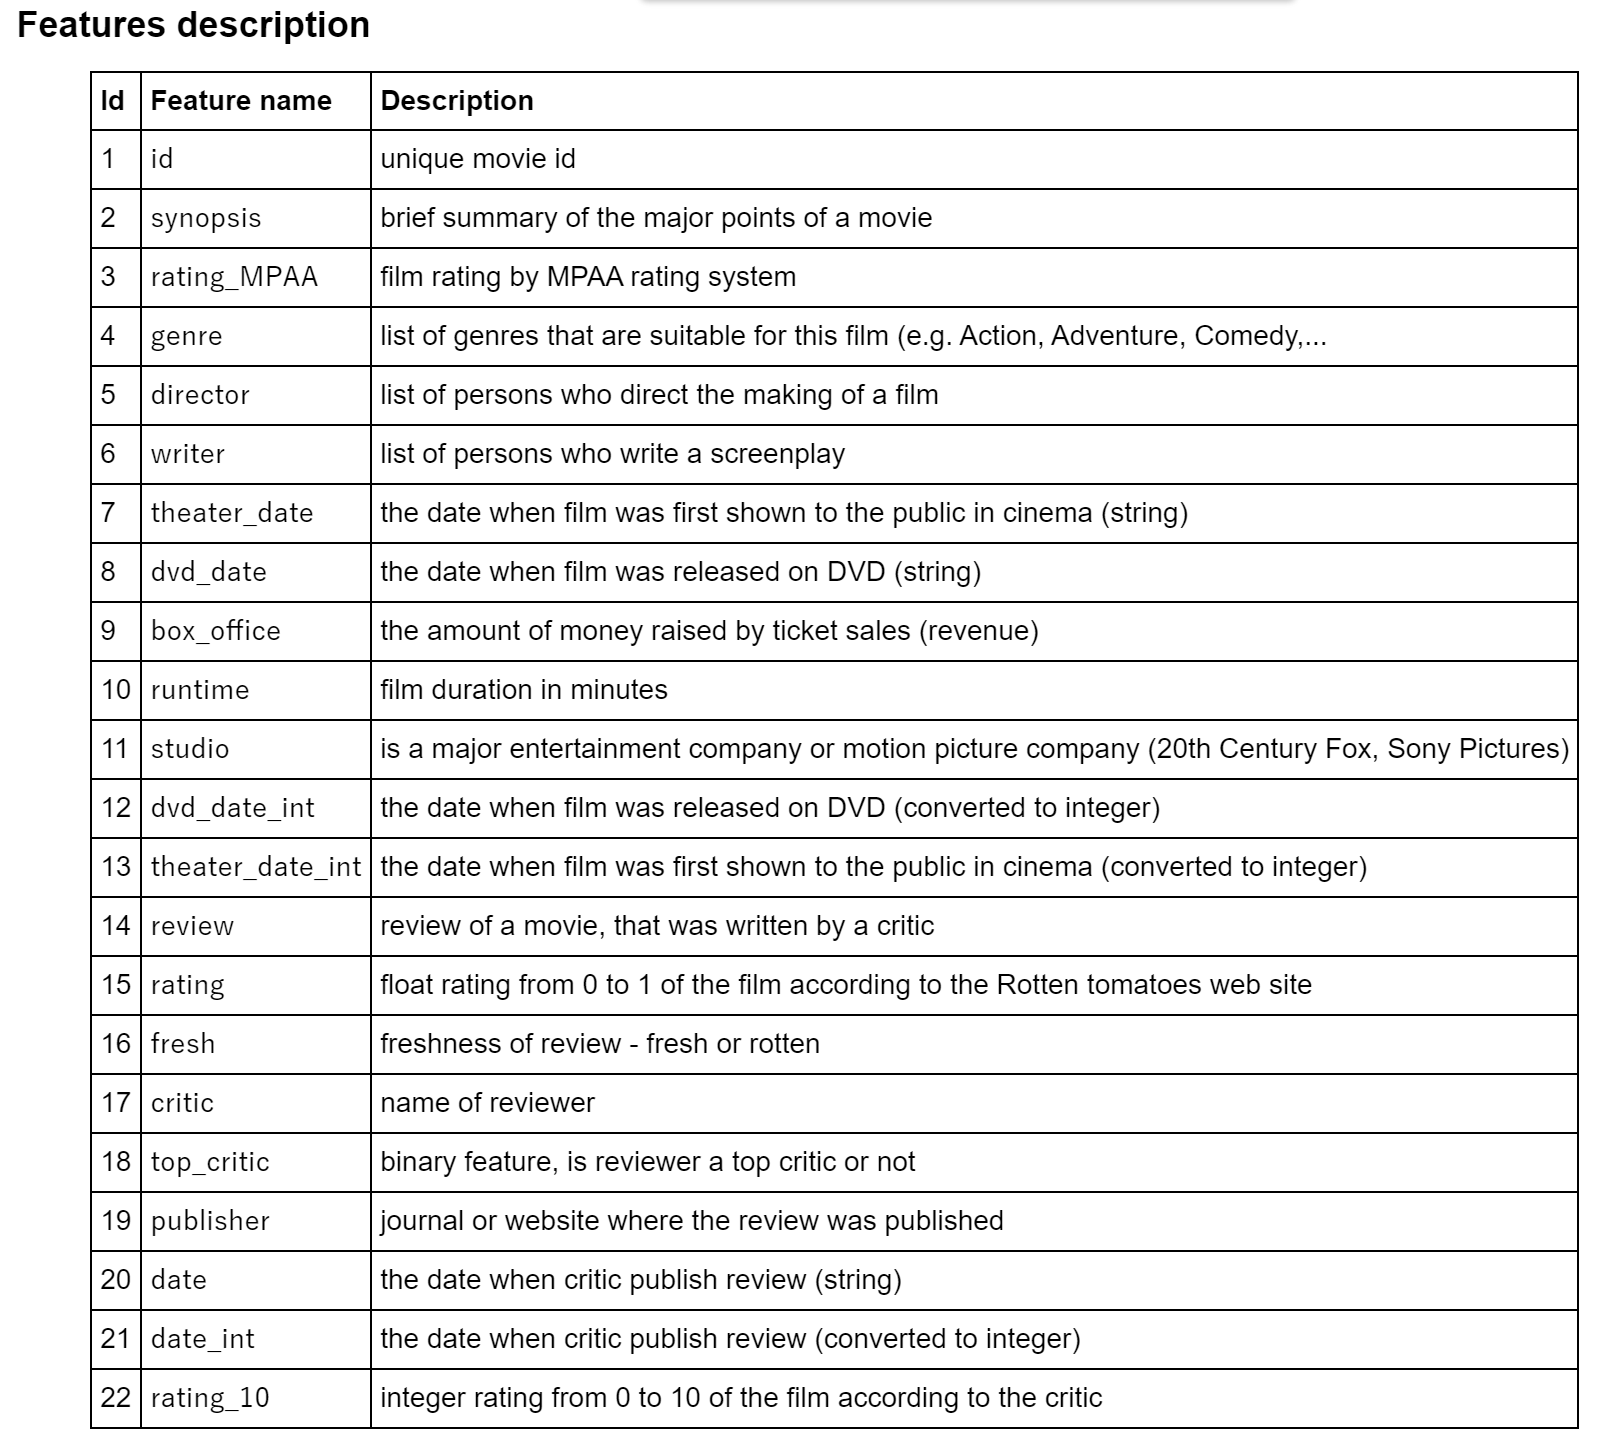
チュートリアル同様、rotten_tomatoesをデータとして使用する。
0~10のrating_10を目的変数とした数値項目、カテゴリ項目、テキスト項目混在のデータセット。
from catboost import Pool, CatBoostClassifier
from catboost.datasets import rotten_tomatoes
from sklearn.metrics import accuracy_score
# カテゴリ項目リスト
list_cat_features = ['rating_MPAA', 'studio', 'fresh', 'critic', 'top_critic', 'publisher']
# テキスト項目リスト
list_text_features = ['synopsis', 'genre', 'director', 'writer', 'review']
def get_processed_rotten_tomatoes():
train, test = rotten_tomatoes()
def fill_na(df, features):
for feature in features:
df[feature].fillna('', inplace=True)
def preprocess_data_part(data_part):
# 動作確認なので、特徴作成に手間の掛かる項目はdrop
data_part = data_part.drop(['id', 'theater_date', 'dvd_date', 'rating', 'date'], axis=1)
fill_na(data_part, list_cat_features)
fill_na(data_part, list_text_features)
X = data_part.drop(['rating_10'], axis=1)
y = data_part['rating_10']
return X, y
X_train, y_train = preprocess_data_part(train)
X_test, y_test = preprocess_data_part(test)
return X_train, X_test, y_train, y_test
# trainとtestに分割
X_train, X_test, y_train, y_test = get_processed_rotten_tomatoes()
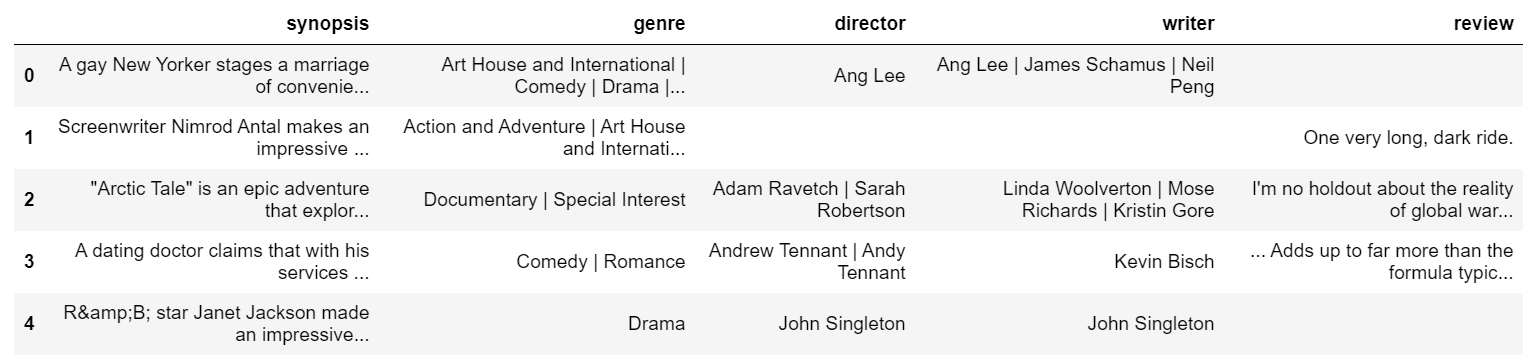
# テキスト項目のみ表示
X_train[list_text_features].head()
設定方法
category_featuresと同様に項目名のリストをtext_featuresに渡してやるだけ。
text_featuresを引数に取ることができるのは下記のクラスとメソッド。
- CatBoost.fit()
- CatBoostClassifier.fit()
- Pool()
ここではPool()に設定する。
# trainデータセット
train_pool = Pool(
    X_train,
    y_train,
    cat_features=list_cat_features,
    text_features=list_text_features,
    feature_names=list(X_train)
)

# testデータセット
test_pool = Pool(
    X_test,
    y_test,
    cat_features=list_cat_features,
    text_features=list_text_features,
    feature_names=list(X_test)
)

catboost_default_params = {
    'iterations': 1000,
    'learning_rate': 0.03,
    'eval_metric': 'Accuracy',
    'task_type': 'GPU',  # 'CPU'は未対応、CatBoostErrorとなる
    'random_seed': 0,
    'verbose': 100

}

# 多クラス分類
clf = CatBoostClassifier(**catboost_default_params)
clf.fit(train_pool)
評価指標
y_pred = clf.predict(X_test)
print(f"accuracy = {accuracy_score(y_test, y_pred):.4f}")
accuracy = 0.4699
チュートリアルではrandom_seedが設定されていないので、チュートリアルのaccuracyと完全一致はしていないが概ね変わらない結果となっている。
チュートリアルの検証結果では、テキスト特徴量をドロップした場合は0.4562なので数ポイントの精度向上となっている。

解説
text_featuresで指定された項目に対してテキスト項目から数値項目へと変換する際、3つの要素を設定できる。
引数
-
tokenizers[doc]
トークン化する際の設定を定義。
delimiterやlowercasingの指定が可能。 -
dictionaries[doc]
トークンを辞書化する際の設定を定義。
単語単位か文字単位か、n-gramのnの指定などが可能。 -
feature_calcers[doc]
- dictionariesの処理方法の設定。
- Bag of words
- NaiveBayes
- BM25
処理イメージ(tokenizer)
['cats so cute :)',
 'mouse skare ...',
 'cat defeated mouse',
 'cute : mice gather army !',
 'army mice defeated cat :(',
 'cat offers peace',
 'cat skared :(',
 'cat mouse live peace :)']
[['cat', 'so', 'cute', ':)'],
 ['mouse', 'skare', '...'],
 ['cat', 'defeat', 'mouse'],
 ['cute', ':', 'mice', 'gather', 'army', '!'],
 ['army', 'mice', 'defeat', 'cat', ':('],
 ['cat', 'offer', 'peace'],
 ['cat', 'skare', ':('],
 ['cat', 'mouse', 'live', 'peace', ':)']]
feature_processingで上記の組み合わせを指定することが可能。
それらの設定はcatboost_paramsに引数でdictとして渡す。
初期設定
{
    "tokenizers" : [{
        "tokenizer_id" : "Space",  # "Space"の名前でtokenizersを定義
        "separator_type" : "ByDelimiter",  # 区切り文字により分割
        "delimiter" : " "  # 区切り文字は半角スペース
    }],

    "dictionaries" : [{
        "dictionary_id" : "BiGram",  # "BiGram"の名前でdictionariesを定義
        "max_dictionary_size" : "50000",
        "occurrence_lower_bound" : "3",
        "gram_order" : "2"  # n-gramのn=2
    }, {
        "dictionary_id" : "Word",  # "Word"の名前でdictionariesを定義
        "max_dictionary_size" : "50000",
        "occurrence_lower_bound" : "3",
        "gram_order" : "1"  # n-gramのn=1
    }],

    "feature_processing" : {
        "default" : [{  # tokenizers, dictionaries, feature_calcersの組み合わせを定義
            "dictionaries_names" : ["BiGram", "Word"],
            "feature_calcers" : ["BoW"],
            "tokenizers_names" : ["Space"]
        }, {
            "dictionaries_names" : ["Word"],
            "feature_calcers" : ["NaiveBayes"],
            "tokenizers_names" : ["Space"]
        }],
    }
}
様々な組み合わせを定義できるので拡張性は高いが、設定値の選択肢が多いのでリファレンス要参照。
おわりに
以前からカテゴリ項目の内部処理化でOneHotEncodingが不要になっていた。
今回テキスト項目まで対応できるようになったことで、テキスト項目含んだ
テーブルデータでも特徴量作成せずにベースラインモデルが作成できるようになった。
最近のKaggleではベースラインモデルとしてLightGBMが最も使われているが、
今後はCatBoostも増えてきそうだ。
自分も取り入れようと思う。
ところで、この数か月の間に主要パッケージで大きなアップデートが続いた。
個人的に気になった内容は下記。
- scikit-learn v0.22(2019/12)
- stackingの新規実装
- permutation importanceの新規実装
- ROC AUCの可視化に対応
- pandas v1.0(2020/01)
- 欠損値をpd.NAに統一化
- pandas.dtypeに文字列型の追加
インパクトのある機能追加だけでなくbag fixも進んでいる。
追いかけるのは大変だが、まさに嬉しい悲鳴といったところ。