mruby-tflite を作りました
今朝、mruby から TensorFlow Lite が扱える様に mrbgems (mruby で言う gems)を作りました。
Big Sky :: MRuby の TensorFlow Lite バインディングを書いた。
これを使うと Python で機械学習したモデルファイルを TensorFlow Lite のモデルに変換し、mruby から利用できる様になります。例えば FizzBuzz を推論するモデルは以下の様に書けます。
import numpy as np
from tensorflow.contrib.keras.api.keras.models import Sequential, model_from_json
from tensorflow.contrib.keras.api.keras.layers import Dense, Dropout, Activation
from tensorflow.contrib.keras.api.keras.optimizers import SGD, Adam
import tensorflow.contrib.lite as lite

def fizzbuzz(i):
    if   i % 15 == 0: return np.array([0, 0, 0, 1])
    elif i % 5  == 0: return np.array([0, 0, 1, 0])
    elif i % 3  == 0: return np.array([0, 1, 0, 0])
    else:             return np.array([1, 0, 0, 0])

def bin(i, num_digits):
    return np.array([i >> d & 1 for d in range(num_digits)])

NUM_DIGITS = 7
trX = np.array([bin(i, NUM_DIGITS) for i in range(1, 101)])
trY = np.array([fizzbuzz(i) for i in range(1, 101)])
model = Sequential()
model.add(Dense(64, input_dim = 7))
model.add(Activation('tanh'))
model.add(Dense(4, input_dim = 64))
model.add(Activation('softmax'))
model.compile(loss = 'categorical_crossentropy', optimizer = 'adam', metrics = ['accuracy'])
model.fit(trX, trY, epochs = 3600, batch_size = 64)
model.save('fizzbuzz_model.h5')

converter = lite.TFLiteConverter.from_keras_model_file('fizzbuzz_model.h5')
tflite_model = converter.convert()
open('fizzbuzz_model.tflite', 'wb').write(tflite_model)
※現状の TFLiteConverter はファイル経由でないと変換できないのが若干辛いですね。
この出力された fizzbuzz_model.tflite を mruby から以下の様に使います。
def bin(n, num_digits)
  f = []
  0.upto(num_digits-1) do |x|
    f[x] = (n >> x) & 1
  end
  return f
end

def dec(b, n)
  b.each_with_index do |x, i|
    if x > 0.4
      return case i+1
      when 1; n.to_s
      when 2; 'Fizz'
      when 3; 'Buzz'
      when 4; 'FizzBuzz'
      end
    end
  end
  raise "OMG!"
end

model = TfLite::Model.from_file 'fizzbuzz_model.tflite'
interpreter = TfLite::Interpreter.new(model)
interpreter.allocate_tensors
input = interpreter.input_tensor(0)
output = interpreter.output_tensor(0)
1.upto(100) do |x|
  input.data = bin(x, 7)
  interpreter.invoke
  puts dec(output.data, x)
end
数値を7桁の one-hot にする為の関数 bin/dec と、TensorFlow Lite のインタプリタを操作するコートです。
本当は画像判定をやりたかった
本来ならば xor や FizzBuzz ではなく画像を読み込み、画像が何なのか判定する様なカッコいい事がやりたいのですが、ブログ記事にも書いた通り現状の mrbgems には画像の画素データにアクセスできるライブラリがありません。これは無理かなと思っていたのですが、ImageMagick の convert コマンドは、出力画像として txt:- を指定すると画素データの一覧を吐いてくれる事が分かりました。
$ gm convert sample1.jpg -resize 299x299! txt:-
0,0: (  0,  2,  0) #000200
1,0: (  0,  2,  0) #000200
2,0: (  0,  2,  0) #000200
3,0: (  0,  2,  0) #000200
4,0: (  0,  2,  0) #000200
5,0: (  0,  2,  0) #000200
6,0: (  0,  2,  0) #000200
ImageMagick (GraphicsMagick) 凄い!!!
これがあれば勝てる、そう考えながらサクッと画素データを読み取るスクリプトを書きました。
img = Array.new(wanted_height * wanted_width * wanted_channel, 0)
`gm convert #{ARGV[0]} -resize #{wanted_width}x#{wanted_height}! txt:-`.each_line do |x|
  r1, r2 = x.split(': (')
  y, x = r1.split(',')
  off = (y.to_i * wanted_width + x.to_i) * wanted_channel
  c = r2.split(')')[0].split(',').map {|x| x.strip.to_f / 255}
  img[off+0] = c[0]
  img[off+1] = c[1]
  img[off+2] = c[2]
end
ブラックホールとポンデリングを見分ける
先日書いた「TensorFlow を使ってブラックホールとポンデリングを見分ける (追記あり)」という記事の為に作った TensorFlow のモデルファイルが運良く消さずに残っていたので、TensorFlow Lite のモデルに変換しました。変換には toco コマンドを使います。
※そろそろ消そうかなと思っていたのでセーフ
$ toco \
    --output_file pondehole.tflite \
    --graph_def_file output_graph.pb \
    --output_format TFLITE \
    --input_array=Placeholder \
    --input_shape=1,299,299,3 \
    --output_array=final_result
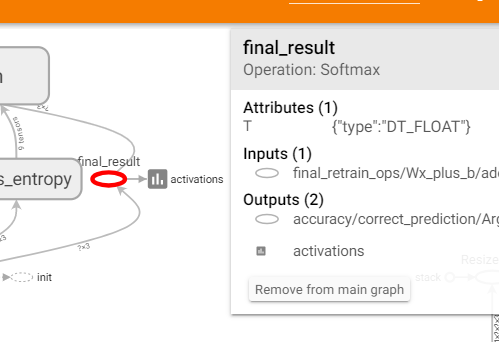
入力ノード(--input_array=Placeholder)と出力ノード(--output_array=final_result)の名前は tensorboard の GRAPH タブを見ると確認できます。
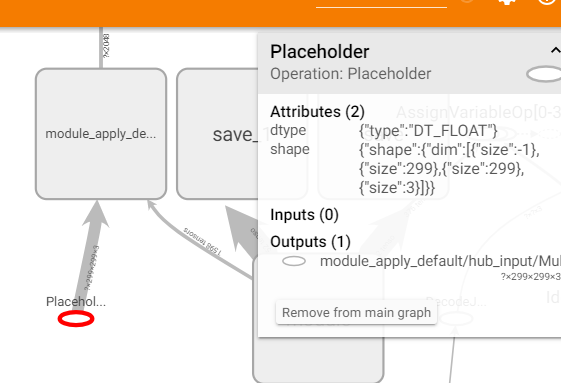
また --input_shape は入力データの形状を示す物ですが、これは学習した際に使用した retrain.py を見てどの画像にリサイズしているかを調べて下さい。この意味は 299x299 サイズ、3 チャネルの画像という意味になります。
ここまでくれば後は以下の様にスクリプトを作ります。
if ARGV.empty?
  puts "usage: #{$0} [image file]"
  return
end

labels = File.read('output_labels.txt').lines.map {|x| x.strip}

model = TfLite::Model.from_file 'c:/dev/pondehole/pondehole.tflite'
interpreter = TfLite::Interpreter.new(model)
interpreter.allocate_tensors
input = interpreter.input_tensor(0)
wanted_width = input.dim(1)
wanted_height = input.dim(2)
wanted_channel = input.dim(3)

img = Array.new(wanted_height * wanted_width * wanted_channel, 0)

`gm convert #{ARGV[0]} -resize #{wanted_width}x#{wanted_height}! txt:-`.each_line do |x|
  r1, r2 = x.split(': (')
  y, x = r1.split(',')
  off = (y.to_i * wanted_width + x.to_i) * wanted_channel
  c = r2.split(')')[0].split(',').map {|x| x.strip.to_f / 255}
  img[off+0] = c[0]
  img[off+1] = c[1]
  img[off+2] = c[2]
end

output = interpreter.output_tensor(0)
input.data = img
interpreter.invoke
puts labels[output.data.each_with_index.max[1].to_i]
mruby で画像判定やります
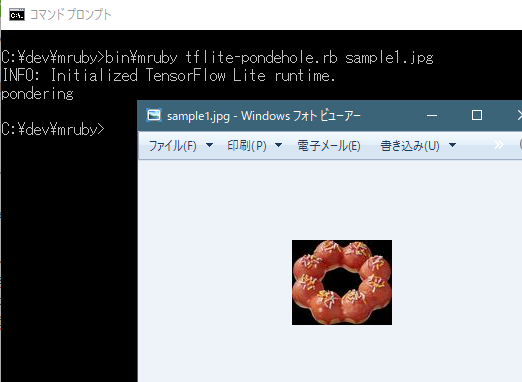
まずはポンデリング
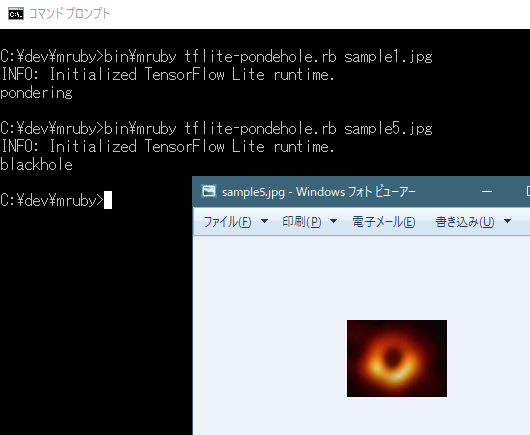
次にブラックホール
最後にオニオンフライ
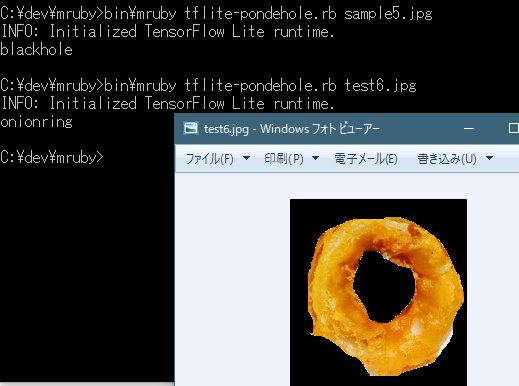
いずれも正しく判定できています。
まとめ
mruby から TensorFlow Lite を扱う為の gem 「mruby-tflite」を作り、画像を読み込んでブラックホールとポンデリング、さらにはオニオンフライを見分ける事に成功しました。これならば「今日のオヤツどれがいい?」とお母さんがブラックホールとポンデリングとオニオンリングを差し出してきてもポンデリングを選ぶ事ができるので安心ですね。良かったですね。
冗談さておき、現実として組み込み用途で使われる可能性がある mruby が機械学習の力を手に入れられる事になったので、アイデア次第で色々な物が作れる様になります。ラズベリーパイ上で mruby を動かし、カメラから取り込んだ画像で画像判定というのも難しくありません。またモデルファイルも mobilenet 等を使う事も出来るのです。ぜひ皆さんの手で面白い物を作ってみて下さい。
なお TensorFlow Lite を Go 言語から扱う為のパッケージも絶賛開発中です。興味のある方は使ってみて下さい。