はじめに
画像セグメンテーションや敵対的生成ネットワーク等で利用されるPyTorch Upsampleクラスのalign_cornersの動作が気になったので、メモを残します。
環境
- Windows 10 home
- Python(3.7.6)
- Numpy(1.19.4)
Upsampleクラスのalign_corners
PyTorch Upsampleクラスは、scale_factorサイズにより、画像データであれば、縦横を拡大するものです。拡大のためには、増加する点を補間する必要があります。補間方法には、大きく分けると、近傍の値と同一ものをとるか(nearest)、線形補間するか(linear, bilinearなど)があります。
今回は、線形補間系に機能する、align_cornersの話です。align_cornersは、公式ドキュメントでは、以下のように説明しています。
align_corners (bool, optional) – if
True, the corner pixels of the input and output tensors are aligned, and thus preserving the values at those pixels.
exampleでは、
>>> input = torch.arange(1, 5, dtype=torch.float32).view(1, 1, 2, 2)
>>> input
tensor([[[[ 1.,  2.],
          [ 3.,  4.]]]])

>>> m = nn.Upsample(scale_factor=2, mode='bilinear')  # align_corners=False
>>> m(input)
tensor([[[[ 1.0000,  1.2500,  1.7500,  2.0000],
          [ 1.5000,  1.7500,  2.2500,  2.5000],
          [ 2.5000,  2.7500,  3.2500,  3.5000],
          [ 3.0000,  3.2500,  3.7500,  4.0000]]]])

>>> m = nn.Upsample(scale_factor=2, mode='bilinear', align_corners=True)
>>> m(input)
tensor([[[[ 1.0000,  1.3333,  1.6667,  2.0000],
          [ 1.6667,  2.0000,  2.3333,  2.6667],
          [ 2.3333,  2.6667,  3.0000,  3.3333],
          [ 3.0000,  3.3333,  3.6667,  4.0000]]]])
と書かれています。cornerの値は、align_corners=Trueとalign_corners=Falseに違いがないような気がして、何がalignされているのか、私はよくわかりませんでした。
調べてみると、PyTorchのdiscussionに、以下の説明がありました。
When
align_corners=True, pixels are regarded as a grid of points. Points at the corners are aligned.When
align_corners=False, pixels are regarded as 1x1 areas. Area boundaries, rather than their centers, are aligned.
どうも元となる配列の値を、拡大した配列のどこに配置し補間するかが違いのようです。では、この図をもとに、Numpyを使って検証してみます。
検証
Numpyに直接bilinearを扱う関数がなかったので、PyTorch Upsample クラスのexamplesの左端の列を対象に、線形補間をする関数のnumpy.interpで、Upsampleの結果を再現します(下図)。

図1:PyTorch Upsample examplesで検証に利用する列。Upsamleクラスexamplesより抜粋。
align_corners=Trueの場合
align_cornersをTrueにすると、拡大配列の端の点と、元配列の端の点を合わせて、拡大配列の値を内挿します。

図2:align_corners=Trueの時の動作イメージ
numpy.interpを用いて、拡大配列を計算します。
import numpy as np
before = np.array([1, 3])
after = np.interp([0, 1, 2, 3], [0, 3], [before[0], before[1]])
print(after.reshape(4, 1))#見た目を合わせるためにreshape


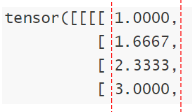
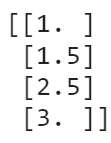
図3:numpy.interpでの計算結果。左:numpy.interp、右:PyTorch Upsample align_corners=True。
PyTorch Upsamle align_corners=Trueのexamplesと同じになりました。
align_corners=Falseの場合
align_cornersをFalseにすると、元配列の値を、拡大した配列の節に配置し、拡大配列の値を線形補間することになります。

図4: align_corners=Falseの時の動作イメージ
numpy.interpを用いて、拡大配列を計算します。align_corners=Trueでは、拡大配列での元配列の値の位置を[0, 3]しましたが、align_corners=Falseでは、[0.5, 2.5]となっています。
import numpy as np
before = np.array([1, 3])
after = np.interp([0, 1, 2, 3], [0.5, 2.5], [before[0], before[1]])
print(after.reshape(4, 1)) # 見た目を合わせるためにreshape


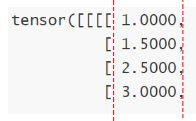
図5:numpy.interpでの計算結果。左:numpy.interp、右:PyTorch Upsample align_corners=False。
これも、PyTorch Upsample align_corners=False examplesと同じになりました。
なお、numpy.interpは、与えられた点の外では、境界の値を出力するようです。align_corners=Falseの例だと、与えられた点の外は、after[0]やafter[-1]に当たり、それぞれafter[0] = before[0](= 1.0)とafter[-1] = before[-1](=3.0)となります。計算結果が同じなので、PyTorch Upsampleも類似の操作をしているのでしょう。
最後に、numpy.interp を組み合わせたbilinearで、PyTorch Upsampleのexamplesの2x2→4x4拡大の再現をしてみます。
Numpy interpを使ってPyToch Upsample examplesを再現
align_corners=True
# align_corners=True
import numpy as np
column0 = np.interp([0, 1, 2, 3], [0, 3], [1, 3])
column3 = np.interp([0, 1, 2, 3], [0, 3], [2, 4])

row0 = np.interp([0,1,2,3], [0,3], [1,2])
row3 = np.interp([0,1,2,3], [0,3], [3,4])
row1 = np.interp([0,1,2,3], [0,3], [column0[1], column3[1]])
row2 = np.interp([0,1,2,3], [0,3], [column0[2], column3[2]])

align_corners_true = np.vstack([row0, row1, row2, row3])
print(align_corners_true)


図6:numpy.interpでのPyTorch Upsample align_corners=True examplesの拡大の再現。上段:numpy.interp、下段:PyTorch Upsample。
align_corner=False
# align_corners=False
import numpy as np
column0 = np.interp([0,1,2,3], [0.5, 2.5], [1,3])
column3 = np.interp([0,1,2,3], [0.5, 2.5], [2,4])

row0 = np.interp([0,1,2,3], [0.5, 2.5], [1,2])
row3 = np.interp([0,1,2,3], [0.5, 2.5], [3,4])
row1 = np.interp([0,1,2,3], [0.5, 2.5], [column0[1], column3[1]])
row2 = np.interp([0,1,2,3], [0.5, 2.5], [column0[2], column3[2]])

align_corners_false = np.vstack([row0, row1, row2, row3])
print(align_corners_false)

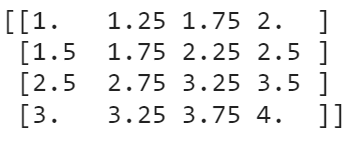
 図7: numpy.interpでのPyTorch Upsample align_corners=False examplesの拡大の再現。上段:numpy.interp、下段:PyTorch Upsample。
numpy.interpでPyTorchのdiscussion説明内容の操作を行って、PyTorch Upsampleクラスexamplesと同じ結果となることが確認できました。
参考
