これは何?
この頃流行りのFlutterに入門して、しょうもないアプリを作るまでの記録です。
ソースはGitHubに置いてます。
大したことはやってないです。
やったこと
まずは環境構築
- 公式からSDKをダウンロード
- 環境変数を通すなどする
- Android Studioも合わせてインストール
- 最初の起動時に作るプロジェクトは使わないので何でも良い
- FlutterとDartのプラグインを入れる
Dartにも入門する
- Language Tourをざっと読む
- https://www.dartlang.org/guides/language/language-tour
- この中にも出てくるDartPadがちょっと試し書きするのに便利
- 結構あるので、とりあえずImportant conceptsまで読んで、あとは必要なら見返すぐらいがちょうどよいかも
- 書かれたのは数年前ですが、日本語だと以下も参考になりました
サンプルのFlutterアプリを作る
- Android Studioから「Flutter Application」を選択する
- ちょっとしたサンプルコード付きのプロジェクトが作成される
- ちょっとしたサンプルコード付きのプロジェクトが作成される
- Emulatorを用意して起動
- AVD Managerから端末のVMを用意して起動する
- AVD Managerから端末のVMを用意して起動する
- とりあえずそのままmain.dartを起動してみる
- 最初は依存関係解決とかで少し時間かかるかも
- 下記のようなボタンの押された回数を数えるサンプルアプリが起動します

アプリを実装する
これもまあまあクソアプリですが、せっかくなので自分でも少し実装してみましょう。
最近家のネットが遅い気がするので、ネットワーク速度を可視化するアプリを作ってみます。
ざっとmain.dartを読むと、下記あたりをいじれば良さそうと推測されます。
class _MyHomePageState extends State<MyHomePage> {
  int _counter = 0;

  void _incrementCounter() {
    setState(() {
      // This call to setState tells the Flutter framework that something has
      // changed in this State, which causes it to rerun the build method below
      // so that the display can reflect the updated values. If we changed
      // _counter without calling setState(), then the build method would not be
      // called again, and so nothing would appear to happen.
      _counter++;
    });
  }

  @override
  Widget build(BuildContext context) {
    // This method is rerun every time setState is called, for instance as done
    // by the _incrementCounter method above.
    //
    // The Flutter framework has been optimized to make rerunning build methods
    // fast, so that you can just rebuild anything that needs updating rather
    // than having to individually change instances of widgets.
    return Scaffold(
      appBar: AppBar(
        // Here we take the value from the MyHomePage object that was created by
        // the App.build method, and use it to set our appbar title.
        title: Text(widget.title),
      ),
      body: Center(
        // Center is a layout widget. It takes a single child and positions it
        // in the middle of the parent.
        child: Column(
          // Column is also layout widget. It takes a list of children and
          // arranges them vertically. By default, it sizes itself to fit its
          // children horizontally, and tries to be as tall as its parent.
          //
          // Invoke "debug painting" (press "p" in the console, choose the
          // "Toggle Debug Paint" action from the Flutter Inspector in Android
          // Studio, or the "Toggle Debug Paint" command in Visual Studio Code)
          // to see the wireframe for each widget.
          //
          // Column has various properties to control how it sizes itself and
          // how it positions its children. Here we use mainAxisAlignment to
          // center the children vertically; the main axis here is the vertical
          // axis because Columns are vertical (the cross axis would be
          // horizontal).
          mainAxisAlignment: MainAxisAlignment.center,
          children: <Widget>[
            Text(
              'You have pushed the button this many times:',
            ),
            Text(
              '$_counter',
              style: Theme.of(context).textTheme.display1,
            ),
          ],
        ),
      ),
      floatingActionButton: FloatingActionButton(
        onPressed: _incrementCounter,
        tooltip: 'Increment',
        child: Icon(Icons.add),
      ), // This trailing comma makes auto-formatting nicer for build methods.
    );
  }
}
さて何となくいじる場所は分かりましたが、どうやって速度を測りましょう。
最初はdart_pingでpingを打とうかと思ったのですが、色々うまく行かなかったので、httpリクエストを投げてからレスポンスを受け取るまでの時間を測ることにしました。
まずはhttpパッケージを公式のインストール手順を参考に使えるようにします。
pubspec.yamlにhttpを追記します。
dependencies:
  flutter:
    sdk: flutter

  # The following adds the Cupertino Icons font to your application.
  # Use with the CupertinoIcons class for iOS style icons.
  cupertino_icons: ^0.1.2

  http: ^0.12.0+2
main.dartにimport文を追記します。
import 'package:flutter/material.dart';
import 'package:http/http.dart' as http;
とりあえずサンプルコードを真似てhttpRequestメソッドを作り、ボタン押下時に呼ばれるようにしてみます。
  void _httpRequest() async {
    var url = 'https://google.com';
    print('GET Request');
    var response = await http.get(url);
    print('Response status: ${response.statusCode}');
    print('Response body: ${response.body}');
  }
// (中略)
     floatingActionButton: FloatingActionButton(
        onPressed: _httpRequest,
        tooltip: 'HttpRequest',
        child: Icon(Icons.add),
      ), // This trailing comma makes auto-formatting nicer for build methods.
この状態でボタン押下すると、コンソールに以下のように表示されます。どうやら成功です。
I/flutter ( 6284): GET Request
I/flutter ( 6284): Response status: 200
I/flutter ( 6284): Response body: <!doctype html><html itemscope="" itemtype="http://schema.org/WebPage" lang="ja"><head><meta content="世界中のあらゆる情報を検索するためのツールを提供しています。さまざまな検索機能を活用して、お探しの情報を見つけてください。" name="description"><meta content="noodp" name="robots"><meta content="text/html; charset=UTF-8" http-equiv="Content-Type"><meta content="/images/branding/googleg/1x/googleg_standard_color_128dp.png" itemprop="image"><title>Google</title><script nonce="9Uc7k0J95W/+EhN3JyNLFw==">(function(){window.google={kEI:'xdiyXPrdD4u68QXUrIrIAw',kEXPI:'0,18168,1335579,108,1906,2423,546,151,528,590,140,224,756,819,30,1228,1893,
続いてhttpRequestメソッドを修正して、レスポンスまでの時間を計測するようにします。
class _MyHomePageState extends State<MyHomePage> {
  int _timeMsec = 0;

  void _httpRequest() async {
    var url = 'https://google.com';
    print('GET Request');
    // リクエスト投げる前の時間取得
    DateTime timeBeforeReq = new DateTime.now();
    await http.get(url);
    // レスポンス受けた後の時間取得
    DateTime timeAfterRes = new DateTime.now();
    int sinceEpochBeforeReq = timeBeforeReq.millisecondsSinceEpoch;
    int sinceEpochAfterRes = timeAfterRes.millisecondsSinceEpoch;
    setState(() {  // おそらく画面の更新のため、setStateでフィールドを変更する必要がある
      _timeMsec = sinceEpochAfterRes - sinceEpochBeforeReq;
    });
  }
//(中略)
            Text(
              '$_timeMsec(ms)',
              style: Theme.of(context).textTheme.display1,
            ),
こんな感じで計測できるようになりました。
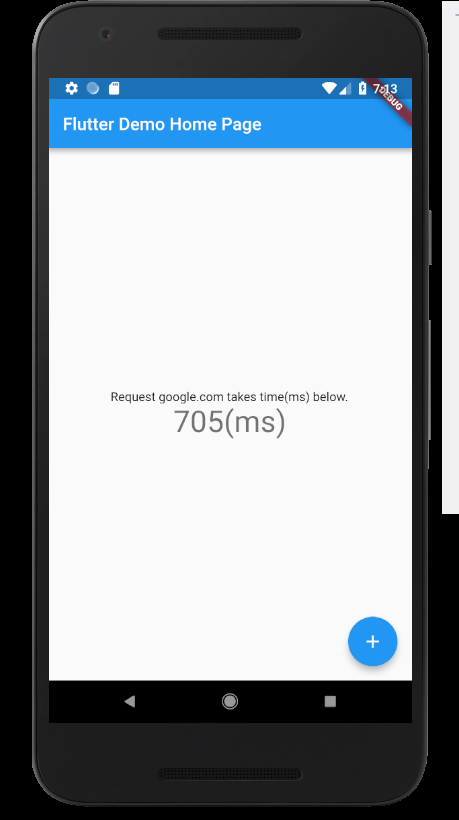
遅すぎワロタ。
少し改修
もしかしてgoogle.co.jpなら少し早くなるのでしょうか。
httpリクエストの送り先を画面から変更可能なように改修してみます。
まず、テキストフィールドとその処理を行うコントローラを追加します。
class _MyHomePageState extends State<MyHomePage> {
  int _timeMsec = 0;
  final myController = TextEditingController();

//(中略)
          children: <Widget>[
            TextField(
              controller: myController,
              decoration: InputDecoration(
                border: OutlineInputBorder(),
                labelText: "Request to",
                hintText: "https://google.com",
              ),
            ),
            Text(
              'Request ${myController.text} takes time(ms) below.',
            ),
            Text(
              '$_timeMsec(ms)',
              style: Theme.of(context).textTheme.display1,
            ),
          ],
そしてhttpRequestメソッドに引数を渡せるようにします。
  void _httpRequest(var url) async {
    print('GET Request');
    // リクエスト投げる前の時間取得
    DateTime timeBeforeReq = new DateTime.now();
    await http.get(url);
    // レスポンス受けた後の時間取得
    DateTime timeAfterRes = new DateTime.now();
    int sinceEpochBeforeReq = timeBeforeReq.millisecondsSinceEpoch;
    int sinceEpochAfterRes = timeAfterRes.millisecondsSinceEpoch;
    setState(() {  // おそらく画面の更新のため、setStateでフィールドを変更する必要がある
      _timeMsec = sinceEpochAfterRes - sinceEpochBeforeReq;
    });
  }

//(中略)

      floatingActionButton: FloatingActionButton(
        onPressed: () => _httpRequest(myController.text),
        tooltip: 'HttpRequest',
        child: Icon(Icons.add),
      ), // This trailing comma makes auto-formatting nicer for build methods.
これでアプリからリクエスト先を指定可能になったので、google.co.jpで試してみましょう。
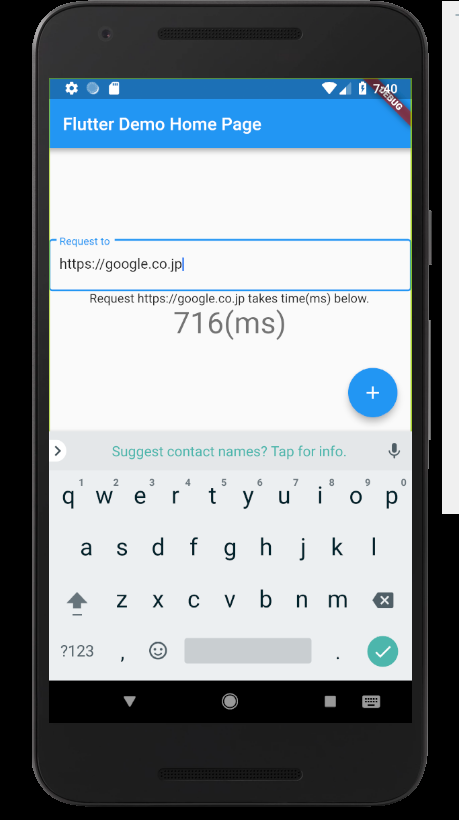
大して変わらないですね!
感想
- dartは書きやすい(Javaエンジニアの感想)
- 今回作ったのはクソアプリですが、まともなアプリも作れそうな気がした
- 今回Windows環境で開発したため、Androidでしか試しておらずクロスプラットフォームの利点は活かせていない
- ただ普通に考えてめっちゃ便利なんだろう
最後までお読みいただきありがとうございました。