はじめに
New RelicのMobile Agentは、正式にはUnityをサポートしてません。ただし、AndroidのSDKはあるので、それらを組み込んでみた方法の記録と結果です。
確認したバージョン
以下のバージョンで確認してます。バージョンが異なると、設定項目や方法が異なる可能性があります。
- Unity
- 2020.3.26f1
- New Relic Android Agent
- 6.9.0 (NativeCrashも組み込みます)
導入方法
UnityPlayerActivityのオーバーライド
NewRelicのAgentの初期化のため、Activityクラスに実装を追加する必要ので、デフォルトのUnityのActivityをオーバーライドしたクラスを作成。
※すでにオーバーライドしたクラスを作成済みの場合は、本ステップはスキップ。
- 「Assets/Plugins/Android/」のフォルダに、MyUnityPlayerActivity.javaを作成。
- 作成したファイルに以下のコードを貼り付け。
※パッケージ名(com.example.application)は、作成するアプリのパッケージ名に合わせて変更。
package com.example.application;

import com.unity3d.player.UnityPlayerActivity;
import android.os.Bundle;

public class MyUnityPlayerActivity extends UnityPlayerActivity {
  protected void onCreate(Bundle savedInstanceState) {

    //TODO add any code you want.

    // UnityPlayerActivity.onCreate() を呼び出す
    super.onCreate(savedInstanceState);
    // logcat にデバッグメッセージをプリントする
  }
}
Agentの初期化
- 前のステップで作成したActivityを開く
- importブロックに以下のimport文を追加
import com.newrelic.agent.android.NewRelic; - onCreate()の関数の先頭(UnityPlayerActivity.onCreate()を呼び返す前)に、以下の行を追加
//NativeCrashを有効にする
NewRelic.enableFeature(FeatureFlag.NativeReporting);
//Agentの初期化を行う
NewRelic.withApplicationToken("<GENERATED_TOKEN>").start(this.getApplicationContext());
* Tokenは、NewRelicから取得したTokenを設定。
* その他のオプション等は必要に応じて設定。
カスタムファイルの追加
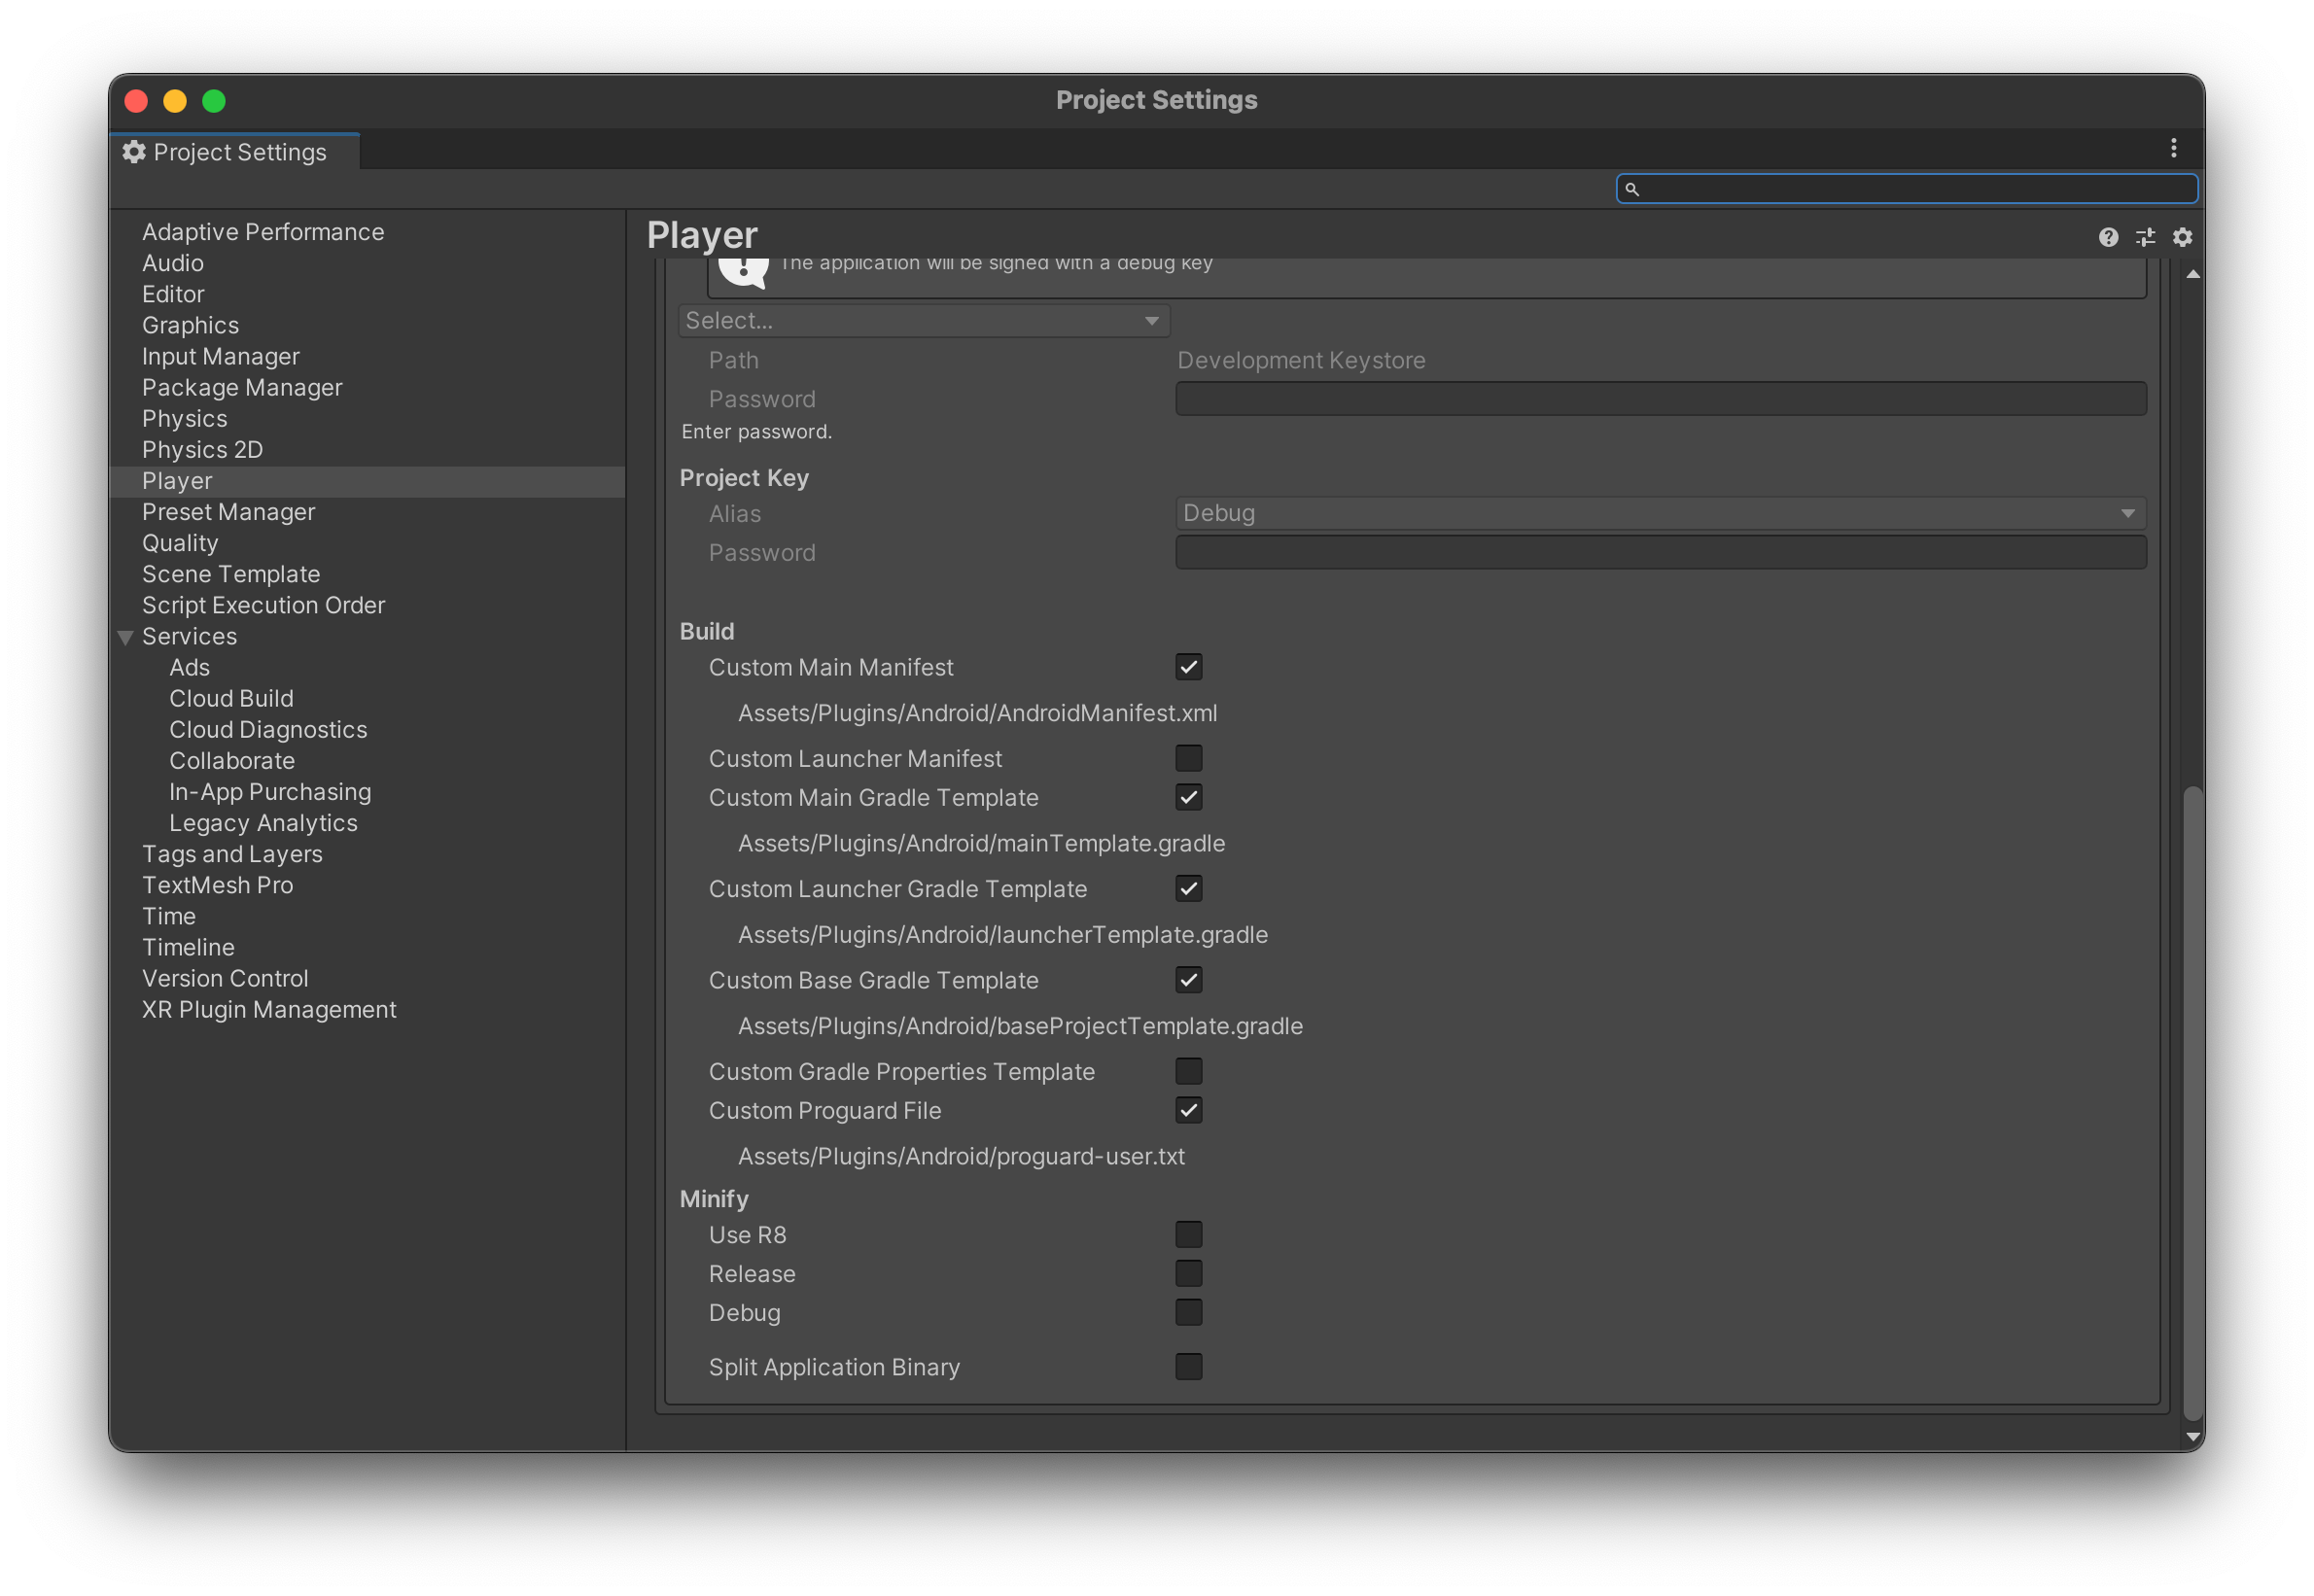
Gradleの設定やAndroidManifestの設定の変更を行うため、以下の手順でカスタムファイルの追加を行う。
- Unity Editor上で、AndroidのPlayer Settingsを開き、Buildのグループにある以下の項目にチックを入れる
AndroidManifest.xmlの編集
- Assets/Plugins/Android/AndroidManifest.xmlを開く
- 以下のように、permissionを追加し、起動Activityを最初のステップで作成したActivityに設定する(Activity名は作成したActivityのパッケージ名及びクラス名を利用)
<?xml version="1.0" encoding="utf-8"?>
<!-- GENERATED BY UNITY. REMOVE THIS COMMENT TO PREVENT OVERWRITING WHEN EXPORTING AGAIN-->
<manifest
    xmlns:android="http://schemas.android.com/apk/res/android"
    package="com.unity3d.player"
    xmlns:tools="http://schemas.android.com/tools">
    <!-- ここにpermission追加 -->
    <uses-permission android:name="android.permission.INTERNET" />
    <uses-permission android:name="android.permission.ACCESS_NETWORK_STATE" />

    <application>
        <!-- ここに起動Activity名を設定 -->
        <activity android:name="com.example.application.MyUnityPlayerActivity"
                  android:theme="@style/UnityThemeSelector">
            <intent-filter>
                <action android:name="android.intent.action.MAIN" />
                <category android:name="android.intent.category.LAUNCHER" />
            </intent-filter>
            <meta-data android:name="unityplayer.UnityActivity" android:value="true" />
        </activity>
    </application>
</manifest>
プロジェクトレベルのbuild.gradleの修正
導入手順にある、プロジェクトレベルのbuild.gradleへの修正の実施。
- Assets/Plugins/Android/baseProjectTemplate.gradleを開く
- 以下のように、手順の内容通りに追加
// GENERATED BY UNITY. REMOVE THIS COMMENT TO PREVENT OVERWRITING WHEN EXPORTING AGAIN
allprojects {
    buildscript {
        repositories {**ARTIFACTORYREPOSITORY**
            google()
            jcenter()

            //ここに mavenCentral を追加
            mavenCentral()
        }

        dependencies {
            // If you are changing the Android Gradle Plugin version, make sure it is compatible with the Gradle version preinstalled with Unity
            // See which Gradle version is preinstalled with Unity here https://docs.unity3d.com/Manual/android-gradle-overview.html
            // See official Gradle and Android Gradle Plugin compatibility table here https://developer.android.com/studio/releases/gradle-plugin#updating-gradle
            // To specify a custom Gradle version in Unity, go do "Preferences > External Tools", uncheck "Gradle Installed with Unity (recommended)" and specify a path to a custom Gradle version
            classpath 'com.android.tools.build:gradle:4.0.1'

            // NewRelcのプラグインを追加。バージョン番号x.x.xは、最新のバージョン番号を入れる
            classpath "com.newrelic.agent.android:agent-gradle-plugin:x.x.x"
            **BUILD_SCRIPT_DEPS**
        }
    }

//〜後略〜
アプリレベルのbuild.gradleの修正
導入手順にあるアプリレベルのbuild.gradleのへの修正の実施
- Assets/Plugins/Android/launcherTemplate.gradleを開く
- 以下のように、手順の内容通りに追加
// GENERATED BY UNITY. REMOVE THIS COMMENT TO PREVENT OVERWRITING WHEN EXPORTING AGAIN // リポジトリの追加 repositories { mavenCentral() } apply plugin: 'com.android.application' // NewRelicのプラグインの追加 apply plugin: 'newrelic' dependencies { implementation project(':unityLibrary') // NewRelcのAgentを追加。バージョン番号x.x.xは、最新のバージョン番号を入れる implementation 'com.newrelic.agent.android:android-agent:x.x.x' // Native CrashのAgentを追加 implementation 'com.newrelic.agent.android:agent-ndk:1.+' } android { compileSdkVersion **APIVERSION** buildToolsVersion '**BUILDTOOLS**' compileOptions { sourceCompatibility JavaVersion.VERSION_1_8 targetCompatibility JavaVersion.VERSION_1_8 } //〜後略〜 - Assets/Plugins/Android/mainTemplate.gradleを開く
- 以下のように、手順の内容通りに追加
// GENERATED BY UNITY. REMOVE THIS COMMENT TO PREVENT OVERWRITING WHEN EXPORTING AGAIN
// リポジトリの追加
repositories {
  mavenCentral()
}
apply plugin: 'com.android.library'
// NewRelicのプラグインの追加
apply plugin: 'newrelic'
**APPLY_PLUGINS**

dependencies {
    implementation fileTree(dir: 'libs', include: ['*.jar'])
    // NewRelcのAgentを追加。バージョン番号x.x.xは、最新のバージョン番号を入れる
    implementation 'com.newrelic.agent.android:android-agent:x.x.x'
**DEPS**}

android {
    compileSdkVersion **APIVERSION**
    buildToolsVersion '**BUILDTOOLS**'


//〜後略〜
proguardの設定
- Assets/Plugins/Android/proguard-user.txtを開く
- 以下のように、手順の内容通りに追加
-keep class com.newrelic.** { *; }
-dontwarn com.newrelic.**
-keepattributes Exceptions, Signature, InnerClasses, LineNumberTable
newrelic.propertiesの追加
Unityで、任意のpropertiesファイルを設定する方法がないので、GradleのTaskで動的に生成する
- Assets/Plugins/Android/baseProjectTemplate.gradleを再度開く
- 以下のように、ファイルの最後にプロパティファイルを作成するタスク(createNewrelicProperties)を追加する
task clean(type: Delete) {
    delete rootProject.buildDir
}

task createNewrelicProperties() {
   new File("${project(':launcher').projectDir}", "newrelic.properties").text =    "com.newrelic.application_token=<GENERATED_TOKEN>"
}
* Tokenは、NewRelicから取得したTokenを設定。
動作確認
簡単な動作確認では、アプリの起動やクラッシュは取れますが、http通信やインタラクションはそのままでは取れないようです。Unity上で、AndroidJavaClassやAndroidJavaObjectを使えばUnity側からAndroidのJavaのAPIを呼び出すことができるので、それらを使ってNewRelicのAPIを呼び出すことで、http通信の結果を記録することはできるのではないかと思われます。
参照
Unity
エクスポートされた Gradle プロジェクトの構造@Unity
Gradeでのファイル作成方法
NewRelic
