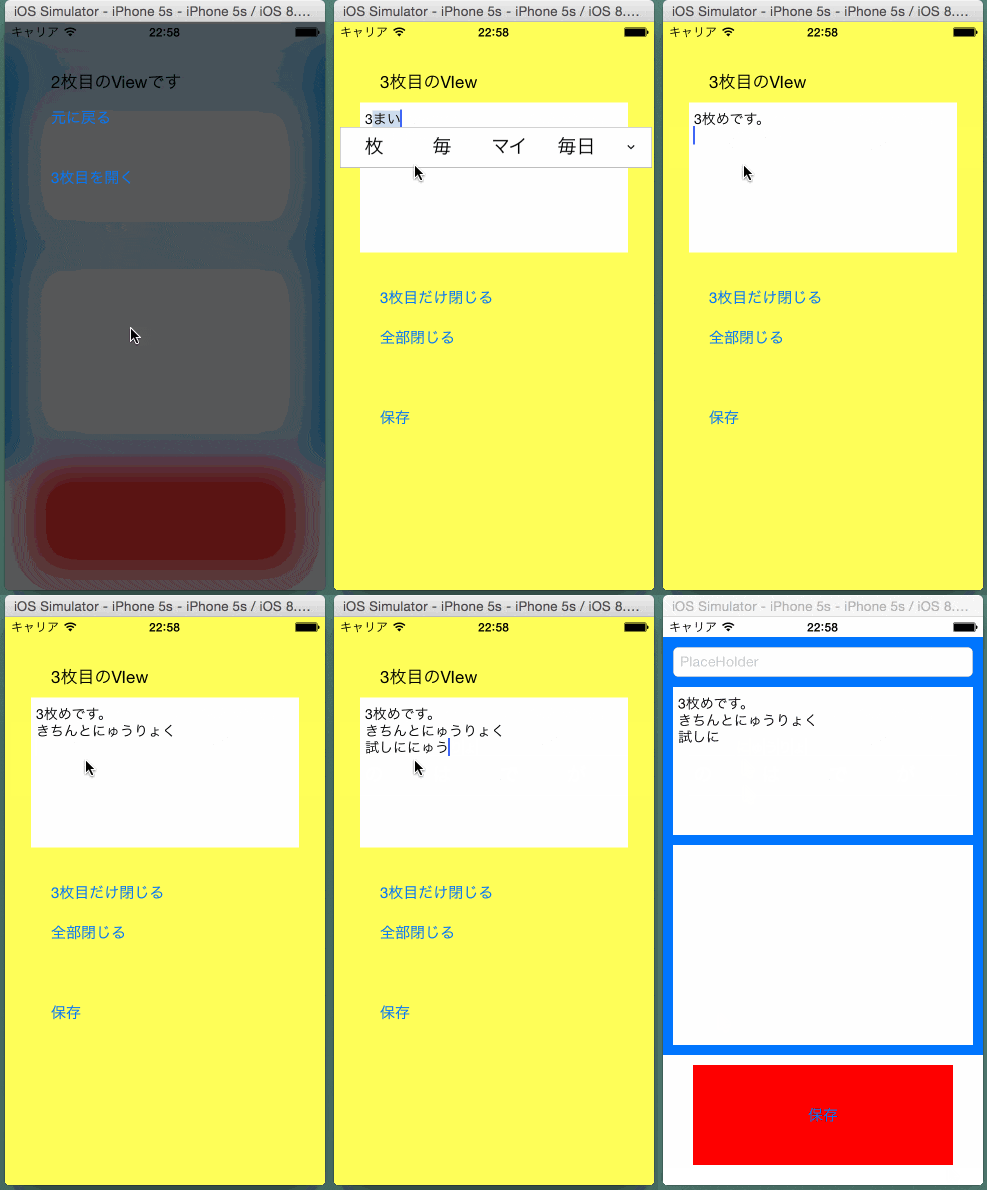
iPhone アプリでモーダルウィンドウから更に別なモーダルウィンドウを呼び出して処理をすることがあります。また、モーダルウィンドウのレイアウトは Storyboard で設定しておきたいこともあります。
- モーダルウィンドウを表示
- モーダルウィンドウを重ねて表示
- モーダルウィンドウを閉じる(1枚ずつ、全部)
- 表示するモーダルウィンドウを透過(磨りガラス風)
- モーダルウィンドウで値の受け渡し(delegate:デリゲート)
画面
完成画面
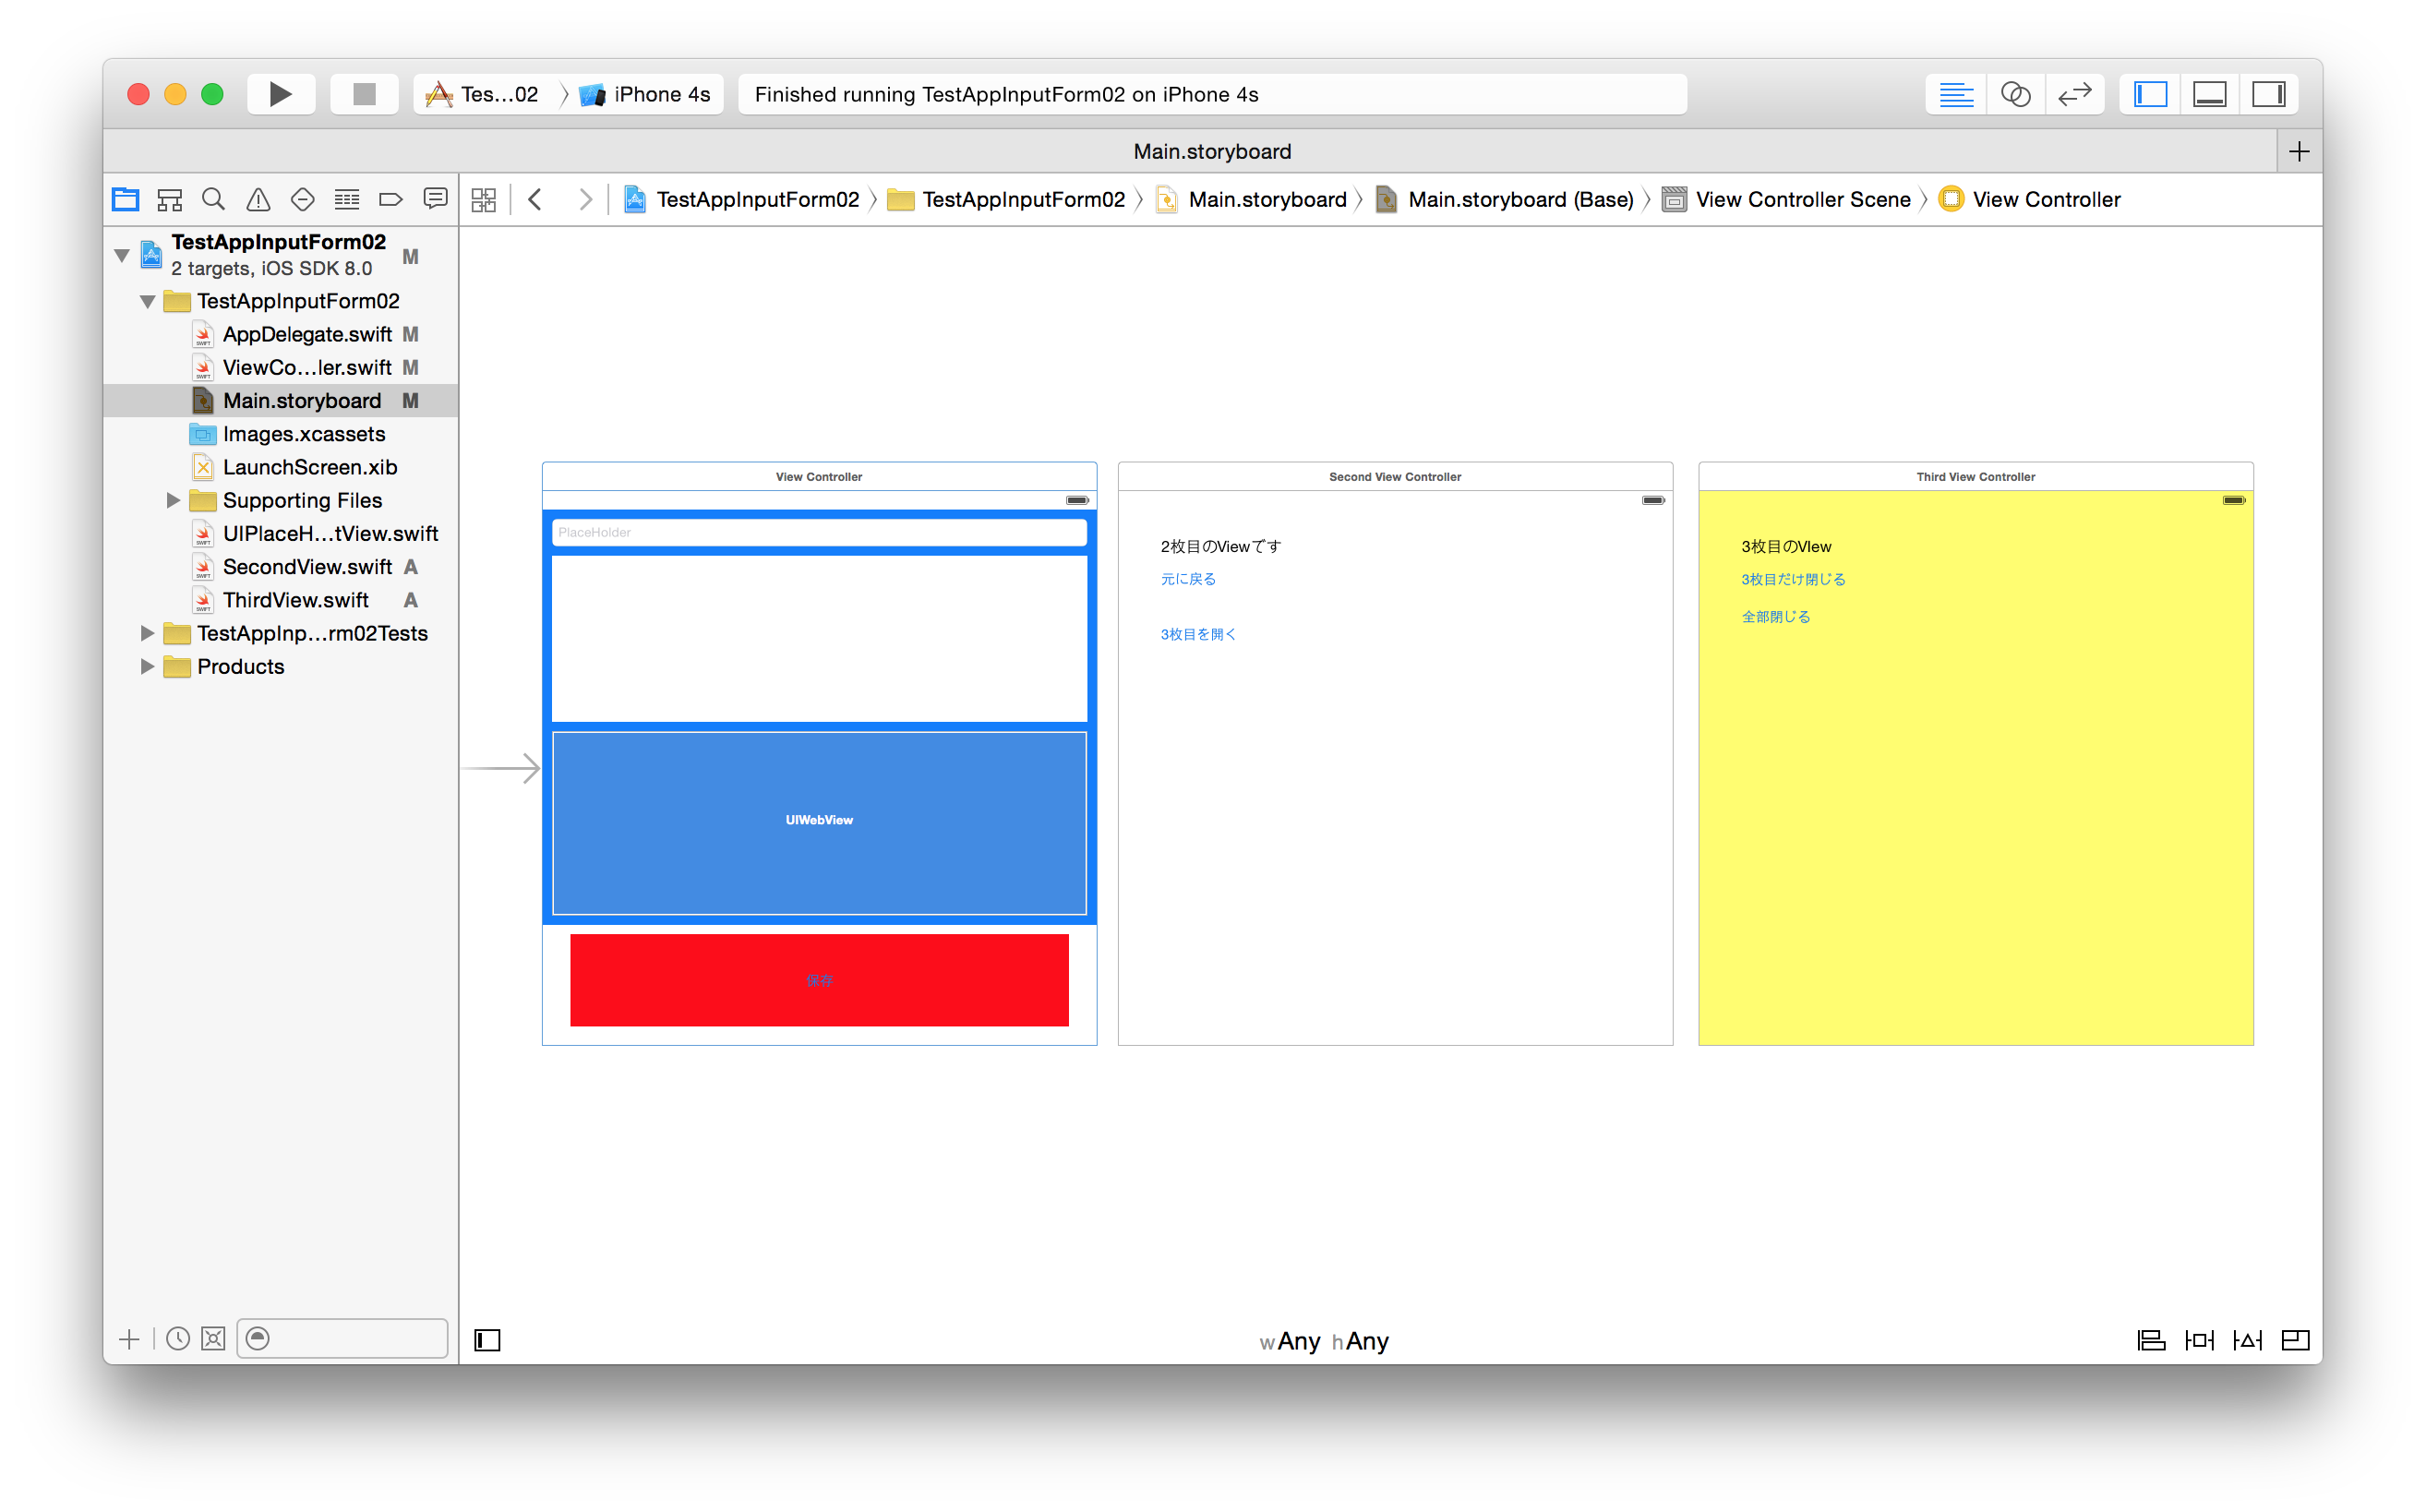
Xcode のStoryboard
モーダルウィンドウを表示
presentViewController を利用
Storyboard で設定することもできますが、presentViewController を利用してモーダルウィンドウを作ることができます。
presentViewController で呼び出す UIViewController は、Storyboardでレイアウトすることができます。なので、AutoLayout も利用可能です。
// storyboard で設定したViewを呼び出します
// - idで「second」を指定しています
// - SecondViewController というclassを別で作っています
var secondView:SecondViewController = self.storyboard!.instantiateViewControllerWithIdentifier("second") as SecondViewController

// 透過などが有効になるように設定
secondView.modalPresentationStyle = UIModalPresentationStyle.OverFullScreen

// モーダルウィンドウを呼び出します
self.presentViewController(secondView as UIViewController, animated: true, completion:nil)
モーダルウィンドウを重ねて表示
上記の方法を繰り返すと、表示したモーダルの上に、モーダルウィンドウを表示することができます。例えば下記の様なときに有効です
- 入力の選択肢をView表示(1枚目)
- 選んだ選択肢での処理を行うViewを表示(2枚目)
表示するモーダルウィンドウを透過
iOS7 からの表現で、下のウィンドウが透けて見えるやつです。重なっていることも利用者に伝えやすいと思います。
- 呼び出し側のViewで、呼び出すView(モーダルウィンドウ)の modalPresentationStyle 下記のような設定をします
- 呼び出されるView(モーダルウィンドウ)では、UIVisualEffectView を利用します
- UIVisualEffectViewはViewの一種なので(であっているかな?)、sendSubviewToBackします
secondView.modalPresentationStyle = UIModalPresentationStyle.OverFullScreen
//  SecondView.swift
//  TestAppInputForm02

import UIKit

class SecondViewController: UIViewController {

  override func viewDidLoad() {
    super.viewDidLoad()

    let visualEffectView = UIVisualEffectView(effect: UIBlurEffect(style: UIBlurEffectStyle.Dark))
    visualEffectView.frame = self.view.bounds
    self.view.backgroundColor = UIColor.clearColor()
    self.view.addSubview(visualEffectView)
    self.view.sendSubviewToBack(visualEffectView)

    // 以下略
  }

}
モーダルウィンドウを閉じる
閉じ方は2つあります。
1枚閉じる
dismissViewControllerAnimated を使う
import UIKit

class SecondViewController: UIViewController {

  @IBOutlet weak var BackButton: UIButton!

  override func viewDidLoad() {
    super.viewDidLoad()
    // 戻る(閉じる)ボタン
    BackButton.addTarget(self, action: "backToMain:", forControlEvents: .TouchUpInside)
  }

  override func didReceiveMemoryWarning() {
    super.didReceiveMemoryWarning()
  }

  func backToMain(sender: AnyObject?) {
    self.dismissViewControllerAnimated(true, completion: nil);
  }
}
全部閉じる
モーダルウィンドウは数枚重ねることもあります(例:投稿ボタンを押したら、投稿の種類を選ぶボタンがあり、どれかのボタンを押したら投稿用のウィンドウが出てくる)。この時に、2回目のView(例でいうと投稿用のウィンドウ)から一番最初のViewに戻りたい or 保存などの処理をしたい時です
rootViewController を利用して閉じる
class ThirdViewController: UIViewController {
  @IBOutlet weak var AllCloseButton: UIButton!

  override func viewDidLoad() {
    super.viewDidLoad()

    // ボタンの設定
    AllCloseButton.addTarget(self, action: "allClose:", forControlEvents: .TouchUpInside)
  }

  override func didReceiveMemoryWarning() {
    super.didReceiveMemoryWarning()
  }

  func allClose(sender: AnyObject?) {
  UIApplication.sharedApplication().keyWindow.rootViewController?.dismissViewControllerAnimated(true, completion: nil)
  }
}
モーダルウィンドウで値の受け渡し
delegate(デリゲート:委譲)を使います。
値の流れは
- モーダルウィンドウ(呼び出されたウィンドウ、View)
- モーダルウィンドウを呼び出したView(rootview、実際の処理をする)
となります。
モーダルウィンドウにdelegateを書く
- protocolを設定
- delegateのviewを設定
import UIKit

@objc protocol ModalViewDelegate {
  func saveText(textdata:String)
}

class ThirdViewController: UIViewController {

  var delegate:ModalViewDelegate! = nil

  @IBOutlet weak var InputTextThird: UIPlaceHolderTextView!
  @IBOutlet weak var SaveButton: UIButton!

  override func viewDidLoad() {
    super.viewDidLoad()

    // ボタンの設定
    SaveButton.addTarget(self, action: "saveSubmit:", forControlEvents: .TouchUpInside)

    // rootViewからdelegate を設定する
    var rootView  = UIApplication.sharedApplication().keyWindow.rootViewController as ViewController
    self.delegate = rootView
  }

  func allClose(sender: AnyObject?) {
    UIApplication.sharedApplication().keyWindow.rootViewController?.dismissViewControllerAnimated(true, completion: nil)
  }

  func saveSubmit(sender: AnyObject?) {

    var inputText:String = InputTextThird.text
    self.delegate.saveText(inputText)

    // 閉じる
    self.allClose(sender)
  }
}
受け取り側に実際の処理を書く
- delegate を書いておく
- delegate の処理を書く
import UIKit

class ViewController: UIViewController, ModalViewDelegate{

  override func viewDidLoad() {
    super.viewDidLoad()
  }

  func saveText(textdata:String){
    ImutView.text = textdata
  }
}
ファイル
呼び出し元
import UIKit

class ViewController: UIViewController, ModalViewDelegate{

  @IBOutlet weak var TestWebView: UIWebView!
  @IBOutlet weak var ImutView: UIPlaceHolderTextView!
  @IBOutlet weak var SaveButton: UIButton!


  override func viewDidLoad() {
    super.viewDidLoad()

    // TextViewの設定
    ImutView.placeHolder = "本文です。"
    ImutView.placeHolderColor = UIColor(red: 255, green: 0, blue: 0, alpha: 0.5)

    // ボタンの設定
    SaveButton.addTarget(self, action: "click:", forControlEvents: .TouchUpInside)
  }

  override func didReceiveMemoryWarning() {
    super.didReceiveMemoryWarning()
  }

  func click(sender: AnyObject?) {
    var secondView:SecondViewController = self.storyboard!.instantiateViewControllerWithIdentifier("second") as SecondViewController

    secondView.modalPresentationStyle = UIModalPresentationStyle.OverFullScreen

    self.presentViewController(secondView as UIViewController, animated: true, completion:nil)
  }

  func saveText(textdata:String){
    ImutView.text = textdata
  }
}
呼び出されるUIView:1
import UIKit

class SecondViewController: UIViewController {

  @IBOutlet weak var BackButton: UIButton!
  @IBOutlet weak var ToThirdViewBbutton: UIButton!

  override func viewDidLoad() {
    super.viewDidLoad()

    let visualEffectView = UIVisualEffectView(effect: UIBlurEffect(style: UIBlurEffectStyle.Dark))
    visualEffectView.frame = self.view.bounds
    self.view.backgroundColor = UIColor.clearColor()
    self.view.addSubview(visualEffectView)
    self.view.sendSubviewToBack(visualEffectView)

    BackButton.addTarget(self, action: "backToMain:", forControlEvents: .TouchUpInside)
    ToThirdViewBbutton.addTarget(self, action: "toThird:", forControlEvents: .TouchUpInside)
  }

  override func didReceiveMemoryWarning() {
    super.didReceiveMemoryWarning()
  }

  func backToMain(sender: AnyObject?) {
    self.dismissViewControllerAnimated(true, completion: nil);
  }

  func toThird(sender: AnyObject?) {
    var thirdView:AnyObject! = self.storyboard?.instantiateViewControllerWithIdentifier("third")
    self.presentViewController(thirdView as UIViewController, animated: true, completion:nil)
  }
}
呼び出されるUIView:2
- UIPlaceHolderTextViewは「UITextViewでのPlaceHolder(プレースホルダ)をSwiftで実装する方法」で実装しています。
import UIKit

@objc protocol ModalViewDelegate {
  func saveText(textdata:String)
}

class ThirdViewController: UIViewController {

  var delegate:ModalViewDelegate! = nil

  @IBOutlet weak var ThisCloseButton: UIButton!
  @IBOutlet weak var AllCloseButton: UIButton!
  @IBOutlet weak var InputTextThird: UIPlaceHolderTextView!
  @IBOutlet weak var SaveButton: UIButton!

  override func viewDidLoad() {
    super.viewDidLoad()

    // TextViewの設定
    InputTextThird.placeHolder = "3枚目のViewです。ここに本文を書き、1枚目に送ります"

    // ボタンの設定
    ThisCloseButton.addTarget(self, action: "backToMain:", forControlEvents: .TouchUpInside)
    AllCloseButton.addTarget(self, action: "allClose:", forControlEvents: .TouchUpInside)
    SaveButton.addTarget(self, action: "saveSubmit:", forControlEvents: .TouchUpInside)

    // rootViewからdelegate を設定する
    var rootView  = UIApplication.sharedApplication().keyWindow.rootViewController as ViewController
    self.delegate = rootView
  }

  override func didReceiveMemoryWarning() {
    super.didReceiveMemoryWarning()
  }

  func backToMain(sender: AnyObject?) {
    self.dismissViewControllerAnimated(true, completion: nil);
  }

  func allClose(sender: AnyObject?) {
    UIApplication.sharedApplication().keyWindow.rootViewController?.dismissViewControllerAnimated(true, completion: nil)
  }

  func saveSubmit(sender: AnyObject?) {

    var inputText:String = InputTextThird.text
    self.delegate.saveText(inputText)

    // 閉じる
    self.allClose(sender)
  }
}
開発環境
- Xcode 6.0(6A313)
- iOS 8

