はじめに
本記事では、BedrockとPollyを軸にシャドーイングアプリを作成した際の備忘録です。
個人で使用することを想定したアプリであるため、セキュリティ面はあまり考慮していませんのでご了承ください。
アプリの概要
-
Bedrock先生にシャドーイング用の英文テキストを生成してもらう


-
生成してもらった英文テキストをPolly先生が音声データに変換してもらう

-
音声データを使ってシャドーイング!
全体アーキテクチャ図
以下に、本アプリの全体アーキテクチャ図を示します。
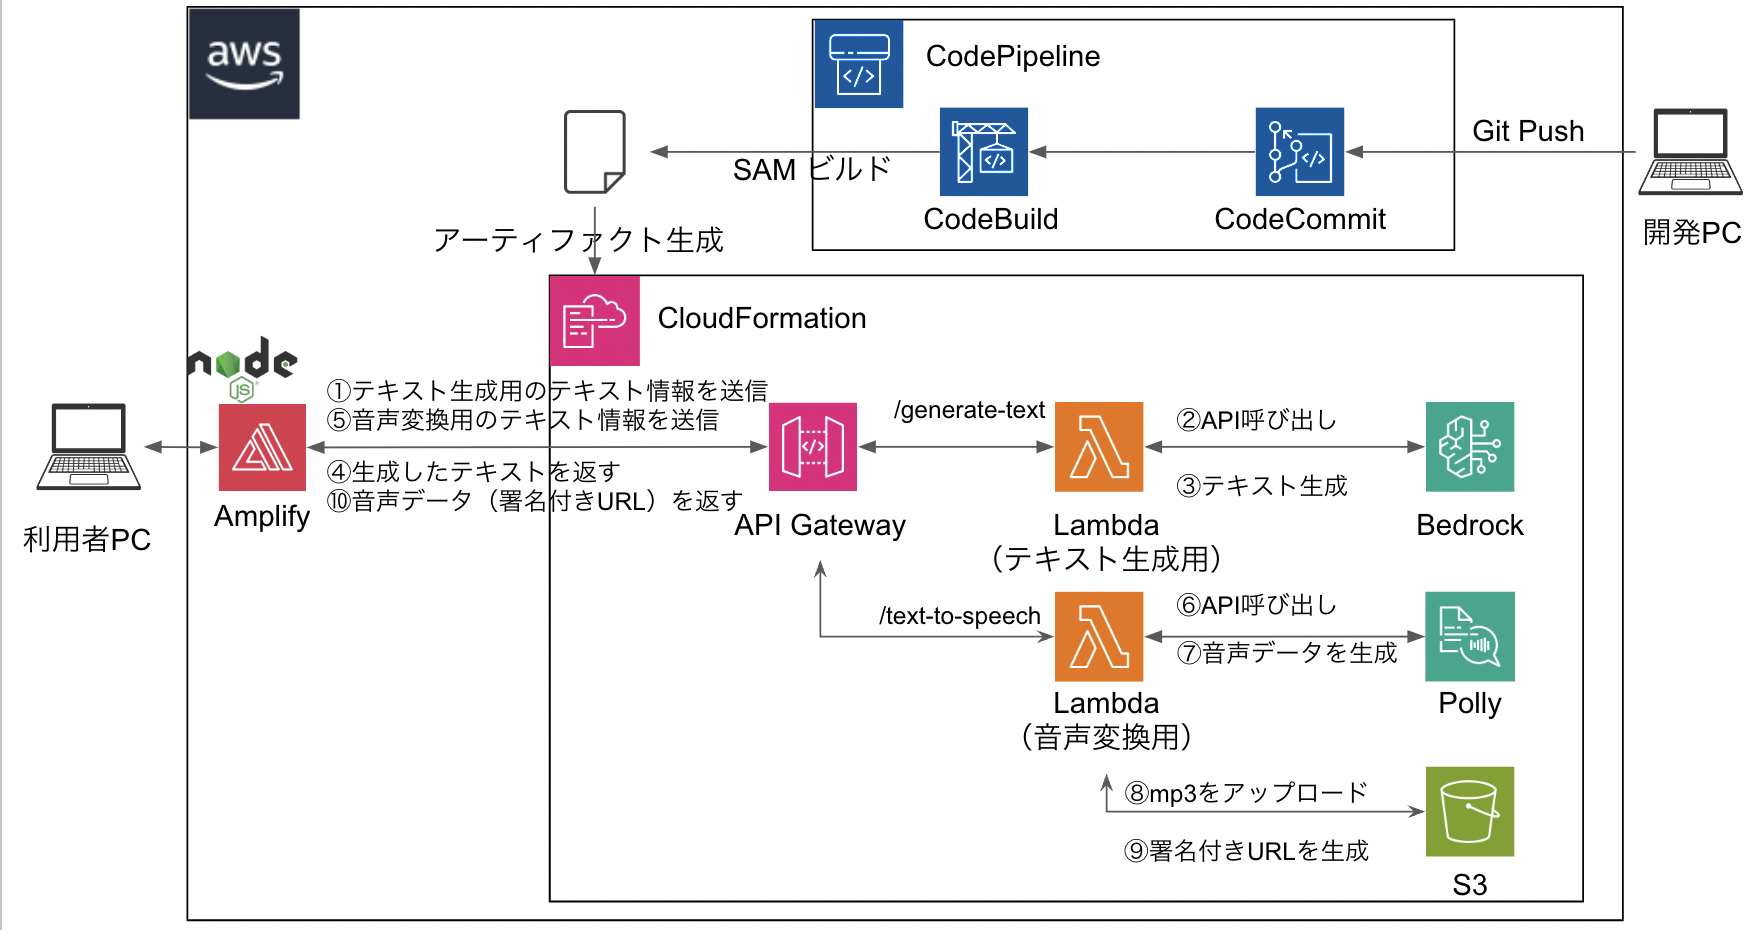
※今回は学習も兼ねてCloudFormationやCode系のサービスを使用していますが、実装しなくても問題ありません。本記事のメインどころはLambda、Bedrock、Pollyです。
実装手順
本記事ではIaC化せず、コンソール上で設定する手順を紹介します
- Bedrockで使用するモデルのアクセスのリクエストを行います
- 適切な権限を付与したIAMロールを作成
- Lambda用
- API Gateway用
- Lambdaを作成
- 英文テキスト生成ためのLambdaを作成します
- 英文テキストを音声に変換するためのLambdaを作成します
- API Gatewayを作成
- フロント部分を作成
Bedrock
今回使用するモデルは、話題の「Claude 3.5」です
「Claude 3.5」は東京リージョン未対応のため、バージニア北部で実装します。
- モデルアクセスの画面へ移動
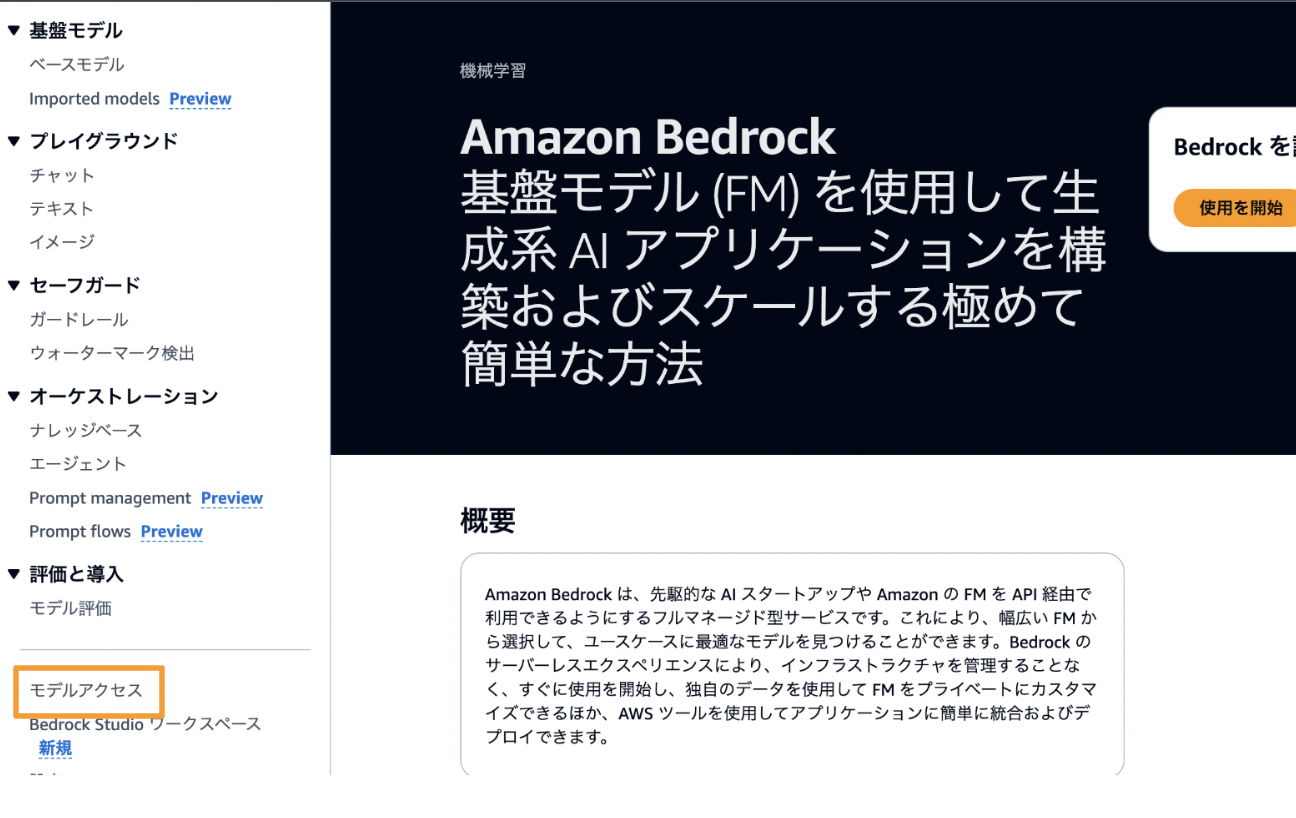
- オレンジ枠部分をクリックし、「Claude 3.5 Sonnet」を選択肢、アクセスリクエストを行ってください

※筆者はすでにアクセスリクエスト済みであるため、表示画面が若干異なっています

3. 以上でBedrockの設定は完了です
IAMロール
IAMロールについては本記事の趣旨ではないため、割愛します。
Lambdaの作成
- 英文テキスト生成用のLambdaを作成します
import boto3
import json

MODEL_ID = "anthropic.claude-3-5-sonnet-20240620-v1:0"
# 明示的にバージニア北部を指定する
bedrock = boto3.client("bedrock-runtime", region_name="us-east-1")
accept = "application/json"
contentType = "application/json"

def generate_text(text):
    body = json.dumps(
        {
            "anthropic_version": "bedrock-2023-05-31",
            "max_tokens": 1000,
            "messages": [
                {
                    "role": "user",
                    "content": text,
                }
            ],
        }
    )
    response = bedrock.invoke_model(
        body=body, modelId=MODEL_ID, accept=accept, contentType=contentType
    )

    response_body = json.loads(response.get("body").read())
    answer = response_body["content"][0]["text"]

    return answer

def main(event, context):
    # API Gatewayからのイベントボディからテキストと追加のパラメータを取得
    body = event.get('body')
    data = json.loads(body)
    # textフィールドの値を取得
    text_data = data.get('text')

    print('[info]:テキスト生成を開始します')
    generative_text = generate_text(text_data)
    print('[info]:テキストを生成しました')

    print(generative_text)
    # レスポンスを作成して返す
    return {
        'statusCode': 200,
        'body': json.dumps({"generative_text": generative_text}, ensure_ascii=False),
        'headers': {
            'Content-Type': 'application/json',
            'Access-Control-Allow-Origin': '*'  # CORS対応
        }
    }
- 英文テキストを音声データに変換する用のLambdaを作成します
なお、変換した音声データをWebアプリから呼び出すためにS3へ保存し、署名付きURLを生成しています
import boto3
import json
from datetime import datetime

def text_to_speach(text, language_code, voice_id):
    # Pollyクライアントをバージニア北部のリージョンで作成
    polly_client = boto3.client('polly', region_name='us-east-1')
    # テキストを音声に変換
    response = polly_client.synthesize_speech(
        Engine='generative',
        LanguageCode=language_code,
        Text=text,
        OutputFormat='mp3',
        VoiceId=voice_id
    )

    return response

def upload_to_s3(response_data):
    # S3に保存するためのS3クライアントを東京リージョンで作成
    s3_client = boto3.client('s3', region_name='ap-northeast-1')
    bucket_name = 'shaowing-app-bucket-20240706'

    timestamp = datetime.now().strftime("%Y%m%d%H%M%S")
    s3_key = f'output_{timestamp}.mp3'

    # 音声ファイルをS3にアップロード
    s3_client.upload_fileobj(response_data['AudioStream'], bucket_name, s3_key)

    # 生成したS3オブジェクトの署名付きURLを取得(有効期限を1時間に設定)
    url = s3_client.generate_presigned_url(
        ClientMethod='get_object',
        Params={'Bucket': bucket_name, 'Key': s3_key},
        ExpiresIn=3600  # 有効期限(秒単位)
    )
    return url

def main(event, context):
    # API Gatewayからのイベントボディからテキストと追加のパラメータを取得
    body = event.get('body')
    data = json.loads(body)
    # textフィールドの値を取得
    text_data = data.get('text')
    language_code = data.get('language')
    voice_id = data.get('voice')

    print('[info]:音声変換処理を開始します')
    audio_data = text_to_speach(text_data, language_code, voice_id)
    print('[info]:音声変換処理が完了しました')
    print(f'{audio_data}')


    print(f'[info]:音声データをS3バケットへ保存します')
    url = upload_to_s3(audio_data)
    print(f'[info]:音声データの保存が完了しました')

    # レスポンスを作成して返す
    return {
        'statusCode': 200,
        'body': json.dumps({'url': url}),
        'headers': {
            'Content-Type': 'application/json',
            'Access-Control-Allow-Origin': '*'  # CORS対応
        }
    }
API Gatewayの作成
-
「APIを作成」をクリックします

-
REST API -> 「インポート」を選択

3. 以下のコードを貼り付けて「APIを作成」をクリック
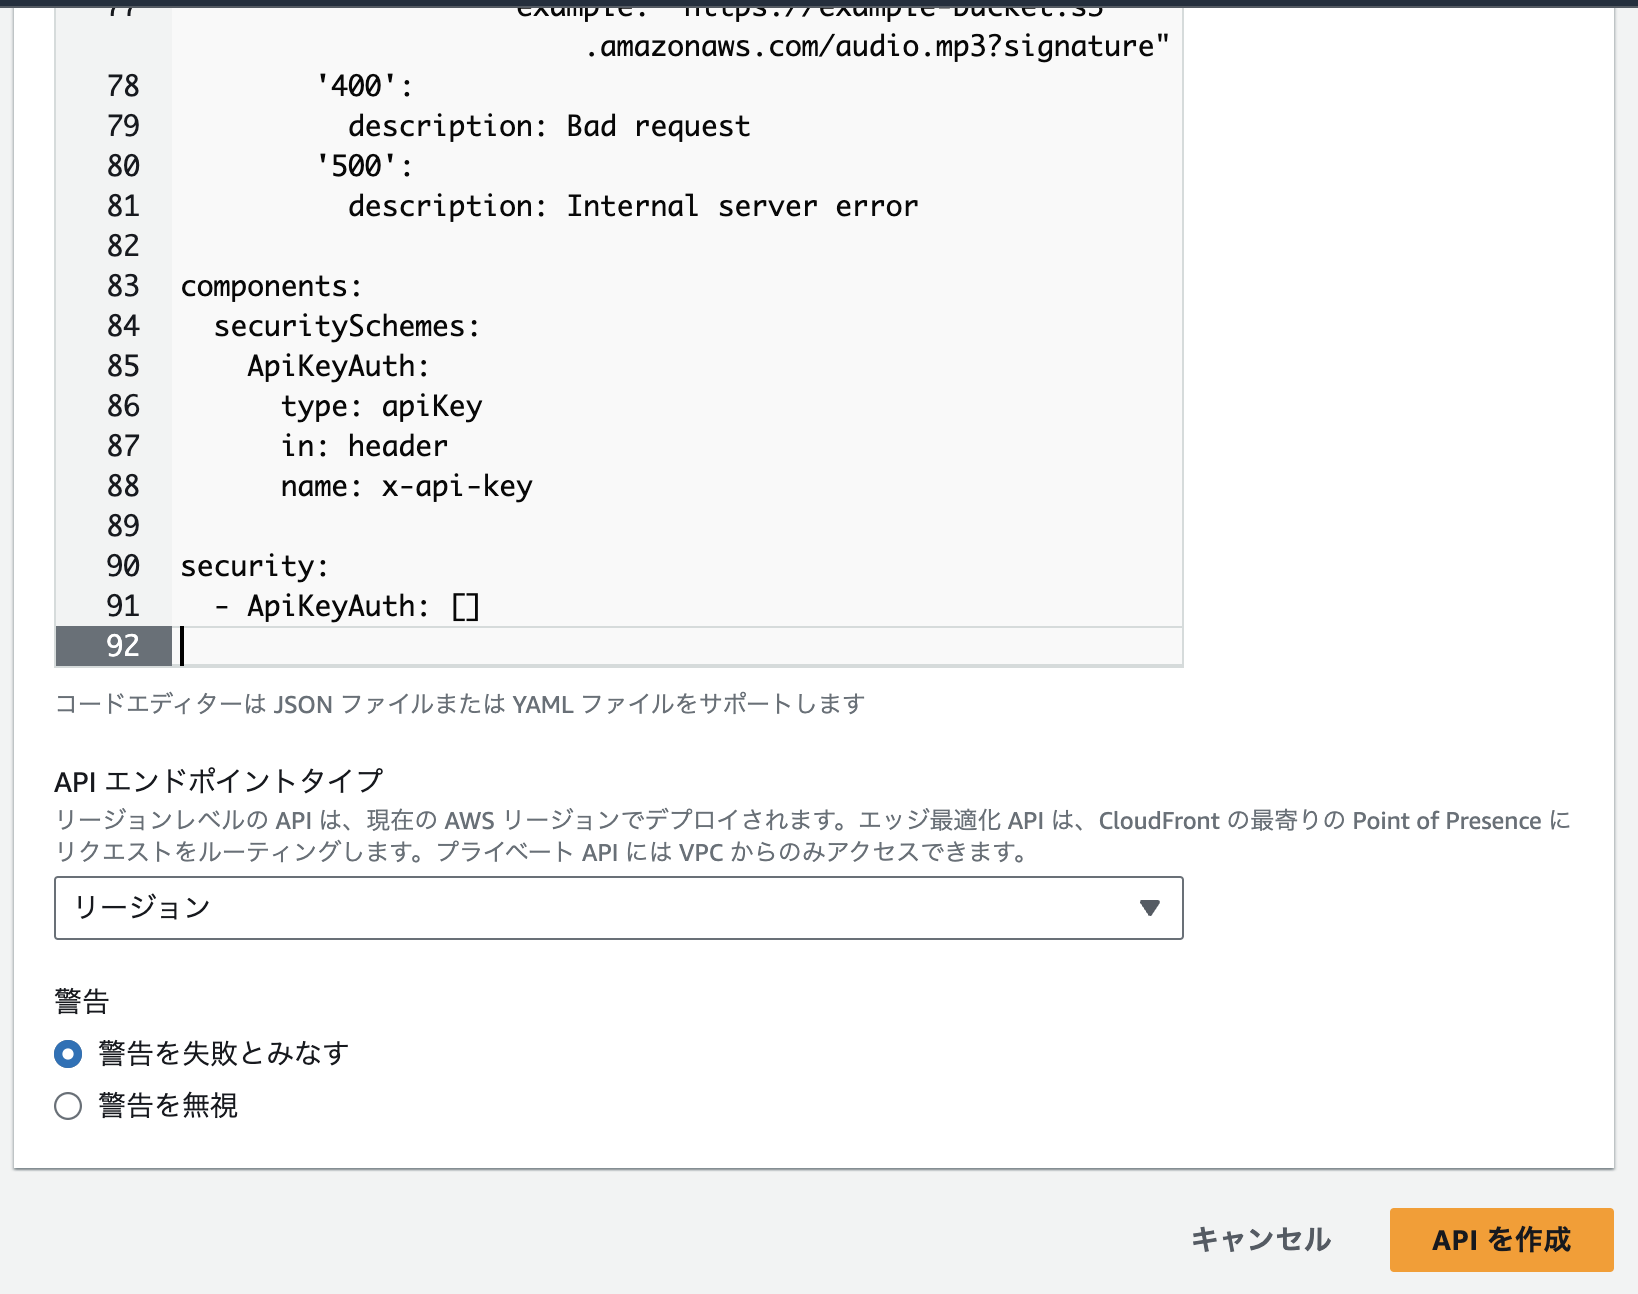
openapi: 3.0.0
info:
  title: Shadowing App API
  description: This API is for Shadowing practice
  version: 1.0.0
servers:
  - url: https://{api_id}.execute-api.{region}.amazonaws.com/prod
    variables:
      api_id:
        default: your-api-id
      region:
        default: your-region

paths:
  /v1/generate-text:
    post:
      summary: Generate text for shadowing practice
      operationId: postGenerateText
      requestBody:
        description: Text generation request
        required: true
        content:
          application/json:
            schema:
              type: object
              properties:
                inputText:
                  type: string
                  example: "This is an example text"
      responses:
        '200':
          description: Text generation successful
          content:
            application/json:
              schema:
                type: object
                properties:
                  generatedText:
                    type: string
                    example: "Generated text response"
        '400':
          description: Bad request
        '500':
          description: Internal server error

  /v1/text-to-speech:
    post:
      summary: Convert text to speech
      operationId: postTextToSpeech
      requestBody:
        description: Text-to-speech request
        required: true
        content:
          application/json:
            schema:
              type: object
              properties:
                text:
                  type: string
                  example: "This is an example text"
                voice:
                  type: string
                  example: "Joanna"
                language:
                  type: string
                  example: "en-US"
      responses:
        '200':
          description: Text-to-speech conversion successful
          content:
            application/json:
              schema:
                type: object
                properties:
                  audioUrl:
                    type: string
                    example: "https://example-bucket.s3.amazonaws.com/audio.mp3?signature"
        '400':
          description: Bad request
        '500':
          description: Internal server error

components:
  securitySchemes:
    ApiKeyAuth:
      type: apiKey
      in: header
      name: x-api-key

security:
  - ApiKeyAuth: []
- 「統合を編集」をクリックします

5. 先ほど作成したLambda(英文テキスト生成用のLambda)とAPI Gateway用のIAMロールを設定します

- 「v1/text-to-speach」の方でも同様に設定します
7. 今回は個人用のため、APIキーの設定は行いませんが、必要に応じてAPIキーの使用有無を設定ください
フロント部分の作成
本記事では、Node.jsを使用してフロント部分を作成しました。
アーキテクチャ図ではAmplifyを実装していますが、ローカルで動作させても問題ありません
また、Web画面を作成するためのコードは本記事の趣旨ではないため、割愛します。
まとめ
BedrockとPollyを使用することで簡単にシャドーイング用のアプリを開発することができます。
備忘録として記載した記事であるため、イけてない箇所や割愛した箇所が多くございます。
もし気になることなどがあればコメントいただけると幸いです。