⭐️⭐️⭐️ GitHubスター70個突破!ありがとうございます😊 ⭐️⭐️⭐️
きっかけ
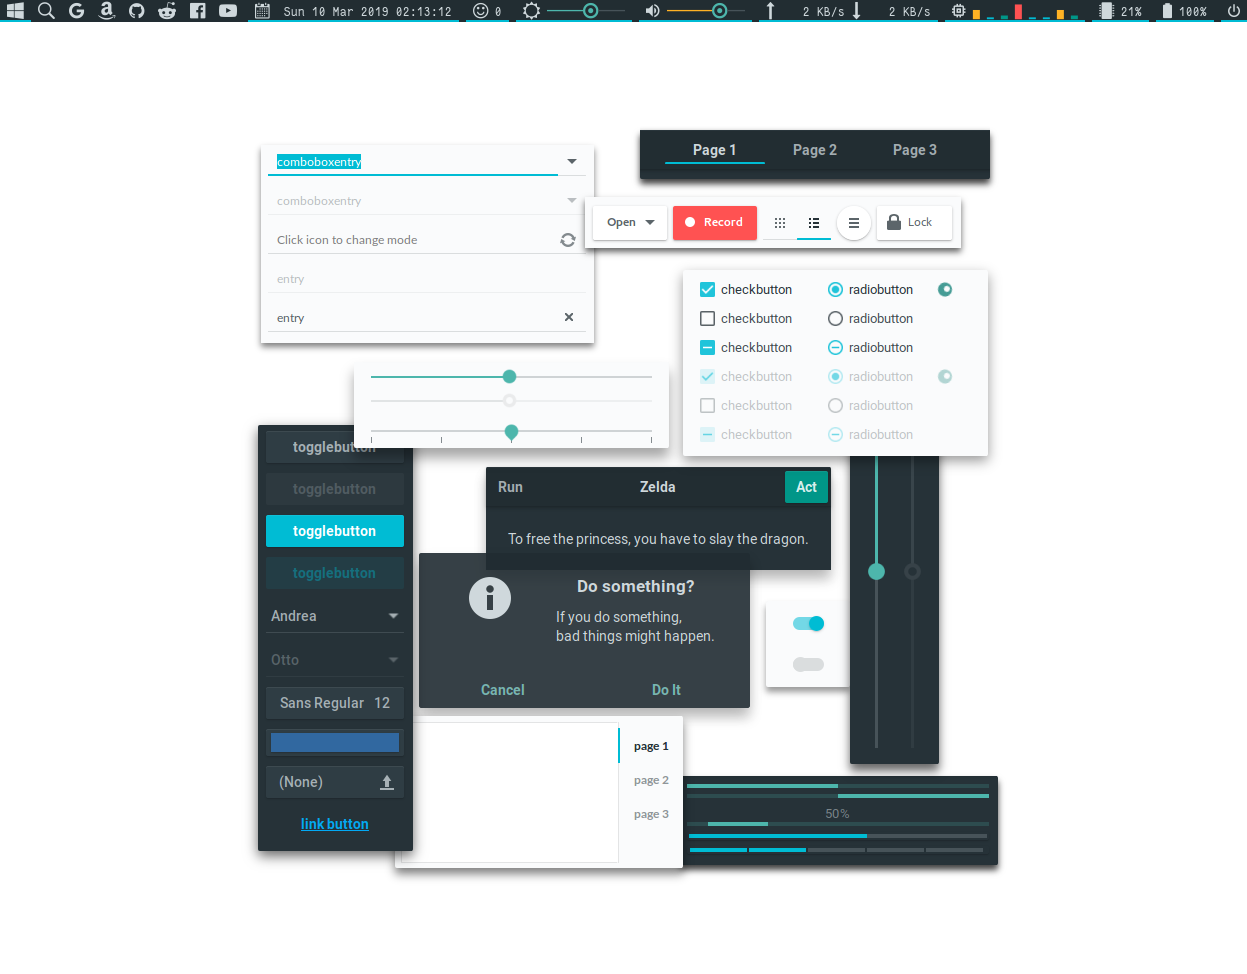
GTK+のテーマであるAdapta-Noktoの洗練されたダークなカッコ良さに感動し、触発され、タイル型ウインドウマネージャi3のステータスバーとして有名なPolybarのテーマを作りました。
もともとウインドウマネージャとしてタイル型のXMonadを常用しており、(半)付属のステータスバーであるxmobarを使っていましたが、その深遠さと難易度に震え、Polybarに逃げ移った次第です。
しかし結果として、Polybarのカスタマイズ性の高さとデフォルト設定の出来の良さに感動させられ、Adapta-Nokto風のダークでクールなデザインを適用することもたった数時間で完了しました。もっと早く移っていればよかった・・・。
Polybarの新しいテーマを作りました。Gtk+テーマのAdapta-Noktoのカラーコードに合わせることで、とてもかっこよく仕上がりました。
— まとるる (@_matoruru) March 8, 2019
ArchLinux環境で、XMonadと組み合わせた例をリンク先にスクリーンショットで載せています。
パッケージを更新して欲しそうな顔が可愛い。https://t.co/9QLAi9jQMO
動作環境
OS:Arch Linux
ウインドウマネージャ(WM):XMonad
コンポジットマネージャ:Picom
ステータスバー:Polybar
設定ファイル
各モジュールについては機能の節で説明します。
インストール手順
以下のいずれかのインストール方法を選んでください。
# 対話式インストーラ
$ bash -c "bash <(curl -sL https://git.io/Jv0e4)"
# 非対話式インストーラ
$ bash -c "bash <(curl -sL https://git.io/Jv0e4) --yes"
あとは ~/.config/polybar/launch.sh を実行すれば起動します!
ログイン時に自動で起動してほしい場合は、launch.sh をスタートアップスクリプトとして設定してください(~/.xinitrcに追記、など)。
本家テーマとの比較
中途半端なテーマを作りたくなかったので、本家テーマのカラーコードを調べて作成しました。
背景、文字、下線、シークバー、バッテリーなど、本テーマで使用する色は全て本家Adapta-Nokto様と同じカラーコードです(ドキュメントに載っていないものはGIMPのスポイト機能で調査しました)。
以下にカラーコードの対応表と比較用画像を載せます。
※比較用画像では、ステータスバーの背景部分を一部省略しています。
| 使用箇所 | カラーコード | 本家カラーコード | 色見本 |
|---|---|---|---|
| 背景 | #222D32 | #222D32 |  |
| 文字 | #CFD8DC | #CFD8DC |  |
| 下線 | #00BCD4 | #00BCD4 |  |
| シークバー(到達) | #4DB6AC | #4DB6AC |  |
| シークバー(未到達) | #475359 | #475359 |  |
| 弱警告 | #C9BC0E | #C9BC0E |  |
| 強警告 | #FF5252 | #FF5252 |  |
機能
主な機能の説明をします。各機能の末尾には対応する設定を記載します(全文はこちら)。
全体を通して使う設定は以下の通りです。
;====General Settings======================================
[colors]
bg = #222D32
fg = #CFD8DC
adapta-cyan = #00BCD4
adapta-red = #FF5252
adapta-yellow = #C9BC0E
adapta-lightgreen = #4DB6AC
adapta-green = #009688
adapta-grey = #475359

[margin]
for-modules = 1

[bar/main]
width = 100%
height = 22
fixed-center = true
line-size = 2
background = ${colors.bg}
foreground = ${colors.fg}
font-0 = "Fantasque Sans Mono:pixelsize=10;3"
font-1 = "Iosevka Nerd Font:pixelsize=14;3"
cursor-click = pointer
;==========================================================

;====Module settings+======================================
modules-left = windows explorer google amazon github reddit facebook youtube workspaces-xmonad
modules-center = date
modules-right = mpd pkg xbacklight volume wlan cpu-graph memory battery powermenu
;==========================================================
Module settingsの中にあるmodules-left、modules-center、modules-rightに表示したいモジュールを設定することで、ステータスバーのレイアウトを決められます。
名前のとおりですが、
- ステータスバーの左側に表示したい -> modules-left
- ステータスバーの中央に表示したい -> modules-center
- ステータスバーの右側に表示したい -> modules-right
といった対応になっています。
また、fixed-centerをtrueにすることで、leftとrightの詰まり具合に影響されることなく中央を定めることができます。
| fixed-center | 表示結果 |
|---|---|
| true |  |
| false |  |
アプリアイコン一覧
左から,
- Appleアイコン
- ご存知、あのリンゴです。特に機能ないです。見た目だけ。Windowが4つくらい並んだ風なマークも設定できます。
- ファイルマネージャ
- Nautilusを開きます。GTK+テーマをAdapta-NoktoにするとPolybarと合います。
- Googleアイコン
- ブラウザでGoogle検索のトップページを開きます。
- ...
- ...、 あとはアイコンの通りのページをブラウザで開きます。
[module/arch]
type = custom/text
content =
content-padding = 1
content-foreground = ${colors.fg}
content-underline = ${colors.adapta-cyan}
;click-left = rmenu_1
;click-right = rmenu_wi_1
[module/apple]
type = custom/text
content =
content-padding = 1
content-foreground = ${colors.fg}
content-underline = ${colors.adapta-cyan}
;click-left = rmenu_1
;click-right = rmenu_wi_1
[module/windows]
type = custom/text
content =
content-padding = 1
content-foreground = ${colors.fg}
content-underline = ${colors.adapta-cyan}
;click-left = rmenu_1
;click-right = rmenu_wi_1
[module/explorer]
type = custom/text
content =
;content =
content-padding = 1
content-foreground = ${colors.fg}
click-left = nautilus
[module/google]
type = custom/text
content =
content-padding = 1
content-foreground = ${colors.fg}
click-left = xdg-open https://www.google.com/
[module/amazon]
type = custom/text
content =
content-padding = 1
content-foreground = ${colors.fg}
click-left = xdg-open https://www.amazon.co.jp/
;click-left = xdg-open https://www.amazon.com/
[module/github]
type = custom/text
content =
content-padding = 1
content-foreground = ${colors.fg}
click-left = xdg-open https://www.github.com/
[module/reddit]
type = custom/text
content =
;content =
content-padding = 1
content-foreground = ${colors.fg}
click-left = xdg-open https://www.reddit.com/
[module/facebook]
type = custom/text
content =
content-padding = 1
content-foreground = ${colors.fg}
click-left = xdg-open https://www.facebook.com/
[module/youtube]
type = custom/text
content =
;content =
content-padding = 1
content-foreground = ${colors.fg}
click-left = xdg-open https://www.youtube.com/
ワークスペース一覧表示
この機能は、XMonadの持つHaskellパワーをフル活用して実現しました。我々が愛するPolybarはxmobarやdzenのようなXMonadの半公式サポートを受けることが許されていないので、欲しい機能は自分で作る必要があります。
こちらにPolybarユーザ様の誰かが作成してくださったワークスペース表示用モジュールがありますが、機能が乏しく(全ワークスペースと現在のワークスペースのみの表示)、名前付きパイプ作成のために外部ツールであるmkfifoへの依存性があり、良くないです。
本記事で紹介する方法では、空のワークスペース(未使用のWS)とウインドウが存在するワークスペース(使用中のWS)を区別することができ、とても便利です。
createNamedPipe関数で作成した名前付きパイプを通じてワークスペース情報を取得しています。
以下のように表示されます(GitHubにアニメーションがあります)。
| 現在のWS | 使用中のWS | 未使用のWS |
|---|---|---|
 |
 |
 |
configファイル内で、普通のワークスペース用モジュール([module/workspaces])とは別にXMonad用([module/workspaces-xmonad])を作成しました。
[module/workspaces-xmonad]
type = custom/script
exec = tail -F /tmp/.xmonad-workspace-log
exec-if = [ -p /tmp/.xmonad-workspace-log ]
tail = true
format-underline = ${colors.adapta-cyan}
format-padding = 1
;format-margin = ${margin.for-modules}
[module/workspaces]
type = internal/xworkspaces
pin-workspaces = false
enable-click = true
enable-scroll = true
format-padding = 1
;icon-0 = 1;❶
;icon-1 = 2;❷
;icon-2 = 3;❸
;icon-3 = 4;❹
;icon-4 = 5;❺
;icon-5 = 6;❻
;icon-6 = 7;❼
;icon-7 = 8;❽
;icon-8 = 9;❾
;icon-9 = 10;❿
icon-default =
format = <label-state>
;format-background = ${colors.shade2}
label-active =
label-occupied =
label-urgent =
label-empty =
label-empty-padding = 1
label-active-padding = 1
label-urgent-padding = 1
label-occupied-padding = 1
label-empty-foreground = ${colors.fg}
;label-active-foreground = ${colors.}
;label-urgent-foreground = ${colors.}
;label-occupied-foreground = ${colors.}
xmonadの設定は以下の通りです。
import Control.Monad
import Data.List
import Data.Monoid
import Data.Ord
import System.Directory
import System.Posix.Files

import qualified XMonad.StackSet as S

-- 〜〜省略〜〜

getWorkspaceLog :: X String
getWorkspaceLog = do
      winset <- gets windowset
      let currWs = S.currentTag winset
      let wss    = S.workspaces winset
      let wsIds  = map S.tag   $ wss
      let wins   = map S.stack $ wss
      let (wsIds', wins') = sortById wsIds wins
      return . join . map (fmt currWs wins') $ wsIds'
      where
         hasW = not . null
         idx = flip (-) 1 . read
         sortById ids xs = unzip $ sortBy (comparing fst) (zip ids xs)
         fmt cw ws id
              | id == cw            = "\63022"
              | hasW $ ws !! idx id = "\61842"
              | otherwise           = "\63023"

eventLogHook :: FilePath -> X ()
eventLogHook filename = io . appendFile filename . (++ "\n") =<< getWorkspaceLog

main :: IO ()
main = do
      wsLogfile <- return "/tmp/.xmonad-workspace-log"
      de <- doesFileExist wsLogfile
      case de of
         True -> return ()
         _    -> createNamedPipe wsLogfile stdFileMode
      xmonad . ewmh $ myConfig wsLogfile

myConfig filename = def
   { -- 〜〜省略〜〜
   , logHook = eventLogHook filename
   , -- 〜〜省略〜〜
   }
日付・時間表示
画面上部中央のやつです。下線がおしゃれ!
[module/date]
type = internal/date
interval = 1
label = %time%
label-padding = 1
;label-background = ${colors.shade1}
label-underline = ${colors.adapta-cyan}
time = %a %d %b %Y %T
label-margin = ${margin.for-modules}
パッケージの更新チェック
これはとても良い機能です。
自動でパッケージの更新が必要かどうかを確認し、表情でパッケージの更新の有無を、数字で更新パッケージ数を知らせてくれます。パッケージマネージャにはpacmanとyayを使用します。
| 更新あり | 更新なし | 情報取得失敗 |
|---|---|---|
 |
 |
 |
パッケージの更新が降ってくるとしかめっ面になりますが、更新するとすぐに笑顔を取り戻してくれます。
こんな感じで笑顔を取り戻します。かわいい。

また、パッケージ情報の取得時に回転アニメーションが表示されているのがわかるでしょうか。これによって、退屈だったステータスバーがよりリッチなものになりますね。
定期的な更新をサボらず、この子の笑顔を守ってあげてください。
[module/pkg]
type = custom/script
exec = bash ~/.config/polybar/updates.sh
;format-background = ${colors.shade2}
format-underline = ${colors.adapta-cyan}
format-padding = 1
tail = true
format-margin = ${margin.for-modules}
以下がパッケージ更新の有無と数を取得するスクリプトです。
#!/bin/sh
if ! updates_arch=$(checkupdates 2> /dev/null | wc -l ); then
updates_arch=0
fi
if ! updates_aur=$(yay -Qum 2> /dev/null | wc -l); then
# if ! updates_aur=$(cower -u 2> /dev/null | wc -l); then
# if ! updates_aur=$(trizen -Su --aur --quiet | wc -l); then
updates_aur=0
fi
updates=$(("$updates_arch" + "$updates_aur"))
if [ "$updates" -gt 0 ]; then
echo " $updates"
else
echo " $updates"
fi
バックライトの輝度調整
バックライトの明るさをシークバーで表しています。
マウスホイールやタッチパッドでスクロールすることでも明るさを変更できます。
[module/xbacklight]
type = internal/xbacklight
format = <label> <bar>
format-underline = ${colors.adapta-cyan}
format-padding = 1
label =
bar-width = 8
bar-indicator =
bar-indicator-foreground = ${colors.adapta-lightgreen}
bar-indicator-font = 0
bar-fill = ─
bar-fill-font = 2
bar-fill-foreground = ${colors.adapta-lightgreen}
bar-empty = ─
bar-empty-font = 2
bar-empty-foreground = ${colors.adapta-grey}
;format-margin = ${margin.for-modules}
音量調整(ALSA)
これも結構良い機能です。
音量を視覚的に知らせてくれます。大きすぎて危険な場合には黄色や赤色で目立たせます。特に色にこだわったポイントです。
| ミュート | 無音〜適切 | 適切〜大音量(警告) | 大音量〜爆音 (Danger!) |
|---|---|---|---|
 |
 |
 |
 |
バックライトのシークバーと同じように、マウスホイールやタッチパッドでも音量を変更できます。
また、クリックすることでスピーカーのオン・オフを切り替えることができます。
[module/volume]
type = internal/alsa
format-volume = <label-volume> <bar-volume>
format-volume-underline = ${colors.adapta-cyan}
format-volume-padding = 1
label-volume = 墳
label-muted = 婢
label-muted-underline = ${colors.adapta-cyan}
label-muted-padding = 1
bar-volume-width = 8
bar-volume-foreground-0 = ${colors.adapta-lightgreen}
bar-volume-foreground-1 = ${colors.adapta-lightgreen}
bar-volume-foreground-2 = ${colors.adapta-lightgreen}
bar-volume-foreground-3 = ${colors.adapta-lightgreen}
bar-volume-foreground-4 = ${colors.adapta-lightgreen}
bar-volume-foreground-5 = ${colors.adapta-yellow}
bar-volume-foreground-6 = ${colors.adapta-yellow}
bar-volume-foreground-7 = ${colors.adapta-red}
bar-volume-gradient = false
bar-volume-indicator =
bar-volume-indicator-foreground = ${colors.adapta-lightgreen}
bar-volume-indicator-font = 0
bar-volume-fill = ─
bar-volume-fill-font = 2
bar-volume-empty = ─
bar-volume-empty-font = 2
bar-volume-empty-foreground = ${colors.adapta-grey}
format-muted-margin = ${margin.for-modules}
format-volume-margin = ${margin.for-modules}
通信速度モニタ
送受信の量や速度がわかりやすくリアルタイムで表示されます。通信時の例は、YouTubeで動画を見ている時のものです。
| 非通信時 | 通信時 | 動作例 |
|---|---|---|
 |
 |
 |
[module/wlan]
type = internal/network
interface = wlp2s0
interval = 0.1
format-connected = <label-connected>
;format-connected-background = ${colors.shade2}
format-connected-underline = ${colors.adapta-cyan}
format-connected-padding = 1
label-connected = %upspeed:9% %downspeed:9%
;label-connected = %upspeed:9% %downspeed:9%
format-disconnected = <label-disconnected>
format-disconnected-padding = 1
format-disconnected-underline = ${colors.adapta-cyan}
label-disconnected = 睊
;format-connected-margin = ${margin.for-modules}
;format-disconnected-margin = ${margin.for-modules}
各CPUコアの使用状況
以下のようなアニメーションで各CPUコアの使用状況が表示されます。
オーディオ機器ののボリュームバーみたいで、見ていて楽しいです。キャプチャ時にはたくさん動いてもらうためにAndroid Studioを動かしてました。
[module/cpu-value]
type = internal/cpu
interval = 0.1
format-prefix = " "
format-underline = ${colors.adapta-cyan}
format-margin = ${margin.for-modules}
format-padding = 1
label = %percentage:2%%
[module/cpu-graph]
type = internal/cpu
interval = 0.08
format = " <ramp-coreload>"
format-underline = ${colors.adapta-cyan}
format-margin = ${margin.for-modules}
format-padding = 1
ramp-coreload-0 = ▁
ramp-coreload-0-foreground = ${colors.adapta-cyan}
ramp-coreload-1 = ▂
ramp-coreload-1-foreground = ${colors.adapta-green}
ramp-coreload-2 = ▃
ramp-coreload-2-foreground = ${colors.adapta-lightgreen}
ramp-coreload-3 = ▄
ramp-coreload-3-foreground = ${colors.adapta-lightgreen}
ramp-coreload-4 = ▅
ramp-coreload-4-foreground = ${colors.adapta-yellow}
ramp-coreload-5 = ▆
ramp-coreload-5-foreground = ${colors.adapta-yellow}
ramp-coreload-6 = ▇
ramp-coreload-6-foreground = ${colors.adapta-red}
ramp-coreload-7 = █
ramp-coreload-7-foreground = ${colors.adapta-red}
モジュールが2つ(cpu-valueとcpu-graph)ありますが、cpu-valueはCPU使用率を数値で表示するシンプルなもので、cpu-graphが本項の初めに載せたアニメーションを表示するものです。
メモリ使用量モニタ
特筆すべきことはないです。メモリを模したゲジゲジ横の数字でメモリ使用量を示します。
[module/memory]
type = internal/memory
interval = 0.1
format-prefix = " "
format-underline = ${colors.adapta-cyan}
;format-margin = ${margin.for-modules}
format-padding = 1
label = %percentage_used:2%%
バッテリ残量・状態モニタ
これも結構良い機能で、気に入っています。
バッテリ残量が少なくなってくると、色が黄色→赤と変化し、警告してくれます。
| 充電中 | 十分 | 少なめ | すごく少ない |
|---|---|---|---|
 |
 |
 |
 |
また、充電時には以下のようなアニメーションがあります。

なんだかすごく速いですが、キャプチャがうまくいっていないだけで、実際はもっと遅いです。
[module/battery]
type = internal/battery
full-at = 99
battery = CMB0
adapter = ADP1
format-charging = <animation-charging> <label-charging>
;format-charging-background = ${colors.shade2}
format-charging-underline = ${colors.adapta-cyan}
format-charging-padding = 1
label-charging = %percentage%%
format-discharging = <ramp-capacity> <label-discharging>
format-discharging-underline = ${colors.adapta-cyan}
format-discharging-padding = 1
label-discharging = %percentage:2%%
format-full = <label-full>
format-full-underline = ${colors.adapta-cyan}
format-full-padding = 1
format-charging-margin = ${margin.for-modules}
format-discharging-margin = ${margin.for-modules}
format-full-margin = ${margin.for-modules}
format-full-prefix = " "
ramp-capacity-0 =
ramp-capacity-1 =
ramp-capacity-2 =
ramp-capacity-3 =
ramp-capacity-4 =
ramp-capacity-5 =
ramp-capacity-6 =
ramp-capacity-7 =
ramp-capacity-8 =
ramp-capacity-9 =
ramp-capacity-0-foreground = ${colors.adapta-red}
ramp-capacity-1-foreground = ${colors.adapta-red}
ramp-capacity-2-foreground = ${colors.adapta-red}
ramp-capacity-3-foreground = ${colors.adapta-red}
ramp-capacity-4-foreground = ${colors.adapta-yellow}
ramp-capacity-5-foreground = ${colors.adapta-yellow}
ramp-capacity-foreground = ${colors.fg}
animation-charging-0 =
animation-charging-1 =
animation-charging-2 =
animation-charging-3 =
animation-charging-4 =
animation-charging-5 =
animation-charging-6 =
animation-charging-foreground = ${colors.fg}
animation-charging-framerate = 750
最後に
本家Adapta-Nokto様のダークかつクールな雰囲気をそのままに、結構良いテーマができたと思います。ぜひ使ってみてください。
Twitterフォローしていただけると嬉しいです!
https://twitter.com/_matoruru
参考
- 今回作成したPolybarテーマのGitHubリポジトリ
- Adapta-gtk-theme本家様のGitHubリポジトリ
- Polybar作者のGitHubリポジトリ
- Polybar - ArchWiki


