Rails チュートリアルに従って要所のみ抜粋。
https://railstutorial.jp/
環境:Cloud9
Railsチュートリアルの流れに沿いながら、作成物は最小にしてポイントをまとめていく。
1.環境準備
1.1.プロジェクト作成
$ cd ~/environment
$ rails _5.1.4_ new XXX
$ cd XXX/
XXX = second_app としてみる。
1.2.Gemfileの変更
1.以下のリスト13.72のように変更
Gemfileのsqliteをdevelopの書き換えがポイント。
group :development, :test do
  gem 'sqlite3', '1.3.13'
  (省略)
end
2.gemのインストール
*production環境でしか使わないものはgemインストールしない
$ bundle install --without production
$ bundle update
1.3. Gitレポジトリ初期化
$ git init
$ git add -A
$ git commit -m "Initialize repository"
Tips:
$ git commit -am "XXX"
で、 add -A とcommit -m コマンドをセットで行うこともできる。
Bitbucket上のリポジトリに作成&Push
$ git remote add origin git@bitbucket.org:ユーザー名/second_app.git
$ git push -u origin --all # リポジトリやその参照先もすべてプッシュする
1.4.HerokuへのPush
$ source <(curl -sL https://cdn.learnenough.com/heroku_install)
$ heroku create
$ git push heroku master
*この source ~ のコマンドは herokuのコマンドが見つからないときの解決になる。
1.5. テストをカラフルにする
require "minitest/reporters"
Minitest::Reporters.use!
1.6 Guard によるテストの自動化
$ bundle exec guard init
/Guardfile は下記からコピペ。
https://bitbucket.org/railstutorial/sample_app_4th_ed/raw/289fcb83f1cd72b51c05fe9319277d590d51f0d2/Guardfile
Guard 使用時の Spring と Git の競合を防ぐ
下記を追加。
# Ignore Spring files.
/spring/*.pid
.gitignore は Git の設定ファイルの1つで、ここで指定されたファ イルは Git リポジトリに追加されなくなる,とのこと。
1.7 本番環境での SSLの設定
まず、コンフィグファイル。もともと記載があったので、コメントアウトを外した。
# Force all access to the app over SSL, use Strict-Transport-Security, and use secure cookies.
  config.force_ssl = true
次にherokuのサーバーをWEBrickからPumaに変更する。
WEBrick は本番環境として適切な Web サーバではありません。よって、今回は WEBrick を Puma という Web サーバに置き換えてみます。Puma は多数のリクエストを捌くことに適した Web サーバです。
とのこと。
以下のように書き換える。
workers Integer(ENV['WEB_CONCURRENCY'] || 2)
threads_count = Integer(ENV['RAILS_MAX_THREADS'] || 5)
threads threads_count, threads_count
preload_app!
rackup      DefaultRackup
port        ENV['PORT']     || 3000
environment ENV['RACK_ENV'] || 'development'
on_worker_boot do
# Worker specific setup for Rails 4.1+
# See: https://devcenter.heroku.com/articles/
# deploying-rails-applications-with-the-puma-web-server#on-worker-boot ActiveRecord::Base.establish_connection
end
最後に、ルート直下にProcfileを作成。
1行のみ加える。
./Procfile
web: bundle exec puma -C config/puma.rb
```
以上。あとはコミットしてherokuにプッシュする。
# 2.静的ページ作成
## 2.1 コントローラー生成・生成されたViewページの確認
```
$ git checkout -b static-pages
$ rails generate controller StaticPages home help
$ git add -A
$ git commit -m "Add a Static Pages controller"
$ git push origin static-pages
```
"git push -u origin static-pages" ですると、以後 $ git push で自動でstatic-pagesにpushしてくれるよう。ただ、明確にするためにパスする。
https://qiita.com/ironsand/items/6c301fef730d53f35bc3
生成できたページの確認.
(ドメイン)/static_pages/home へアクセスする。
## 2.2 テスト作成
### 1.新しいテストを作成する。
下記を変更していく。
#### タイトルタグをチェックする
```test/controllers/static_pages_controller_test.rb
test "should get home" do
get static_pages_home_url # HTTP通信でGETリクエストをサーバーに送る
assert_response :success # リクエストがうまくいったか
assert_select "title", "Home | #{@base_title}" # ここで「title」タグが "Home | #{@base_title}" と等しいか確認。
end
```
### 共通のタイトルを設定する。
```/views/layouts/application.html.erb
<title><%= yield(:title) %> | Ruby on Rails Tutorial App</title>
```
ここで指定している :titleに値が入るように、各viewページのファイルにて
provideを用いてそれぞれ設定値を入れることができる。
```/views/static_pages/home.html.erb
<% provide(:title, "Home) %>
<!DOCTYPE html>
```
### 共通となる便利な関数を作成する
```app/helpers/application_helper.rb
module ApplicationHelper
def full_title(page_title = '')
base_title = "Ruby on Rails Tutorial Sample App"
if page_title.empty?
base_title
else
page_title + " | " + base_title
end
end
end
```
これで共通のレイアウトのリファクタリングが可能に
before
```/views/layouts/application.html.erb
<title><%= yield(:title) %> | Ruby on Rails Tutorial App</title>
```
after
````/views/layouts/application.html.erb
<title><%= full_title(yield(:title)) %> </title>
```
### 共通となるviewパーシャルを作成する
大元のviewに下記のように設定しておく。
```/views/layouts/application.html.erb
<body>
<% render 'layouts/header' %>
<div class="container">
<%= yield %>
<% render 'layouts/footer' %>
</div>
</body>
```
そして layoutディレクトリ以下に _header.htm.erbと _footer.html.erb を作成
```/views/layouts/_header.htm.erb
<header class="navbar navbar-fixed-top navbar-inverse">
<div class="container">
<%= link_to "sample app", root_path, id: "logo" %>
<nav>
<ul class="nav navbar-nav navbar-right">
<li><%= link_to "Home", root_path %></li>
<li><%= link_to "Help", help_path %></li>
<% if logged_in? %>
<li><%= link_to "Users", users_path %></li>
<li class="dropdown">
<a href="#" class="dropdown-toggle" data-toggle="dropdown">
Account <b class="caret"></b>
</a>
<ul class="dropdown-menu">
<li><%= link_to "Profile", current_user %></li>
<li><%= link_to "Setting", edit_user_path(current_user) %></li>
<li class="divider"></li>
<li><%= link_to "Log out", logout_path, method: :delete %></li>
</ul>
</li>
<% else %>
<li><%= link_to "Log in", login_path %></li>
<% end %>
</ul>
</nav>
</div>
</header>
```
```/views/layouts/_footer.htm.erb
<footer class="footer">
<small>
The <a href="">Ruby on Rails Tutorial</a>
by <a href="">Michael Hartl</a>
</small>
<nav>
<ul>
<li><%= link_to "About", about_path %></li>
<li><%= link_to "Contact", contact_path %></li>
<li><a href="http://news.railstutorial.org/">News</a></li>
</ul>
</nav>
</footer>
```
ポイントは、
パーシャルは _xxx.html.erb として設定する規則。勝手に変換読み込みをしてくれる。
それを
```
<%= render 'xxx' %>
```
で呼び出せる。
#####
Bootstrap に含まれる CSS の dropdown クラスや dropdown-menu などを使う。これらのドロップダウン 機能を有効にするため、Rails の application.js ファイルを通して、Bootstrap に同梱 されている JavaScript ライブラリと jQuery*9を読み込むようアセットパイプラインに指示
```app/assets/javascripts/application.js
//= require rails-ujs
//= require jquery
//= require bootstrap
//= require turbolinks
//= require_tree .
```
### ルーティングの設定
・routes.rb
・html
の呼び出し、指定設定をする。
概要として、
・routes.rb: 定義とコントローラーへのアクションの命令の関連づけ
・html: コントローラーから呼び出されるview
```/config/routes.rb
root 'static_pages#home'
get '/help', to: 'static_pages#help'
get '/about', to: 'static_pages#about'
```
これで /static_pages/home と指定せずに コントローラStaticPagesが管理している
"view/static_pages"ディレクトリ以下の home.html.erb まで誘導できている。
これはRailsの一般規約。
```
root_path -> '/'
root_url -> 'http://www.example.com/
```
これはRailsの規約。
>基本的には_path 書式を使い、リダイレクトの場合のみ_url 書式を使うようにします
とのこと。
なので, テストコードも原則 xxx_path を使うように変更する。
before
```/test/controllers/static_pages_controller_test.rb
test "should get root" do
get static_pages_home_url
assert_response :success
end
test "should get home" do
get home_path
assert_response :success
assert_select "title", "Home | #{@base_title}"
end
```
after
```/test/controllers/static_pages_controller_test.rb
test "should get home" do
get root_path
assert_response :success
assert_select "title", "Ruby on Rails Tutorial Sample App"
end
test "should get help" do
get help_path
assert_response :success
assert_select "title", "Help | Ruby on Rails Tutorial Sample App"
end
```
htmlのコード内のリンク設定も、この規則を用いる。
link_toメソッドを使用する。
```
<li><%= link_to "Home", root_path %></li>
```
これで '/'のルートをリクエストする "Home"というリンク文字が生成できる。
### リンクのテストを作成
リンクのテストには統合テストを用いる。
```
$ rails generate integration_test site_layout
```
```/test/integration/site_layout_test.rb
require 'test_helper' # これは共通で使うファイルを読み込んでる。
class SiteLayoutTest < ActionDispatch::IntegrationTest
test "layout links" do
get root_path # 'ルートへのリクエスト'
assert_template 'static_pages/home' # 表示されたものが 指定のhtmlのものと一致しているかどうか。
assert_select "a[href=?]", root_path, count:2 # aタグの href=?の値が ルートパスと一致しているかどうか。 また、それが 2つ存在しているかどうか。(ロゴとリンク文字をチェックしている)
assert_select "a[href=?]", help_path # aタグのhref=?の値が'/help'と一致しているかどうか。
assert_select "a[href=?]", about_path # aタグのhref=?の値が'/about'と一致しているかどうか。
end
```
統合テスト(integration/site_layout_test.rb のみテスト)
```
rails test:integration
```
# 3. モデルの作成
### 3.1 モデルの生成
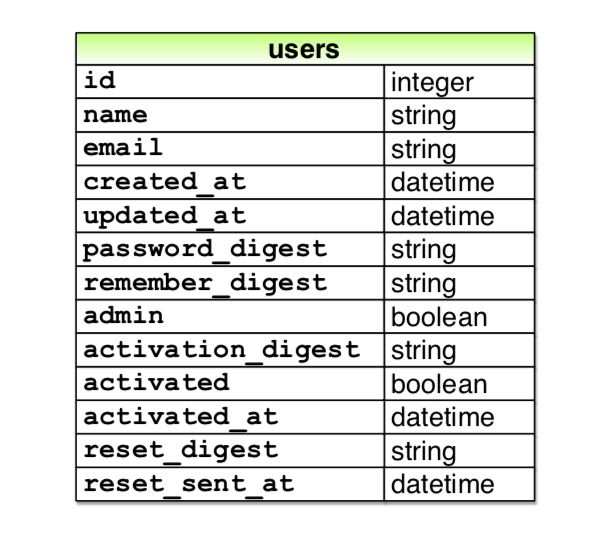
```
$ rails generate model User name:string email:string
$ rails generate migration add_password_digest_to_users password_digest:string
$ rails generate migration add_remember_digest_to_users remember_digest:string
$ rails generate migration add_admin_to_users admin:boolean
$ rails generate migration add_activation_to_users activation_digest:string activated:boolean activated_at:datetime
$ rails generate migration add_reset_to_users reset_digest:string reset_sent_at:datetime
$ rails generate migration add_index_to_users_email
```
#### 権限デフォルトをfalseにする
```db/migrate/[timestamp]_add_admin_to_users.rb
class AddAdminToUsers < ActiveRecord::Migration[5.1]
def change
add_column :users, :admin, :boolean, default: false # default:falseを追加
end
end
```
#### サンプルデータ生成タスクに管理者を 1 人追加する
```db/seeds.rb
User.create!(name: "Example User",
email: "example@railstutorial.org",
password: "foobar",
password_confirmation: "foobar",
admin: true)
99.times do |n|
name = Faker::Name.name
email = "example-#{n+1}@railstutorial.org"
password = "password"
User.create!(name: name,
email: email,
password: password,
password_confirmation: password)
end
```
リセットを行う
```
$ rails db:migrate:reset
$ rails db:seed
```
### 3.2 モデルのマイグレーション
「マイグレーションの適用 (migrating up)」を行う。
```
$ rails db:migrate
```
初めて db:migrate が実行されると、db/development.sqlite3 という名前のファイ ルが生成される。
以後は更新される。
内容は db/schema.rb で確認することができる。
また、マイグレーションの内容をもとに戻すと時はリセットする。
```
$ rails db:rollback
```
### 3.3 モデルのテスト作成
作成したモデルに対してテストを作成する。
観点:
・存在性 (presence) の検証
・長さ (length) の検証
・フォーマット (format) の検証
・一意性 (uniqueness) の検証
・確認 (confirmation)
```test/models/user_test.rb
require 'test_helper'
class UserTest < ActiveSupport::TestCase
def setup
@user = User.new(name: "Example User", email: "user@example.com",
password: "foobar", password_confirmation: "foobar")
end
test "should be valid" do
assert @user.valid?
end
# 存在性 (presence) の検証
test "name should be present" do
@user.name = " "
assert_not @user.valid?
end
test "email should be present" do
@user.email = " "
assert_not @user.valid?
end
# 長さ (length) の検証
test "name should not be too long" do
@user.name = "a" * 51
assert_not @user.valid?
end
test "email shold not be too long" do
@user.email = "a" * 244 + "@example.com"
assert_not @user.valid?
end
# フォーマット (format) の検証
test "email validation should accept valid addresses" do
valid_addresses = %w[user@example.com USER@foo.COM A_US-ER@foo.bar.org
first.last@foo.jp alice+bob@baz.cn]
valid_addresses.each do |valid_address|
@user.email= valid_address
assert @user.valid?, "#{valid_address.inspect} should be valid"
end
end
test "email validation should reject invalid addresses" do
invalid_addresses = %w[user@example,com user_at_foo.org user.name@example.
foo@bar_baz.com foo@bar+baz.com, foo@bar..com]
invalid_addresses.each do |invalid_address|
@user.email = invalid_address
assert_not @user.valid?, "#{invalid_address} should be invalid"
end
end
# 一意性 (uniqueness) の検証
test "email addresses should be unique" do
duplicate_user = @user.dup # dup(): To duplicate data having same attributes on memory
duplicate_user.email = @user.email.upcase # To make no difference between UPPERCASR and lowercase
@user.save
assert_not duplicate_user.valid?
end
# 存在性 (presence) の検証
test "password should be present (nonblank)" do
@user.password = @user.password_confirmation = " " * 6
assert_not @user.valid?
end
# フォーマット (format) の検証
test "password should have a minimum length" do
@user.password = @user.password_confirmation = "a" * 5
assert_not @user.valid?
end
```
Rails APIの「has_secure_password」をモデルに実装することで、
ただし、has_secure_password使用条件にモデル(ここではUserモデル)内にpassword_digest という属性が必須。
使用すると、下記のメリット
>• セキュアにハッシュ化したパスワードを、データベース内の password_digest という属性に保存できるようになる。
>• 2 つのペアの仮想的な属性 (password と password_confirmation) が使えるよ うになる。また、存在性と値が一致するかどうかのバリデーションも追加される*18 。
>• authenticate メソッドが使えるようになる (引数の文字列がパスワードと一致す ると User オブジェクトを、間違っていると false を返すメソッド) 。
2番目が注意。has_secure_passwordを入れないと、
ActiveModel::UnknownAttributeError: unknown attribute 'password' for User.
test/models/user_test.rb:6:in `setup'
というエラーが出たりする。 Userモデルにはpassword属性なんてないよ、というメッセージ。
password_digestという属性とpasswordという属性をつなげている様子。
これに対して、Userモデル
```app/models/user.rb
class User < ApplicationRecord
# name属性: 存在性 (presence) の検証 と 長さ (length) の検証
validates :name, presence: true, length: { maximum: 50}
# email属性: 存在性 (presence) の検証 と 長さ (length) の検証
VALID_EMAIL_REGEX = /\A[\w+\-.]+@[a-z\d\-]+(\.[a-z\d\-]+)*\.[a-z]+\z/i
validates :email, presence: true, length: { maximum: 50},
format: {with: VALID_EMAIL_REGEX}, # フォーマット (format) の検証
uniqueness: {case_sensitive: false} # 一意性 (uniqueness) の検証
# password属性:存在性 (presence) の検証 と 長さ (length) の検証
has_secure_password
validates :password, presence: true, length: {minimum: 6}, allow_nil: true
end
```
注意点:
allow_nil: true の目的は、ユーザー登録フォー ムで空のパスワードを入力すると 2 つの同じエラーメッセージが表示されてしまい、冗長なエラーメッセージを表示させないこと。
(presence: true によるバリデーションも、has_secure_password に よるバリデーションも空のパスワード (nil) を検知してしまうため)
has_secure_passwordはオブジェクト生成時に存在性検証するので、新規登録時にはnilを有効判定しない
ことでも問題なし。
# デバッグ設定
# 4. ユーザー登録
## 4.1 Userコントローラーの設定
### Userコントローラの作成
```
$ rails generate controller Users new
```
### routesにユーザーをリソースとして追加。
```config/routes.rb
(省略)
get '/signup', to: 'users#new'
resources :users
end
```
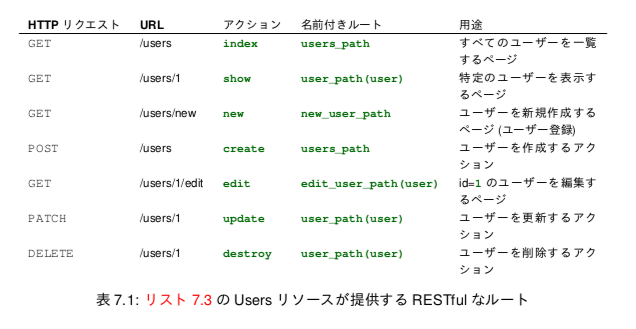
"resources :users"という1行を追加する と、ユーザーの URL を生成するための多数の名前付きルート (5.3.3) と共に、RESTful な Users リソースで必要となるすべてのアクションが利用できるようになる
### ルーティングの設定をHTMLにも反映
routes.rb で設定がされたので "signup_path" が使用できるようになった。HTMLでの
link_to に適用するため変更。
```app/views/static_pages/home.html.erb
<%= link_to "Sign up now!", signup_path, class: "btn btn-lg btn-primary" %>
```
### Userコントローラのテスト
```test/controllers/users_controller_test.rb
test "should get new" do
get signup_path
assert_response :success
end
```
ここもroutes.rbにて /signup のパスを /user/new につなげるルーティングをしていることで、
users_controller_test.rb で signup_path を認識できる。
## 4.2 RESTful対応の各ページの作成

上記の「アクション」項目はUserコントローラのアクションと一致。
必要な作業の概要は、
新規作成:
・コントローラ: app/controllers/users_controllers.rb
・new アクション (GETリクエストでのHTML表示のため)
・create アクション (実際にデータベースを更新するため)
・showアクション (GETリクエストでのHTML表示のため)
・HTML:
・app/views/users/new.html.erb (入力フォーム用)
・app/views/users/show.html.erb (新規作成成功時のユーザー詳細表示ページ)
編集:
・コントローラ: app/controllers/users_controllers.rb
・edit アクション (GETリクエストでのHTML表示のため)
・update アクション (実際にデータベースを更新するため)
・HTML: app/views/users/edit.html.erb
### 4.2.1 新規作成
#### コントローラの変更
```app/controllers/users_controllers.rb
def new
@user = User.new
end
```
ここで Userコントローラはnewアクションを呼び出された時に、 Userモデルの @userというインスタンスを生成している。呼び出されるusers/new.html.erbでは、このインスタンスにデータを入れていく。(のちに読み込んだりにも使えるためにformパーシャルに分けている。)
#### HTMLの作成
##### 表示ビュー
```app/views/users/new.html.erb
<% provide(:title, 'Sign up') %>
<% provide(:button_text, 'Create my account') %>
<h1>Sign up</h1>
<div class="row">
<div class="col-md-6 col-md-offset-3">
<%= render 'form' %>
</div>
</div>
```
#### 汎用できるようにフォームのパーシャルHTMLを作成
作成
```
$ touch app/views/users/_form.html.erb
```
記述
```app/views/users/_form.html.erb
<%=form_for(@user) do |f| %>
<%= render 'shared/error_messages', object: f.object %>
<%= f.label :name %>
<%= f.text_field :name, class: 'form_control' %>
<%= f.label :email %>
<%= f.email_field :email, class: 'form_control' %>
<%= f.label :password %>
<%= f.password_field :password, class: 'form_control' %>
<%= f.label :password_confirmation %>
<%= f.password_field :password_confirmation, class: 'form_control' %>
<%= f.submit yield(:button_text), class: "btn btn-primary" %>
<% end %>
```
#### エラーの場合のパーシャルも作成
・汎用用のパーシャルディレクトリを作成
```
$ mkdir app/views/shared
```
・エラー表示用Viewを作成
```
$ touch app/views/shared/_error_messages.html.erb
```
```app/views/shared/_error_messages.html.erb
<% if object.errors.any? %>
<div id="error_explanation">
<div class="alert alert-danger">
The form contains <%= pluralize(object.errors.count, "error") %>
</div>
<ul>
<% object.errors.full_messages.each do |msg| %>
<li><%= msg %></li>
<% end %>
</ul>
</div>
<% end %>
```
#### UserコントローラのCreateアクションも作成
```
def create
@user = User.new(user_params)
if @user.save
flash[:info] = "Plese check your email to activate your account."
redirect_to root_url
else
render 'new'
end
end
private
def user_params
params.require(:user).permit(:name, :email,
:password, :password_confirmation)
end
```
Userモデルのsaveメソッド(実際にデータベース更新を行う)が成功であれば、root_urlへリダイレクトさせる。
ここで成功したことを示すメッセージを変数で持たせておく。
#### リダイレクトされたメッセージを含めて表示
```app/views/layouts/application.html.erb
<body>
<%= render 'layouts/header' %>
<div class="container">
<% flash.each do |message_type, message| %>
<div class="alert alert-<%= message_type %>"><%= message %></div>
<% end %>
<%= yield %>
<%= render 'layouts/footer' %>
</div>
</body>
```
<% flash.each do |message_type, message| %>
の箇所でさっきのflashという変数に格納されたものを取り出している。
#### 統合テストの作成
```
$ rails generate integration_test users_signup
```
#### 統合テストの記述
ユーザー作成におけるリンク遷移をテスト
```test/integration/users_signup_test.rb
# 向こうなユーザー登録で、ページ遷移せずにエラーが表示される動作テスト
test "invalid signup information" do
get signup_path
assert_no_difference 'User.count' do
post signup_path, params: { user: { name: "",
email: "user@invalid",
password: "foo",
password_confirmation: "bar" } }
end
assert_template 'users/new'
assert_select 'div#error_explanation' # at shared/_error_messages.html.erb
assert_select 'div.field_with_errors'
assert_select 'div.alert'
assert_select 'form[action="/users"]'
end
```
####
# メールによるアカウントの有効化
## コントローラの生成
### 生成
```
$ rails generate controller AccountActivations
```
### ルーティングの追加
```config/routes.rb
resources :account_activations, only: [:edit]
```
*activationの変更のみなので、これだけ。editを rails g controller に含めない。 viewやtestも生成されてしまうため。
## モデル
### マイグレーション
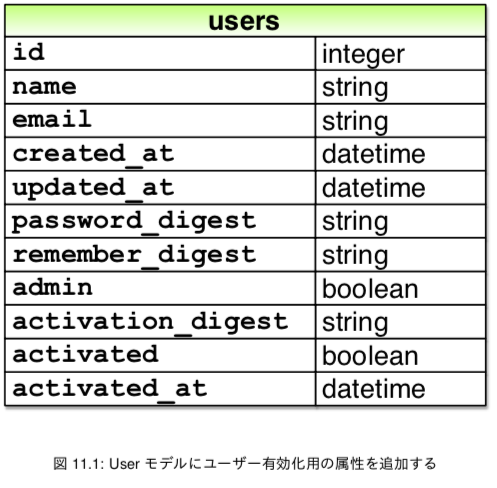
#### 生成
```
$ rails generate migration add_activation_to_users activation_digest:string activated:boolean activated_at:datetime
```
・activation_digest:string
・activated:boolean
・activated_at:datetime
が追加された。
#### ファイルの編集
```db/migrate/[timestamp]_add_activation_to_users.rb
class AddActivationToUsers < ActiveRecord::Migration[5.0]
def change
add_column :users, :activation_digest, :string
add_column :users, :activated, :boolean, default: false
add_column :users, :activated_at, :datetime
end
end
```
#### マイグレーションの実行
```
$ rails db:migrate
```
これでUserモデルにマイグレーション完了
### モデルの有効化
```app/models/user.rb
(省略)
attr_accessor :remember_token, :activation_token, :activation_token, :reset_token
before_save :downcase_email
before_create :create_activation_digest
(省略)
private
# メールアドレスをすべて小文字にする
def downcase_email
self.email = email.downcase
end
# 有効化トークンとダイジェストを作成および代入する
def create_activation_digest
self.activation_token = User.new_token
self.activation_digest = User.digest(activation_token)
end
(省略)
```
・attr_accessor
->クラスやモジュールにインスタンス変数を読み書きするためのアクセサメソッド
(getterやsetterを実装してくれるよう)
・before_save
->saveメソッド実行前にdown_caseというメソッドを探し、実行する。()
・before_create
before_saveやbefore_createはRailsのコールバック。
>コールバックとは、オブジェクトのライフサイクル期間における特定の瞬間に呼び出されるメソッドのことです。コールバックを利用することで、Active Recordオブジェクトが作成/保存/更新/削除/検証/データベースからの読み込み、などのイベント発生時に常に実行されるコードを書くことができます。
https://railsguides.jp/active_record_callbacks.html
#### Action Mailer ライブラリを使って User のメイ ラーを追加
```
$ rails generate mailer UserMailer account_activation password_reset
```
これで必要となる以下を生成。
・account_activation メソッド
・password_reset メソッド
また成したメイラーごとに、ビューのテンプレートが 2 つずつ下記も生成される。
・app/views/user_mailer/account_activation.text.erb
・app/views/user_mailer/account_activation.html.erb
ここで注意点:
クラスの継承による関係が
UserMailer < ApplicationMailer < ActionMailer::Base
の関係になってる。
送信元: ApplicationMailer (noreply@example.com)
viewやその他処理: UserMailer
として、サブクラスに実装をメインにしている。
##### ApplicationMailer送信元を設定
```app/mailers/application_mailer.rb
class ApplicationMailer < ActionMailer::Base
default from: "noreply@example.com" # ここが送信元になる
layout 'mailer'
end
```
##### UserMailerを実装する。
```app/mailers/user_mailer.rb
class UserMailer < ApplicationMailer
def account_activation(user) # 引数からuserインスタンスを取得
@user = user # Userクラスのインスタンスとして@userを作成
mail to: user.email, subject: "Account activation"
# mail (to: user.email, subject: "Account activation") と同値
# :toヘッダーと:subjectヘッダーを渡している
end
def password_reset
@greeting = "Hi"
mail to: "to@example.org"
end
end
```
参考:mailer, mailメソッド
https://railsguides.jp/action_mailer_basics.html
コントローラの場合と同様、メイラーのメソッド内で定義されたすべてのインスタンス変数はそのままビューで使用できる。
つまり、ビューのテンプレートでは@userを使用できる。
逆に@user.mail でない理由は, 堅牢性のため。 @userはviewでの使用のためにしておくべき。
##### テンプレートViewを実装する
```app/views/user_mailer/account_activation.text.erb
Hi <%= @user.name %>,
Welcome to the Sample App! Click on the link below to activate your account: <%= edit_account_activation_url(@user.activation_token, email: @user.email) %>
```
```app/views/user_mailer/account_activation.html.erb
<h1>Sample App</h1>
<p>Hi <%= @user.name %>,</p>
<p>
Welcome to the Sample App! Click on the link below to activate your account:
</p>
<%= link_to "Activate", edit_account_activation_url(@user.activation_token, email: @user.email) %>
```
#### 送信メールプレビュー
##### development 環境のメール設定
```config/environments/development.rb
(省略)
config.action_mailer.raise_delivery_errors = true
config.action_mailer.delivery_method = :test
host = '8ea2da4b173847d79f74ad5398dff6bd.vfs.cloud9.us-east-2.amazonaws.com'
config.action_mailer.default_url_options = { host: host, protocol: 'https' }
(省略)
```
"host = xxx" は環境により異なる。
例:
host= host = 'rails-tutorial-mhartl.c9users.io' # クラウド IDE
host = 'localhost:3000' # ローカル環境
(*ローカルならprotocolもhttpでoK.)
ここでdevelopmentサーバーを再起動が必要。
(Ctrl + C でストップ。$rails server で再起動)
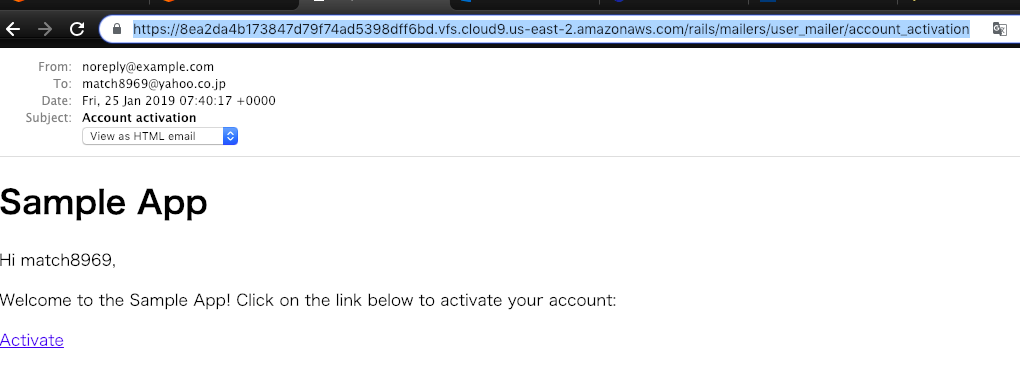
##### アカウント有効化のプレビュー
下記のようにプレビューのためにファイルを更新
```test/mailers/previews/user_mailer_preview.rb
class UserMailerPreview < ActionMailer::Preview
# Preview this email at
# http://localhost:3000/rails/mailers/user_mailer/account_activation
def account_activation
user = User.first
user.activation_token = User.new_token
UserMailer.account_activation(user)
end
# Preview this email at
# http://localhost:3000/rails/mailers/user_mailer/password_reset def password_reset
UserMailer.password_reset
end
end
```
・user 変数が開発用データベースの最初のユーザーになるように定義
->account_activation の引数には有効な User オブジェクト を渡す必要があるため
・UserMailer.account_activation の引数として渡す
・user.activation_token の値にも代入
->テンプレートでは、アカウント有効化のトークンが必要なので、代入は省略できないため
##### プレビューの確認
https://8ea2da4b173847d79f74ad5398dff6bd.vfs.cloud9.us-east-2.amazonaws.com/rails/mailers/user_mailer/account_activation
#### テストの作成
##### fixture作成
```test/fixtures/users.yml
# Read about fixtures at http://api.rubyonrails.org/classes/ActiveRecord/FixtureSet.html
michael:
name: Michael Example
email: michael@example.com
password_digest: <%= User.digest('password') %>
admin: true
activated: true
activated_at: <%= Time.zone.now %>
archer:
name: Sterling Archer
email: duchess@example.gov
password_digest: <%= User.digest('password') %>
activated: true
activated_at: <%= Time.zone.now %>
lana:
name: Lana Kane
email: hands@example.gov
password_digest: <%= User.digest('password') %>
activated: true
activated_at: <%= Time.zone.now %>
malory:
name: Malory Archer
email: boss@example.gov
password_digest: <%= User.digest('password') %>
activated: true
activated_at: <%= Time.zone.now %>
<% 30.times do |n| %>
user_<%= n %>:
name: <%= "User #{n}"%>
email: <%= "user-#{n}@example.com" %>
password_digest: <%= User.digest('password')%>
activated: true
activated_at: <%= Time.zone.now %>
<% end %>
```
##### テストのドメインホストを設定する
```config/environments/test.rb
(省略)
config.action_mailer.delivery_method = :test
config.action_mailer.default_url_options = { host: 'example.com' } # この1行を追加
(省略)
```
##### User メイラーのテスト
```test/mailers/user_mailer_test.rb
require 'test_helper'
class UserMailerTest < ActionMailer::TestCase
test "account_activation" do
user = users(:michael)
user.activation_token = User.new_token
mail = UserMailer.account_activation(user)
assert_equal "Account activation", mail.subject
assert_equal [user.email], mail.to
assert_equal ["noreply@example.com"], mail.from
# assert_match => Check regular expression
assert_match user.name, mail.body.encoded
assert_match user.activation_token, mail.body.encoded
assert_match CGI.escape(user.email), mail.body.encoded
end
test "password_reset" do
user = users(:michael)
user.reset_token = User.new_token
mail = UserMailer.password_reset(user)
assert_equal "Password reset", mail.subject
assert_equal [user.email], mail.to
assert_equal ["noreply@example.com"], mail.from
assert_match user.reset_token, mail.body.encoded
assert_match CGI.escape(user.email), mail.body.encoded
end
end
```
・assert_matchは正規表現でのチェック機能
https://railsguides.jp/testing.html
##### ユーザーの create アクションを作成
```app/controllers/users_controller.rb
def create
@user = User.new(user_params)
if @user.save
@user.send_activation_email
flash[:info] = "Plese check your email to activate your account."
redirect_to root_url
else
render 'new'
end
end
```
##### viewの追加
flash[info]を表示するために、flash.each ~ end まで3行を追加
```app/views/layouts/application.html.erb
(省略)
<body>
<%= render 'layouts/header' %>
<div class="container">
<% flash.each do |message_type, message| %>
<div class="alert alert-<%= message_type %>"><%= message %></div>
<% end %>
<%= yield %>
<%= render 'layouts/footer' %>
</div>
</body>
(省略)
```
##### authenticated?メソッドの抽象化
アカウント有効化のダイジェストと、渡されたトークンが一致するかどうかをチェックするため、authenticated?を用いる。
受け取ったパラメータに応じて呼び出すメソッドを切り替えるようにする。
```app/models/user.rb
(省略)
# トークンがダイジェストと一致したら true を返す
def authenticated?(attribute, token)
digest = send("#{attribute}_digest")
return false if digest.nil?
BCrypt::Password.new(digest).is_password?(token)
end
(省略)
```
#### Sessionの作成
##### Session Controllerの作成
```
$ rails generate controller Sessions new
```
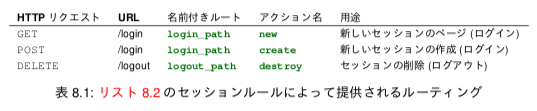
##### routesの追加
```config/routes.rb
(省略)
get '/login', to: 'sessions#new'
post '/login', to: 'sessions#create'
delete '/logout', to: 'sessions#destroy'
(省略)
```
##### コントローラの記述追加
```app/controllers/sessions_controller.rb
class SessionsController < ApplicationController
def new
end
def create
@user = User.find_by(email: params[:session][:email].downcase)
if @user && @user.authenticate(params[:session][:password])
if @user.activated?
log_in @user
params[:session][:remember_me] == '1' ? remember(@user) : forget(@user)
redirect_back_or @user
else
message = "Account not activated."
message += "Check your email for the activation link."
flash[:warning] = message
redirect_to root_url
end
else
flash.now[:danger] = "Invalid email/password combination"
render 'new'
end
end
def destroy
#ログイン中の場合のみログアウト処理ができる
log_out if logged_in?
redirect_to root_url
end
end
```
注:ここで今後セッションを広い範囲で使うことができるように、一部の関数はhelper関数として分離する。
・log_in()
・remember()
・forget()
・redirect_back_or()
・log_out()
・logged_in?
##### Session Helper
```app/helpers/sessions_helper.rb
module SessionsHelper
#渡されたユーザーでログインする
def log_in(user)
session[:user_id] = user.id
end
#ユーザーのセッションを永続化する
def remember(user)
user.remember
#cookieに保存
cookies.permanent.signed[:user_id] = user.id
cookies.permanent[:remember_token] = user.remember_token
end
def current_user?(user)
user == current_user
end
#記憶トークンcookieに対応するユーザーを返す
def current_user
#ユーザーIDにsessinのuser_idを代入した結果、ユーザーIDのsessionが存在すれば。
if (user_id = session[:user_id])
@current_user ||= User.find_by(id: user_id)
elsif (user_id = cookies.signed[:user_id])
user = User.find_by(id: user_id)
if user && user.authenticated?(:remember, cookies[:remember_token])
log_in user
@current_user = user
end
end
end
# ||= is Same with
# if @current_user.nil?
# @current_user = User.find_by(id: session[:user_id])
# else
# @current_user
# end
#ユーザーがログインしていればtrue, その他ならfalseを返す
def logged_in? # ? means 'return boolean'
!current_user.nil? # not nil returns
end
def forget(user)
user.forget
cookies.delete(:user_id)
cookies.delete(:remember_token)
end
#現在のユーザーをログアウトする
def log_out
forget(current_user)
session.delete(:user_id)
@current_user
end
#記憶したURL(もしくはデフォルト値)にリダイレクト
def redirect_back_or(default)
redirect_to(session[:forwarding_url] || default)
session.delete(:forwarding_url)
end
#アクセスしようとしたURLを覚えておく
def store_location
session[:forwarding_url] = request.original_url if request.get?
end
end
```
*current_userとstore_locationは別の箇所で使う。
・current_user
-> viewページ
ユーザー ID を一時セッションの中に安全に置けるようになったので、今度はそのユーザーIDを別のページで取り出すため。セッションIDに対応するユーザー名をデータベースから取り出せるように。
<%= current_user.name %>とか。
redirect_to current_user とか。
・
-> userコントローラーで使いたい.
フレンドリーフォワーディングのため。
@app/controllers/users_controller.rb
*
>フレンドリーフォワーディングというのは、ログインが必要なページ(仮にAページとします)に未ログイン状態でアクセスした場合に、ログイン画面に遷移させてログインした後はAページに戻すというものです。
https://www.lanches.co.jp/blog/624
##### Account Activationを更新させる
メールのリンクをクリックするときに動作するeditアクションによってユーザーのアクティベーションを有効化する。
```app/controllers/account_activations_controller.rb
class AccountActivationsController < ApplicationController
def edit
user = User.find_by(email: params[:email])
if user && !user.activated? && user.authenticated?(:activation, params[:id])
user.activate
log_in user
flash[:success] = "Account activated!"
redirect_to user
else
flash[:danger] = "Invalid activation link"
redirect_to root_url
end
end
end
```
ここでは user.activateによって更新を伝えている。
なのでUserモデルも追記
```app/models/user.rb
def forget
update_attribute(:remember_digest, nil)
end
def activate
update_columns(activated: true, activated_at: Time.zone.now)
end
def send_activation_email
UserMailer.account_activation(self).deliver_now
end
```
・forget()
-> Remember Me 機能のために追加
・activate()
-> データベースのユーザーのアクティベーションを有効にする
・ send_activation_email()
->最初にユーザーsingupのフォーム入力後に createメソッドで「まだアクティベイトされていない」Userモデルのインスタンスの作成と同時にメールの送信をMailerにさせている。
ざっくりなイメージは
User.create -> @user -> @user.send_activation_email
-> serMailer.account_activation(self).deliver_now
-> メール届く。リンククリック -> ページに飛ぶリンク。その前にActivationControllerにいく
-> account_activations_controller.rb のedit()実行
-> @user.activate
-> Activation 有効化!!!
-> ActivationControllerのredirect_to でページ遷移
#### AccountActivations コントローラの編集
##### editメソッド の内容を追記。
```app/controllers/account_activations_controller.rb
class AccountActivationsController < ApplicationController
def edit
user = User.find_by(email: params[:email])
if user && !user.activated? && user.authenticated?(:activation, params[:id])
user.activate
log_in user
flash[:success] = "Account activated!"
redirect_to user
else
flash[:danger] = "Invalid activation link"
redirect_to root_url
end
end
end
```
#### ログインViewの作成
```
```
#### Test の作成
```
$ rails generate integration_test users_signup
$ rails generate integration_test users_login
```
```test/integration/users_signup_test.rb
require 'test_helper'
class UsersSignupTest < ActionDispatch::IntegrationTest
def setup
ActionMailer::Base.deliveries.clear
end
test "invalid signup information" do
get signup_path
assert_no_difference 'User.count' do
post signup_path, params: { user: { name: "",
email: "user@invalid",
password: "foo",
password_confirmation: "bar" } }
end
assert_template 'users/new'
assert_select 'div#error_explanation' # at shared/_error_messages.html.erb
assert_select 'div.field_with_errors'
assert_select 'div.alert'
assert_select 'form[action="/users"]'
end
test "valid signup information with account activation" do
get signup_path
assert_difference 'User.count', 1 do
post users_path, params: { user: {name: "Example User",
email: "user@example.com",
password: "password",
password_confimation: "password"
}}
end
assert_equal 1, ActionMailer::Base.deliveries.size
user = assigns(:user)
assert_not user.activated?
#有効かしていない状態でログインしてみる
log_in_as(user)
assert_not is_logged_in?
#有効化トークンが不正な場合
get edit_account_activation_path("invalid token", email: user.email)
assert_not is_logged_in?
#トークンは正しいがメールアドレスが無効な場合
get edit_account_activation_path(user.activation_token, email: "wrong")
assert_not is_logged_in?
#有効化トークンが正しい場合
get edit_account_activation_path(user.activation_token, email: user.email)
assert user.reload.activated?
follow_redirect! # POSTリクエストの結果をみて、指定先のリダイレクト先に移動するメソッド。ここでは 'users/show'へ。
assert_template 'users/show'
assert is_logged_in?
assert_not flash.empty?
end
end
```
```test/integration/users_login_test.rb
require 'test_helper'
class UsersLoginTest < ActionDispatch::IntegrationTest
test "login with invalid information" do
get login_path
assert_template 'sessions/new'
post login_path, params: { session: { email: "", password: "" } }
assert_template 'sessions/new'
assert_not flash.empty?
get root_path
assert flash.empty?
end end
```
##### テストのパスを変更
```test/controllers/sessions_controller_test.rb
require 'test_helper'
class SessionsControllerTest < ActionDispatch::IntegrationTest
test "should get new" do
get login_path
assert_response :success
end
end
```
##### テストの完成
(作成中)
#### 本番環境でのメール送信確認
「SendGrid」という Heroku アドオンが必要なため、変更を加える。
##### procutionの環境設定
```config/environments/production.rb
Rails.application.configure do
(省略)
config.action_mailer.raise_delivery_errors = true
config.action_mailer.delivery_method = :smtp
host = '<your heroku app>.herokuapp.com'
config.action_mailer.default_url_options = { host: host }
ActionMailer::Base.smtp_settings = {
:address => 'smtp.sendgrid.net',
:port => '587',
:authentication => :plain,
}
(省略)
end
```
##### SendGridを使うようにする
```
$ heroku addons:create sendgrid:starter
$ heroku addons:add sendgrid:starter
```
##### 環境変数の設定
```
$ heroku config:get SENDGRID_USERNAME
$ heroku config:get SENDGRID_PASSWORD
```
##### Herokuにpush
*現在のbranch をコミットしてmasterにmergeをしておく。
Deploy
```
$ git push heroku master
```
Database を Migrate
```
$ heroku run rails db:migrate
```
###### エラーがあった部分
domainをheroku指定のものに変更をしていなかった。
```config/environments/production.rb
host = 'radiant-headland-50521.herokuapp.com'
```