はじめに
今回はrailsでのページネーションを実装していきます。
kaminariというページネーション用のgemを使って実装していきます。
簡単に実装できるので一緒にやっていきましょう!
kaminariのインストール
Gemfileにgem 'kaminari'を追加し、$ bundle installでインストールします。
# 最後の行に追加
gem 'kaminari'
$ bundle install
これでkaminariをインストールすることができました。
ページネーションを表示させる
controllerで、ページネーションを表示させたいデータに.page(params[:page])を追加します。
def index
    @q = Note.all.ransack(params[:q])
     # ページネーションをつけたいデータに.page(params[:page])を追加
    @notes = @q.result(distinct: true).page(params[:page])
end
次に、viewでページネーションを表示させたいところに<%= paginate @notes %>を追加します。
<%= render 'shared/flash_messages' %>
<div class='container'>
   <div class='row'>
      <div class= serch.id>
        <%= search_form_for @q, class:'form-inline' ,url: notes_path do |f| %>
          <%= f.search_field :title_cont, class: 'form-control input-lg', placeholder: "IT用語やカテゴリー名を入力" ,data: {"turbolinks" => false}%>
          <%= f.submit "検索", class: "btn btn-success btn-lg" %>
        <% end %>
      </div>
      <h1>メモ一覧</h1>
      <div class='col-md-3 col-xs-12'>
        <%= render 'categories/serch', categorys: @categorys %>
      </div>
      <div class='col-md-9 col-xs-12'>
        <h2><%= @title %>一覧</h2>
       <p>(全<%= @notes.count %>件)</p>
        <%= render 'notes/notes_index', notes: @notes %>

      </div>
      <div class='child-center'>
        <%= paginate @notes %>     #追加
      </div>
   </div>
</div>
これでページネーションが実装できました!
ページネーションが1ページに表示するレコード数はデフォルトで25件です。ページネーションを表示させるために、レコード数が26件以上になるようデータを作りましょう。
レコード数が26件以上あれば、ページネーションが表示されます。
ページに表示するレコード数の変更
1ページに表示するレコード数はデフォルトで25件です。このレコード数を変更したい場合は、controllerで.per(表示したいレコード数)を追加します。
例えば、.per(10)を追加すると1ページに10件のみレコードを表示します。
def index
    @q = Note.all.ransack(params[:q])
    # .page(params[:page])の後に.per(10)を追加
    @notes = @q.result(distinct: true).page(params[:page]).per(10)
end
これで1ページに表示するレコード数を10件にすることができます。
ページネーションのデザイン変更
ページネーションが実装できたら、デザインを変更して見た目を分かりやすくしましょう。
1.bootstrapで見た目を整える
kaminariにbootstrapを適用させて、整ったページネーションにします。
まずはじめにbootstrapを読み込みます。
app/views/layouts/application.html.erbに以下のコードを追加して、アプリ全体にbootstrapを適用します。
<!DOCTYPE html>
<html>
  <head>
    <title>ItT</title>
    <%= csrf_meta_tags %>
    <%= csp_meta_tag %>
    <!-- bootstrap -->
     <!-- コード追加 Bootstrap CSS読み込みコード-->
    <link rel="stylesheet" href="https://maxcdn.bootstrapcdn.com/bootstrap/3.3.7/css/bootstrap.min.css" integrity="sha384-BVYiiSIFeK1dGmJRAkycuHAHRg32OmUcww7on3RYdg4Va+PmSTsz/K68vbdEjh4u" crossorigin="anonymous">

    <!-- Optional theme -->
    <link rel="stylesheet" href="https://maxcdn.bootstrapcdn.com/bootstrap/3.3.7/css/bootstrap-theme.min.css" integrity="sha384-rHyoN1iRsVXV4nD0JutlnGaslCJuC7uwjduW9SVrLvRYooPp2bWYgmgJQIXwl/Sp" crossorigin="anonymous">

    <%= stylesheet_link_tag    'application', media: 'all', 'data-turbolinks-track': 'reload' %>
    <%= javascript_include_tag 'application', 'data-turbolinks-track': 'reload' %>

  </head>
</html>
これでアプリにbootstrapが適用されます。
次に、kaminariにbootstrapを適用させます。
以下のコマンドを実行しましょう。
$ rails g kaminari:views bootstrap3
このコマンドによりapp/viewsにkaminariフォルダが自動生成され、ページネーションにbootstrapデザインが適用されます。
2.ラベルを日本語に変更する
ラベルはi18nに対応しています。
config/application.rbのmoduleにconfig.i18n.default_locale = :jaを追加し、デフォルト言語を日本語に設定しましょう。
# 最後
module Testapp(自分のアプリ名)
  class Application < Rails::Application
    # Settings in config/environments/* take precedence over those specified here.
    # Application configuration should go into files in config/initializers
    # -- all .rb files in that directory are automatically loaded.
    config.i18n.default_locale = :ja #追加
  end
end
サーバを再起動して設定を反映させます。
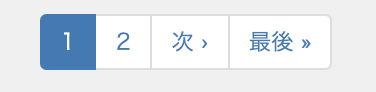
ラベルの変更
config/localesに日本語変換用のymlファイルja.ymlを作成し、以下のコードを追加します。
ja:
  views:
    pagination:
      first: "« 最初"
      last: "最後 »"
      previous: "‹ 前"
      next: "次 ›"
      truncate: "..."
これでページネーションのラベルを日本語に変更できました!
最後に
これで最低限度の実装ができました。
あとはお好みで見た目を整えてみてください。
間違っているところがあればご指摘いただければ幸いです。
最後までありがとうございました。