フリーランスの案件で画像をマスキング処理する可能性があると聞き、
これまでやったことの無い画像処理を急遽学習しました。
pythonのライブラリやモデルを使って画像認識のプログラムを作成するのが望ましいのですが、
今回はAWS Rekognitionを使って画像から顔認識&マスキングを行うことにしました。
結論マスキングはできたのですが、1点気になる点もありましたので詳細を共有いたします。
1. イントロダクション
AWSのRekognitionは、画像や動画から顔やオブジェクトを検出し、分析するサービスです。
今回試した顔認識以外にも、ラベリングなど多様な機能があります。
こちらの動画が参考になりました。https://www.youtube.com/watch?v=2mSbb42BcE8
2. 権限設定
今回の作業を行うために、IAMで下記の権限をユーザーに付与しました。
・AmazonSageMakerFullAccess
・AmazonS3FullAccess
3. 画像のアップロード
まず顔を含む画像をS3へアップロードします。
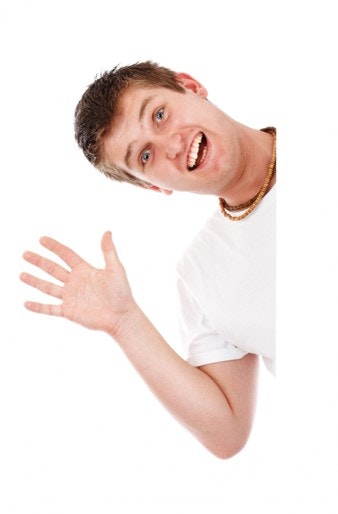
今回はパワーポイントにあった下記の画像を「image1.jpg」として配置しました。

実際の画像はこのようなものです。(チャーミングな方ですね!)

4. 画像処理の実行
次にsagemakerでノートブックインスタンスを作成します。(一番小さいリソースで可)

jupyter notebookで下記のコードを実行します。
先ほど記載したリンクの動画とchat GPTを使い、プログラムを作成しました。

# 必要なモジュールのインストール
!pip install -U pip boto3 awscli IPython opencv-python

# ライブラリのインポート
import boto3
from IPython.display import display, Image
import cv2
import numpy as np

# AWS SDK for Python のインポート
rekognition = boto3.client('rekognition')
s3 = boto3.client('s3')

# S3から画像を読み込む関数
def read_image_from_s3(bucket_name, file_key):
    s3 = boto3.client('s3')
    response = s3.get_object(Bucket=bucket_name, Key=file_key)
    image_bytes = response['Body'].read()
    nparr = np.frombuffer(image_bytes, np.uint8)
    image = cv2.imdecode(nparr, cv2.IMREAD_COLOR)
    return image

# 画像をS3にアップロードする関数
def upload_image_to_s3(bucket_name, file_key, image):
    _, image_bytes = cv2.imencode('.jpg', image)
    s3 = boto3.client('s3')
    s3.put_object(Bucket=bucket_name, Key=file_key, Body=image_bytes.tobytes())

# 顔にマスキング処理を適用する関数
def apply_blur_to_faces(image, response):
    for face_detail in response['FaceDetails']:
        left = int(face_detail['BoundingBox']['Left'] * image.shape[1])
        top = int(face_detail['BoundingBox']['Top'] * image.shape[0])
        width = int(face_detail['BoundingBox']['Width'] * image.shape[1])
        height = int(face_detail['BoundingBox']['Height'] * image.shape[0])
        face = image[top:top+height, left:left+width]
        blurred_face = cv2.GaussianBlur(face, (99, 99), 30)
        image[top:top+height, left:left+width] = blurred_face

# S3バケット名とファイルキー(パス)を指定
bucket_name = 'XXXXX'
file_key = 'image1.jpg'

# S3から画像を読み込み
image = read_image_from_s3(bucket_name, file_key)

# 顔の検出とマスキング処理
response = rekognition.detect_faces(
    Image={'S3Object':{'Bucket':bucket_name,'Name':file_key}},
    Attributes=['ALL']
)

apply_blur_to_faces(image, response)

# 画像をS3にアップロード
upload_image_to_s3(bucket_name, 'image2.jpg', image)
5. 処理後の画像を確認
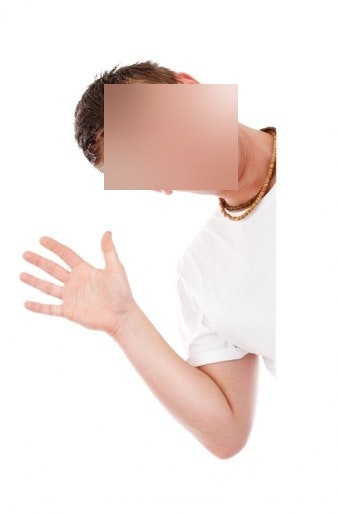
処理実行後にS3を確認すると、「image2.jpg」が作成されておりました。
画像を確認すると・・・想定通り・・・ではありませんが、きちんとマスキングがされておりました!
想定では、顔の丸い輪郭にそってマスキングがされるイメージでした。
6. まとめ
下記リンクに記載がありますがRekognitionで顔を検知した後に、
APIから返される値は「境界ボックス – 顔を囲む境界ボックスの座標」のため、
マスキングの範囲が四角なっているのですね。
この点は実際に利用する際に、プロジェクトの目的を達成できるかのポイントとなりそうですね。
以上になります。
読んでいただきありがとうございました。

