経緯
普段はJavaを書くことが多く、C#を書くときもWEBが多く、クライアントアプリはほとんどやったことないので、お勉強にWPFをやってみようと思います。
PrismでNavigationWindowをやってみたかったけど、意外と苦戦しました。
次に作るときにまた迷うと思ったので自分用メモとして残します。
プロジェクトの作成
2017/11/26追記
Prism Template Packが2系にアップデートしたらプロジェクトの作り方が変わったようなので、1系の説明の他に、2系の説明を追記。
2系の説明はここをみました。
Prism Template Pack 1.x系の場合
新しいプロジェクトから「Visual C#」→「Prism」→「WPF」→「Prism Unity App(WPF)」を選択

Prism Template Pack 2.x系の場合
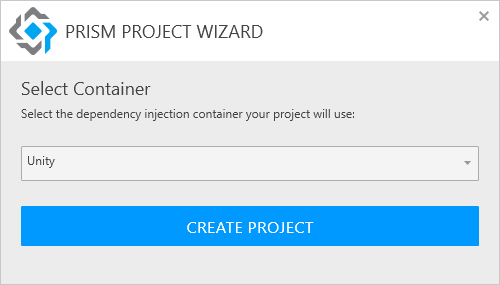
新しいプロジェクトから「Visual C#」→「Prism」→「WPF」→「Prism Blank App(WPF)」を選択

Select Containerを「Unity」に選択してCREATEボタンをクリックする。
最初に表示させるページの追加
Viewの配下にページ(WPF)を追加する。
今回はMenu.xamlとした。
MainWindow.xaml.csの変更
MainWindow.xaml.csを開き、Windowを継承している部分をNavigationWindowに変更する。
using System.Windows;
using System.Windows.Navigation;

namespace Hoge.Views
{
    /// <summary>
    /// Interaction logic for MainWindow.xaml
    /// </summary>
    public partial class MainWindow : NavigationWindow // この行を変更
    {
        public MainWindow()
        {
            InitializeComponent();
        }
    }
}
NavigationWindowに変更
MainWindow.xamlをNavigationWindowに変更し、Sourceを追加する。
ここまでで、トップページは完成。
<NavigationWindow x:Class="Hoge.Views.MainWindow"  <!-- この行変更 -->
        xmlns="http://schemas.microsoft.com/winfx/2006/xaml/presentation"
        xmlns:x="http://schemas.microsoft.com/winfx/2006/xaml"
        xmlns:prism="http://prismlibrary.com/"
        prism:ViewModelLocator.AutoWireViewModel="True"
        Title="{Binding Title}" Height="350" Width="525"
        Source="Menu.xaml"> <!-- ここを追加 -->

</NavigationWindow> <!-- この行を変更 -->
遷移先ページの作成
遷移先のページを作成。
View配下に、ページ(WPF)を追加する。
今回はSecondPage.xamlとする。
<Page x:Class="Hoge.Views.SecondPage"
      xmlns="http://schemas.microsoft.com/winfx/2006/xaml/presentation"
      xmlns:x="http://schemas.microsoft.com/winfx/2006/xaml"
      xmlns:mc="http://schemas.openxmlformats.org/markup-compatibility/2006"
      xmlns:d="http://schemas.microsoft.com/expression/blend/2008"
      xmlns:local="clr-namespace:Hoge.Views"
      mc:Ignorable="d"
      d:DesignHeight="300" d:DesignWidth="300"
      Title="SecondPage">

    <Grid>
        <Label Content="2ページ目だよ!" />
    </Grid>
</Page>
ページ遷移のボタンを追加
Menu.xamlにSecondPageに遷移させるためのボタンを用意する。
<Page x:Class="Hoge.Views.Menu"
      xmlns="http://schemas.microsoft.com/winfx/2006/xaml/presentation"
      xmlns:x="http://schemas.microsoft.com/winfx/2006/xaml"
      xmlns:mc="http://schemas.openxmlformats.org/markup-compatibility/2006"
      xmlns:d="http://schemas.microsoft.com/expression/blend/2008"
      xmlns:local="clr-namespace:Hoge.Views"
      mc:Ignorable="d"
      d:DesignHeight="300" d:DesignWidth="300"
      Title="Menu">

    <Grid>
        <Button Content="次のページへ" Height="30" Width="100" />
    </Grid>
</Page>
ボタンにページ遷移のイベントを追加
デザインから「次のページへ」ボタンをダブルクリックし、Menu.xaml.csを開く。Button_Clickメソッドが追加されているはずなので、以下のように追記してSecondPageへ遷移するようにする。

using System;
using System.Collections.Generic;
using System.Linq;
using System.Text;
using System.Threading.Tasks;
using System.Windows;
using System.Windows.Controls;
using System.Windows.Data;
using System.Windows.Documents;
using System.Windows.Input;
using System.Windows.Media;
using System.Windows.Media.Imaging;
using System.Windows.Navigation;
using System.Windows.Shapes;

namespace Hoge.Views
{
    /// <summary>
    /// Menu.xaml の相互作用ロジック
    /// </summary>
    public partial class Menu : Page
    {
        public Menu()
        {
            InitializeComponent();
        }

        private void Button_Click(object sender, RoutedEventArgs e)
        {
                        // 下記2行を追加
            var secondPage = new SecondPage();
            NavigationService.Navigate(secondPage);
        }
    }
}
これでNavigationWindowでページ遷移ができるようになります。