はじめに
- この資料は、WebRTCハンズオン勉強会(2016.09.19/2017.04.09)用の資料です。
- 資料の全体はこちらのINDEXを参照してください。
録画/録音はMediaRecorderで
どちらも録画可能に(Chrome 49〜、Firefoxは以前から)
- ローカルのメディアストリームの録画
- getUserMedia()で取得したもの
- リモートのメディアストリームの録画
- PeerConnectionで通信して受け取ったもの

MediaRecorder を生成
let recorder = new MediaRecorder(stream);
// または
let recorder = new MediaRecorder(stream, options);
optionsの例
const options = {
  videoBitsPerSecond : 512000, // 512kbits / sec
  mimeType : 'video/webm; codecs=vp9'
};
録画の開始
let chunks = []; // 録画データを保持する

// 一定間隔で録画が区切られて、データが渡される
recorder.ondataavailable = function(evt) {
  chunks.push(evt.data);
};

// 録画開始
recorder.start(1000); // 1000ms 毎に録画データを区切る
録画の停止
// 録画停止時に呼ばれる
recorder.onstop = function(evt) {
  recorder = null;
  playRecorded();
};

// 録画停止(の要求)
recorder.stop();
録画の再生
// 再生用のvideo要素
const playbackVideo = document.getElementById('playback_video');
let blobUrl = null;

function playRecorded() {
  const videoBlob = new Blob(chunks, { type: "video/webm" });
  blobUrl = window.URL.createObjectURL(videoBlob);

  if (playbackVideo.src) {
    window.URL.revokeObjectURL(playbackVideo.src); // 解放
    playbackVideo.src = null;
  }
  playbackVideo.src = blobUrl;
  playbackVideo.play();
}
これから作るもの
-
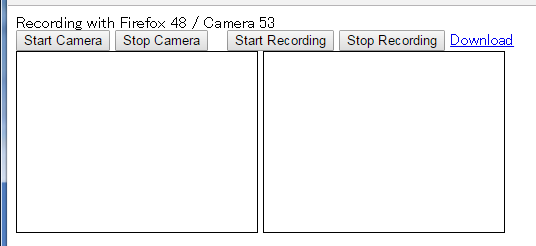
[Start Camera]ボタンで、カメラ映像を取得
- 左の<video>タグで再生
-
[Stop Camera]ボタンで、カメラ映像を停止
-
[Start Recording]ボタンで録画開始
-
[Stop Recording]ボタンで録画停止
- 右の<video>タグで再生
-
Dwonload リンクをクリックすると、ファイル保存
-
デモ:
準備
- このハンズオンのレポジトリ https://github.com/mganeko/handson_201609/
- 元になるファイル: ブランチ step_0
- https://github.com/mganeko/handson_201609/tree/step_0/mediarecorder
- その中の recorder.html を、自分の環境にコピーしてください
- recorder.html に記述を追加して行きましょう
やってみよう:(1) カメラ映像の取得
- [Start Camera]ボタンで、カメラ映像を取得
- 左の<video>タグで再生
- → startVideo() の中身を記述してください
- [Stop Camera]ボタンで、カメラ映像を停止
- → stopVideo() の中身を記述してください
※今日のハンズオンの最初でやったことの復習です
→ ここまでの記述例: ブランチ step_1
補足:新しいAPIについて
- navigator.mediaDevices.getUserMedia()
- FirefoxとChrome53から利用可能
- コールバックではなく、Promiseを返す
navigator.mediaDevices.getUserMedia(
  {video: true}
)
.then(function (stream) { // success
  // 成功したときの処理
}).catch(function (error) { // error
  // 失敗したときの処理
});
- video.srcObject = stream;
- FirefoxとChrome53から利用可能
- MediaStreamを直接渡せる
やってみよう:(2) 録画
- [Start Recording] ボタンで録画開始
- → startRecording() の中身を記述してください
- [Stop Recording] ボタンで録画停止
- 右の<video>タグで再生
- → stopRecording() の中身を記述してください
- → playRecorded() の中身を記述してください
※この資料を振り返ってやってみましょう
→ ここまでの記述例: ブランチ step_2
録画ファイルの保存
<a> タグを利用
const anchor = document.getElementById('download_link');
anchor.download = 'recorded.webm'; // ファイル名
anchor.href = blobUrl; // createObjecURL()で生成したURL
やってみよう:(3) 録画ファイルを保存
- playRecorded() にダンロード向けの処理を追加してください
→ ここまでの記述例: ブランチ step_3
Canvasから映像の取得(2017.04.05 追加)
let localStream = canvas.captureStream(10); // 10fps
やってみよう:(4) Canvasを利用したお絵かきツールの録画
-
responsive-canvas-painter のソースを利用
- cssフォルダ以下、jsフォルダ以下をコピーして利用
- index.htmlファイルから処理を拝借
(4-1) スタイルシート部分をコピー
<head>内にスタイルシートの指定をresponsive-canvas-painterのindex.htmlからコピー
 <link rel="stylesheet" href="css/painter.css" type="text/css">
 <style>
  a {
    color: #0088cc;
    text-decoration: none;
  }
  .logo {
    font-size: 60px;
    text-align: center;
    line-height: 60px;
  }
  .description {
    text-align: center;
  }
  .subtitle {
    padding-top: 10px;
  }
 </style>
(4-2) Canvas要素を記述
<body>の先頭にresponsive-canvas-painterのindex.htmlから記述をコピー
  <h1 class="logo">Responsive canvas painter</h1>
  <div class="description">
    <a href="https://github.com/woohoeon/responsive-canvas-painter"><span>View on GitHub</span></a>
    <h2 class="subtitle">Demo</h2>
  </div>
  <div id="section">
    <canvas class="canvas-layer" id="canvasLayer"></canvas>
    <canvas class="canvas-layer" id="canvasInterfaceLayer"></canvas>
  </div>
(4-3) お絵かき部分のスクリプトを記述
responsive-canvas-painterのindex.htmlからJavaScriptの部分をコピー
<script type="text/javascript" src="js/painter.js"></script>
<script>
  (() => {

    const painter = canvasPainter('canvasLayer', 'canvasInterfaceLayer', '700', '500');

    painter.init({
      type : 'pen',
      weight : 3,
      cap : 'round',
      color : '#ff5fa6'
    });

  })();
</script>
(4-4) Canvasからメディアストリームを取得
startVideo() の処理を変更
  function startVideo() {
    const canvasToCapture = document.getElementById('canvasLayer');
    if (canvasToCapture) {
      localStream = canvasToCapture.captureStream(30); // 30 fps
      localVideo.srcObject = localStream;
    }
  }
→ ここまでの記述例: ブランチ step_paint
- ※responsive-canvas-painterの css/ , js/ は含んでいないので、自分でコピーしてください
録画を使って遊ぼう
時間のあるかぎり、自由に拡張してみてください。例えば...
- リモートの映像を録画
- 前半で作った通信アプリを拡張して、相手の映像を録画してみよう
- 一人Wave
- 録画を複数並べて表示してみよう
- 一人Train(Ghost)
- 録画を重ねて表示してみよう
みなさん、ご自由な発想でお楽しみください!
ヒント:動的にvideoタグを作る
// 親となるdivタグ
var container =  document.getElementById('container');

// videoタグを生成
var newVideo = document.createElement('video');
newVideo.style.width = '160px';
newVideo.style.height = '120px';
newVideo.style.border = '1px solid';
newVideo.src = blobUrl;

// 親となるタグの配下に追加
container.appendChild(newVideo);

// 再生
newVideo.play();
→ 実装例: ブランチ step_extra
