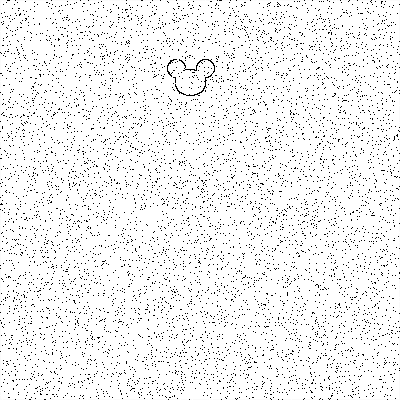
クマさんが映ってる画像から、クマさんに関する情報を得る「くまンティック・セぐまンテーション」。くまンティック・セグメンテーション2の続編です。
前回との違い
前回は、「クマさんの足跡が 複数 映ってる画像」を学習に用いて「クマさんの足跡を 複数 検出する」ことを目指しました(が、うまくいきませんでした)。
今回は、「クマさんのシルエットが 1つだけ 映ってる画像」を学習に用いて「クマさんのシルエットを 複数 検出する」ことを目指します。
クマさんが映ってる画像を自動で生成
学習および検証用のデータセット作成に用います。
import numpy as np
import random
from PIL import Image, ImageDraw, ImageFilter
from itertools import product

def draw_bear(n_bear=1): # ランダムにクマさんの画像を生成する
    r = g = b = 250
    im = Image.new('RGB', (400, 400), (r, g, b))
    draw = ImageDraw.Draw(im)

    for _ in range(random.randint(-1, 0)):
        r = random.randint(10, 200)
        g = random.randint(10, 200)
        b = random.randint(10, 200)
        x1 = random.randint(0, 400)
        y1 = random.randint(0, 400)
        dx = random.randint(10, 50)
        dy = random.randint(10, 50)
        draw.ellipse((x1, y1, x1+dx, y1+dy), fill=(r, g, b))

    for _ in range(n_bear):
        r = g = b = 1
        center_x = 200
        center_y = 200
        wx = 60
        wy = 50
        dx1 = 90
        dx2 = 20
        dy1 = 90
        dy2 = 20
        dx3 = 15
        dy3 = 100
        dy4 = 60
        shape1 = (center_x - wx, center_y - wy, center_x + wx, center_y + wy)
        shape2 = (center_x - dx1, center_y - dy1, center_x - dx2, center_y - dy2)
        shape3 = (center_x + dx2, center_y - dy1, center_x + dx1, center_y - dy2)
        shape4 = (center_x - dx3, center_y - dy3, center_x + dx3, center_y - dy4)

        zoom = 0.2 + random.random() * 0.4
        center_x = random.randint(-30, 250)
        center_y = random.randint(-30, 250)

        shape1 = modify(shape1, zoom=zoom, center_x=center_x, center_y=center_y)
        shape2= modify(shape2, zoom=zoom, center_x=center_x, center_y=center_y)
        shape3 = modify(shape3, zoom=zoom, center_x=center_x, center_y=center_y)
        shape4 = modify(shape4, zoom=zoom, center_x=center_x, center_y=center_y)

        draw.ellipse(shape1, fill=(r, g, b))
        draw.ellipse(shape2, fill=(r, g, b))
        draw.ellipse(shape3, fill=(r, g, b))
        #draw.ellipse(shape4, fill=(r, g, b))

    return im

def modify(shape, zoom=1, center_x=0, center_y=0):
    x1, y1, x2, y2 = np.array(shape) * zoom
    return (x1 + center_x, y1 + center_y, x2 + center_x, y2 + center_y)

class Noise: # クマさんの画像にノイズを乗せる
    def __init__(self, input_image):
        self.input_image = input_image
        self.input_pix = self.input_image.load()
        self.w, self.h = self.input_image.size

    def saltpepper(self, salt=0.05, pepper=0.05):
        output_image = Image.new("RGB", self.input_image.size)
        output_pix = output_image.load()

        for x, y in product(*map(range, (self.w, self.h))):
            r = random.random()
            if r < salt:
                output_pix[x, y] = (255, 255, 255)
            elif r > 1 - pepper:
                output_pix[x, y] = (  0,   0,   0)
            else:
                output_pix[x, y] = self.input_pix[x, y]
        return output_image

## クマさんの画像をセマンティック・セグメンテーション用の教師データに加工する
def getdata_for_semantic_segmentation(im):
    x_im = im.filter(ImageFilter.CONTOUR)
    im2 = Noise(input_image=x_im)
    x_im = im2.saltpepper()
    a_im = np.asarray(im)
    y_im = Image.fromarray(np.where(a_im == 1, 255, 0).astype(dtype='uint8'))
    return x_im, y_im
以上の関数を用意すれば、クマさんの画像 x_im および正解データ y_im は次のようにして得られます。
x_im, y_im = getdata_for_semantic_segmentation(draw_bear())
中身の確認
x_im
y_im
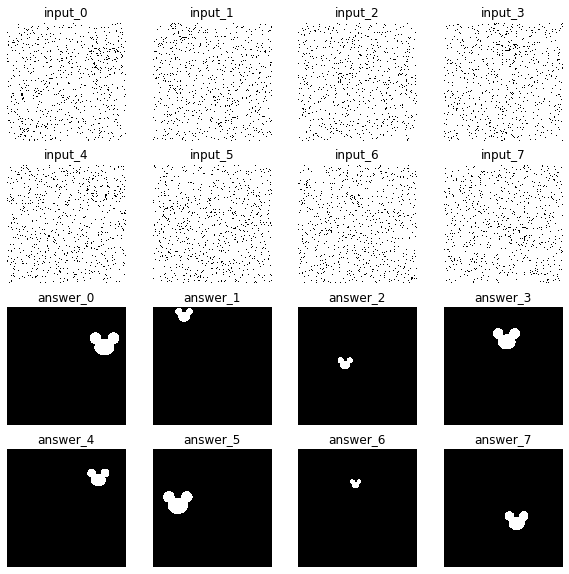
よし、クマさんの画像が生成されるのを確認しました。これは誰がどう見てもクマさんです。
学習用データ1000個生成
次のようにして学習用データを1000個生成します。
%%time
X_data = [] # 画像データ格納用
Y_data = [] # 正解データ格納用
for i in range(1000): # 画像を1000個生成する
    x_im, y_im = getdata_for_semantic_segmentation(draw_bear())
    X_data.append(x_im) # 画像データ
    Y_data.append(y_im) # 正解データ
CPU times: user 1min 13s, sys: 865 ms, total: 1min 14s
Wall time: 1min 15s
念のため、生成したデータの先頭8つだけ確認します。
%matplotlib inline
import matplotlib.pyplot as plt
fig = plt.figure(figsize=(10,10))
for i in range(16):
    ax = fig.add_subplot(4, 4, i+1)
    ax.axis('off')
    if i < 8: # 画像データのトップ8を表示
        ax.set_title('input_{}'.format(i))
        ax.imshow(X_data[i],cmap=plt.cm.gray, interpolation='none')
    else: # 正解データのトップ8を表示
        ax.set_title('answer_{}'.format(i - 8))
        ax.imshow(Y_data[i - 8],cmap=plt.cm.gray, interpolation='none')
plt.show()
得られたデータを PyTorch 用に整形します。
import torch
from torch.utils.data import TensorDataset, DataLoader

# 画像データと正解データを ndarray に変換
X_a = np.array([[np.asarray(x).transpose((2, 0, 1))[0]] for x in X_data])
Y_a = np.array([[np.asarray(y).transpose((2, 0, 1))[0]] for y in Y_data])

# ndarray の画像データと正解データを tensor に変換
X_t = torch.tensor(X_a, dtype = torch.float32)
Y_t = torch.tensor(Y_a, dtype = torch.float32)

# PyTorch で学習するためにデータローダーに格納
data_set = TensorDataset(X_t, Y_t)
data_loader = DataLoader(data_set, batch_size = 100, shuffle = True)
クマさんのシルエットを認識するクマネットワーク
前回のと同じネットワークを使いました。
from torch import nn, optim
from torch.nn import functional as F
class Kuma(nn.Module):
    def __init__(self):
        super(Kuma, self).__init__()
        # エンコーダー部分
        self.encode1 = nn.Sequential(
            *[
              nn.Conv2d(
                  in_channels = 1, out_channels = 6, kernel_size = 3, padding = 1),
              nn.BatchNorm2d(6)
              ])
        self.encode2 = nn.Sequential(
            *[
              nn.Conv2d(
                  in_channels = 6, out_channels = 16, kernel_size = 3, padding = 1),
              nn.BatchNorm2d(16)
              ])
        self.encode3 = nn.Sequential(
            *[
              nn.Conv2d(
                  in_channels = 16, out_channels = 32, kernel_size = 3, padding = 1),
              nn.BatchNorm2d(32)
              ])

        # デコーダー部分
        self.decode3 = nn.Sequential(
            *[
              nn.ConvTranspose2d(
                  in_channels = 32, out_channels = 16, kernel_size = 3, padding = 1),
              nn.BatchNorm2d(16)
              ])
        self.decode2 = nn.Sequential(
            *[
              nn.ConvTranspose2d(
                  in_channels = 16, out_channels = 6, kernel_size = 3, padding = 1),
              nn.BatchNorm2d(6)
              ])
        self.decode1 = nn.Sequential(
            *[
              nn.ConvTranspose2d(
                  in_channels = 6, out_channels = 1, kernel_size = 3, padding = 1),
              ])

    def forward(self, x):
        # エンコーダー部分
        dim_0 = x.size() # デコーダー第1層でサイズを元に戻すとき用
        x = F.relu(self.encode1(x))
        # return_indices = True にして、デコーダーで max_pool の位置idxを用いる
        x, idx_1 = F.max_pool2d(x, kernel_size = 2, stride = 2, return_indices = True)
        dim_1 = x.size() # デコーダー第2層でサイズを元に戻すとき用
        x = F.relu(self.encode2(x))
        # return_indices = True にして、デコーダーで max_pool の位置idxを用いる
        x, idx_2 = F.max_pool2d(x, kernel_size = 2, stride = 2, return_indices = True)
        dim_2 = x.size()
        x = F.relu(self.encode3(x)) # デコーダー第3層でサイズを元に戻すとき用
        # return_indices = True にして、デコーダーで max_pool の位置idxを用いる
        x, idx_3 = F.max_pool2d(x, kernel_size = 2, stride = 2, return_indices = True)

        # デコーダー部分
        x = F.max_unpool2d(x, idx_3, kernel_size = 2, stride = 2, output_size = dim_2)
        x = F.relu(self.decode3(x))
        x = F.max_unpool2d(x, idx_2, kernel_size = 2, stride = 2, output_size = dim_1)
        x = F.relu(self.decode2(x))
        x = F.max_unpool2d(x, idx_1, kernel_size = 2, stride = 2, output_size = dim_0)
        x = F.relu(self.decode1(x))
        x = torch.sigmoid(x)

        return x
学習開始
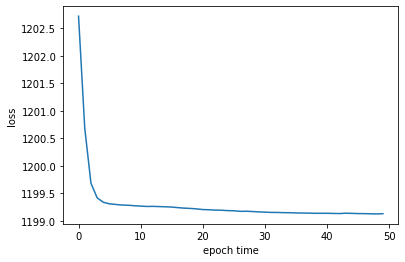
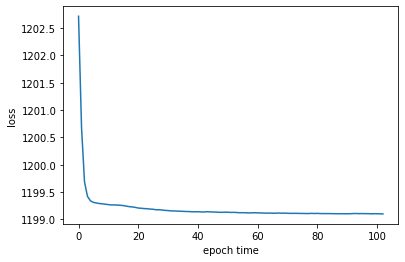
まず50エポックだけ学習します。
%%time

kuma = Kuma()
loss_fn = nn.MSELoss()
optimizer = optim.Adam(kuma.parameters(), lr = 0.01)

total_loss_history = []
epoch_time = 50
for epoch in range(epoch_time):
    !date
    total_loss = 0.0
    kuma.train()
    for i, (XX, yy) in enumerate(data_loader):
        optimizer.zero_grad()
        y_pred = kuma(XX)
        loss = loss_fn(y_pred, yy)
        loss.backward()
        optimizer.step()
        total_loss += loss.item()
    print("epoch:",epoch, " loss:", total_loss/(i + 1))
    total_loss_history.append(total_loss/(i + 1))

plt.plot(total_loss_history)
plt.ylabel("loss")
plt.xlabel("epoch time")
plt.savefig("total_loss_history")
plt.show()
Tue Feb 25 12:07:52 UTC 2020
epoch: 0  loss: 1202.7168701171875
Tue Feb 25 12:10:12 UTC 2020
epoch: 1  loss: 1200.6845336914062
Tue Feb 25 12:12:28 UTC 2020
...
Tue Feb 25 13:53:40 UTC 2020
epoch: 47  loss: 1199.1316650390625
Tue Feb 25 13:55:54 UTC 2020
epoch: 48  loss: 1199.1294555664062
Tue Feb 25 13:58:08 UTC 2020
epoch: 49  loss: 1199.133544921875
CPU times: user 1h 36min 47s, sys: 2min 23s, total: 1h 39min 11s
Wall time: 1h 52min 30s
収束したっぽいですね。
検証
学習に用いなかった新規データを100個生成して、検証します。
X_test = [] # テスト用の画像データを格納
Y_test = [] # テスト用の正解データを格納
Z_test = [] # テスト用の予測結果を格納

for i in range(100): # 学習に用いなかった新規データを100個生成
    x_im, y_im = getdata_for_semantic_segmentation(draw_bear())
    X_test.append(x_im)
    Y_test.append(y_im)

# テスト用の画像データをPyTorch用に整形
X_test_a = np.array([[np.asarray(x).transpose((2, 0, 1))[0]] for x in X_test])
X_test_t = torch.tensor(X_test_a, dtype = torch.float32)

# 学習済みのモデルを使って予測値を計算
Y_pred = kuma(X_test_t)

# 予測値を ndarray として格納
for pred in Y_pred:
    Z_test.append(pred.detach().numpy())
先頭10個のデータだけ図示してみます。
# データの先頭10個に対して、画像データ、正解データ、予測値を描画
fig = plt.figure(figsize=(12,36))
for i in range(10):
    ax = fig.add_subplot(10, 3, (i * 3)+1)
    ax.axis('off')
    ax.set_title('input_{}'.format(i))
    ax.imshow(X_test[i])
    ax = fig.add_subplot(10, 3, (i * 3)+2)
    ax.axis('off')
    ax.set_title('answer_{}'.format(i))
    ax.imshow(Y_test[i])
    ax = fig.add_subplot(10, 3, (i * 3)+3)
    ax.axis('off')
    ax.set_title('predicted_{}'.format(i))
    yp2 = Y_pred[i].detach().numpy()[0] * 255
    z_im = Image.fromarray(np.array([yp2, yp2, yp2]).transpose((1, 2, 0)).astype(dtype='uint8'))
    ax.imshow(z_im)
plt.show()
ノイズがだいぶ入っていますが、ある程度は予測できているようです。
クマさんの大きさ
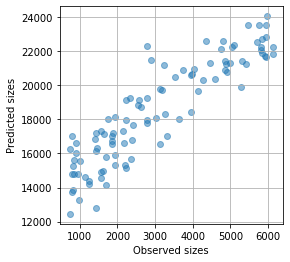
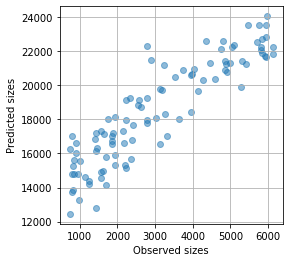
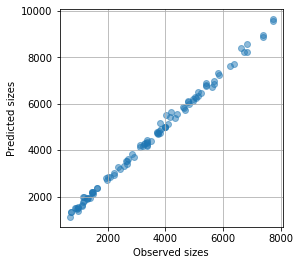
実際のクマさんの大きさと、検出された(予測された)クマさんの大きさの関係を見てみましょう。
A_ans = []
A_pred = []
for yt, zt in zip(Y_test, Z_test):
    # 正解の白の面積(ベクトルが3色分あるので3で割る)
    A_ans.append(np.where(np.asarray(yt) > 0.5, 1, 0).sum() / 3)
    A_pred.append(np.where(np.asarray(zt) > 0.5, 1, 0).sum()) # 予測値の白の面積

plt.figure(figsize=(4, 4))
plt.scatter(A_ans, A_pred, alpha=0.5)
plt.grid()
plt.xlabel('Observed sizes')
plt.ylabel('Predicted sizes')
# plt.xlim([0, 1700])
# plt.ylim([0, 1700])
plt.show()
精度は良いとは言えませんが、ぼんやりとした直線関係があります。
学習済みモデルの保存
次のようにして学習済みモデルを保存すれば、またいつでも使えます。
torch.save(kuma.state_dict(), "kuma_050_20200225.pytorch")
追加でさらに50エポック
なんとなく、追加でさらに50エポック学習してみました。コードは省略。
ちょっとは誤差が減ったかな(でも大きくは変わらない)
大きな改善はないようです。
torch.save(kuma.state_dict(), "kuma_100_20200225.pytorch")
とりあえず上のようにして学習済みモデルを保存しました。
複数のクマさんを検出する
さあ、やっと本番ですよ。今までは「クマさんが 1匹だけ 含まれる画像」を学習して「クマさんが 1匹だけ 含まれる画像」の中からクマさんを検出していましたが、今からは「クマさんが 1匹だけ 含まれる画像」を学習して「クマさんが 複数 含まれる画像」の中からクマさんを検出したいと思います。
学習済みモデルの読み込み
さきほど保存した、学習済みモデルを読み込みます。
kuma = Kuma()
kuma.load_state_dict(torch.load("kuma_100_20200225.pytorch"))
<All keys matched successfully>
クマさんを複数含む画像
クマさんを複数含む画像を100個生成します。クマさんが映ってない残念画像も生成します。
X_test = [] # テスト用の画像データを格納
Y_test = [] # テスト用の正解データを格納
Z_test = [] # テスト用の予測結果を格納

for i in range(100): # 学習に用いなかった新規データを100個生成
    x_im, y_im = getdata_for_semantic_segmentation(draw_bear(n_bear=random.randint(0, 5)))
    X_test.append(x_im)
    Y_test.append(y_im)

# テスト用の画像データをPyTorch用に整形
X_test_a = np.array([[np.asarray(x).transpose((2, 0, 1))[0]] for x in X_test])
X_test_t = torch.tensor(X_test_a, dtype = torch.float32)
予測開始
学習済みモデルなので、予測は一瞬です。
# 学習済みのモデルを使って予測値を計算
Y_pred = kuma(X_test_t)

# 予測値を ndarray として格納
for pred in Y_pred:
    Z_test.append(pred.detach().numpy())

# データの先頭10個に対して、画像データ、正解データ、予測値を描画
fig = plt.figure(figsize=(12,36))
for i in range(10):
    ax = fig.add_subplot(10, 3, (i * 3)+1)
    ax.axis('off')
    ax.set_title('input_{}'.format(i))
    ax.imshow(X_test[i])
    ax = fig.add_subplot(10, 3, (i * 3)+2)
    ax.axis('off')
    ax.set_title('answer_{}'.format(i))
    ax.imshow(Y_test[i])
    ax = fig.add_subplot(10, 3, (i * 3)+3)
    ax.axis('off')
    ax.set_title('predicted_{}'.format(i))
    yp2 = Y_pred[i].detach().numpy()[0] * 255
    z_im = Image.fromarray(np.array([yp2, yp2, yp2]).transpose((1, 2, 0)).astype(dtype='uint8'))
    ax.imshow(z_im)
plt.show()
ノイズがかなり多いですが、大雑把な予測はできました。
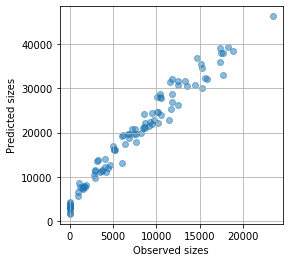
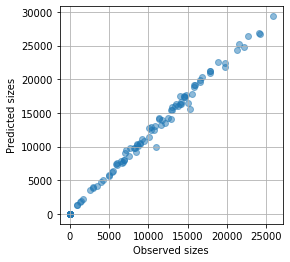
クマさんの実際の大きさと、予測された大きさとの関係を見てみましょう。
A_ans = []
A_pred = []
for yt, zt in zip(Y_test, Z_test):
    # 正解の白の面積(ベクトルが3色分あるので3で割る)
    A_ans.append(np.where(np.asarray(yt) > 0.5, 1, 0).sum() / 3)
    A_pred.append(np.where(np.asarray(zt) > 0.5, 1, 0).sum()) # 予測値の白の面積

plt.figure(figsize=(4, 4))
plt.scatter(A_ans, A_pred, alpha=0.5)
plt.grid()
plt.xlabel('Observed sizes')
plt.ylabel('Predicted sizes')
# plt.xlim([0, 1700])
# plt.ylim([0, 1700])
plt.show()
そこそこきれいな直線関係にあるので、大きさが知りたいだけならこの関係から補正できそうです。
さらにディープなネットワーク
もう1層追加して、さらにディープなネットワークを作ってみました。
import torch
from torch import nn, optim
from torch.nn import functional as F
class Kuma(nn.Module):
    def __init__(self):
        super(Kuma, self).__init__()
        # エンコーダー部分
        self.encode1 = nn.Sequential(
            *[
              nn.Conv2d(
                  in_channels = 1, out_channels = 6, kernel_size = 3, padding = 1),
              nn.BatchNorm2d(6)
              ])
        self.encode2 = nn.Sequential(
            *[
              nn.Conv2d(
                  in_channels = 6, out_channels = 16, kernel_size = 3, padding = 1),
              nn.BatchNorm2d(16)
              ])
        self.encode3 = nn.Sequential(
            *[
              nn.Conv2d(
                  in_channels = 16, out_channels = 32, kernel_size = 3, padding = 1),
              nn.BatchNorm2d(32)
              ])

        self.encode4 = nn.Sequential(
            *[
              nn.Conv2d(
                  in_channels = 32, out_channels = 64, kernel_size = 3, padding = 1),
              nn.BatchNorm2d(64)
              ])

        # デコーダー部分
        self.decode4 = nn.Sequential(
            *[
              nn.ConvTranspose2d(
                  in_channels = 64, out_channels = 32, kernel_size = 3, padding = 1),
              nn.BatchNorm2d(32)
              ])
        self.decode3 = nn.Sequential(
            *[
              nn.ConvTranspose2d(
                  in_channels = 32, out_channels = 16, kernel_size = 3, padding = 1),
              nn.BatchNorm2d(16)
              ])
        self.decode2 = nn.Sequential(
            *[
              nn.ConvTranspose2d(
                  in_channels = 16, out_channels = 6, kernel_size = 3, padding = 1),
              nn.BatchNorm2d(6)
              ])
        self.decode1 = nn.Sequential(
            *[
              nn.ConvTranspose2d(
                  in_channels = 6, out_channels = 1, kernel_size = 3, padding = 1),
              ])

    def forward(self, x):
        # エンコーダー部分
        dim_0 = x.size()
        x = F.relu(self.encode1(x))
        x, idx_1 = F.max_pool2d(x, kernel_size = 2, stride = 2, return_indices = True)

        dim_1 = x.size()
        x = F.relu(self.encode2(x))
        x, idx_2 = F.max_pool2d(x, kernel_size = 2, stride = 2, return_indices = True)

        dim_2 = x.size()
        x = F.relu(self.encode3(x))
        x, idx_3 = F.max_pool2d(x, kernel_size = 2, stride = 2, return_indices = True)

        dim_3 = x.size()
        x = F.relu(self.encode4(x))
        x, idx_4 = F.max_pool2d(x, kernel_size = 2, stride = 2, return_indices = True)

        # デコーダー部分
        x = F.max_unpool2d(x, idx_4, kernel_size = 2, stride = 2, output_size = dim_3)
        x = F.relu(self.decode4(x))

        x = F.max_unpool2d(x, idx_3, kernel_size = 2, stride = 2, output_size = dim_2)
        x = F.relu(self.decode3(x))

        x = F.max_unpool2d(x, idx_2, kernel_size = 2, stride = 2, output_size = dim_1)
        x = F.relu(self.decode2(x))

        x = F.max_unpool2d(x, idx_1, kernel_size = 2, stride = 2, output_size = dim_0)
        x = F.relu(self.decode1(x))

        x = torch.sigmoid(x)

        return x
その結果は次の通りです。コードは上に記したものと同一です(保存するファイル名が違うだけ)
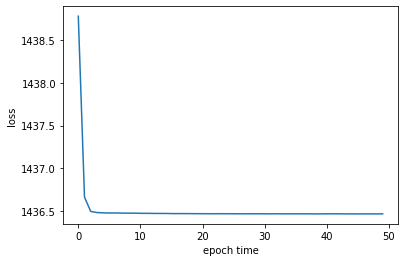
学習曲線
予測結果例(クマさん1匹)
クマさんのサイズ
予測結果例(クマさんたくさん)
クマさんのサイズ
1層追加するだけで、だいぶ綺麗になりました!
