この記事では、SwiftUIアプリでLineログインを統合し、ログイン成功時にユーザーのプロファイル情報を取得することについて説明します。
私は新しいChatGPT iOSアプリ(興味があれば私のTwitterをチェックしてください)でLineログイン機能を実装していたのですが、SwiftUIアプリ用のインストラクションがないことを発見しました。そこで、この記事を書きました。

SwiftUIアプリとは
SwiftUIアプリはApp構造体のみを持ち、AppDelegate ファイルや SceneDelegate ファイルは持っていません。
import SwiftUI

@main
struct TestApp: App {
    var body: some Scene {
        WindowGroup {
            ContentView()
        }
    }
}
認証に成功した後、
LineはアプリのカスタムURLスキーマを呼び出し、
認証トークンの情報を提供します。
SwiftUIアプリでは、
onOpenURLモディファイアがあり、
ユーザーがLineで認証した後のログイン結果を処理するために使用することができます。
アプリの登録
まず、LINEのデベロッパーサイトにアクセスし、アプリケーションを登録します。
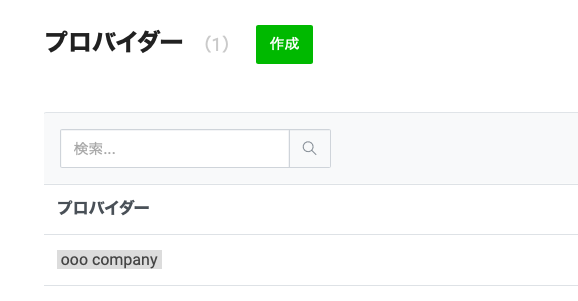
まず、プロバイダを作成します。
これは会社名でも自分の名前でもかまいません。
プロバイダーは複数のチャンネル(アプリケーション)を含むことができます。
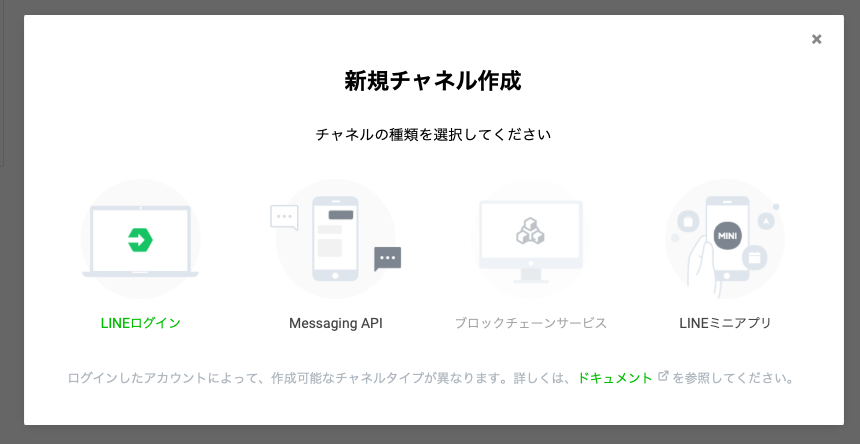
次に、作成したプロバイダーをクリックし、アプリケーション(チャネル)を作成します。
種類は、"LINEログイン"を選択します。
新しいチャンネルのフォームで、
情報を入力します。
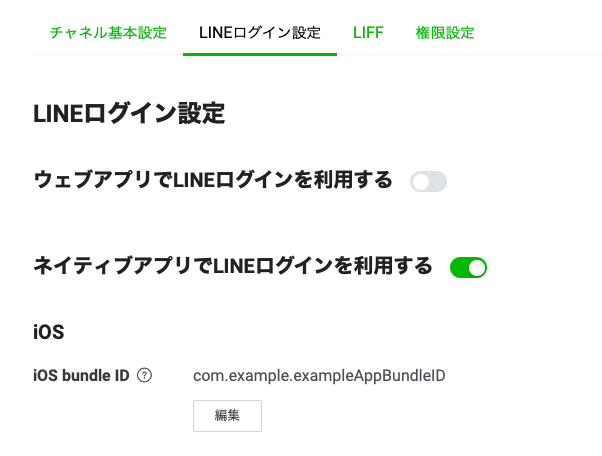
"アプリの種類"で、"ネイティブアプリ "をトグルします。
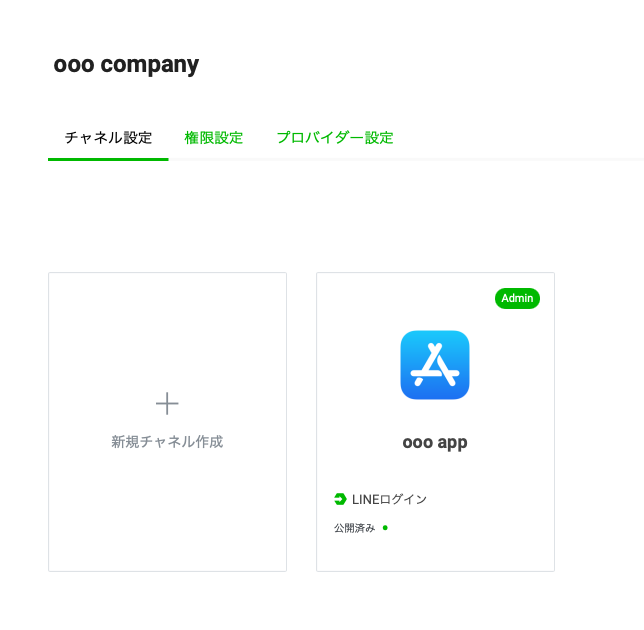
リストに自分のチャンネルが表示されるので、クリックして開きます。
「LINEログイン設定」にて、iOSアプリケーションのバンドルIDを入力します。
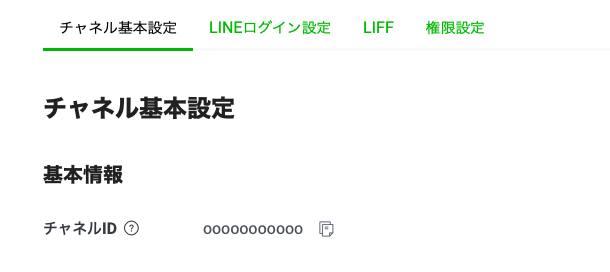
ここで、「チャンネル基本設定」タブにある チャンネルID を覚えておきましょう
また、チャンネルを公開とマークすることを確認してください。
SDKを統合
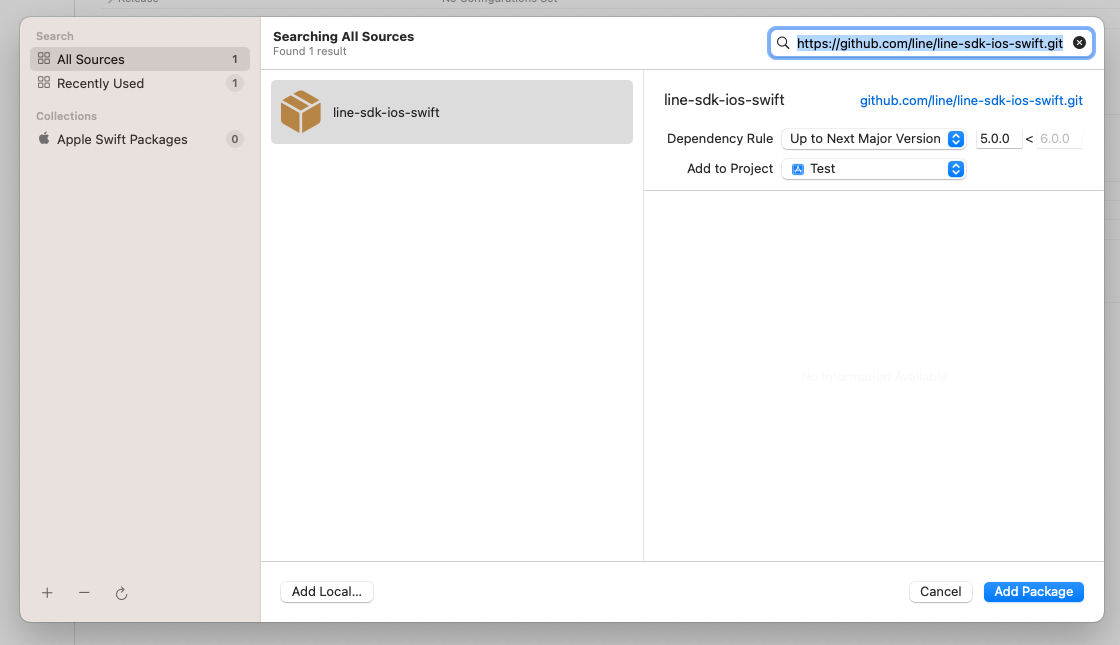
LineSDK はSwift Packageを使用しても配布されています。
プロジェクトに追加するには、Xcodeの「File」メニューをタップし、「Add Packages」をクリックしてください。以下のURLを入力します:
https://github.com/line/line-sdk-ios-swift.git
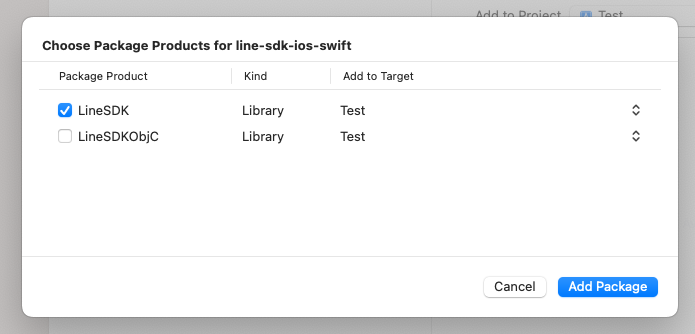
そして、「LineSDK」にチェックを入れ、メインとなるiOSターゲットを選択し、フレームワークを追加します。
URLタイプの追加
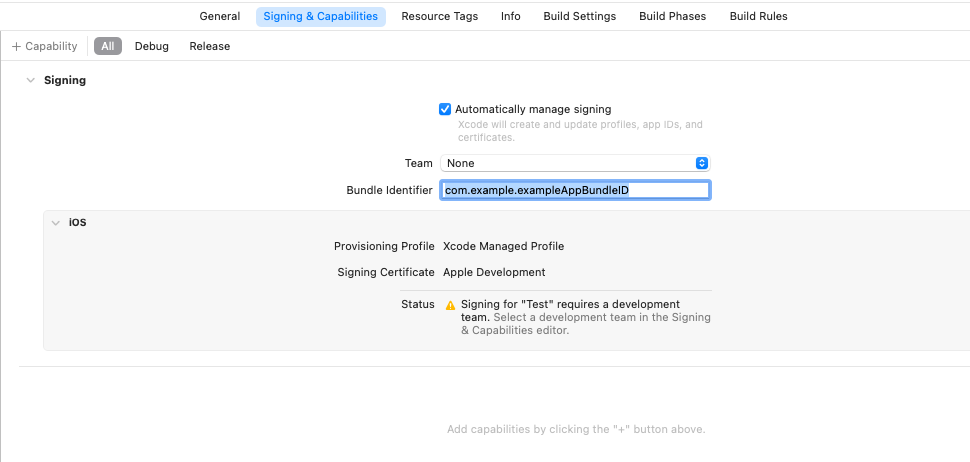
ユーザーがLINEで認証されると、LINEはURLスキーマを使ってあなたのアプリを呼び出します。そのURLスキーマを定義する必要があります。
プロジェクトファイルを開き、iOSアプリのターゲットを選択し、Info タブで、以下のURLスキーマを追加します。
line3rdp.$(PRODUCT_BUNDLE_IDENTIFIER):
SDKの初期化
SwiftUIアプリのファイル(@main`があるファイル)内で、
SDKをインポートし、
アプリ起動時にLine SDKを初期化するためのAppDelegateアダプタを追加します。
import SwiftUI
+import LineSDK

@main
struct LearnEnglishGPTApp: App {

+    @UIApplicationDelegateAdaptor(AppDelegate.self) var appDelegate

    var body: some Scene {
        WindowGroup {
            ContentView()
        }
    }
}

+class AppDelegate: UIResponder, UIApplicationDelegate, UIWindowSceneDelegate {
+    func application(_ application: UIApplication, didFinishLaunchingWithOptions launchOptions: [UIApplication.LaunchOptionsKey : Any]? = nil) -> Bool {
+        LineSDK.LoginManager.shared.setup(channelID: "ooooooooo", universalLinkURL: nil)
+        return true
+    }
+}
channelIDには、チャンネルページのチャンネルIDです。
認証結果の処理
SwiftUIアプリの場合、
認証結果を処理するためにonOpenURLを使用する必要があります。
SwiftUIアプリのファイルに、
ログインを処理するコードを追加します:
import SwiftUI
import LineSDK

@main
struct LearnEnglishGPTApp: App {

    @UIApplicationDelegateAdaptor(AppDelegate.self) var appDelegate

    var body: some Scene {
        WindowGroup {
            ContentView()
+                .onOpenURL { openedURL in
+                    if openedURL.absoluteString.contains("line3rdp") {
+                        _ = LineSDK.LoginManager.shared.application(UIApplication.shared, open: openedURL)
+                    }
                }
        }
    }
}

class AppDelegate: UIResponder, UIApplicationDelegate, UIWindowSceneDelegate {

    func application(_ application: UIApplication, didFinishLaunchingWithOptions launchOptions: [UIApplication.LaunchOptionsKey : Any]? = nil) -> Bool {
        LineSDK.LoginManager.shared.setup(channelID: "ooooooooo", universalLinkURL: nil)
        return true
    }

}
SwiftUI ビューにログインボタンを追加する
ログインの状態を監視するために、observedオブジェクトを使用することにします。
ここでの値は、ログインボタンを表示するビューに伝え返されます。
また、より多くの情報を含むカスタム構造体を使用することもできます。
class LineLoginStatus: NSObject, ObservableObject {
    @Published var isLoggingIn: Bool = false
    @Published var signInSuccessful_userID: String?
    @Published var errorMessage: String?
}
まず、SwiftUIでUIKit Lineログインボタンを表示するための互換ビューを作成する必要があります:
import SwiftUI
import LineSDK

struct LineLoginButtonCompatibleView: UIViewRepresentable {

    @ObservedObject var stateManager: LineLoginStatus

    func makeUIView(context: Context) -> UIView {
        let containerView = UIView()
        let loginButton = LoginButton()
        loginButton.delegate = context.coordinator
        loginButton.permissions = [.profile, .openID]
        containerView.addSubview(loginButton)
        // auto layout
        loginButton.translatesAutoresizingMaskIntoConstraints = false
        let centerX = loginButton.centerXAnchor.constraint(equalTo: containerView.centerXAnchor)
        let centerY = loginButton.centerYAnchor.constraint(equalTo: containerView.centerYAnchor)
        NSLayoutConstraint.activate([centerX, centerY])
        return containerView
    }

    func updateUIView(_ view: UIView, context: Context) { }

    func makeCoordinator() -> Coordinator {
        Coordinator(self)
    }

    class Coordinator: NSObject, LoginButtonDelegate {

        var parent: LineLoginButtonCompatibleView

        init(_ parentView: LineLoginButtonCompatibleView) {
            self.parent = parentView
        }

        func loginButton(_ button: LoginButton, didSucceedLogin loginResult: LoginResult) {
            print("Line login success! \(loginResult.userProfile?.userID) \(loginResult.userProfile?.displayName) \(loginResult.accessToken.value)")
            parent.stateManager.signInSuccessful_userID = loginResult.userProfile?.userID
            parent.stateManager.isLoggingIn = false
        }

        func loginButton(_ button: LoginButton, didFailLogin error: LineSDKError) {
            print("Line Login Error \(error.localizedDescription)")
            parent.stateManager.isLoggingIn = false
            parent.stateManager.errorMessage = error.localizedDescription
        }

        func loginButtonDidStartLogin(_ button: LoginButton) {
            print("Line login started")
            parent.stateManager.isLoggingIn = true
        }
    }

}
ログインボタンを表示するビューにログインの状態を報告するために、LineLoginStatusを使用しています。
その中で、
@Published変数を使用し、
これらの変数値の変更によってビューを更新します
(そして.onChangeビューモディファイアを呼び出します)。
##SwiftUIビューにLINEのログインボタンを追加する
さて、SwiftUIのビューにボタンを追加することができます:
struct SignInSheet: View {

    @ObservedObject var lineLoginStatus: LineLoginStatus = .init()

    @State private var loggedInUserID: String?
    @State private var errorMessage: String?
    @State private var isProcessingLogin: Bool = false

    var body: some View {

        Form {

            Section("Button") {
                LineLoginButton(stateManager: self.lineLoginStatus)
                    .onChange(of: self.lineLoginStatus.signInSuccessful_userID) { newValue in
                        if let newValue {
                            DispatchQueue.main.async {
                                self.loggedInUserID = newValue
                            }
                        }
                    }
                    .onChange(of: self.lineLoginStatus.errorMessage) { newValue in
                        if let newValue {
                            DispatchQueue.main.async {
                                self.errorMessage = newValue
                            }
                        }
                    }
                    .onChange(of: self.lineLoginStatus.isLoggingIn) { newValue in
                        DispatchQueue.main.async {
                            self.isProcessingLogin = newValue
                        }
                    }
                    .frame(height: 45)
                    .padding(.top, 5)
            }

            Section("Result") {
                if isProcessingLogin {
                    ProgressView()
                }
                if let loggedInUserID {
                    Label(loggedInUserID, systemImage: "checkmark.circle")
                }
                if let errorMessage {
                    Label(errorMessage, systemImage: "xmark")
                }
            }

        }

    }
}
onChange`ビューモディファイアを使って、ユーザーIDの変更(サインイン成功時)とエラーメッセージ(エラー時)を監視しています。
これで、このアプリを実行し、ユーザーがログインに成功したときにユーザーIDを確認することができます。
お読みいただきありがとうございました。
☺️ サイト https://MszPro.com

Written by MszPro~
