この機能はSNSアプリ向けです。この機能を実装することで
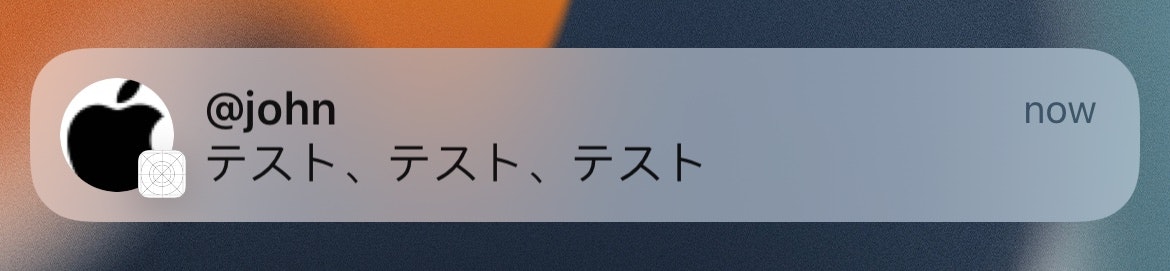
- アプリのアイコンだけでなく、チャットのアバターが通知に表示されます。

(アプリアイコンは右下に表示されます。このデモではアプリアイコンは空白です。)
-
システムの連絡先アプリや共有シートを通して、アプリ内の連絡先をシステムが提案できるようになります。
-
ユーザーがフォーカスモードをオンにして、選択した相手だけからの通信を許可すると、これらの人たちがあなたのアプリを通じて送信したメッセージが通知されます。
-
通知サービス拡張機能を使って、あなたのリモート通知を画面に表示される前に編集することができます。
プロジェクトの設定を行う
まず、あなたのXcodeプロジェクトの Communication Notifications の機能を有効にする必要があります。
その後、メインアプリケーションターゲットの Info.plist ファイルに以下のキーと値を追加します。
NSUserActivityTypes (Array)
    - INStartCallIntent
    - INSendMessageIntent

ローカル通知に向けた実装
この機能を試すには、まずローカル通知用に実装してみましょう。
事前に、ユーザーがアプリに通知を送信する許可を与えていることを確認してください。
まず、チャットの参加者についての情報をご提供ください
システムは、お使いのアプリ内の連絡先とiOSの「連絡先」アプリ内の連絡先を照合しようとしますので、チャットの参加者についての情報をシステムに提供いただく必要があります。
そのためには Intents フレームワークをインポートしていただく必要があります。その後関連する情報をご提供ください:
let demoParticipant: INPerson = INPerson(
    personHandle: INPersonHandle(value: "John-Appleseed@mac.com", type: .emailAddress),
    nameComponents: try? PersonNameComponents("John Appleseed"),
    displayName: "@john",
    image: INImage(imageData: UIImage(systemName: "applelogo")!.pngData()!),
    contactIdentifier: nil,
    customIdentifier: "john",
    isMe: false,
    suggestionType: .instantMessageAddress
)
| パラメータ名 | 説明 |
|---|---|
personHandle |
連絡先のEメールアドレスまたは電話番号。これは、iOSの連絡先アプリの連絡先情報と照合するために使用されます。 |
nameComponents |
参加者の本名(提供可能な場合) |
displayName |
参加者のニックネームまたは表示名 |
image |
参加者の画像またはアバター |
contactIdentifier |
iOSの連絡先アプリから取得した識別子。これにより、システムが連絡先情報を直接照合することができます。 |
customIdentifier |
カスタム識別子(参加者のユーザーID) |
isMe |
INPerson オブジェクトは、送信者と受信者の両方を表すことができます。この変数の設定が True の場合、このオブジェクトが現デバイスのユーザーを表すことを意味します。 |
それから、Intentオブジェクトを定義します。
let intent = INSendMessageIntent(
    recipients: [currentUser],
    outgoingMessageType: .outgoingMessageText,
    content: chatMessage,
    speakableGroupName: INSpeakableString(spokenPhrase: sender.displayName),
    conversationIdentifier: "chat001",
    serviceName: nil,
    sender: sender,
    attachments: nil
)

intent.setImage(sender.image, forParameterNamed: \.sender)
ここであなたはメッセージの受信者および送信者を表す INPerson オブジェクトを規定します。メッセージのコンテンツ、およびグループIDを規定します。
アプリがメッセージを受信するとき、メッセージを送信した人を送信者 sender に設定し、受信者 recipients を現在のユーザーに設定します。
アプリがメッセージを送信するとき、送信者 sender を現在のユーザーに設定し、受信者 recipients についてはメッセージを受信する人に設定します。
当社ではローカル通知を送信するために UNMutableNotificationContent オブジェクトを作成しているため、
INSendMessageIntent にUNMutableNotificationContent を追加するためにアップデート updating 機能を使用していただきます。
let interaction = INInteraction(intent: intent, response: nil)
interaction.direction = .incoming

interaction.donate(completion: nil)

do {
    content = try content.updating(from: intent) as! UNMutableNotificationContent
} catch {
    // Handle error
}
これにより、連絡先画像が通知に組み込まれます。
通常の通知
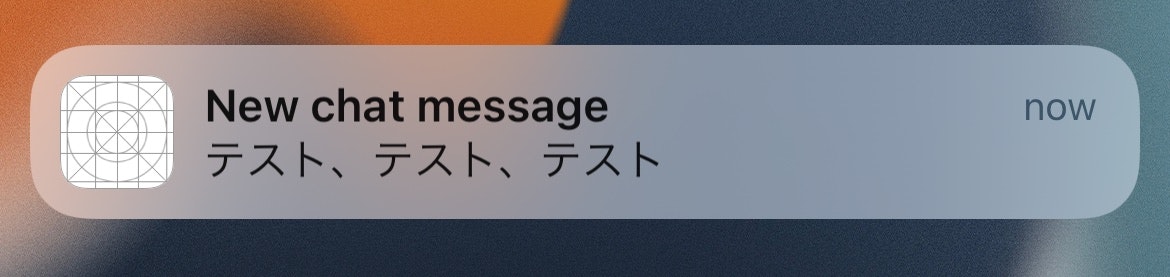
INSendMessageIntentに関する通知です
(アプリアイコンは右下に表示されます。このデモではアプリアイコンは空白です。)
これは完成したコードです。
Button("Schedule a notification (5 seconds later)") {

    let sender = [DemoParticipants.demoParticipant, DemoParticipants.demoParticipant2].randomElement()!
    let currentUser = DemoParticipants.currentUser
    let chatMessage = "テスト、テスト、テスト"

    var content = UNMutableNotificationContent()
    content.title = "New chat message"
    content.body = chatMessage

    let intent = INSendMessageIntent(
        recipients: [currentUser],
        outgoingMessageType: .outgoingMessageText,
        content: chatMessage,
        speakableGroupName: INSpeakableString(spokenPhrase: sender.displayName),
        conversationIdentifier: "chat001",
        serviceName: nil,
        sender: sender,
        attachments: nil
    )

    intent.setImage(sender.image, forParameterNamed: \.sender)

    let interaction = INInteraction(intent: intent, response: nil)
    interaction.direction = .incoming

    interaction.donate(completion: nil)

    do {
        content = try content.updating(from: intent) as! UNMutableNotificationContent
    } catch {
        // Handle error
    }

    // Show the message after 5 seconds
    let trigger = UNTimeIntervalNotificationTrigger(timeInterval: 5, repeats: false)
    let request = UNNotificationRequest(identifier: UUID().uuidString, content: content, trigger: trigger)
    UNUserNotificationCenter.current().add(request)

}
あなたはこれからコンタクトイメージの通知を見ることになります。このシステムは最終的に、あなたのアプリについて、システム共有シートおよびコンタクトアプリにおけるオプションであることを示唆します。
(これはシミュレーター上のデモのアプリでは見られません。しかしこれは、私が単に限られた回数でのみ、それを試したからかもしれません)。
リモート通知の実装
SNSの通知の大半はサーバーからAppleのAPNサーバーに送られてからデバイスに送信されます。
通知サービスの拡張機能をご利用いただく必要があります。その拡張機能は、通知を処理してから画面に表示するために使用されるものです。
AppleのAPNサーバーからアプリの通知サービス拡張機能に流れ、次にスマホの通知センターに流れます。
まず、Notification Service Extension拡張機能をプロジェクトに追加してください。

次に、新しく追加した Notification Service Extension 拡張機能の Info.plist に以下のキーと値を追加してください。

この機能 didReceive にコードを書き、通知オブジェクトに追加情報を加えます。
この機能はApple APNサーバーから通知が送られるたび、それがユーザーの画面に表示される前に呼び出されます。
import UserNotifications
import Intents
import UIKit

class NotificationService: UNNotificationServiceExtension {

    var contentHandler: ((UNNotificationContent) -> Void)?
    var bestAttemptContent: UNMutableNotificationContent?

    override func didReceive(_ request: UNNotificationRequest, withContentHandler contentHandler: @escaping (UNNotificationContent) -> Void) {
        if let bestAttemptContent = bestAttemptContent {
            // ...
        }
    }
}
INPersonを初期化するには、送信者の情報が必要となります。この情報はAPNプッシュ通知に含めることができます。
たとえば、以下がAPNプッシュ通知の一例です:
{
    "Simulator Target Bundle": "com.demo.SNS-Intent-Demo",
    "aps": {
        "alert": {
            "body": "Hello world! This is a test message.",
            "title": "@Neko"
        },
    },
    "sender_id": "1",
    "sender_name": "NekoNeko",
    "sender_image_url": "hhttps://placekitten.com/200/287",
    "sender_nickname": "@Neko",
    "sender_email": "Neko@Neko.Neko",
    "chat-session_id": "chat-1"
}
まず、プッシュ通知から追加情報を入手することができます。
if let senderAccountID = bestAttemptContent.userInfo["sender_id"] as? String,
               let senderName = bestAttemptContent.userInfo["sender_name"] as? String,
               let senderImageURLString = bestAttemptContent.userInfo["sender_image_url"] as? String,
               let senderImageURL = URL(string: senderImageURLString),
               let senderDisplayName = bestAttemptContent.userInfo["sender_nickname"] as? String,
               let senderEmailAddr = bestAttemptContent.userInfo["sender_email"] as? String,
               let chatSessionID = bestAttemptContent.userInfo["chat-session_id"] as? String
{
    // ...
}
そして、こうした情報を使用して INPerson または INSendMessageIntent を作成することで、プッシュ通知のメッセージにこれを付加します。
class NotificationService: UNNotificationServiceExtension {

    var contentHandler: ((UNNotificationContent) -> Void)?
    var bestAttemptContent: UNMutableNotificationContent?

    override func didReceive(_ request: UNNotificationRequest, withContentHandler contentHandler: @escaping (UNNotificationContent) -> Void) {
        self.contentHandler = contentHandler
        bestAttemptContent = (request.content.mutableCopy() as? UNMutableNotificationContent)

        if let bestAttemptContent = bestAttemptContent {
            // Modify the notification content here...
            bestAttemptContent.title = "\(bestAttemptContent.title) [modified]"

            /*
             Use the custom information included in this notification from the chat server to retrive the chat participant's information.
             - This is the information of the sender of the message.
             - Providing a user's accruate name helps the iOS system match this user with a contact in the system contact app.
             */
            if let senderAccountID = bestAttemptContent.userInfo["sender_id"] as? String,
               let senderName = bestAttemptContent.userInfo["sender_name"] as? String,
               let senderImageURLString = bestAttemptContent.userInfo["sender_image_url"] as? String,
               let senderImageURL = URL(string: senderImageURLString),
               let senderDisplayName = bestAttemptContent.userInfo["sender_nickname"] as? String,
               let senderEmailAddr = bestAttemptContent.userInfo["sender_email"] as? String,
               let chatSessionID = bestAttemptContent.userInfo["chat-session_id"] as? String
            {

                // You can also use the sender's phone number to initialize the `INPersonHandle` object. This will help the iOS system to match this sender with a contact.
                // TODO: - Here you need to download the image data from the URL. In this demo, we are using a system image instead.
                let messageSender = INPerson(
                    personHandle: INPersonHandle(value: senderEmailAddr, type: .emailAddress),
                    nameComponents: try? PersonNameComponents(senderName),
                    displayName: senderDisplayName,
                    image: INImage(imageData: UIImage(systemName: "applelogo")!.pngData()!),
                    contactIdentifier: nil,
                    customIdentifier: senderAccountID,
                    isMe: false,
                    suggestionType: .instantMessageAddress
                )

                let intent = INSendMessageIntent(recipients: nil,
                                                 outgoingMessageType: .outgoingMessageText,
                                                 content: bestAttemptContent.body,
                                                 speakableGroupName: INSpeakableString(spokenPhrase: senderDisplayName),
                                                 conversationIdentifier: chatSessionID,
                                                 serviceName: nil,
                                                 sender: messageSender,
                                                 attachments: nil)

                let interaction = INInteraction(intent: intent, response: nil)
                interaction.direction = .incoming
                interaction.donate(completion: nil)
                do {
                    let messageContent = try request.content.updating(from: intent)
                    contentHandler(messageContent)
                } catch {
                    print(error.localizedDescription)
                }

            }

            contentHandler(bestAttemptContent)
        }
    }

    override func serviceExtensionTimeWillExpire() {
        // Called just before the extension will be terminated by the system.
        // Use this as an opportunity to deliver your "best attempt" at modified content, otherwise the original push payload will be used.
        if let contentHandler = contentHandler, let bestAttemptContent =  bestAttemptContent {
            contentHandler(bestAttemptContent)
        }
    }

}
追加資料:通知を変更する
UNNotificationServiceExtension拡張機能を使うと、リモート通知がユーザー画面に表示される前に、その内容を読むように変更できます。
import UserNotifications

class NotificationService: UNNotificationServiceExtension {

    var contentHandler: ((UNNotificationContent) -> Void)?
    var bestAttemptContent: UNMutableNotificationContent?

    override func didReceive(_ request: UNNotificationRequest, withContentHandler contentHandler: @escaping (UNNotificationContent) -> Void) {
        self.contentHandler = contentHandler
        bestAttemptContent = (request.content.mutableCopy() as? UNMutableNotificationContent)

        if let bestAttemptContent = bestAttemptContent {
            // Modify the notification content here...
            bestAttemptContent.title = "\(bestAttemptContent.title) [modified]"

            contentHandler(bestAttemptContent)
        }
    }

    override func serviceExtensionTimeWillExpire() {
        // Called just before the extension will be terminated by the system.
        // Use this as an opportunity to deliver your "best attempt" at modified content, otherwise the original push payload will be used.
        if let contentHandler = contentHandler, let bestAttemptContent =  bestAttemptContent {
            contentHandler(bestAttemptContent)
        }
    }

}
例えば、以下のコードでは画面に表示される通知のタイトルを変更することができます。
bestAttemptContent.title = "\(bestAttemptContent.title) [modified]"
シミュレーターでは.apnsファイルを使用してこの機能をテストできないことにご注意ください。
完成したプロジェクト
完成したデモプロジェクトはこちらからダウンロードできます。
iOS Dev Letter ( •̀∀︎•́ )✧︎⋆︎*
私の公開されているQiita記事をカテゴリー別にご覧いただけます。

![]() 今後ともよろしくお願い致します。
今後ともよろしくお願い致します。