この記事の内容
- アプリにVisionOSターゲットを追加
- ビューの背景の透明度を切り替える方法
- VisionOSアプリ用のコードを条件付きで実行する方法
- 3Dアセット(.usdzファイル)を読み込む方法
- 没入空間を開き、2Dビューとともに3Dアセットを表示する方法
- 新しいウィンドウを開いて3Dアセットを表示し、ユーザーがモデルを回転・ズームできるようにする方法
- 3Dアセットの位置やスケールを変更する方法
- 3Dアセットにアニメーションを適用する方法
- 没入空間を閉じる方法
- オブジェクトを選択可能にする方法
この記事を読めば、部屋の中でランダムな場所に現れるロボットをタップして隠すミニゲームの作り方を学べます。

Githubリポジトリ: https://github.com/mszpro/VisionOS101
この記事は 英語で 録画されたYouTube動画もあります:https://www.youtube.com/watch?v=6gDu80Jbnwo
私のVisionOSアプリとゲーム
これまでに3つのVisionOSアプリとゲームを個人で開発・公開しました。
| Spatial Dream | Spatial Boxer | SoraSNS |
|---|---|---|
| 部屋の中で楽しめる小さなパズルゲーム。 | 音楽に合わせてボックスをパンチし、爆弾を避けるリズムゲーム。 | Mastodon、Bluesky、Misskey、Firefish向けのFediverseアプリ。 |
 |
 |
 |
さあ、始めましょう!
スタート
通常のiOS向けSwiftUIアプリケーションから始めます:
上記のようなファイル構造と、"Hello World" というテキストを表示する基本的なSwiftUIビューが用意されています。
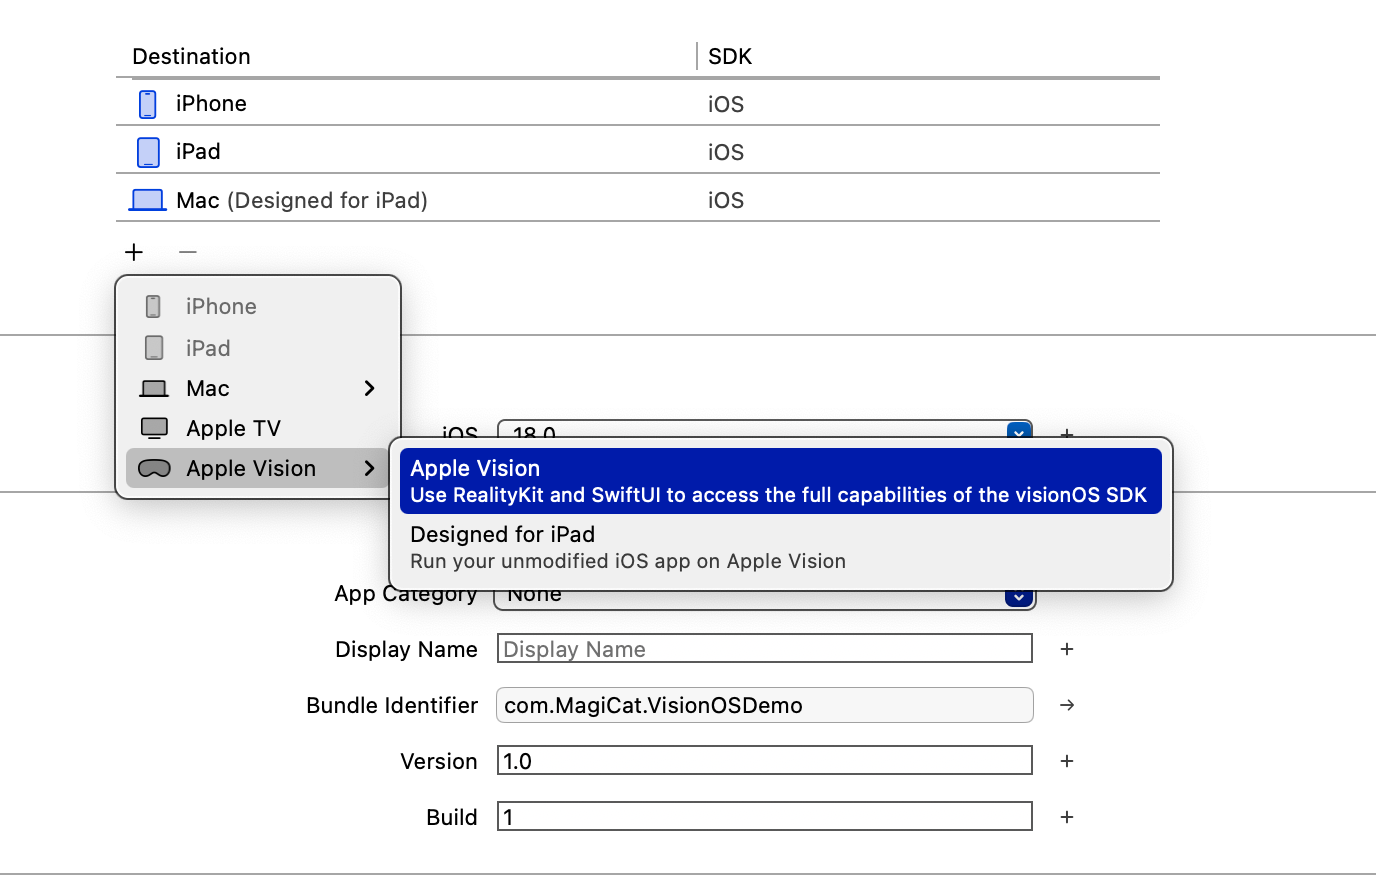
次に、メインターゲットのプロジェクト設定に切り替えます。アプリがすでにApple Visionに対応していることが表示されていますが、"Designed for iPad" と書かれています。
これは、このアプリがVisionOSでiPadと同じように動作することを意味しており、3D空間のアセットをサポートせず、背景が美しくない状態です。
例えば、ターゲットをApple Vision Proに切り替えて実行ボタンを押すと、今アプリをシミュレーターで実行することができます。
ビューには白い非透明な背景があり、ウィンドウのサイズを変更することが全くできません。
サポートされている実行先のリストで、Apple Vision Pro(Designed for iPad)を削除し、Apple Visionを追加します。
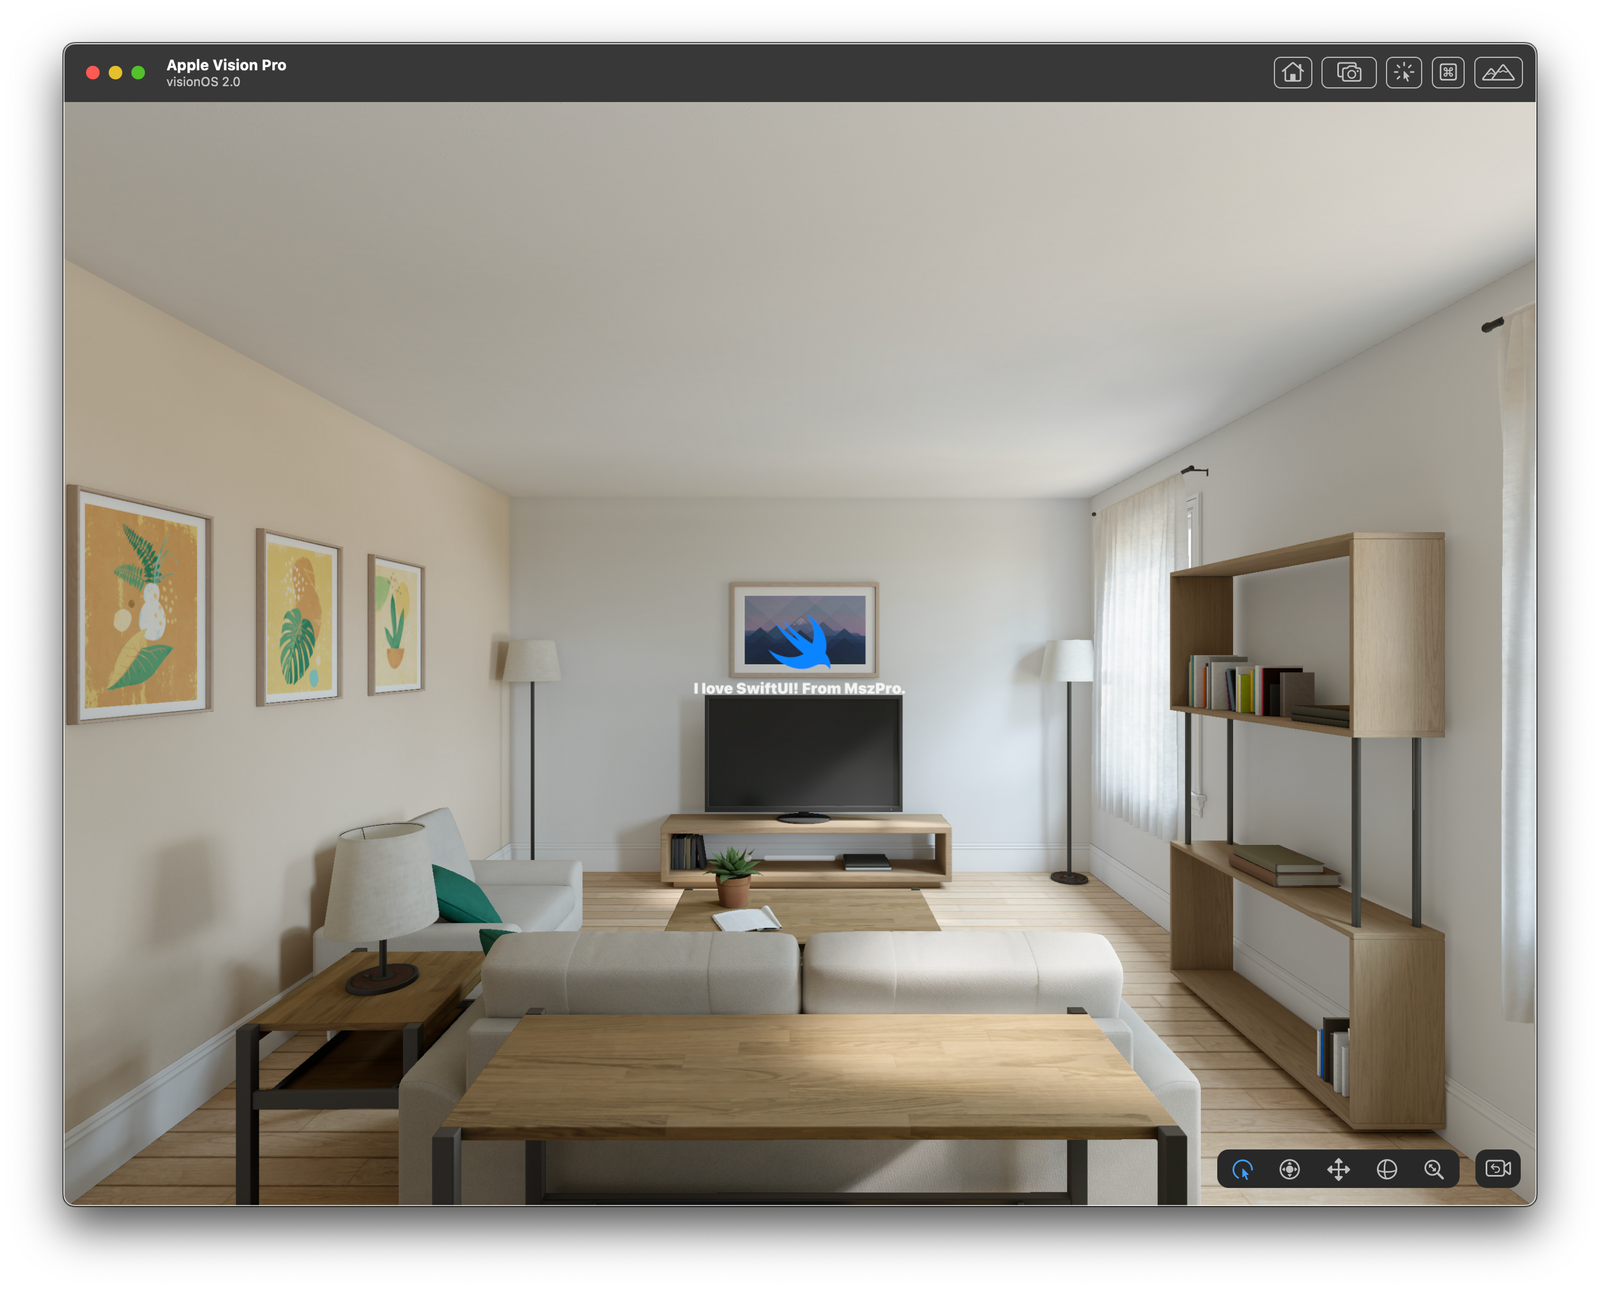
もう一度シミュレーターでアプリを実行すると、ネイティブのApple Vision Proアプリになったことが確認できます。
💡 既存のiOSアプリに上記の変更を適用すると、コンパイル警告が発生する可能性があります。例えば、使用しているサードパーティのパッケージやライブラリがApple Vision OSに対応していない場合や、一部のコードがVision OSで利用できない場合があります。その場合、Vision OS用に別のコードブランチを実行するために条件付きチェックを使用する必要があります。
背景のガラスモーフィズム効果を制御する
デフォルトでは、ガラスモーフィズム(ガラスのように、ウィンドウの後ろが見える効果)の背景が適用されています。これを制御することができます。
まず、アプリケーションウィンドウが2Dコンテンツのみを表示する場合、メインのSwiftUIアプリでwindowStyleを.plainに設定することができます:
import SwiftUI

@main
struct VisionOSDemoApp: App {
    var body: some Scene {
        WindowGroup {
            ContentView()
        }
        .windowStyle(.plain)
    }
}
次に、ContentViewでは背景のガラス効果を表示しないように設定します:
struct ContentView: View {

    var body: some View {

        VStack {

            Image(systemName: "swift")
                .resizable()
                .scaledToFit()
                .frame(width: 120, height: 120)
                .foregroundStyle(.tint)

            Text("I love SwiftUI! From MszPro.")
                .font(.largeTitle)
                .bold()

        }
        .padding()
        .glassBackgroundEffect(displayMode: .never)

    }

}
すると、次のようになります:
背景のガラス効果を動的に制御することも可能です。例えば、@State変数とトグルを使用して、以下のように制御できます:
struct ContentView: View {

    @State private var showGlassBackground: Bool = true

    var body: some View {

        VStack {

            Image(systemName: "swift")
                .resizable()
                .scaledToFit()
                .frame(width: 120, height: 120)
                .foregroundStyle(.tint)

            Text("I love SwiftUI! From MszPro.")
                .font(.largeTitle)
                .bold()

            Toggle("Show glass background", isOn: $showGlassBackground)

        }
        .padding()
        .frame(width: 700)
        .glassBackgroundEffect(displayMode: showGlassBackground ? .always : .never)

    }

}

3Dアセットバンドルの作成
アプリに3Dアセットを埋め込むには、3Dアセットファイル(通常は.usdz)を含む特別なSwiftパッケージを作成する必要があります。
まず、Reality Composer Proアプリケーションを開きます:
「Create new project」をクリックし、Xcodeプロジェクトと同じフォルダ内にプロジェクトを作成します。
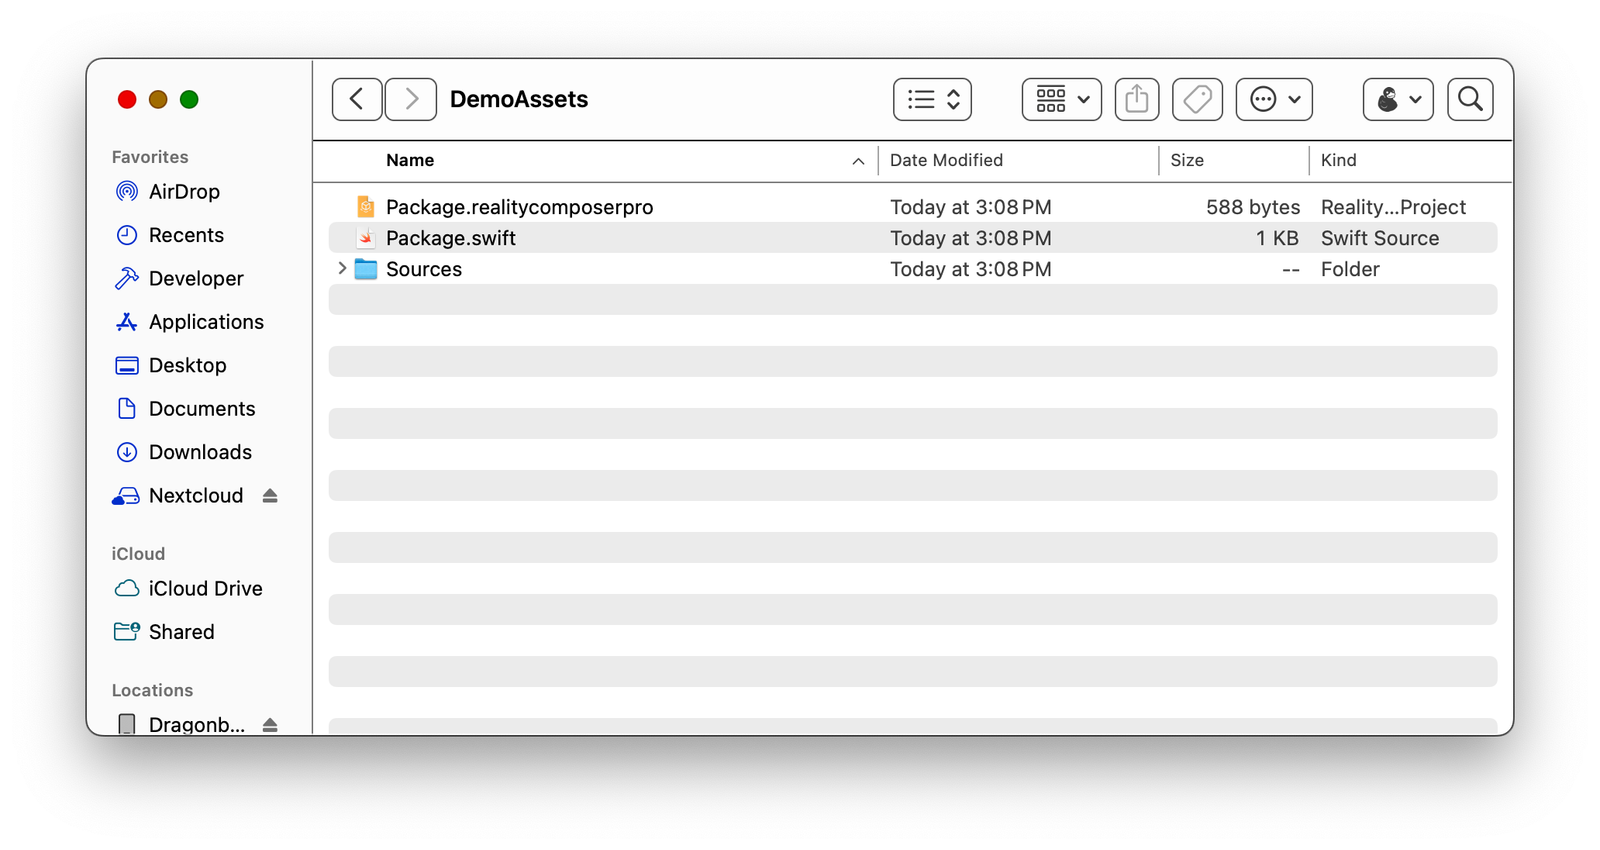
新しく作成されたプロジェクトフォルダを見ると、それが実際にはSwiftパッケージであることがわかります:
次に、3Dアセットを追加します。Apple Developerのウェブサイトにあるサンプル3Dモデルの中から1つを使用できます。ここで取得できます: https://developer.apple.com/augmented-reality/quick-look/
アニメーションについても説明するので、アニメーションが含まれているモデルを選んでください。例えば、ロボット(この記事のチュートリアルに従うためには、このロボットを使用する必要があります)。右クリックして.usdzファイルをダウンロードします。
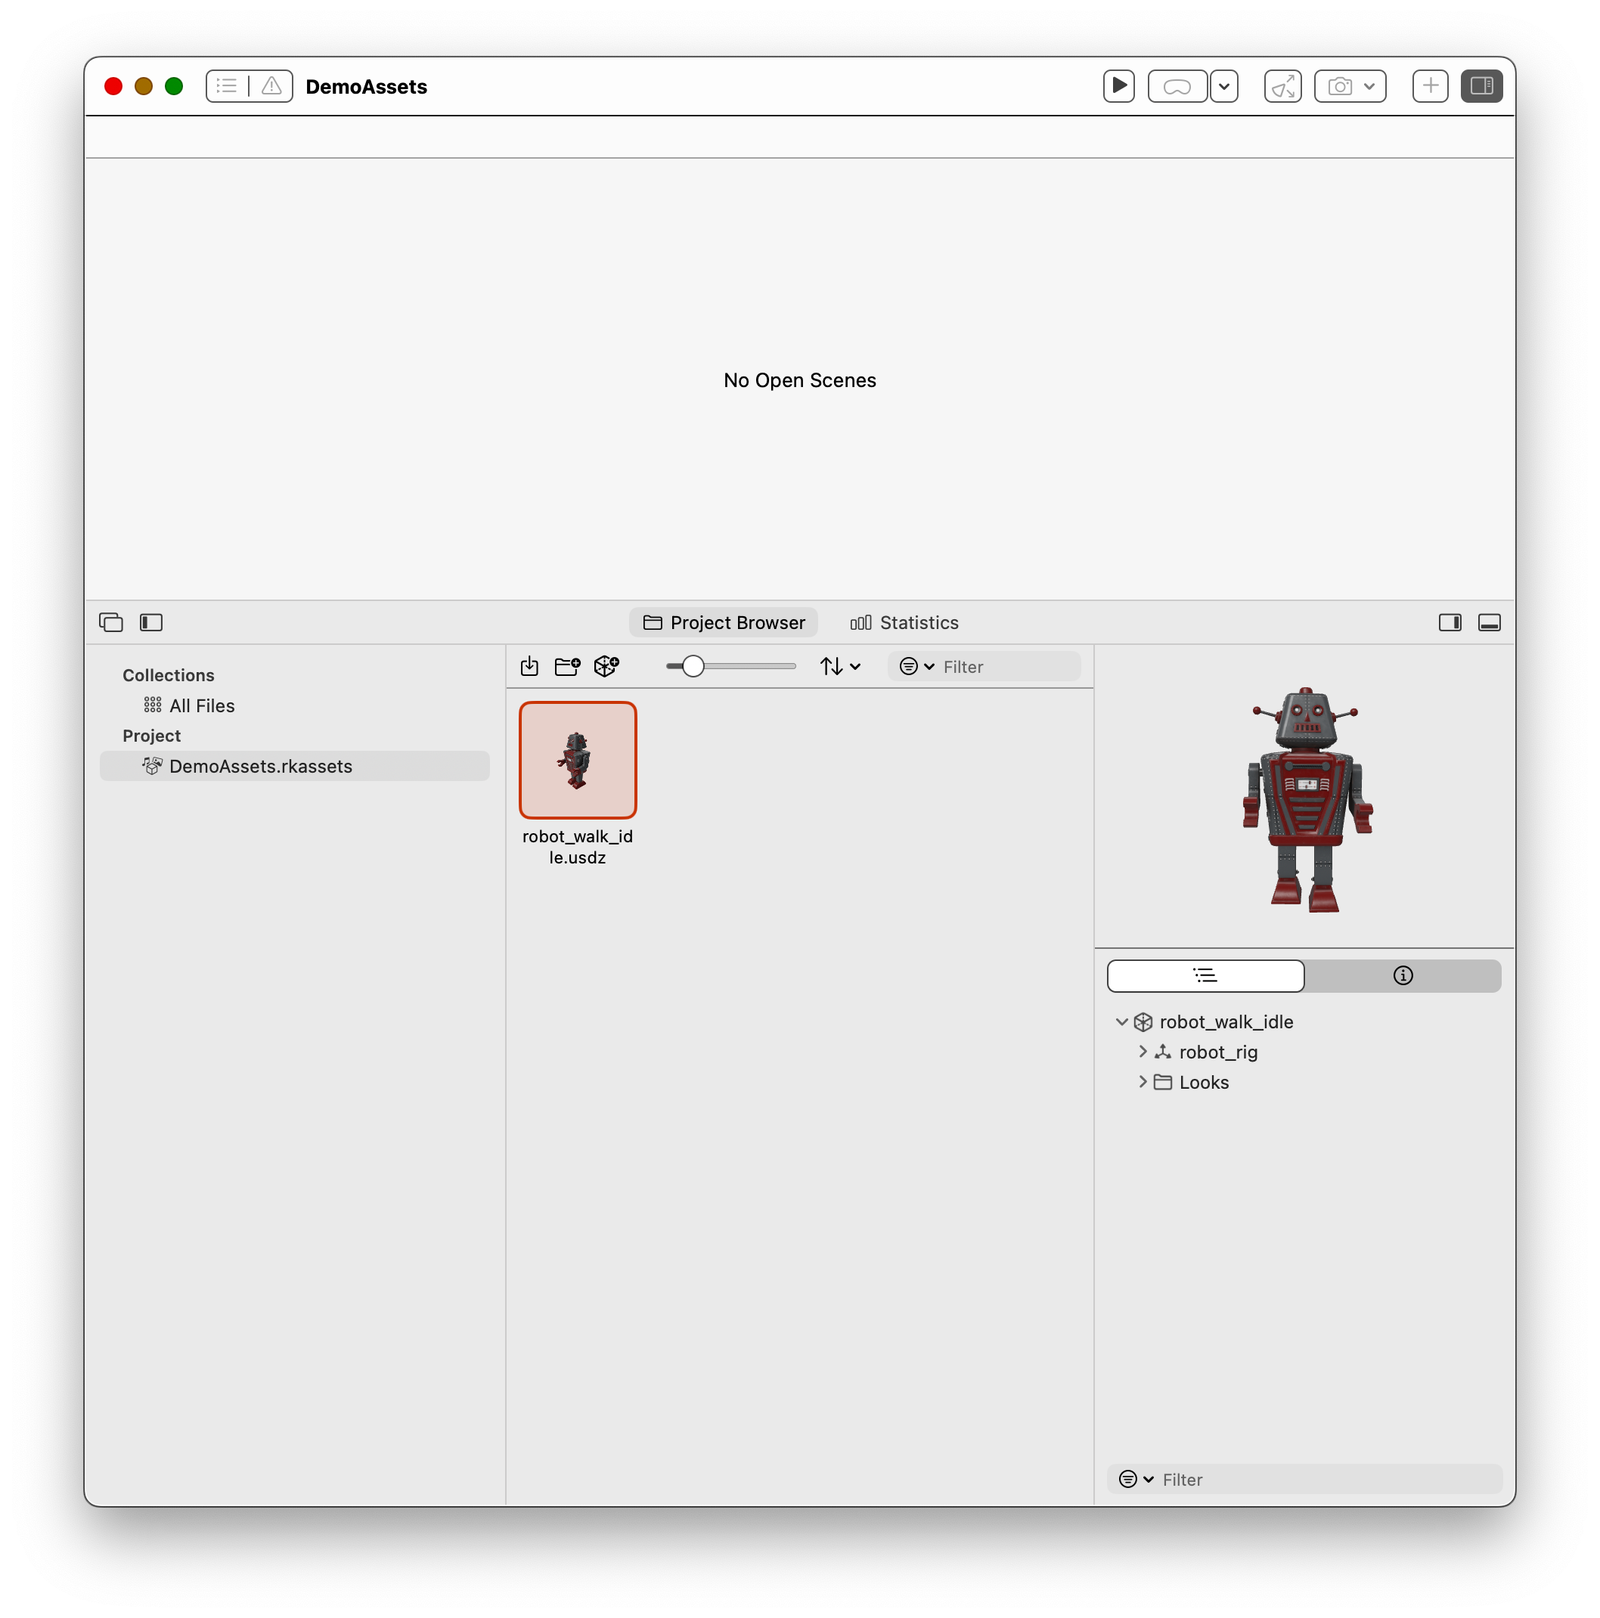
ダウンロードしたファイルをReality Composer Proのプロジェクトブラウザにドラッグします。右側のパネルでアニメーション付きのモデルが再生されるのが確認できます:
次に、Xcodeのプロジェクトで、このReality Composer ProプロジェクトをSwiftパッケージのようにインポートします:
アセットをバンドルから読み込む関数
次に、Reality Composer Proバンドルから特定のアセットを読み込むための関数を作成します:
#if os(visionOS)

import Foundation
import RealityKit
import DemoAssets

@MainActor
func loadFromRealityComposerProject(nodeName: String, sceneFileName: String) async -> Entity? {
    var entity: Entity? = nil
    do {
        let scene = try await Entity(named: sceneFileName,
                                     in: demoAssetsBundle)
        entity = scene.findEntity(named: nodeName)
    } catch {
        print("Failed to load asset named \(nodeName) within the file \(sceneFileName)")
    }
    return entity
}

#endif
このコードがVisionOS向けにビルドされている場合のみコンパイルされるように、if os(visionOS) チェックを使用しています。
この関数の入力では、ノードの名前(任意)とファイルの名前を受け取ります。
ノードの名前は任意です。上記のコードでは特定のエンティティ名を指定しない場合、ルートノードが使用されます。ただし、必要に応じて、すべての子ノードを簡単にリストアップすることができます。
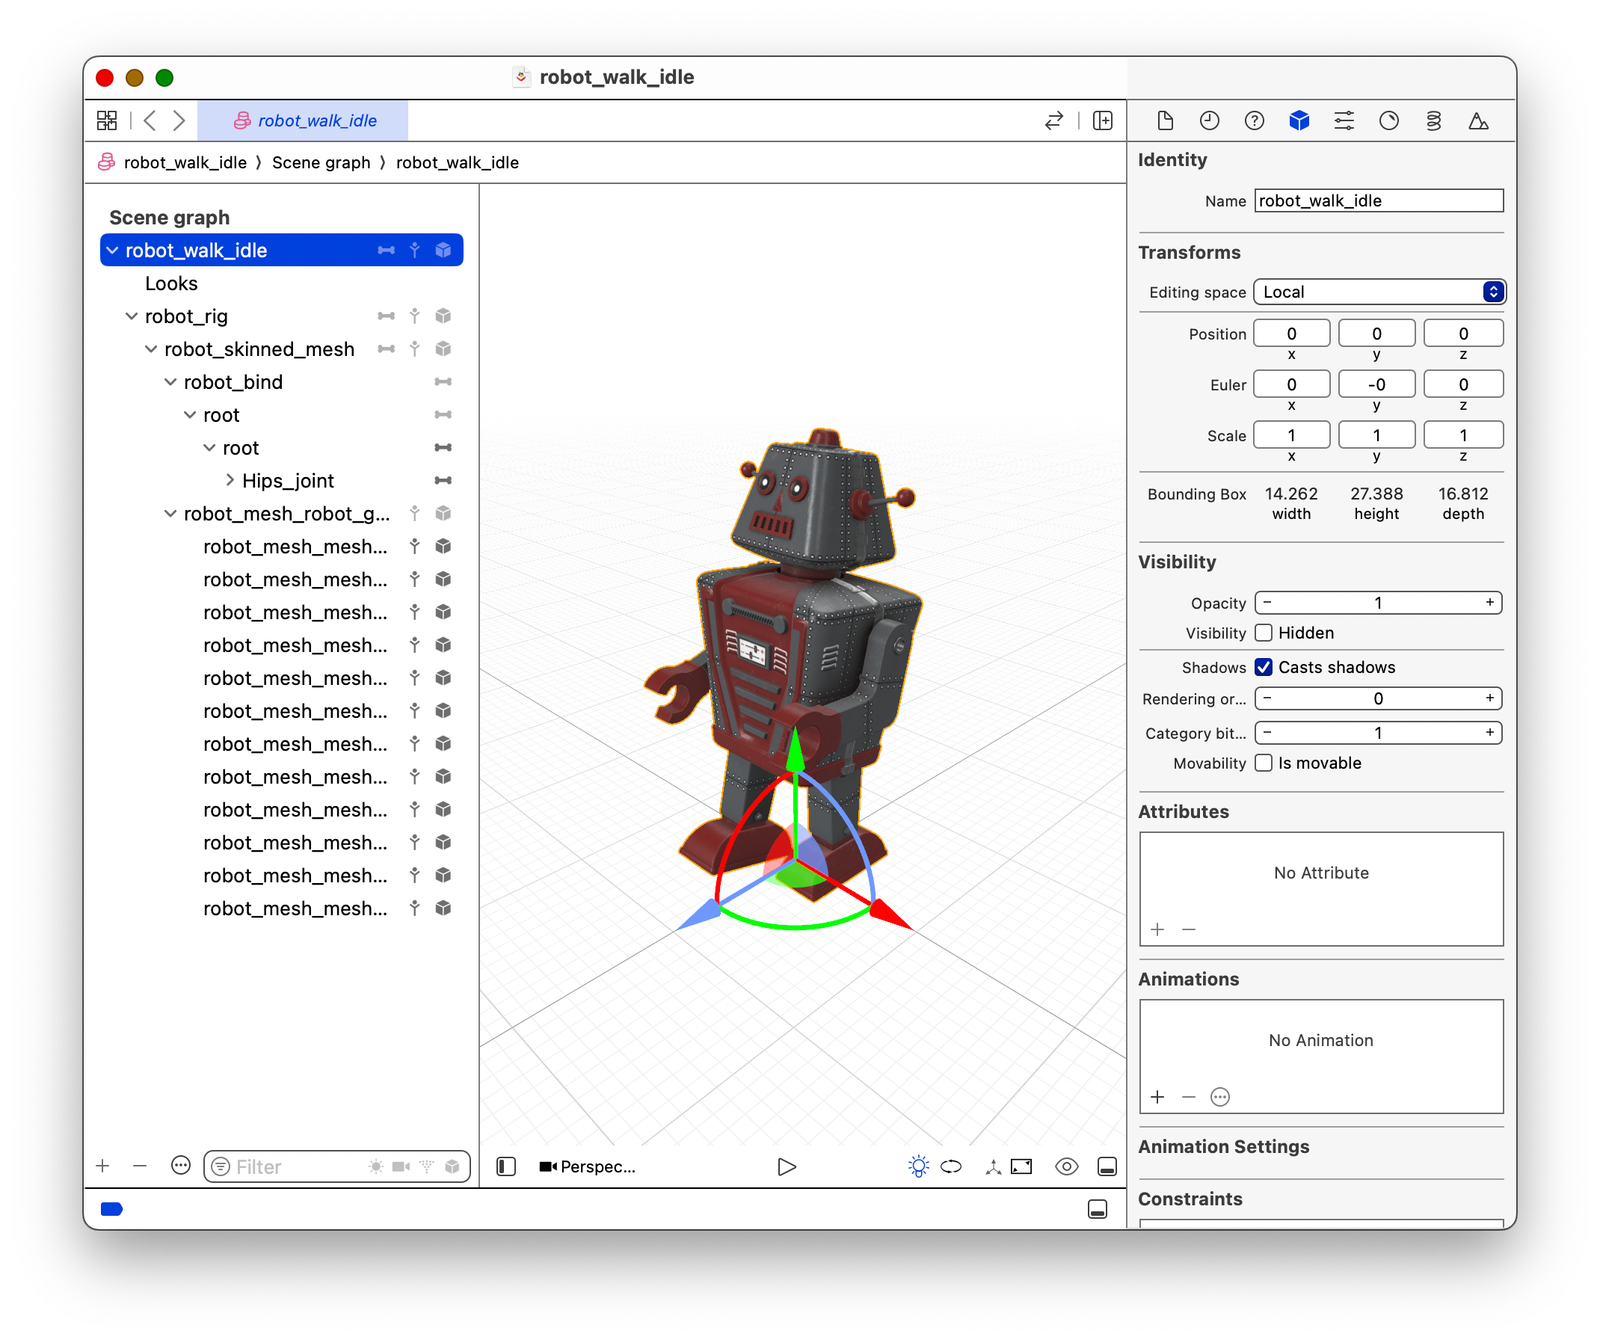
まず、.usdzファイルを開き、SceneKitにエクスポートして、ファイルに含まれるノードのリストを確認します:
上記の例では、robot_walk_idle がルート(トップレベル)エンティティの名前です。
これは、単一の.usdzファイル内に多くのアセットが含まれていて、そのうちの1つだけを読み込みたい場合に便利です。
💡 .usdzファイルはエンドユーザーに提供される読み取り専用の形式と考えてください。一方、.scnファイルは開発者や3Dデザイナーが3Dファイルの内容を編集するために使用する編集用形式です。.usdzはいつでも.scnに変換でき、暗号化されていません。
没入空間 (Immersive Space) の作成
ユーザーの部屋にコンテンツを表示するには、没入空間を作成する必要があります。これは、アプリケーションウィンドウ内に3Dコンテンツを表示するのとは異なります。この記事では、これらの両方を説明します。
ContentSpace.swift という新しいファイルを作成します。このファイルでは、RealityViewを使用して3Dアセットを読み込み、設定し、それをビューに追加します:
#if os(visionOS)

import SwiftUI
import RealityKit

struct ContentSpace: View {

    @State private var loaded3DAsset: Entity? = nil

    var body: some View {

        RealityView { content in

            loaded3DAsset = await loadFromRealityComposerProject(nodeName: "robot_walk_idle",
                                                                 sceneFileName: "robot_walk_idle.usdz")
            loaded3DAsset?.scale = .init(x: 0.1, y: 0.1, z: 0.1)
            loaded3DAsset?.position = .init(x: 0, y: 0, z: -3)

            // TODO: Collision
            // TODO: Allow user to tap on it
            // TODO: add lighting

            guard let loaded3DAsset else {
                return
            }

            content.add(loaded3DAsset)

        }

    }

}
オブジェクトに適切なスケールを設定することを忘れないでください。オブジェクトのサイズ(メートル単位)を最初に確認し、それに基づいて計算することができます。オブジェクトが見えない場合、通常それは大きすぎるか小さすぎることが原因です。
次に、メインアプリのコードに移り、上記のビューを没入空間として宣言します。また、スペースにIDを付与することで、アプリのどこからでもそれを呼び出すことができます。呼び出すと、それはユーザーの部屋に表示されます。
import SwiftUI

@main
struct VisionOSDemoApp: App {

    var body: some Scene {

        WindowGroup {
            ContentView()
        }
        .windowStyle(.plain)

        ImmersiveSpace(id: "robotSpace") {
            ContentSpace()
        }

    }

}
没入空間を開くか、現在表示されている没入空間を閉じるためには、SwiftUIの環境変数を使用します。
@Environment(\.openImmersiveSpace) private var openImmersiveSpace

@Environment(\.dismissImmersiveSpace) private var dismissImmersiveSpace
一度に表示できる没入空間は1つだけです。新しいものを表示するには、現在のものを閉じるようにしてください(もし表示されている場合)。
次に、上記のrobotSpaceを2Dビュー内で表示するボタンを追加します。

もし大きすぎる場合は、.scaleファクターを調整することができます。
座標空間についての説明
loaded3DAsset?.position = .init(x: 0, y: 0, z: -3) を使用して、3Dアセットの初期位置を設定していることに気づいたかもしれません。
- X軸は左右を意味します。
- Y軸は上下(天井や床)を意味します。
- Z軸はユーザーに対して近いか遠いかを意味します。負の値であればユーザーの前にあり、正の値であればユーザーの後ろにあることを示します。
アニメーションの追加
もし3Dモデルにアニメーションが付属している場合、そのアニメーションを再生することができます:
RealityView { content in

            // ...

            guard let loaded3DAsset else {
                return
            }

            // animation
            if let firstAnimation = loaded3DAsset.availableAnimations.first {
                loaded3DAsset.playAnimation(firstAnimation.repeat(),
                                           transitionDuration: 0,
                                           startsPaused: false)
            }

            // TODO: Collision
            // TODO: Allow user to tap on it
            // TODO: add lighting

            content.add(loaded3DAsset)

        }
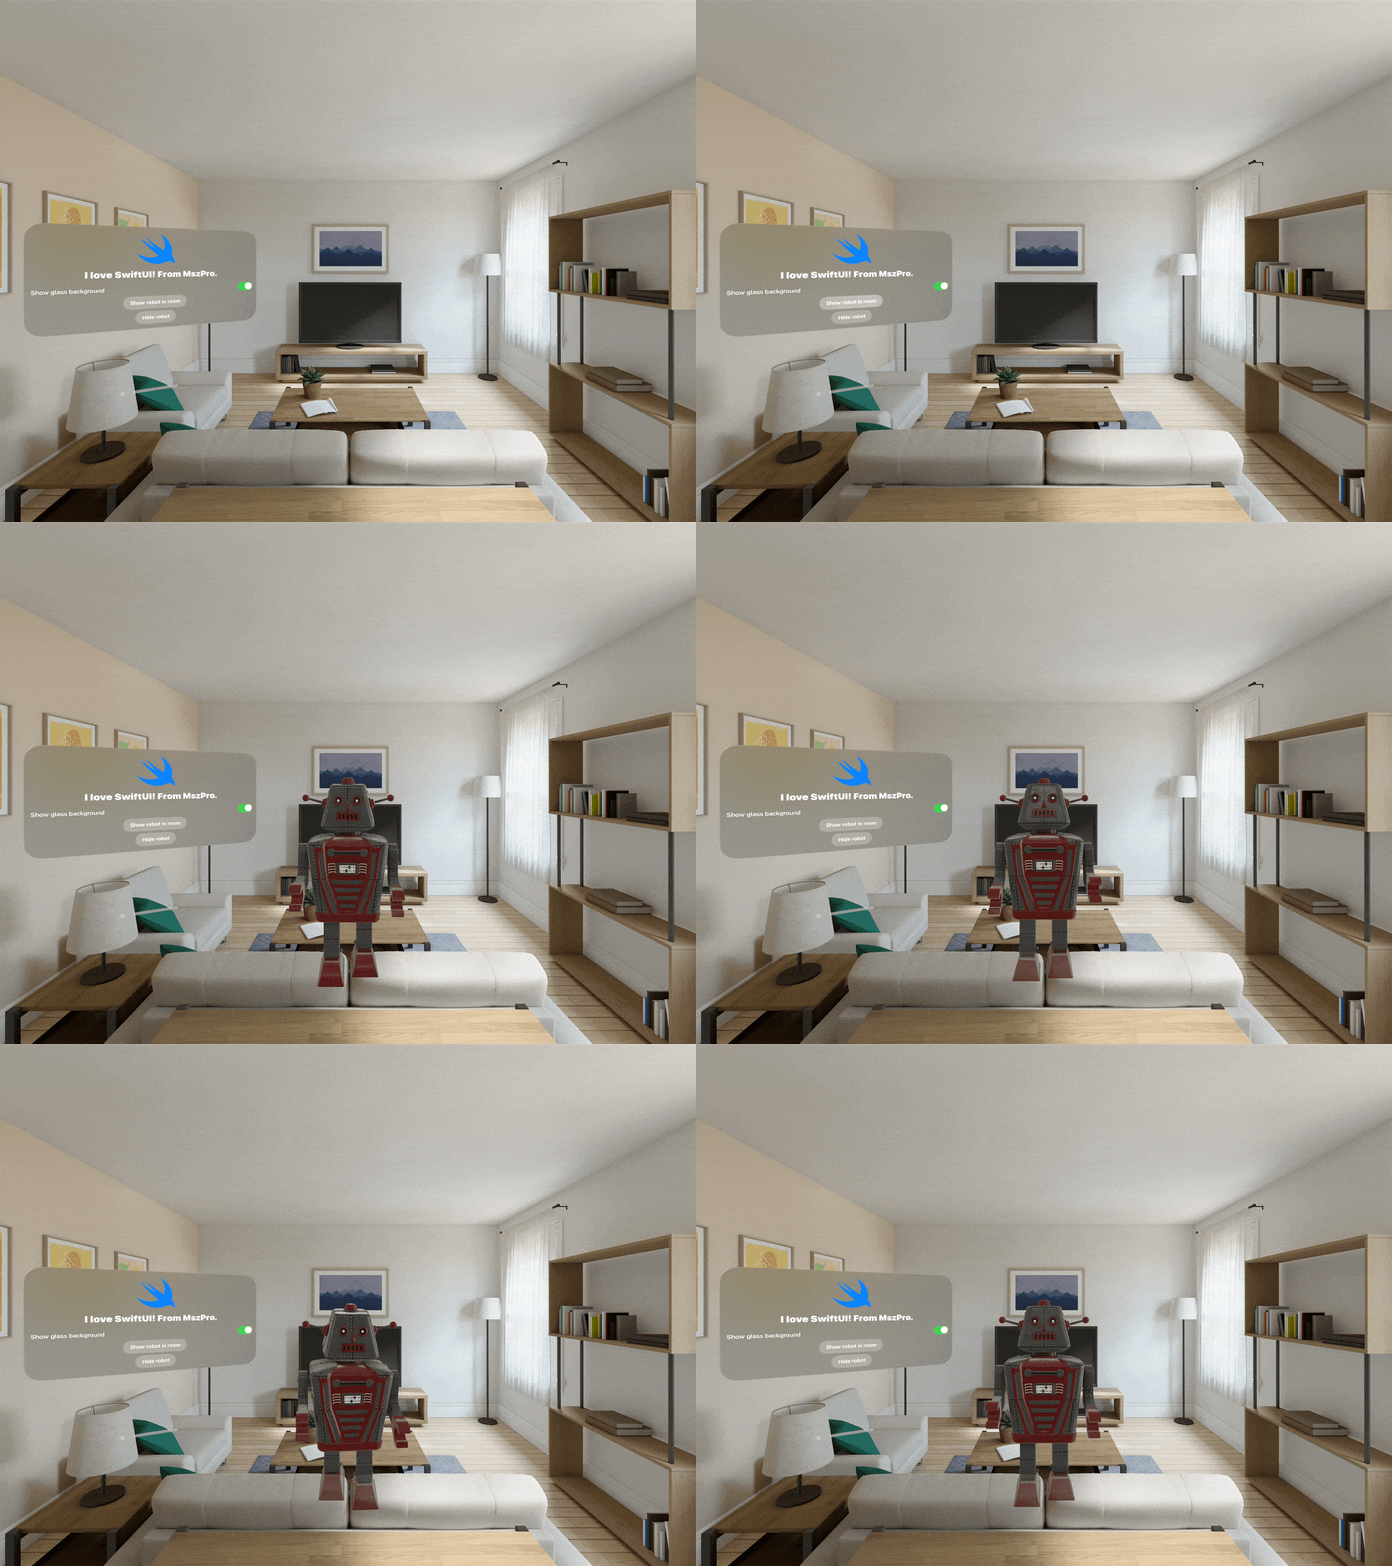
これで、ロボットが歩いているのが見えるはずです。
インタラクティブなロボットモデル用の新しいウィンドウを開く
ロボットをユーザーの空間ではなく新しいウィンドウで表示し、ユーザーがピンチ操作でロボットをスケールしたり、手を使って回転させたりしてさまざまな角度からロボットを見ることができるようにすることもできます。
まず、どのARモデルを表示するかをアプリに指示するデータ構造を定義する必要があります。
struct ARModelOpenParameter: Identifiable, Hashable, Codable {
    var id: String {
        return "\(modelName)-\(modelNodeName)"
    }
    var modelName: String
    var modelNodeName: String
    var initialScale: Float
}
次に、ユーザーがドラッグしてモデルを回転できるようにするため、以下のヘルパー関数をコード内に追加します。以下のコードは、Apple Developerのドキュメントにあるサンプルプロジェクトから引用しています。
/*
See the LICENSE.txt file for this sample’s licensing information.

Abstract:
A modifier for turning drag gestures into rotation.
*/

import SwiftUI
import RealityKit

extension View {
    /// Enables people to drag an entity to rotate it, with optional limitations
    /// on the rotation in yaw and pitch.
    func dragRotation(
        yawLimit: Angle? = nil,
        pitchLimit: Angle? = nil,
        sensitivity: Double = 10,
        axRotateClockwise: Bool = false,
        axRotateCounterClockwise: Bool = false
    ) -> some View {
        self.modifier(
            DragRotationModifier(
                yawLimit: yawLimit,
                pitchLimit: pitchLimit,
                sensitivity: sensitivity,
                axRotateClockwise: axRotateClockwise,
                axRotateCounterClockwise: axRotateCounterClockwise
            )
        )
    }
}

/// A modifier converts drag gestures into entity rotation.
private struct DragRotationModifier: ViewModifier {
    var yawLimit: Angle?
    var pitchLimit: Angle?
    var sensitivity: Double
    var axRotateClockwise: Bool
    var axRotateCounterClockwise: Bool

    @State private var baseYaw: Double = 0
    @State private var yaw: Double = 0
    @State private var basePitch: Double = 0
    @State private var pitch: Double = 0

    func body(content: Content) -> some View {
        content
            .rotation3DEffect(.radians(yaw == 0 ? 0.01 : yaw), axis: .y)
            .rotation3DEffect(.radians(pitch == 0 ? 0.01 : pitch), axis: .x)
            .gesture(DragGesture(minimumDistance: 0.0)
                .targetedToAnyEntity()
                .onChanged { value in
                    // Find the current linear displacement.
                    let location3D = value.convert(value.location3D, from: .local, to: .scene)
                    let startLocation3D = value.convert(value.startLocation3D, from: .local, to: .scene)
                    let delta = location3D - startLocation3D

                    // Use an interactive spring animation that becomes
                    // a spring animation when the gesture ends below.
                    withAnimation(.interactiveSpring) {
                        yaw = spin(displacement: Double(delta.x), base: baseYaw, limit: yawLimit)
                        pitch = spin(displacement: Double(delta.y), base: basePitch, limit: pitchLimit)
                    }
                }
                .onEnded { value in
                    // Find the current and predicted final linear displacements.
                    let location3D = value.convert(value.location3D, from: .local, to: .scene)
                    let startLocation3D = value.convert(value.startLocation3D, from: .local, to: .scene)
                    let predictedEndLocation3D = value.convert(value.predictedEndLocation3D, from: .local, to: .scene)
                    let delta = location3D - startLocation3D
                    let predictedDelta = predictedEndLocation3D - location3D

                    // Set the final spin value using a spring animation.
                    withAnimation(.spring) {
                        yaw = finalSpin(
                            displacement: Double(delta.x),
                            predictedDisplacement: Double(predictedDelta.x),
                            base: baseYaw,
                            limit: yawLimit)
                        pitch = finalSpin(
                            displacement: Double(delta.y),
                            predictedDisplacement: Double(predictedDelta.y),
                            base: basePitch,
                            limit: pitchLimit)
                    }

                    // Store the last value for use by the next gesture.
                    baseYaw = yaw
                    basePitch = pitch
                }
            )
            .onChange(of: axRotateClockwise) {
                withAnimation(.spring) {
                    yaw -= (.pi / 6)
                    baseYaw = yaw
                }
            }
            .onChange(of: axRotateCounterClockwise) {
                withAnimation(.spring) {
                    yaw += (.pi / 6)
                    baseYaw = yaw
                }
            }
    }

    /// Finds the spin for the specified linear displacement, subject to an
    /// optional limit.
    private func spin(
        displacement: Double,
        base: Double,
        limit: Angle?
    ) -> Double {
        if let limit {
            return atan(displacement * sensitivity) * (limit.degrees / 90)
        } else {
            return base + displacement * sensitivity
        }
    }

    /// Finds the final spin given the current and predicted final linear
    /// displacements, or zero when the spin is restricted.
    private func finalSpin(
        displacement: Double,
        predictedDisplacement: Double,
        base: Double,
        limit: Angle?
    ) -> Double {
        // If there is a spin limit, always return to zero spin at the end.
        guard limit == nil else { return 0 }

        // Find the projected final linear displacement, capped at 1 more revolution.
        let cap = .pi * 2.0 / sensitivity
        let delta = displacement + max(-cap, min(cap, predictedDisplacement))

        // Find the final spin.
        return base + delta * sensitivity
    }
}
その後、メインのSwiftUIアプリコードを更新します。
@main
struct VisionOSDemoApp: App {

    @Environment(\.dismissWindow) private var dismissWindow

    var body: some SwiftUI.Scene {

        WindowGroup {
            ContentView()
        }
        .windowStyle(.plain)

        ImmersiveSpace(id: "robotSpace") {
            ContentSpace()
        }

        WindowGroup(for: ARModelOpenParameter.self) { $object in
            // 3D view
            if let object {
                RealityView { content in
                    guard let arAsset = await loadFromRealityComposerProject(
                        nodeName: object.modelNodeName,
                        sceneFileName: object.modelName
                    ) else {
                        fatalError("Unable to load beam from Reality Composer Pro project.")
                    }
                    arAsset.generateCollisionShapes(recursive: true)
                    arAsset.position = .init(x: 0, y: 0, z: 0)
                    arAsset.scale = .init(x: object.initialScale,
                                          y: object.initialScale,
                                          z: object.initialScale)
                    arAsset.components[InputTargetComponent.self] = InputTargetComponent(allowedInputTypes: .all)
                    content.add(arAsset)
                }
                .dragRotation()
                .frame(width: 900, height: 900)
                .glassBackgroundEffect(displayMode: .always)
            }
        }
        .windowStyle(.volumetric)
        .defaultSize(width: 0.5, height: 0.5, depth: 0.5, in: .meters)

    }

}
ここでの変更点は以下の通りです:
- ビューのタイプを
SceneからSwiftUI.Sceneに変更します。これは、同じ名前がRealityKitのシステムフレームワーク内でも使われているためです。 -
WindowGroupを新しく追加し、ARModelOpenParameterで提供されたデータに基づいて開くようにします。新しいウィンドウ内では、ARオブジェクトが表示され、そのオブジェクトを回転させることができます。 - そのウィンドウを表示するには、
openWindow環境変数を使用し、ARModelOpenParameterを構築します。
@Environment(\.openWindow) private var openWindow

Button("Inspect robot in a window") {
    self.openWindow(value: ARModelOpenParameter(modelName: "robot_walk_idle.usdz", modelNodeName: "robot_walk_idle", initialScale: 0.01))
}
これで、このボタンをタップして、回転可能な3Dモデルを検査するための別のウィンドウを表示できるようになります。

システム3Dビューアを使用する
上記の方法では、モデルのプレビューウィンドウを自分でデザインする方法を示しましたが、VisionOSシステムが提供するモデルプレビューを直接使用することもできます:
Model3D(named: "Robot-Drummer") { model in
    model
        .resizable()
        .aspectRatio(contentMode: .fit)
} placeholder: {
    ProgressView()
}
作成したパッケージ内のモデルを使用することも可能です:
Model3D(named: "robot_walk_idle.usdz", bundle: demoAssetsBundle)
    .padding(.bottom, 50)
モデルをタップできるようにする
VisionOSでは、ユーザーは目で見て、指をピンチすることで何かを選択できます。この機能をシーンに追加した3Dオブジェクトに適用できます。
💡注意: これは、手で3Dモデルに触れるのとは異なります。手の追跡は複雑なため、この機能については別の記事で説明します。
読み込んだ3Dエンティティに以下の行を追加することで、ユーザーがそれをタップできるようにすることができます:
arAsset.components[InputTargetComponent.self] = InputTargetComponent(allowedInputTypes: .all)
タップイベントを受け取るには、RealityView を使用している3D空間ビューに次のジェスチャーを追加する必要があります。ユーザーがタップしたノードは tappedNode として取得できますが、これは追加したノードの子ノードである可能性があることに注意してください。
.gesture(TapGesture()
        .targetedToAnyEntity()
        .onEnded({ tap in
            let tappedNode = tap.entity

        }))
そのため、ユーザーが探しているノードをタップしたかどうかを確認するために、親ノードを再帰的にチェックすることを忘れないでください。ノードの名前を識別子として使用することもできます。
Whac-A-Robot!

前のステップでは、読み込んだ3DモデルをContentSpaceに保存しました。アプリ内のどこからでもそのアセットにアクセスできるように、より柔軟にするために、それをモデルに保存することができます:
import SwiftUI
import RealityKit

let contentSpaceOrigin = Entity()

@Observable
class ContentModel {

    var loaded3DAsset: Entity? = nil

    @MainActor
    func loadAssets() async {
        loaded3DAsset = await loadFromRealityComposerProject(nodeName: "robot_walk_idle",
                                                             sceneFileName: "robot_walk_idle.usdz")
        loaded3DAsset?.name = "robot_root_node"
        loaded3DAsset?.scale = .init(x: 0.05, y: 0.05, z: 0.05)
        loaded3DAsset?.position = .init(x: 0, y: 0, z: -3)

        guard let loaded3DAsset else {
            return
        }

        // animation
        if let firstAnimation = loaded3DAsset.availableAnimations.first {
            loaded3DAsset.playAnimation(firstAnimation.repeat(),
                                        transitionDuration: 0,
                                        startsPaused: false)
        }

        // allow tap
        loaded3DAsset.generateCollisionShapes(recursive: true)
        loaded3DAsset.components[InputTargetComponent.self] = InputTargetComponent(allowedInputTypes: .all)

        contentSpaceOrigin.addChild(loaded3DAsset)
    }

    func addRobotAtRandomPosition() {
        guard let loaded3DAsset else { return }
        // clone the already loaded robot node
        let newRobot = loaded3DAsset.clone(recursive: true)
        newRobot.name = "robot_root_node"
        newRobot.position = .init(x: Float.random(in: -2...2),
                                  y: Float.random(in: 0...2),
                                  z: Float.random(in: (-3)...(-2)))
        newRobot.scale = .init(x: 0.03, y: 0.03, z: 0.03)
        if let firstAnimation = newRobot.availableAnimations.first {
            newRobot.playAnimation(firstAnimation.repeat(),
                                        transitionDuration: 0,
                                        startsPaused: false)
        }
        newRobot.generateCollisionShapes(recursive: true)
        newRobot.components[InputTargetComponent.self] = InputTargetComponent(allowedInputTypes: .all)
        contentSpaceOrigin.addChild(newRobot)
    }

}
ここでは、アセットをメモリに読み込むloadAssets関数があります。この関数は、没入空間が表示される前に呼び出されます。また、ゲーム内でロボットをランダムな場所に追加するために使用されるaddRobotAtRandomPosition関数もあります。
上記のコードに見られるように、没入ビューが表示される前にアセットを読み込む必要があります。しかし、没入ビューが表示される前には、アセットを追加するためのワールドルートノード(部屋の環境のノード)が存在しません。そのため、すべての読み込んだアセットを追加するためのグローバル変数contentSpaceOriginを作成し、没入空間が表示されたときに、contentSpaceOriginをワールドノードの子として追加します。
import SwiftUI
import RealityKit

struct ContentSpace: View {

    @Environment(ContentModel.self) var gameModel

    var body: some View {

        RealityView { content in
            content.add(contentSpaceOrigin)
        }
        .gesture(TapGesture()
            .targetedToAnyEntity()
            .onEnded({ tap in
                let tappedNode = tap.entity
                // look up until it reaches the robot main node
                var foundRobotMainNode: Entity? = tappedNode
                while foundRobotMainNode != nil &&
                        foundRobotMainNode?.parent != nil {
                    if foundRobotMainNode?.name == "robot_root_node" {
                        break // we found it!
                    } else {
                        foundRobotMainNode = foundRobotMainNode?.parent
                    }
                }
                foundRobotMainNode?.removeFromParent()
                speak(text: "まだね")
            }))

    }

}
上記のコードでは、タップジェスチャーの検出を設定しています。タップジェスチャーがあるたびに、アプリはタップされたロボットを削除します。
次に、2Dビューにランダムなロボットを追加するボタンを配置します。
import SwiftUI
import RealityKit

struct ContentView: View {

    @State private var showGlassBackground: Bool = true

    @Environment(ContentModel.self) var gameModel
    @Environment(\.openImmersiveSpace) private var openImmersiveSpace
    @Environment(\.dismissImmersiveSpace) private var dismissImmersiveSpace

    @Environment(\.openWindow) private var openWindow

    var body: some View {

        VStack {

            Image(systemName: "swift")
                .resizable()
                .scaledToFit()
                .frame(width: 120, height: 120)
                .foregroundStyle(.tint)

            Text("I love SwiftUI! From MszPro.")
                .font(.largeTitle)
                .bold()

            Toggle("Show glass background", isOn: $showGlassBackground)

            Button("Open immersive space") {
                Task { @MainActor in
                    await self.dismissImmersiveSpace()
                    await self.gameModel.loadAssets()
                    await self.openImmersiveSpace(id: "robotSpace")
                }
            }

            Button("Add random robot in room") {
                self.gameModel.addRobotAtRandomPosition()
                speak(text: "ハロー")
            }

            Button("Hide robot") {
                Task { @MainActor in
                    await self.dismissImmersiveSpace()
                }
            }

            Button("Inspect robot in a window") {
                self.openWindow(value: ARModelOpenParameter(modelName: "robot_walk_idle.usdz", modelNodeName: "robot_walk_idle", initialScale: 0.01))
            }

        }
        .padding()
        .frame(width: 700)
        .glassBackgroundEffect(displayMode: showGlassBackground ? .always : .never)

    }

}
そして、テキスト入力を読み上げるヘルパー関数はこちらです。
import SwiftUI
import AVFoundation

func speak(text: String) {
    let utterance = AVSpeechUtterance(string: text)
    utterance.voice = AVSpeechSynthesisVoice(language: "ja-JP")
    utterance.rate = 0.5
    utterance.pitchMultiplier = 1.5

    let synthesizer = AVSpeechSynthesizer()
    synthesizer.speak(utterance)
}
これでアプリを実行し、ボタンをタップしてランダムなロボットを約10体追加し、ロボットをタップしてWHAC-A-BOTをプレイすることができます!
読んでいただきありがとうございます!
English version: https://mszpro.com/blog/blog-article-visionos-dev-101/
私の記事は、アプリクリップで読むことができます:https://appclip.apple.com/id?p=com.ShunzheMa.MszMagic.Clip
https://buymeacoffee.com/mszpro
Twitter: https://twitter.com/mszpro
Appleコードライセンス
Copyright (C) 2024 Apple Inc. All Rights Reserved.

IMPORTANT:  This Apple software is supplied to you by Apple
Inc. ("Apple") in consideration of your agreement to the following
terms, and your use, installation, modification or redistribution of
this Apple software constitutes acceptance of these terms.  If you do
not agree with these terms, please do not use, install, modify or
redistribute this Apple software.

In consideration of your agreement to abide by the following terms, and
subject to these terms, Apple grants you a personal, non-exclusive
license, under Apple's copyrights in this original Apple software (the
"Apple Software"), to use, reproduce, modify and redistribute the Apple
Software, with or without modifications, in source and/or binary forms;
provided that if you redistribute the Apple Software in its entirety and
without modifications, you must retain this notice and the following
text and disclaimers in all such redistributions of the Apple Software.
Neither the name, trademarks, service marks or logos of Apple Inc. may
be used to endorse or promote products derived from the Apple Software
without specific prior written permission from Apple.  Except as
expressly stated in this notice, no other rights or licenses, express or
implied, are granted by Apple herein, including but not limited to any
patent rights that may be infringed by your derivative works or by other
works in which the Apple Software may be incorporated.

The Apple Software is provided by Apple on an "AS IS" basis.  APPLE
MAKES NO WARRANTIES, EXPRESS OR IMPLIED, INCLUDING WITHOUT LIMITATION
THE IMPLIED WARRANTIES OF NON-INFRINGEMENT, MERCHANTABILITY AND FITNESS
FOR A PARTICULAR PURPOSE, REGARDING THE APPLE SOFTWARE OR ITS USE AND
OPERATION ALONE OR IN COMBINATION WITH YOUR PRODUCTS.

IN NO EVENT SHALL APPLE BE LIABLE FOR ANY SPECIAL, INDIRECT, INCIDENTAL
OR CONSEQUENTIAL DAMAGES (INCLUDING, BUT NOT LIMITED TO, PROCUREMENT OF
SUBSTITUTE GOODS OR SERVICES; LOSS OF USE, DATA, OR PROFITS; OR BUSINESS
INTERRUPTION) ARISING IN ANY WAY OUT OF THE USE, REPRODUCTION,
MODIFICATION AND/OR DISTRIBUTION OF THE APPLE SOFTWARE, HOWEVER CAUSED
AND WHETHER UNDER THEORY OF CONTRACT, TORT (INCLUDING NEGLIGENCE),
STRICT LIABILITY OR OTHERWISE, EVEN IF APPLE HAS BEEN ADVISED OF THE
POSSIBILITY OF SUCH DAMAGE.


