この記事では、iOS 17の新しいTipKitフレームワークを使用して、アプリ内のさまざまな機能をユーザーに発見させる方法について説明します。
本記事の内容は以下の通りです:
- インラインヒントの表示
- フローティングヒントの表示
- 条件に基づくヒントの表示
- カウンターに基づくヒントの表示
- ヒントのアクションボタンのカスタマイズ
この記事は、主にSwiftUIを対象としています。
この記事は公開されているリソースをもとに書かれており、公開されているAppleのドキュメンテーションからのスクリーンショットや例示コードが含まれる場合があります。
動作の仕方を確認したい場合は、Xcode 15 beta 8で自身で試してください。
Tipオブジェクトの定義
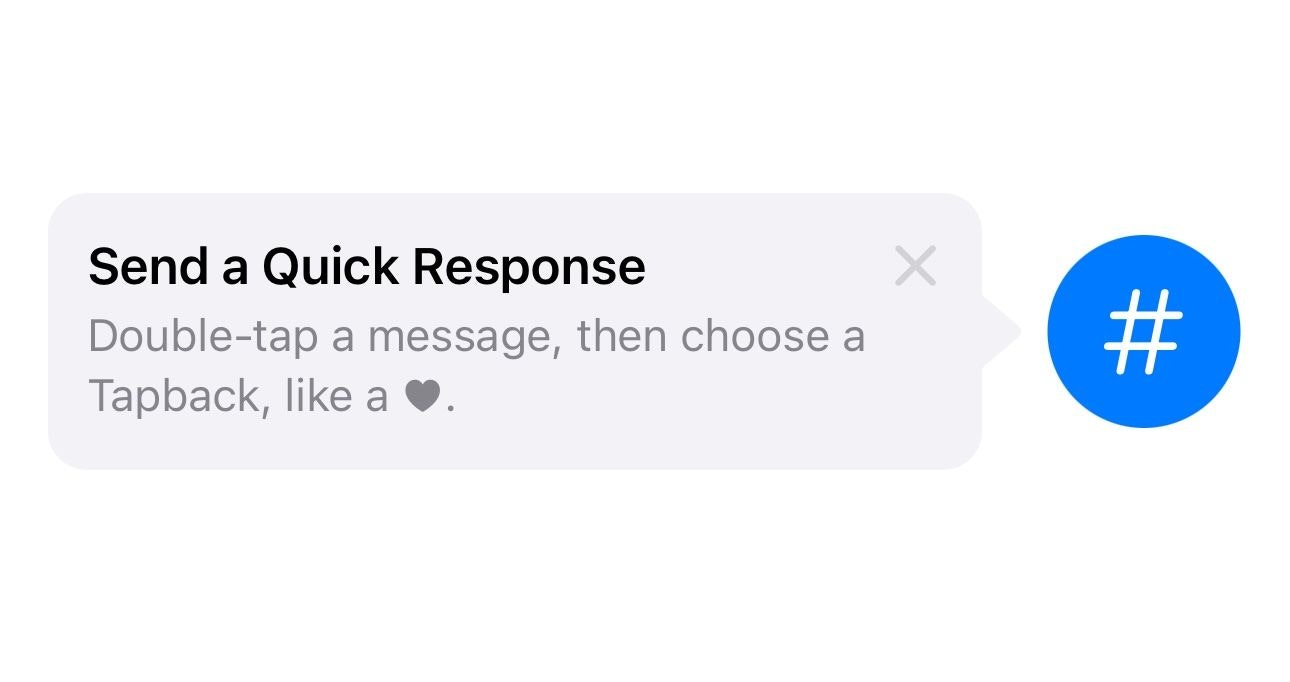
Tipオブジェクトには、画像、タイトル、説明、およびヒントのアクションが含まれています。以下はシンプルなヒントの例です:
var asset: Image? には、ヒントの左側に表示するオプションの画像を提供できます。
var title: Text には、このヒントのタイトルとして表示したいSwiftUIのテキストを提供します。
var message: Text? には、タイトルの下部に表示されるオプションの説明文字列を提供できます。
import TipKit

struct HashTagPostButtonTip: Tip {
    var image: Image? {
        Image(systemName: "star.bubble")
    }
    var title: Text {
        Text("Send a Quick Response")
    }
    var message: Text? {
        Text("Double-tap a message, then choose a Tapback, like a ♥︎.")
    }
}
また、var rules: [Rule] および var actions: [Action] パラメータもありますが、これについては記事の次のセクションで説明します。
ヒントの表示
ヒントを表示する方法は2つあります。
(from WWDC video)
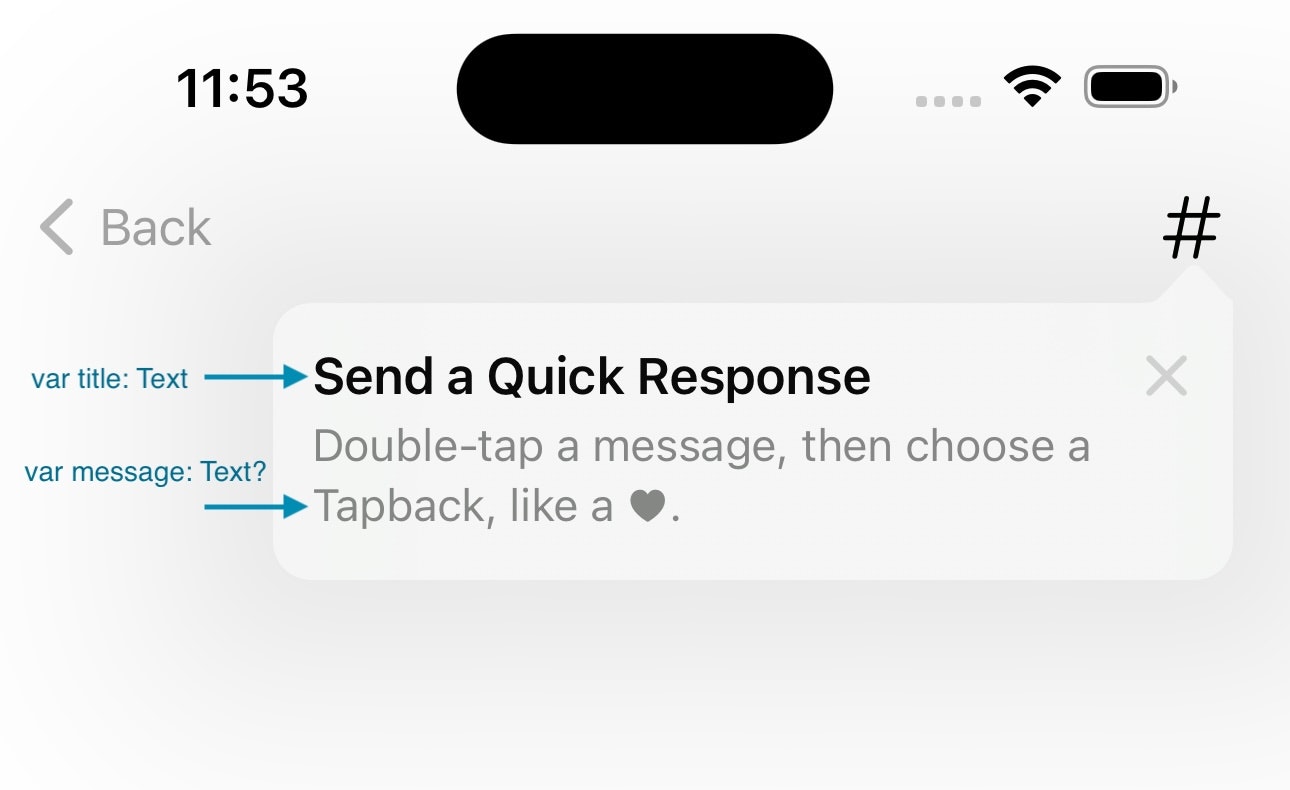
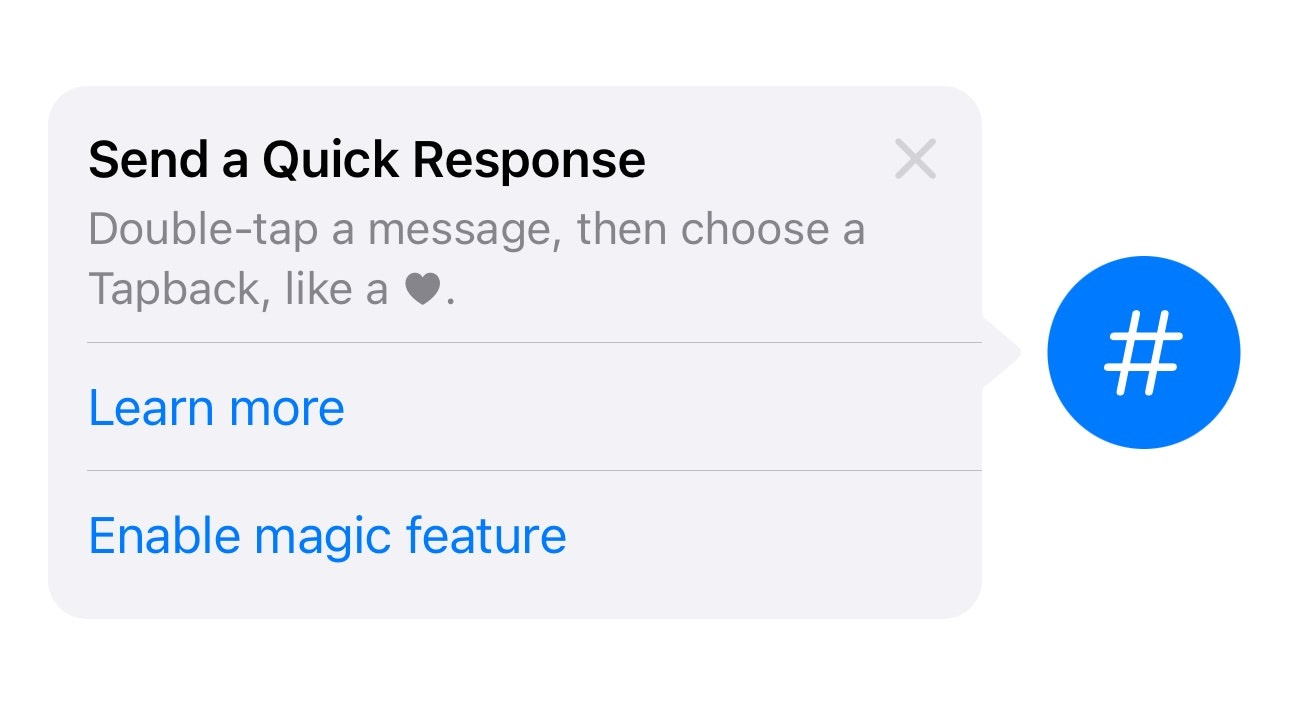
インラインヒント
ヒントをビュー内に表示することができます。ヒントビューは、あなたの機能(例:ボタン)を指す矢印とともに表示されます。これは、TipViewをビューコードに直接含めることで実現できます:
import SwiftUI
import TipKit

struct TipWithArrow: View {
    var body: some View {
        VStack {

            HStack {
                TipView(HashTagPostButtonTip(), arrowEdge: .trailing)

                Image(systemName: "number")
                    .font(.system(size: 30))
                    .foregroundStyle(.white)
                    .padding()
                    .background { Circle().foregroundStyle(.blue) }
            }

        }
        .padding()
        .task {
            try? Tips.configure([
                .displayFrequency(.immediate),
                .datastoreLocation(.applicationDefault)
            ])
        }
    }
}

#Preview {
    TipWithArrow()
}
arrowEdge パラメータを使用して、矢印の指す方向を決定することができます。
.trailing に設定すると、ヒントは右側を指す矢印を表示します(つまり、機能ボタンが右側にあります)。
また、機能ボタンが左側にあり(表示されているヒントがボタンの右側にある場合)、.leading に設定します。
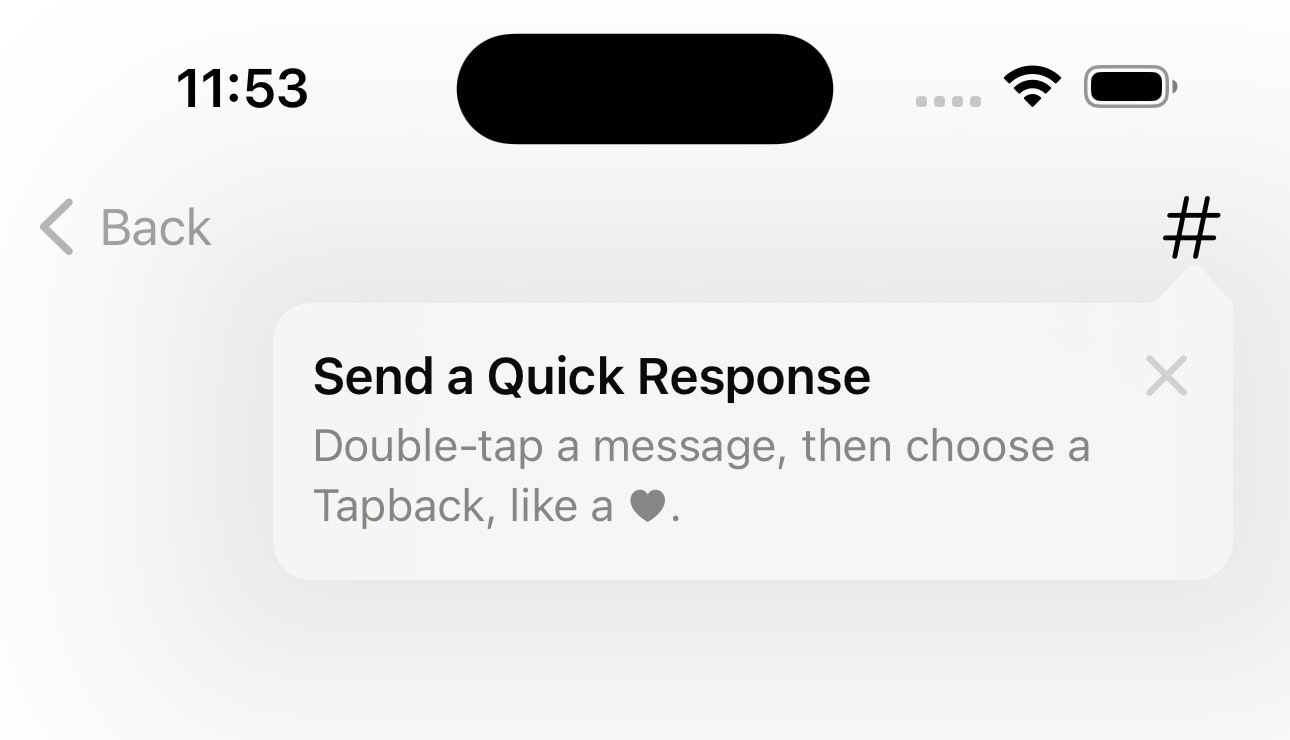
フローティング(ポップオーバー)ヒント
ボタンにフローティングヒントを添付するためのビューモディファイアも使用できます。これは、例えばナビゲーションボタンに対するヒントを表示したい場合に便利です:
struct PopOverTip: View {

    var hashtagButtonTip = HashTagPostButtonTip()

    var body: some View {
        VStack {

            Text("Hello world!")

        }
        .padding()
        .toolbar {
            ToolbarItem(placement: .navigationBarTrailing) {
                Image(systemName: "number")
                    .onTapGesture {
                        hashtagButtonTip.invalidate(reason: .actionPerformed)
                    }
                    .popoverTip(hashtagButtonTip)
            }
        }
        .task {
            try? Tips.configure([
                .displayFrequency(.immediate),
                .datastoreLocation(.applicationDefault)
            ])
        }
    }

}

#Preview {
    PopOverTip()
}
If you want your app to be compatible also with previous iOS versions, you can use a similar technique as shown below to create a conditional view modifier:
extension View {
	@ViewBuilder
	func tipIfAvailable(with tip: Tip) -> some View {
		if #available(iOS 17, *) {
			self
				.popoverTip(tip)
		}
	}
}
ヒントの頻度
デフォルトでは、各ヒントは一度だけ表示されます。
.displayFrequency(.immediate) に設定すると、ユーザーが以前にヒントを見ていない場合、ヒントはすぐに表示されます。
他の表示頻度も設定することができます。例えば、.hourly に設定すると、システムは1時間に1回以上ヒントが表示されないようにします。
ヒントデータの保存場所(ヒントが表示されたかどうか)も .datastoreLocation(.applicationDefault) 関数を使用してカスタマイズできます。
特定の条件が満たされたときにヒントを表示
特定の条件が満たされた場合にのみヒントを表示することができます。例えば、プレミアム機能のヒントは、ユーザーがプレミアム機能を購入した場合にのみ表示されるべきです。
Tipオブジェクトの静的変数を定義することができます。その後、その静的変数に値を割り当てることで、ヒントが表示されるかどうかを制御することができます。
import TipKit

struct PremiumUserOnlyTip: Tip {

    @Parameter
    static var isPremiumUser: Bool = false

    var image: Image? {
        Image(systemName: "wand.and.rays")
    }
    var title: Text {
        Text("Add an Effect")
    }
    var message: Text? {
        Text("Choose a fun Live Photo effect like Loop or Bounce.")
    }

    var rules: [Rule] {
        #Rule(Self.$isPremiumUser) {
            $0 == true
        }
    }

}
アプリの起動時に、静的変数 PremiumUserOnlyTip.isPremiumUser を設定することで、ヒントはプレミアムユーザーのみに表示されます。
ユーザーのインタラクションを記録し、それに応じてヒントを表示
ユーザーのインタラクションをカウンターとして記録(アプリを使用した回数など)し、ユーザーが要件を満たしたときのみヒントを表示することができます。
import TipKit

struct UsageFrequencyBasedTip: Tip {

    static let numerOfTimesOpened: Event = Event(id: "com.example.TipKit.numberOfTimesOpened")

    var image: Image? {
        Image(systemName: "star.fill")
    }
    var title: Text {
        Text("Tap to download HD picture")
    }
    var message: Text? {
        Text("Only for premium users")
    }

    var rules: [Rule] {
        #Rule(Self.numerOfTimesOpened) {
            $0.donations.count >= 3
        }
    }

}
上記のコードでは、Eventオブジェクトを使用してアプリを開いた回数を記録します。rulesパラメータでは、Swiftのマクロを使用して、ユーザーがアプリを開いた回数が3回以上の場合にのみヒントが表示されることを示しています。
これで、アプリ内で以下のコードを使用してカウンターをインクリメントできます:
Button("tap this button 3 times") {
    Task {
        await UsageFrequencyBasedTip.numerOfTimesOpened.donate()
    }
}
UsageFrequencyBasedTip.numerOfTimesOpened.donate() 関数を3回呼び出すと、ヒントが表示されます。
カスタムアクション付きヒント
ヒントのアクションボタンを提供することもできます:
import TipKit

struct TipWithOptions: Tip {

    var image: Image? {
        Image(systemName: "star.bubble")
    }

    var title: Text {
        Text("Send a Quick Response")
    }

    var message: Text? {
        Text("Double-tap a message, then choose a Tapback, like a ♥︎.")
    }

    var actions: [Action] {
        return [
            .init(id: "learn-more", title: "Learn more", perform: {
                print("Learn more tapped")
            }),
            .init(id: "enable-feature", title: "Enable magic feature", perform: {
                print("Enable feature tapped")
            })
        ]
    }

}
ヒントのデバッグ
以下の関数を使用して、ヒントをデバッグすることができます:
ヒントが表示されたかどうかのストレージデータベースをリセット:
try? Tips.resetDatastore()
上記のコードは、Tips/configure(options:)を呼び出す前に呼び出す必要があります。
ヒントが以前に表示されたかどうかに関係なく、すべてのヒントを表示することもできます:
Tips.showAllTipsForTesting()
ヒントが以前に表示されたかどうかに関係なく、特定のヒントを表示する:
Tips.showTipsForTesting([ExampleTip.self])
パラメータで、ヒントのタイプの配列を提供します。
すべてのヒントを隠す、または特定のタイプのヒントのみを隠すこともできます:
Tips.hideAllTipsForTesting()
Tips.hideTipsForTesting(_ tips: [Tip.Type])
サンプルコード
iOS 17が公開された後、サンプルのXcodeプロジェクトをアップロードします。
Good & NG
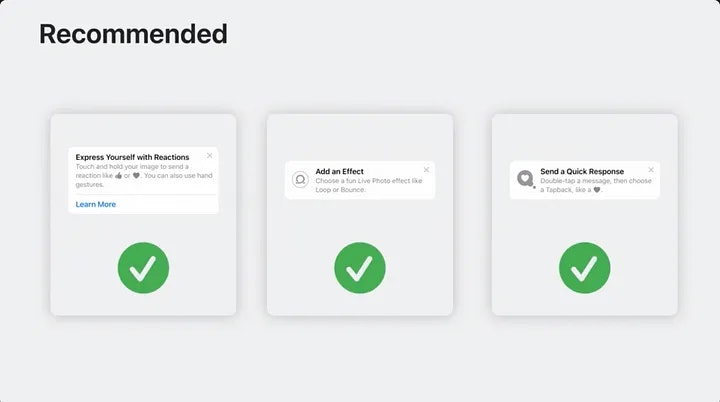
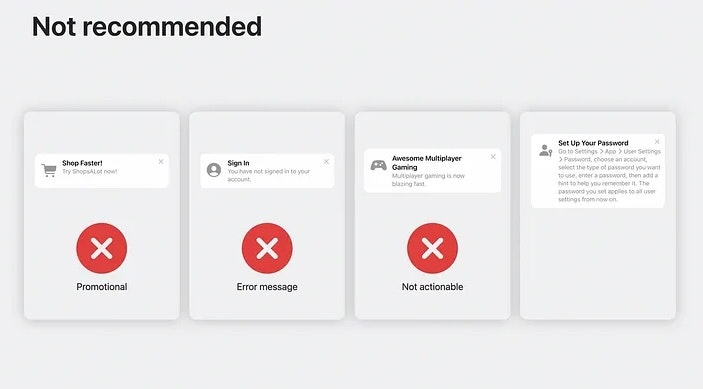
プロモーションのヒントを表示すべきではありません。TipKitを使用してエラーメッセージを表示しないでください。実行可能なアイテム(例:クリック可能な機能ボタン)に関連したヒントのみを表示し、ヒント内に詳細な手順を表示しないでください(NGの例で示されているように。その場合、ユーザーにオプションを提供するためにカスタムアクションボタンを使用するのが最善)。
(source: public Apple session videos)
WWDC 2023
お読みいただき、ありがとうございました。
ニュースレター: https://blog.mszpro.com
Mastodon/MissKey: @me@mszpro.com https://sns.mszpro.com
![]() 個人ウェブサイト https://MszPro.com
個人ウェブサイト https://MszPro.com

注
上記内容の一部は、Apple社のサンプルコードから引用しています。ライセンスは下記に添付しています:
Copyright © 2023 Apple Inc.

Permission is hereby granted, free of charge, to any person obtaining a copy of this software and associated documentation files (the "Software"), to deal in the Software without restriction, including without limitation the rights to use, copy, modify, merge, publish, distribute, sublicense, and/or sell copies of the Software, and to permit persons to whom the Software is furnished to do so, subject to the following conditions:

The above copyright notice and this permission notice shall be included in all copies or substantial portions of the Software.

THE SOFTWARE IS PROVIDED "AS IS", WITHOUT WARRANTY OF ANY KIND, EXPRESS OR IMPLIED, INCLUDING BUT NOT LIMITED TO THE WARRANTIES OF MERCHANTABILITY, FITNESS FOR A PARTICULAR PURPOSE AND NONINFRINGEMENT. IN NO EVENT SHALL THE AUTHORS OR COPYRIGHT HOLDERS BE LIABLE FOR ANY CLAIM, DAMAGES OR OTHER LIABILITY, WHETHER IN AN ACTION OF CONTRACT, TORT OR OTHERWISE, ARISING FROM, OUT OF OR IN CONNECTION WITH THE SOFTWARE OR THE USE OR OTHER DEALINGS IN THE SOFTWARE.