FlutterでCSVインポート時にアラートを表示する方法
はじめに
FlutterでCSVデータをインポートする機能を実装した際、「ちゃんとインポートされたか分かるようにアラートを表示したい!」 という課題に直面しました。
本記事では、FlutterでCSVインポート完了時にアラートを表示する方法 を紹介し、実際のデザイン調整のプロセス についても触れます。さらに、AI(ChatGPT)を活用したデザイン改善の流れ についても解説します。
目標
- CSVインポート後にアラートを表示する
- アラートのデザインを調整する
- ChatGPTを活用してデザインをブラッシュアップする
1. アラートの基本実装
まず、FlutterのshowDialog()を使用して、CSVインポート完了時にアラートを表示する基本的なコードを実装します。
showDialog(
  context: context,
  builder: (BuildContext context) {
    return AlertDialog(
      title: Text('CSVインポート'),
      content: Text('インポートが成功しました!'),
      actions: [
        TextButton(
          onPressed: () {
            Navigator.pop(context); // ダイアログを閉じる
            Navigator.pop(context); // 前の画面に戻る
          },
          child: Text('OK'),
        ),
      ],
    );
  },
);
このコードを使えば、CSVインポート成功時にシンプルなアラートを表示できます。

2. デザイン調整
アラートは表示されるものの、デフォルトデザインだと微妙…。
「もうちょっとカッコよくしたい!」と思ったので、ChatGPTにデザインの提案をもらいながら調整しました。
例えば、ChatGPTとのやり取りでこんな修正を加えました:
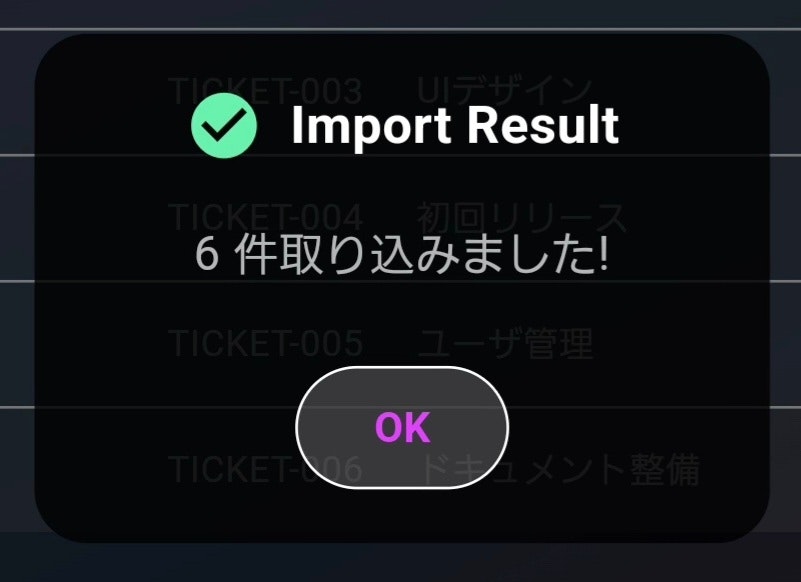
✅ 背景を黒の半透明にしてモダンな印象にする
✅ タイトル横にアイコンを追加して視認性を向上
✅ ボタンをデフォルトのものからカスタムデザインに変更
showDialog(
  context: context,
  builder: (BuildContext context) {
    return AlertDialog(
      shape: RoundedRectangleBorder(
        borderRadius: BorderRadius.circular(20),
      ),
      backgroundColor: Colors.black.withOpacity(0.8),
      title: Row(
        children: [
          Icon(Icons.check_circle, color: Colors.greenAccent, size: 30),
          SizedBox(width: 10),
          Text(
            'Import Result',
            style: TextStyle(
              color: Colors.white,
              fontWeight: FontWeight.bold,
            ),
          ),
        ],
      ),
      content: Column(
        mainAxisSize: MainAxisSize.min,
        children: [
          Text(
            'インポートが成功しました!',
            style: TextStyle(
              color: Colors.white70,
              fontSize: 18,
            ),
            textAlign: TextAlign.center,
          ),
          SizedBox(height: 20),
          OutlinedButton(
            style: OutlinedButton.styleFrom(
              side: BorderSide(color: Colors.white),
              foregroundColor: Colors.purpleAccent,
              backgroundColor: Colors.white.withOpacity(0.2),
              padding: EdgeInsets.symmetric(vertical: 12, horizontal: 30),
              shape: RoundedRectangleBorder(
                borderRadius: BorderRadius.circular(30),
              ),
            ),
            onPressed: () {
              Navigator.pop(context);
              Navigator.pop(context);
            },
            child: Text('OK', style: TextStyle(fontSize: 16, fontWeight: FontWeight.bold)),
          ),
        ],
      ),
    );
  },
);
このように調整することで、より視認性の高いモダンなアラートになりました。
3. AIを活用したデザイン改善のポイント
今回のアラートデザインでは、ChatGPTを活用することで以下のメリットがありました。
✅ 「こうしたい」をすぐにコードに落とし込める
✅ 「どんなデザインが良いか?」といった提案をもらえる
✅ 試行錯誤の手間が減り、よりスムーズに調整できる
特に、「ボタンのスタイルや配色の調整」 などはChatGPTからの提案が的確で、かなりスムーズにブラッシュアップできました。
AIをただのコード補助として使うのではなく、「一緒に開発するパートナー」として活用することで、より短時間で完成度の高いデザインに仕上げることができます。
まとめ
-
FlutterでCSVインポート後のアラートを実装するには
showDialog()を活用する - デザインをカスタマイズすることで、より見やすくモダンなアラートに改善可能
- ChatGPTを活用すれば、デザインのアイデア出しからコード実装までスムーズに進められる
Flutter初心者でも、AIのサポートを活用すれば**「実装+デザイン改善」**までスムーズに進められると実感しました!
みなさんも、ChatGPTを活用しながらFlutter開発を進めてみてください!