やりたいこと
Raspi4の起動時に室温と湿度をひたすら記録する
必要なもの
H/W
使用したH/Wは以下のとおり
- Raspberry Pi 4
- HDC1000
S/W
- Python 3.6.1 | packaged by rpi | (default, Apr 20 2017, 19:35:19)
- Linux raspi4 4.19.97-v7l+ #1294 SMP Thu Jan 30 13:21:14 GMT 2020 armv7l GNU/Linux
各種設定
HDC1000の接続
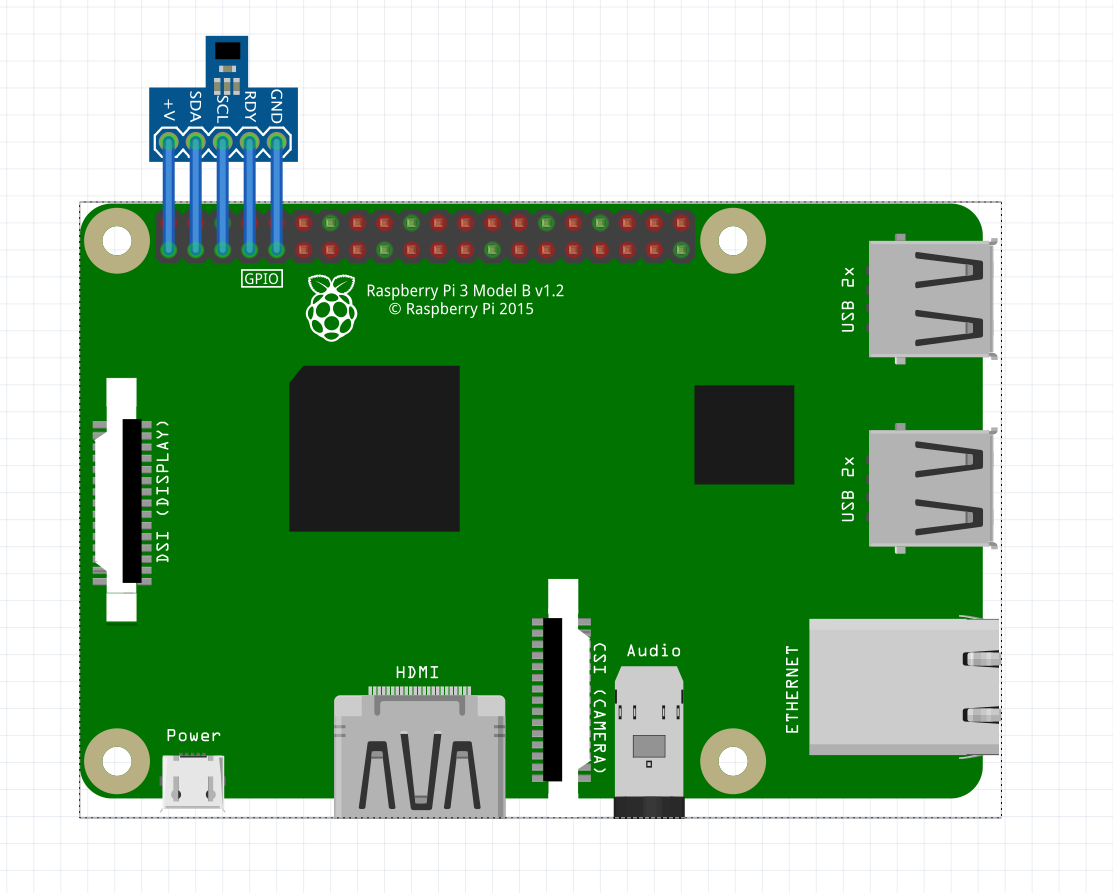
ラズパイ4のパーツを見つけられませんでした。
HDC1000の設定
/boot/config.txt
i2c関連の設定部分
dtparam=i2c_arm=on
/etc/modules
モジュール関連の設定
i2c-dev
i2c-bcm2835
HDC1000の設定の確認
sh
$ lsmod | grep i2c
i2c_bcm2835            16384  0
i2c_dev                20480  0
sh
$ dmesg | grep i2c
[    2.153160] i2c /dev entries driver
sh
$ i2cdetect -l
i2c-1	i2c       	bcm2835 I2C adapter             	I2C adapter

$ i2cdetect -y 1
     0  1  2  3  4  5  6  7  8  9  a  b  c  d  e  f
00:          -- -- -- -- -- -- -- -- -- -- -- -- --
10: -- -- -- -- -- -- -- -- -- -- -- -- -- -- -- --
20: -- -- -- -- -- -- -- -- -- -- -- -- -- -- -- --
30: -- -- -- -- -- -- -- -- -- -- -- -- -- -- -- --
40: 40 -- -- -- -- -- -- -- -- -- -- -- -- -- -- --
50: -- -- -- -- -- -- -- -- -- -- -- -- -- -- -- --
60: -- -- -- -- -- -- -- -- -- -- -- -- -- -- -- --
70: -- -- -- -- -- -- -- --
動作確認
サンプルプログラムです。
python
# -*- coding: utf-8 -*-
import smbus
import time

# Get I2C bus
bus = smbus.SMBus(1)

# HDC1000 address, 0x40(64)
# Select configuration register, 0x02(02)
#        0x30(48)    Temperature, Humidity enabled, Resolultion = 14-bits, Heater on
bus.write_byte_data(0x40, 0x02, 0x30)

# HDC1000 address, 0x40(64)
# Send temp measurement command, 0x00(00)
bus.write_byte(0x40, 0x00)

time.sleep(0.2)

# HDC1000 address, 0x40(64)
# Read data back, 2 bytes
# temp MSB, temp LSB
data0 = bus.read_byte(0x40)
data1 = bus.read_byte(0x40)

# Convert the data
temp = (data0 * 256.000) + data1
cTemp = (temp / 65536.000) * 165.000 - 40.000

# HDC1000 address, 0x40(64)
# Send humidity measurement command, 0x01(01)
bus.write_byte(0x40, 0x01)
time.sleep(0.2)

# HDC1000 address, 0x40(64)
# Read data back, 2 bytes
# humidity MSB, humidity LSB
data0 = bus.read_byte(0x40)
data1 = bus.read_byte(0x40)


# Convert the data
humidity = (data0 * 256.000) + data1
humidity = (humidity / 65536.000) * 100.000

print('Humid.:' + str(humidity) + '%')
print('Temp. :' + str(cTemp) + '℃ ')
実行すると以下のようになります。
$ python HDC1000.py
Humid.:41.96014404296875%
Temp. :22.763748168945312℃
記録用プログラム
記録用のプログラムは、こんな感じにしました。
python
# !/usr/bin/env python
# -*- coding: utf-8 -*-
import smbus
import time
import datetime
import csv
import pathlib
import os

file_name = 'th_data.csv'
header_data = 'date_time,temperature\n'

def read_temp():
        # Get I2C bus
        bus = smbus.SMBus(1)
        # HDC1000 address, 0x40(64)
        # Select configuration register, 0x02(02)
        #        0x30(48)    Temperature, Humidity enabled, Resolultion = 14-bits, Heater on
        bus.write_byte_data(0x40, 0x02, 0x30)

        # HDC1000 address, 0x40(64)
        # Send temp measurement command, 0x00(00)
        bus.write_byte(0x40, 0x00)
        time.sleep(0.2)

        # HDC1000 address, 0x40(64)
        # Read data back, 2 bytes
        # temp MSB, temp LSB
        data0 = bus.read_byte(0x40)
        data1 = bus.read_byte(0x40)

        # Convert the data
        temp = (data0 * 256.000) + data1
        cTemp = (temp / 65536.000) * 165.000 - 40.000
        return cTemp

def read_humid():
        # Get I2C bus
        bus = smbus.SMBus(1)
        # HDC1000 address, 0x40(64)
        # Select configuration register, 0x02(02)
        #        0x30(48)    Temperature, Humidity enabled, Resolultion = 14-bits, Heater on
        bus.write_byte_data(0x40, 0x02, 0x30)

        # HDC1000 address, 0x40(64)
        # Send humidity measurement command, 0x01(01)
        bus.write_byte(0x40, 0x01)
        time.sleep(0.2)

        # HDC1000 address, 0x40(64)
        # Read data back, 2 bytes
        # humidity MSB, humidity LSB
        data0 = bus.read_byte(0x40)
        data1 = bus.read_byte(0x40)

        # Convert the data
        humidity = (data0 * 256.000) + data1
        humidity = (humidity / 65536.000) * 100.000
        return humidity


def file_check():
        global file_name
        file_name = pathlib.Path(file_name)
        if os.path.exists(file_name):
                print('Data File exists!')
        else:
                file_name.touch()
def header():
        global file_name
        with open(file_name) as f:
                line = f.readline()
        if 'date' in line:
                print('Header exists!')
        else:
                with open(file_name) as f:
                        lines = f.readlines()
                        lines.insert(0, header_data)
                        f.close()
                with open(file_name, mode='w') as f:
                        f.writelines(lines)

def main():
        global file_name
        file_check()
        header()
        while True:
                now = datetime.datetime.now()
                temp = read_temp()
                humid = read_humid()
#               print(now.strftime('%Y%m%d-%H:%M:%S'), '{:.3f}'.format(temp), '{:.3f}'.format(humid))
                save_data = [now.strftime('%Y%m%d-%H:%M:%S'), '{:.3f}'.format(temp), '{:.3f}'.format(humid)]
                with open(file_name,'a',newline='') as f:
                        writer = csv.writer(f, lineterminator='\r\n')
                        writer.writerow(save_data)
                time.sleep(10)

if __name__ == '__main__':
        main()
systemdの設定と自動起動の設定
/etc/systemd/system/thlogger.service
thloggerというサービス名にしました。
[Unit]
Description=TH_Logger
After=syslog.target

[Service]
User = pi
PIDFile=/var/run/thlogger.pid
WorkingDirectory=/home/pi/Jupyter/data
ExecStart=/home/pi/berryconda3/bin/python /home/pi/works/HDC1000/TH_logger.py
ExecStop=/bin/kill $MAINPID
ExecReload=/bin/kill -HUP $MAINPID
Restart=always

RestartSec=10s
[Install]
WantedBy = multi-user.target
$ sudo systemctl daemon-reload
$ sudo systemctl start thlogger
起動ログを確認(/var/log/system)し
$ sudo systemctl status thlogger.service -l
● thlogger.service - TH_Logger
   Loaded: loaded (/etc/systemd/system/thlogger.service; enabled; vendor preset: enabled)
   Active: active (running) since Fri 2020-04-10 13:09:16 JST; 18min ago
 Main PID: 352 (python)
    Tasks: 1 (limit: 4915)
   Memory: 9.1M
   CGroup: /system.slice/thlogger.service
           └─352 /home/pi/berryconda3/bin/python /home/pi/works/HDC1000/TH_logger.py

 4月 10 13:09:16 raspi4 systemd[1]: Started TH_Logger.
問題なければ、起動時に実行するようにします。
$ sudo systemctl enable thlogger
自動起動しないようにする
サービスの状況の確認
$ sudo systemctl status thplogger.service
● thplogger.service - THP_Logger
   Loaded: loaded (/etc/systemd/system/thplogger.service; enabled; vendor preset: enabled)
   Active: active (running) since Fri 2021-01-29 16:57:13 JST; 4s ago
 Main PID: 7244 (python)
    Tasks: 1 (limit: 4248)
   CGroup: /system.slice/thplogger.service
           └─7244 /usr/bin/python /home/pi/share/pi4_works/thp_logger/THP_logger.py

 1月 29 16:57:13 raspi4 systemd[1]: Started THP_Logger.
稼働していることを確認して、サービスを停止します。
$ sudo systemctl status thplogger.service
● thplogger.service - THP_Logger
   Loaded: loaded (/etc/systemd/system/thplogger.service; enabled; vendor preset: enabled)
   Active: inactive (dead) since Fri 2021-01-29 16:58:42 JST; 1s ago
  Process: 7244 ExecStart=/usr/bin/python /home/pi/share/pi4_works/thp_logger/THP_logger.py (code=killed, signal=TERM)
  Process: 7339 ExecStop=/bin/kill $MAINPID (code=exited, status=0/SUCCESS)
 Main PID: 7244 (code=killed, signal=TERM)

 1月 29 16:57:13 raspi4 systemd[1]: Started THP_Logger.
 1月 29 16:58:42 raspi4 systemd[1]: Stopping THP_Logger...
 1月 29 16:58:42 raspi4 systemd[1]: thplogger.service: Main process exited, code=killed, status=15/TERM
 1月 29 16:58:42 raspi4 systemd[1]: thplogger.service: Succeeded.
 1月 29 16:58:42 raspi4 systemd[1]: Stopped THP_Logger.
自動起動しないようにします。
$ sudo systemctl disable thplogger.service
Removed /etc/systemd/system/multi-user.target.wants/thplogger.service.